...joining the two halves and pressing. In spite of another two inches of snow to shovel and clearing a bit of the driveway, then running out for groceries and gas, I found time yesterday to complete my 56 pinwheel blocks.

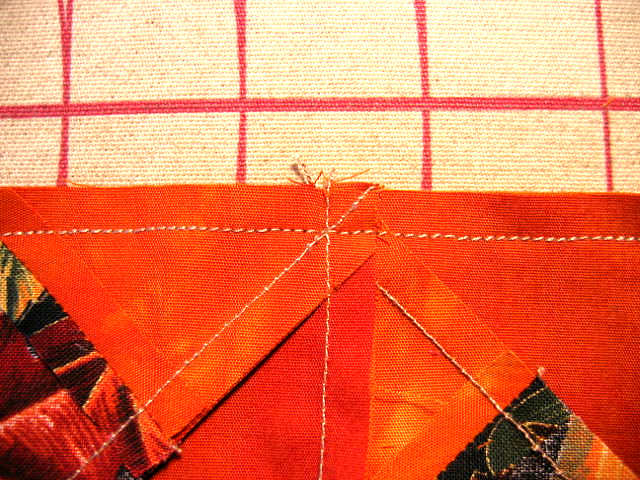
Ideally, the line of stitching should cross the angled and vertical seam exactly where they intersect. Now some people can get perfect intersections where those 8 seams come together, but I'm not one of them. I'm not going for perfection on this piece, just close enough to meet my personal standard. Sometimes you can get away with being slightly off if the fabric is busy or of low contrast as it is here. And I figure the slight imperfections will probably disappear in the loft of the batting and quilting, and not be visible at the distance at which they will be viewed. I just remember the reaction of students to some of my samples. They would comment on how perfect my points were, then I'd have to show them just where they were not. It's a good lesson for all of us to learn - that what is glaringly wrong to us, others do not see. This piece may or may not end up in competition under the close scrutiny of a quilt judge - probably not - so I'm not going to spend a lot of time pulling out stitches and re-sewing. There were some blocks like this one off enough that I did re-do them today. Then it was on to pressing.

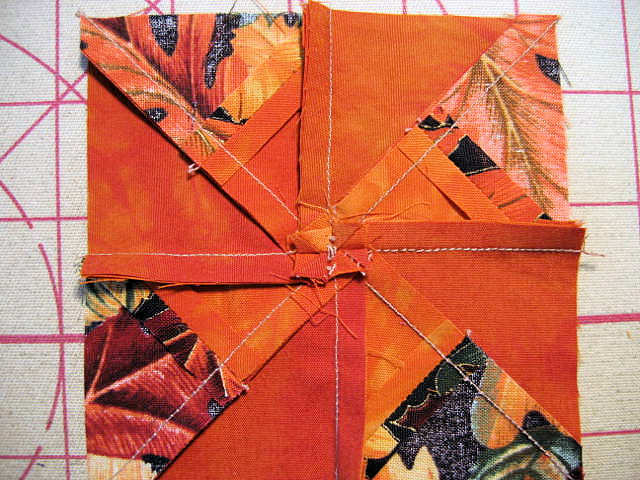
Rather than pressing open or to one side, this is where I use the nifty trick of spinning the seam to that it rotates in line with the other seams. To do this, you have to tease open the stitches of that vertical seam. This allows the seam to go in opposite directions on either side of the intersection. Sometimes the seam will give way with a slight tug, other times you have to help loosen the stitches with a seam ripper.

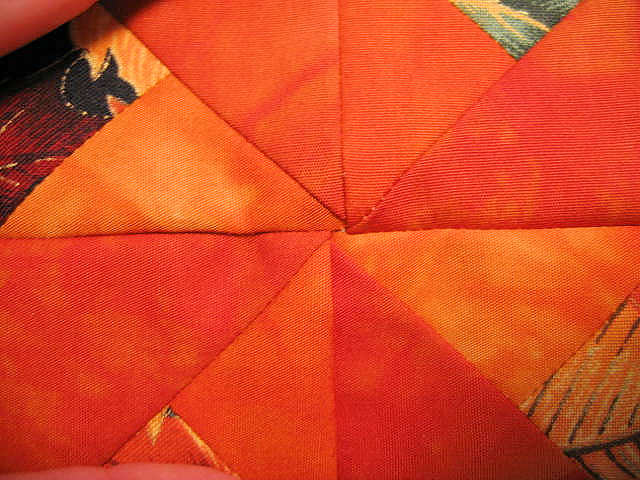
Once the stitching gives way to the crossing stitching, I flatten out that center and hold it in place with my thumb while I flip the block to the right side for pressing. I carefully remove my thumb to make sure the center has stayed open, then make sure the seam allowance is going in the direction it's supposed to. Now I can carefully press from the front.

For good measure, I usually turn the block back to the wrong side and press the center from the back.

I sometimes worry about compromising the integrety of the stitching with this method because it requires removing those stitches. I try not to use it on quilts that will get hard use and washing. But for wall quilts, I'm comfortable using it.
Ideally, the line of stitching should cross the angled and vertical seam exactly where they intersect. Now some people can get perfect intersections where those 8 seams come together, but I'm not one of them. I'm not going for perfection on this piece, just close enough to meet my personal standard. Sometimes you can get away with being slightly off if the fabric is busy or of low contrast as it is here. And I figure the slight imperfections will probably disappear in the loft of the batting and quilting, and not be visible at the distance at which they will be viewed. I just remember the reaction of students to some of my samples. They would comment on how perfect my points were, then I'd have to show them just where they were not. It's a good lesson for all of us to learn - that what is glaringly wrong to us, others do not see. This piece may or may not end up in competition under the close scrutiny of a quilt judge - probably not - so I'm not going to spend a lot of time pulling out stitches and re-sewing. There were some blocks like this one off enough that I did re-do them today. Then it was on to pressing.
Rather than pressing open or to one side, this is where I use the nifty trick of spinning the seam to that it rotates in line with the other seams. To do this, you have to tease open the stitches of that vertical seam. This allows the seam to go in opposite directions on either side of the intersection. Sometimes the seam will give way with a slight tug, other times you have to help loosen the stitches with a seam ripper.

Once the stitching gives way to the crossing stitching, I flatten out that center and hold it in place with my thumb while I flip the block to the right side for pressing. I carefully remove my thumb to make sure the center has stayed open, then make sure the seam allowance is going in the direction it's supposed to. Now I can carefully press from the front.

For good measure, I usually turn the block back to the wrong side and press the center from the back.
I sometimes worry about compromising the integrety of the stitching with this method because it requires removing those stitches. I try not to use it on quilts that will get hard use and washing. But for wall quilts, I'm comfortable using it.
2 comments:
It's kind of a lose/lose situation with pinwheels, isn't it! You can either use this method, which is brilliant for reducing the bulk where all those seams meet up, but does run the risk of being slightly weaker where you've taken stitches out. Or you can press to one side or press open, which is stronger, but can make you skip stitches or break a needle if quilting at speed - or I suppose if handquilting, it might mean you simply couldn't get your needle through. Won't stop me doing pinwheels, though...
Such careful, methodical work - you've got me wanting to make some pinwheels. The splayed seam would be ok on a much-used quilt if it was tied at those points?
Post a Comment