Showing posts with label Machine Quilting. Show all posts

Sunday, June 14, 2026

NOW We're Flying!


I've been pretty diligent this week, working on my two major projects - the crochet cardigan and the Venetian Tiles quilt. You might remember that the chirpie young lady on the cardigan video promised that it would "fly off your hook", but I wasn't finding that to be true at all. But with the back now done and the first front panel under way, it does feel more like I'm flying. The front panel is 45 stitches wide vs 109 on the back so that would be one reason why. The other would be that I am now so familiar with the repeat pattern that I'm not spending nearly as much time puzzling over instructions and counting stitches.

Also felt like I was flying on Venetian tiles as I machine quilted the four big blocks and 4 of the remaining cornerstones needing a thread color change. My machine quilting does not bear close inspection, stitches quite tiny and my less than steady hands struggled for smooth lines where I wanted them to be. And again, the thinness of the batting means one doesn't even see any texture rising from those 4 main blocks that aren't heavily quilted. Good thing this is just for me and the patterns of the kaleidoscopes are really what I want seen.

And then it was time to work on the binding. This is what I had left of the fabric that bordered the blocks to make sashing, and I hoped there'd be enough to provide the same burgundy edge around the outside. 

So this required a bit of math calculations, deciding that the binding would be a half inch wide, then figuring how wide to cut strips so that stripe fell in the right place, and finally, with that figure, was there enough fabric. Yes! A lot of seams but more than enough. On the left is what I came up with and used as a template of sorts to make sure I was cutting the binding in the right spot.

I had hoped to have the binding sewn on by the end of the week but it didn't happen. I still had to do a bit of calculation to determine where exactly to trim the quilt beyond the edge of the top. That strip will actually be applied face down, not as it is seen here, but my trial had it face up so I could see exactly where it would turn to the back. All this thinking tired me out! Best to take a few days off before actually trimming the quilt top and sewing on the binding. Priority for the upcoming week.

In a break between machine quilting and figuring binding, I took the time to cover with washi tape a box that saline packets come in. Washi tape is still a mystery to me, not really understanding how to use it no matter how many times I watch videos of it being used. Still, like any good crafter, I've bought more than one spool of it and rarely have used any of it. But I am a sucker for anything William Morris and could not resist buying a roll of this wider washi tape with one of his designs on it. 

It made pretty quick work of covering the box which I will either keep my rolls of washi tape or maybe linen binding thread in. I can see now I need to put a little more tape on it to cover the inside of the lid. 

Finally, I had a surprise visitor to my deck garden. It got quite cool last week, enough for me to turn on the furnace, which may be why this little frog decided to hunker down in one of my pots. If he hadn't moved as I watered the plant within, I don't think I would have noticed him in there.


Saturday, May 09, 2026

Not Exactly Flying

When I queued up the tutorial video for the crochet cardigan, I found myself watching a young and perky gal so excited about this pattern and promising that "it will fly off your hook!" Well, I'm not finding that to be true (although there's a lot of slipping off the hook - more about that later). Here's my progress this week, which has been slow. There's a lot of counting, which limits the kind of tv show I can have on while I work. I've already had to do a fix at the end of a row so I didn't have to undo two rows of crocheting, and undo a different row where I'd put a stitch in the wrong place near the beginning which threw off where the final stitches would land. I'm not flying (although one thing about crochet - those stitches really do fly when you're undoing them), and I'm not exactly enjoying the journey.

Add to that the difficulty of working with the slick yarn whose twisted threads don't really stick to each other making it way too easy to snag one as the hook is pulled through or even find the hook splitting the strand altogether. Slow going but I persist. There are many 4 row repeats left to go on this back section. I've only managed 3 so far.


Not having a great deal more success with the quilting on Venetian Tiles. I finished the 1/2" echoing inside the half blocks around the outside, all done with a walking foot. Moving on to the small "cornerstone" squares, I was reticent to give up my walking foot and slowly worked my way around 4 of the 9 squares' fabric motifs. No, you cannot see the stitching very well, as I wanted, but because I used Thermore batting, I'm not getting much texture either. I'm wishing I'd used something with more loft. The more I studied the different squares that were left, the more I realized I'd need to get rid of my "training wheels" and switch to free motion quilting. Not my finest hour as I quilted a fifth square, but again, it doesn't really show.. I'm planning on switching thread color on the final four so before doing that, I moved to one of the big octagon blocks, again studying the motifs to determine the best routes round for minimum starting and stopping. Not exactly flying on this one either but slow and steady wins the race I guess. And of course, the more I do, the more relaxed and better I'll get.

Continuing spring reporting, my side of the street is lined with chokecherry trees that burst into bloom last week.

They have a sweet smell that hit me as soon as I opened the front door. I just love them. Apologies for the blurry pic - it was quite breezy when I tried to get this close-up shot. I also noticed a lilac bush in bloom, another sweet smelling flower that strikes me as coming out a bit early this year. I'm sure the Lilac Festival organizers and participants are a bit worried as the parade isn't until next weekend. 

Thursday, April 30, 2026

A Distracted Week

I'm letting this knitting and crocheting kinda distract me, anxious to cast on the next knitting project and spending time checking to see if I have the right size needles for what is lined up. As if not bad enough to have at least 3 projects ready to go, I keep looking through patterns I've printed out but not paired with yarn yet, and a nearly gone skein of yarn I'd really like to use up. Yup, knitting, like quilting, leaves you with "scraps" left over that you can't toss but can find it difficult to use up. But as my mind has wandered, it occurred to me that there would be enough yarn on that skein to do the ribbing on a tam and there was a tam pattern with a sweater pattern I'd printed out so I couldn't resist starting that. This may all be because I'm finding myself a bit intimidated by that crochet cardigan. Right off the bat it requires me to learn a new stitch with a yarn that is very slippery. I didn't think that the bamboo viscose yarn would be like that but then again, it is actually just rayon, and rayon is definitely slick.

The pattern does give a link to a video showing how to do this foundation double crochet stitch, a good thing because I couldn't quite figure it out from this copyright 1959 book that, along with a 8-1/2 x 11 multi-page how-to pamphlet I'd was given way back in gradeschool is how I taught myself to crochet. 

Me and my sister-in-law crocheting away

This book was bought in 1970 before heading out on a 3 week family vacation that included one brother and his wife. Sue wanted something to keep her occupied in the car and decided she and I needed to get yarn and this book. I've made several things from it and it is a good resource to have on hand. I have to be honest, I'm really struggling with this stitch and that slippery thread, as I work to make 109 of these stitches before turning my work and doing the next much easier row.

I had hoped to spend more time quilting Venetian Tiles but the distractions also included catching up on correspondence and end of the month bills plus baking my annual rhubarb pie. Still, I'm probably about half done quilting the green parts around the outside, easily done echoing using an adjustable bar attached to the walking foot set for half inch spacing . The green thread I chose definitely blends in nicely, leaving me wondering if it is too safe a choice. Nahhh, as I've mentioned before, I'm generally not into showy quilting, texture being enough for me. Click on the photo for a larger view to see just how those stitches blend rather than stand out.

Yesterday as I was looking down our greenbelt, I noticed the syringa has started to bloom. It's been lovely to watch the procession of blooms throughout the neighborhood. Certainly brings a smile! How is spring in your neck of the woods? 

Friday, April 24, 2026

Another Finish!

With more diligent knitting this week, the blue knee high socks are finally finished. And I have mixed feelings about them. I measured, and measured, and measured again the distance from the floor to my kneecap and consistently came up with the same measurement as suggested in the directions. And yet once on, the socks could easily be an inch or more longer to actually reach the knee. Plus the ribbing really stretches out over the calf which looks a bit weird to me. However, the knee high bit is for warmth, not show, and close to the knee is close enough for this pair. I'll make a note on the pattern should I try this again. I'm also finding the yarn doesn't feel as soft when knit up as I thought it would, but I do still need to block these, and they may soften and "bloom" once I do. But they are done and I can move on to the next project.

I pulled the wrong yarn for this pic. This "tape" yarn will be for a bag.

And that would be a crochet project? It's been quite awhile since I've done any crocheting, but just like my knitting, there was a time when I did a lot of it, mostly to make baby blankets (that lovely ripple pattern) and throws (including a variation of the popular granny square block for a throw that I made for my dad). Back in the 70's - 90's, I never liked the look of crocheted wearables that couldn't hold a candle to ones I could knit with a more sophisticated look. But here I am, ready to give crocheting a summery cap-sleeve cardigan a go, all because I'd been looking at something similar in a catalog and found myself saying, surely I could make one myself for less. And then I ran across this kit on the Lion Brand Yarn website, liking it better than what I'd been seeing in the catalogs. I do think I will make it shorter though so that it hits mid hip - about where my summer tops end. It calls for a size G hook and uses a bamboo viscose yarn which I've not dealt with before but is supposed to work up light and drapey; hopefully it will work up quickly. Bear in mind I bought this to have to wear LAST summer but a knitting project didn't finish up in time for me to start it. Wish me luck!

I've also started the quilting on Venetian Tiles by doing a lot of stitching in the ditch along the burgundy sashings, with burgundy thread so I can't really show a picture of it, it hides so well. I'm generally not into showy quilting, so have been auditioning threads for areas where the stitching really will show but where I don't want to "hide" the beautiful patterns in the kaleidoscopes. From the very start back in 2003 I thought I would use the pink and/or blue Oliver Twist hand-dyed threads and pulled them out to see how that would work. Hmmm. By chance, I'd picked a dark brown bobbin thread to pair with the burgundy thread and it helped me see that behind those pink and blue motifs in the fabric was a golden brown. And yes, I have 3 different Oliver Twist browns to choose from so that all the quilting in those blocks can be done with a single color, no switching back and forth from the pink to the blue. Finally, the green variegated King Tut thread will be perfect over the scroll-like patterns in the green fabric around the outside of the top. 

Thursday, March 19, 2026

Heels Turned

The zippered pouch with Hmong applique holds crochet needles and knitting accessories

I must admit I've lost enthusiasm for the split nine-patch project since failing to find that piece of batik I planned to use for a moon. And I still needed to clear space on the worktable in order to go ahead with finishing the Stack n Whack top. So my mind has been occupied instead on knitting: projects in the queue and the project on my needles. I hunkered down over the instructions for turning the heel, knowing I would have to concentrate to get it right this time, and I can report that I think I managed better, not seeing any holes that will need closing up later. Yeah!!!! Now I'm moving up the leg, first with some rounds in pattern to establish it and then changing the stockinette stitches to ribbing to match the ribbing on the instep. I honestly don't know how some knitters knock out socks so fast; these will take even longer than my last pair as I am making them kneehighs. But I really like working on both socks in the pair at the same time, alternating between them as I move through different sections.

I use cardstock for the covers, using a photo from her website

Clearing a space on the table meant catching up some things I wanted to add to my gratitude journal and gathering up printouts from some of Angela Walters' machine quilting series. Sometimes I think I like organizing more than I like actually making things; I'd found a stack of these printouts buried on the floor with a panel I'd bought in order to practice stitches from her "Fillers" series. Well, they won't do me any good there, and I'd thought that as I collected more and more printouts from her series, I should "bind" them using the Arc Notebook System as I had with my Handmade Books printouts. As much as I enjoy binding books, I have yet to run across one that will do what this system does. It works a bit like a spiral binding except that you can add and remove pages at will. It requires a special punch which I decided to invest in plus the plastic discs that hold the pages, and I have not regretted that purchase. Now that I have these organized and at my fingertips, it would not be a bad idea to get that panel out and layer it up. It would make a great warm-up piece; just doing one small section before starting a session on the Stack n Whack quilt.

I don't know about you, but I am having a terrible time adjust to the time change. That, and all the disturbing news bombarding us on a daily basis here in the states is enough to make me want to hide away with my knitting and quilting and reading or just curl up on the couch. Snuggled under a quilt, eyes shut, has always made me feel safe - the ultimate escape, But it's not the only thing, which is why I was gladdened to run across what I share with you below. Hang in there, fellow "hobbyists" and artists! We have a built-in safety feature. 💖


Tuesday, December 30, 2025

Did I Make It?

Click on picture for a larger view of the stitching

Yes, I did! At about 5:00 p.m. Christmas, I put the finishing touches on the Joy Banner and hung it in the living room, followed by getting out the Christmas trump topper and a few decorations - instant Christmas! If memory serves, there is a tradition somewhere of waiting until Christmas Eve to put up decorations which to be honest I've never tried until this year. But I kind of like it! However, I listened to so much Christmas music while working on the Banner that I got Christmas song-ed out. Wouldn't have thought possible! So let me walk you through the finishing touches starting with decisions about where else to put quilting after stitching in the ditch along most seams (I just quilted up the middle of the checkerboard and not along all the horizontal seams). There were those almost triangular areas above the arch at the top, and to carry out the holly theme I decided to quilt around the holly template used to do the applique below. Note how I also quilted close to the edge of the holly and bow appliques - a really nice touch.


I'd been puzzling over the outer border, whether to add any quilting in it or just let it go since it wasn't very wide. But I had holly leaves on the brain and decided to quilt a string of them around the border, no marking and with the same gold thread - yes, getting daring because indeed I'd wondered if I should do it in a less visible green thread. Really hard to photograph metallic thread and the thread didn't really pop off the border - I used the YLI thread this time since I'd be doing free motion quilting and I didn't trust that old Coats metallic thread to hold up to that. The Coats metallic was a bit flatter which I think catches the light better. The leaves are wonky, the only non-precision thing about this quilt but I'm fine with that. Be sure to click for the larger view.


Time to bind. I'd mentioned in a comment on the last post that I didn't think I had even a small sleeve in me for hanging this quilt. I'd been thinking tabs and decided to see how much binding I had leftover. Believe it or not, I had exactly enough left to make three tabs (two pieces right sides together, sew up each side to make a tube and turn). I've perfected this method of cutting binding slightly wider than 2 inches so that when turned to the wrong side it overlaps the stitching line enough to be caught when I sew it down from the front by stitching in the binding's ditch. All I needed to do was fold each tube in half and position the raw edges even with the edge of the quilt edge, then turn the binding over, pin and stitch. It worked very well. If you click on the photo for a larger view, you should be able to see the nest of metallic threads that have been pulled to the back for burying.

17" x 32"

And here we are - a joyful, joyfully made, Joy Banner to enjoy now and for years to come!

It's nearly New Year's Eve so I also wish you a Happy New Year full of wonderful projects and surprises. 

Wednesday, December 17, 2025

The Quilting Has Begun

I was daft to start the Joy banner in December. Here I am, well into week three of working on it with much left to do. The completed top looks rather good though, don't you think?

I know there are some who are into adding lots of quilting to every piece, but I want to keep this one simple. All three prints do have metallic gold accents so I'm using gold metallic thread. That's a very old spool of Coats metallic thread on the left that I'd really like to use up, now that I have a more reliable YLI gold metallic thread on hand. Wondering what I should use as a bobbin thread, I discovered I had multiple spools of Sulky 60 wt PolyLite thread which I must have gotten in a grab bag special on Superior Threads website, and which I'm not sure I've actually used. But there was the perfect color (matches more closely than the photo implies) and the description that came with it does say it is perfect to use with metallic threads.

This combination is working well as I do a slow crawl stitching in the ditch around the borders and sashing. Slow because these stitches really show and I need to stay right in the ditch and because I don't want to put stress on the metallic thread such that it will suddenly fray and break on me. So far, so good.

Tried to video the way that thread really does sparkle, even in the ditch but it didn't capture very well. Click for a larger view. But if you listen closely, you can hear the Christmas music I'm listening to while stitching, compliments of The Jazz Groove. I think I may have to pause work on this for a few days to work on Christmas cards, but I am determined it will be done. at least enough, to hang on the wall by Christmas Eve.

Saturday, August 23, 2025

This Is A Sleeve?

Yes, this IS a sleeve, for my eyelet cardigan. Because of the way the shoulder extends down the arm, the length of the sleeve is quite short and straight across the top. One more to go and I can complete seaming the sweater to completion.

I also layered up the orphan block for the pillow and machine quilted it by stitching in the ditch which you can see from this back view. I studied the seams to see how I could quilt with the least amount of starting and stopping and was pleased to find that I only had to start in a new place three times. A little game I played that was pretty satisfying. 

It's been hot here so I'm usually inside until the sun goes down and it starts to cool, making for some very pleasant evening walks that include some star gazing although I have little idea of what I'm looking at. I do spend a little time on my east-facing deck late morning to do a little reading. Its shade and slight breezes are equally a pleasant way to enjoy the waning summer. How are things like in your part of the world? 

Thursday, June 12, 2025

A Mending Week

Arrow pointing to invisible thread loop of finger

I have company coming in a couple of weeks; it's prodding me to take care of some things I've been putting off, like making more repairs on the couch quilt. You might remember that a lot of the cotton bobbin threads had worn through leaving loops of the invisible thread my fingers kept catching on. These were mostly along the stitch in the ditch quilting and I decided to requilt all those lines, using a stronger polyester bobbin thread. I feared that the scallop quilting in the borders and setting triangles might also be at risk but was not up for requilting all those sections too. As I suspected, those areas started failing as well and I started tying yarn around the loops I ran into, dreading having to requilt those areas. I did realize one thing though as I noticed where these loops were popping up - almost all of them along the top border where strain would be put on the quilting as I'd pull the quilt up over me. Anyway, having a quilt with a lot of yarn ties decorating it would be embarrassing to have out for company to see, so this week my "creative" time has been working my way over these broken areas.

Right side of seaming

I finished the left front panel of the eyelet cardigan and discovered that the 3 needle cast off required was not only easy but a pretty nifty way to seam two pieces together.

Wrong side of seaming

The two sections are placed wrong sides together as you would any seaming, with those needles with "live" stitches held together. Then casting off proceeds as usual except for knitting together a stitch from each needle before moving the previous stitch on the right hand needle over this new stitch for a cast off. Makes for such a smooth seam on the wrong side as well as the right side. I'm about 4 inches up the right side panel and wishing this was going a little faster only because I have something else waiting in the wings that is for warmer weather like we've been having.


I realized that when I showed you the plantings of my deck garden, I didn't show you the plant I decided to put in the big pot out front. I was looking for something that would stick up higher than the pot rim and these flowers are doing just that.

Finally, I've been noting the progression of blooms along a stretch of my daily walk that includes a vacant house (where the lilac bush grows along with old fashioned roses and sweet peas) and an undeveloped lot next to it (just trees and brush). The roses from next door have spread into that area, and to my surprise, I spotted some honeysuckle as well. Seeing that honeysuckle brought to mind a specific image from my youth when dad liked to load up the camper and head over Thompson Pass into Montana to fish. We'd gotten over the pass and had pulled to the side of the road where mom spotted some syringa and honeysuckle just like these. I always marveled that mom knew all the names of the flowering plants and she always approached them like old friends.  

Friday, August 16, 2024

Highly Influenced

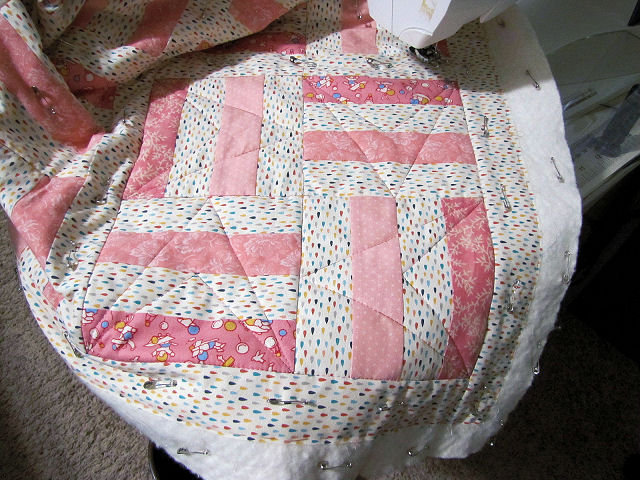
I am stubborn. I try to avoid cliches or puns when naming my quilts. I strive for something more than "For (quilt recipient's name)". But as I mentioned, an obvious name for this quilt for my goddaughter's baby was alluding me. But not really. Every time I spread it out on the table,"Pretty In Pink" popped into my brain. NO, my stubborn side said, that's a movie title, one I've not even watched, and probably sending a message I don't want to send. And yet . . . this quilt IS so pretty in pink. So I gave in, inking the info on the back of the quilt. I usually use a micron pen to do my inking, and more recently, their plastic nib versions. Had a blue one I've used before, but it seemed to have dried up. I've had a lot of issues with that recently with micron pens I've purchased either at the Michael's store near me or added to an internet purchase from some place like Cheap Joe's. It's making me wonder how long these pens have sat in stock, because I have pens I bought years ago but don't use often that still work fine. Was about to change to a black one when I had a thought. Could I use one of their brush pens instead, since I had one of those in blue? Yes! In fact, a brush pen may move even better over fabric when using a light touch.

I am so pleased with my choices for the quilting. After finishing all the arrows on the blocks, I wondered if I shouldn't add more lines. I decided to wait until I'd quilted the sashing to make up my mind. The arrows were a take on one of Angela Walters' "dot to dot" designs from her recent series, Dot to Dot FMQ Challenge Quilting Along, such an easy method of quilting with straight lines. But for the sashings, I was considering several of her more curvy designs like serpentine or ribbon candy. I've done neither of these before and wasn't in the mood for practicing or setting up my machine for free motion quilting. As I stared and considered, it occurred to me I could put into practice more dot to dot quilting in that sashing, using the seams of the strips in the blocks as my "dots" to shoot for. This worked so well and when I spread out the quilt again, I didn't feel I needed any more quilting in the blocks. Thanks, Angela, for influencing how I approached the quilting on this piece.

When making baby quilts, I've gotten in the habit of quilting the baby's name somewhere within the quilting designs. This time I reserved the border for adding her name, interspersed with hearts. My script may not be the prettiest but the variegated thread hides some of my inconsistencies.

So here it is, ready at last to send off to baby Briar. But first, I'm going to make some pillowcases from what I have left of the Noah's Ark fabrics. I have quite a bit and have no desire for it to go back into my stash. They can go to the other kids in the family.

Wednesday, July 17, 2024

It Worked!

I started quilting on the rails quilt by stitching-in-the-ditch through the center of each block both directions to stabilize things before quilting the "arrows" in. It occurred to me that repositioning the architect lamp that usually shines down on the needle area over to the left and down to shine the light at an angle might produce shadowing so I could see those hera markings even over the light fabric. And it worked like a charm - I could see all markings easily.

I like the way the arrows rotate around the block. Makes me think of the storms and winds Noah and his ark must have weathered. My only concern is that there may be too much open unquilted space that I might feel compelled to add more stitching to. I'll not worry about that now.

Here you can see those initial lines of stitch-in-the-ditch quilting and the wedges of unquilted space.

I do like this gold/yellow thread on the back. It does run quite light as it variegates but I think it was a good choice.

Monday, December 11, 2023

An Alternative To Paint and A Finish

Years ago Washi Tape crossed my radar as a thing. I didn't understand what it was exactly, nor why it was being touted as a must have item but I bought some anyway. The 4 or 5 rolls I bought have remained unopened until the other day. I've gained a better understanding of how to use this tape but still couldn't figure out how to work it into any of my various projects - it just didn't seem to be the sort of thing I'd use. But as I found a page in the gratitude journal to add a gratitude to, but one that did not have the painted borders, it dawned on me that I could put strips of Washi tape around my entry. Oooo, so much less messy than paint, quick and easy, I'm going to have to tape off some other pages! And yes, last week's challenge was dealing with a crown that came off. Just what one needs in the weeks before Christmas! All better now for the time being but I'll be staying away from things like sticky caramel (which was not the culprit btw - I was just eating a slice of soft crust pizza . . .).

As for my finish, I finally got all the lines of quilting on the 4-patch strip quilt resewn. I started working on that back in August but not very steadily. But I could see the finish line approaching the last time I worked on it so devoted big chunks of time over the weekend to get it done. And really, this was not something I was going to do slowly and carefully; perfection was hardly on my mind and so there are lots of places where my new stitching did not go exactly over the old stitching. Can you hear me yelling "I DON"T CARE!!! I just want to get this done!"? It seemed to take forever anyway. I don't think there's any other repair or mending work to do so I can move on to some other more interesting sewing project.