Tuesday, July 19, 2022

Here I Go . . .

Tomorrow's the big day when I head out for my back surgery. I think I've gotten everything done and taken care of that needs to be, and now it's time to relax, let the control freak in me take a break and put myself in competent hands. I've had the photo above as my computer wallpaper this month, one I took prior to the pandemic lockdown while taking a birthday cruise on the lake. I've seen so little of the lake this year as my ability to enjoy a walk around city park or down the Bay Trail has disappeared. So the picture when I fire up the computer is a reminder of why I'm having this surgery and what I hope to be getting back to soon. Wish me luck!

Wednesday, July 13, 2022

Still Distracted

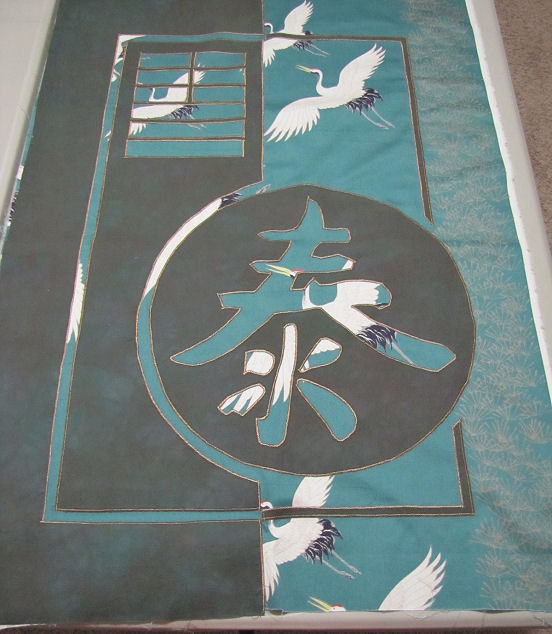
Disruptions continue, including a day devoted to my pre-op appointments, and I totally forgot to post what I did get done last week. I finished the satin stitching on the second Peace Quilt and I guess I should have used some stabilizer. The first quilt was all done with tightly woven hand-dyes while this one trades one of those out for the less stable sateen fabric. I good press got most of the draw-in flattened out and hopefully the quilting will do the rest. I've decided to back it like I did the first one, same dark hand-dye used on the front with the intent to turn it to the front to make the binding. But I don't think I'll use felt again, even though that will mean a lot of thread burying. Felt is good for smaller projects but I was not totally happy with the way this larger piece hung, the felt not being as firm as I thought it would be. I think I will go back to Hobbs 80/20 in black, which has more stability to it than regular 80/20 for some reason. Will see if I can get it sandwiched up before the end of the week, along with the continuing straightening and preparing of the house for my post-surgery recovery, and of course gathering what I will need to take to the hospital.

I'm lining up things to work on for when my bending/twisting/lifting is limited. I have one really old hand applique piece in mind. Have laid out supplies for several books. And printed off photos of quilts I've yet to fill out documentation sheets for. That seemed like an excellent project I could do sitting.

Perhaps I'll finally try some Gelli printing. I already have a 5 x 7 plate, going with the smaller size partly because they are so darned expensive and partly because it is a good size for printing in some of the sketchbooks I've made. But all the demos I watch show using a larger plate, one you can pull printer paper size prints when playing with masks and stencils. So when Michael's was having a particularly good sale, I was able to pick up this larger one at half price. As for the Scor-Pal, I admit I got sucked in by the "ooo what a cool tool gotta get one" thing after watching it being used to score for folding accordion style the spine for this challenge journal (and here also to see the folding of the spine) as well as other scoring chores in bookmaking. But again, this tool is a little pricey so I'd been putting off getting it. Then I realized I had a bunch of credit card points I could apply to an Amazon purchase so was able to get it there essentially for free. Am looking forward to trying it out when I make this book again, only bigger.

Tuesday, July 05, 2022

Montage Homage

I've used most if not all of the photos in the collection shown above as I've marked year after year the anniversary of my husband's death on July 5, 2000 on this blog, but I don't think I've ever shared this grouping. I put it together as a special memory of our adventures on our Harley 750 Sportster. There were short hops and day trips and weekend jaunts to nearby motorcycle road races and week-long vacations sightseeing our way through Wisconsin, Illinois, Michigan and even parts of Canada. I told him we couldn't afford it when he came home from the dealership marveling at his opportunity to buy the bike when the person who said they wanted it changed their mind - normally there was a long waiting list to get one but he happened to be right there when the dealer lost that potential sale. I knew he was going to figure out how to buy it anyway, and I never regretted it, making sure he knew I expected to be taken along on many a ride. We had marvelous times on that machine and where it took us.

So the photo montage was put together so I could print it on fabric to make a journal quilt. I cut a border from the "checkered flag" sleeves of one of his Harley t-shirts and added a little quilting as well as various pins we picked up along the way. It never fails to warm my heart when I see these photos and remember how much he loved that bike . .  and me of course, never minding my tagging along. Loved you then, sweetie, and love you still.


Sunday, June 26, 2022

A Week of Disruptions

Nothing creative got done this week, much to my chagrin. I got my date for back surgery, then this week got a call rescheduling it to July 20th (only a week later) which then generated a flurry of phone calls from various sources at the hospital asking questions and imparting wisdom. All good but time consuming as I look around at what I should take care of in the coming few weeks before movement and lifting restrictions take effect. I look at this as I did my cataract surgery last year about this time - knowledge that much of my life will go on hold while I recover, but at a point where it simply must be done so I can get back to activities that now are literally a pain to do. Oddly enough, sitting at the machine doing that satin stitching didn't seem to bother me but the distance I can drive without setting things off has gotten shorter and shorter and I can't walk very far either. Not the way I expected to age but I know I am not alone in this.

And then on Friday I had scheduled an internet upgrade from my provider. They've been putting in fiber lines in the area for awhile and now my neighborhood was ready to be hooked up at bargain introductory rates. Sure, why not? But I have yet to have any technological change or upgrade go smoothly and this was no different. Suddenly my laptop could not access the network without setting up my pc with a mobile hot spot that it could connect to. The installer couldn't figure it out though he tried many things and finally hit upon the hotspot idea as a work around until I could contact Tech Support or figure it out on my own. I looked at so many things on both computers that didn't make a difference and discovered that the installer was wrong about being able to put my pc in sleep mode as I usually do and still have network access with the lap top. When I have more time to spend on the phone, I'll see what Tech Support says, but in the meantime, I discovered I couldn't print or scan from the pc! I originally set up the 3-in-1 printer to connect to the pc through blue tooth but now it wouldn't do that. NOOOO, this printer now wanted me to connect directly to the network (which actually went fairly smoothly) but I still couldn't communicate between the pc and printer. Now I can't remember what I stumbled on to change that magically turned on the scanner, and now it would take print jobs too - hallelujah! But it did take hours of messing around to get it all working together again. Not sure this extra speed and quality is worth it . . .

So this week I share an article on inspiration that I'd set aside but failed to include in any blog post as near as I can remember. If I have, it's been long enough that it's worth a second read. The title alone is wonderful and speaks a bit to what I'm going through at the moment: "Artist Agnes Martin on Inspiration, Interruptions, Cultivating a Creative Atmosphere, and the Only Type of Person You Should Allow Into Your Studio".  Here's a taste:

"An inspiration is a happy moment that takes us by surprise.

Many people are so startled by an inspiration or a condition of inspiration, which is so different from daily care, that they think that they are unique in having had it. Nothing could be further from the truth. Inspiration is there all the time for anyone whose mind is not covered over with thoughts and concerns, and [it is] used by everyone whether they realize it or not.

It is an untroubled state of mind. Of course, we know that an untroubled state of mind cannot last, so we say that inspiration comes and goes, but it is there all the time waiting for us to be untroubled again. We can therefore say that it is pervasive."

I do love that part about it taking us by surprise and that it is there all the time waiting for us to be untroubled again. I've gone through several long droughts of inspiration in say the last 5 years and suspected it was partly because I was troubled. As for interruptions:

". . . Martin urges artists to create a sanctuary for inspiration — a space devoid of busyness and dedicated to unburdened clarity of mind, with “no telephone,” where one is “to be disturbed only if the house is burning.” . . . Because the studio should be a sacred space for the untroubled mind, Martin recommends avoiding physical clutter in order to prevent mental clutter. . ."

Let me tell you, my studio is nothing BUT clutter these days, has been for quite awhile, more so than just the normal kind of clutter that actually sparks ideas unbidden. I long to find a happy medium to that. Maybe I can address some of that while I convalesce. 

Saturday, June 18, 2022

Satin Stitching Away

Only a few smaller areas left to satin stitch.

When I made the first Peace quilt, I was concerned about my thread color showing too much. I wanted everything to sort of blend. This is my knee jerk reaction when picking thread color. But on this one, that tan in the border and bits of it on the cranes made me want to choose a color for the satin stitching that would play off that and stand out. I can't tell you how very pleased I am with the results. And the sheen of the twist thread is perfect against the sheen of the sateen crane fabric.

I discovered I still have some of the two green threads I used on the first quilt (can you believe they are still sitting by the side of my machine 2 years later?) and may use these for the quilting. We shall see.

Sunday, June 12, 2022

Succumbed!

Pillow Panel includes 2 of these printed squares

If you've been paying attention, you know I've become a real fan of Angela Walters and how she presents machine quilting techniques and designs per her many videos and challenges. These are all free, but she is quite candid about the fact that she can only do that through the support of at least some viewers purchasing the panels she designs for the challenges as well as coordinating fabric lines and thread collections. Generally speaking, I haven't been that drawn to her designs and certainly have plenty of thread on hand so am not tempted to participate in the challenges by practicing the quilting on her products. However . . . there's a new challenge starting in about a week called Free Motion Fillers Quilt Along which will present a LOT of different designs, and her thought when designing the panel was that when finished it could make for a handy reference when sitting down to quilt other quilts. Ahhh, that rather hooked me, along with the fact that I kinda liked the design which was done up in colors I like AND I didn't have to buy a big panel (a little pricey) but could opt for the pillow panel (which appealed more for several reasons). "Oh, I can't believe I'm ordering it," I thought to myself as I added the pillow panel to the cart, and then added one of the coordinating prints. I can come up with several rationalizations, but I needn't tell YOU about that, I'm sure! The panel and extra fabric arrived yesterday, and I am just as thrilled with them as I was when I saw them on her website. Anyone want to join me?

In the meantime, I have found my curved scissors. I swear I had looked in that spot on the shelf surround of my machine more than once. I can't even remember what I moved from that spot in preparation for the next step on the Peace quilt. When I turned back, there they sat and I swear they were smirking. Glad to have found them because the applique pieces of the second Peace quilt have been arranged and permanently fused, ready for satin stitching around their edges and I prefer using them for thread snipping over a regular pair of snips. 

While so much of my memory seems to be failing me lately, I was very happy to find it had not failed me about a certain thread I was sure I had that would be a good color for the satin stitching. I still had the sample I'd stitched out when deciding on thread color, width and tension for stitching on the first Peace quilt so I didn't have to rely on my memory for test settings. I did change one setting but at least I had a starting point. What I wasn't sure about was whether I'd put any stabilizer on the reverse side of the quilt top or if the Misty Fuse adhered to the applique provided enough stabilization. This is one of the reason I like the way I blog, because I could go back to the posts about that part of working on Peace I to see how I had done it. Yeah!  No stabilizer. Ready to sit at the machine and work my way around all those raw edges that Misty Fuse does not hold in check. The upper thread matches the tan in the print along the side and is the no longer being made Sulky Ultra Twist. The lower thread is more yellow and will be backup if I run out of the other thread. It is the replacement Twist thread produced by the company that bought out the original. It's close but just not the same.

Saturday, June 04, 2022

What's Next

Once that quilt was mended, I thought I'd make another book, having set aside supplies for several different ones. But instead, there was some howling from the closet, a "wait a minute, you've been thinking about something else for awhile and what you need is in here" I couldn't resist. The Peace quilt construction left me with negative pieces of the design with fusible on the back. I couldn't toss them - some very big pieces there - and I couldn't quite bring myself to think in terms of cutting them up for some other sort of applique piece. I wanted to make a second quilt using a piece of fabric I knew lurked in this footlocker in the closet, itself lurking under boxes of my framed artwork. I had no idea what a Pandora's Box I was about to unearth and open.

When I went away to college in the 70's, pretty much everyone had some sort of footlocker in their dorm room and mine was this red, white and blue version. After college I hung on to it, using it mostly (if I remember correctly) to store my needlecraft supplies like yarns and cross-stitch cloth and rug hooking supplies and the like. At some point, I started storing fabric in it, and as I transitioned from garment making to quilting, the fabric was more likely to be long lengths of cotton fabric that I didn't want a lot of creases in. But there was also some garment fabric in there, corduroys and even some silks. Underneath this stack, that dark blue rectangle on the right, is actually some corduroy my mother-in-law passed on to me when she gave up on sewing. I'd forgotten it was in there, and forgotten as well why these particular fabrics are stored away here. Peeking out around the other two corners on the right is major yardage of black fabric bought at that same quilt shop I taught at that left that quilt top smelling like cigarette smoke. As I needed black fabric, I'd get it out and cut off a piece. I haven't had to do that for a long time and now I'm wondering if it too harbors some smoke odors.

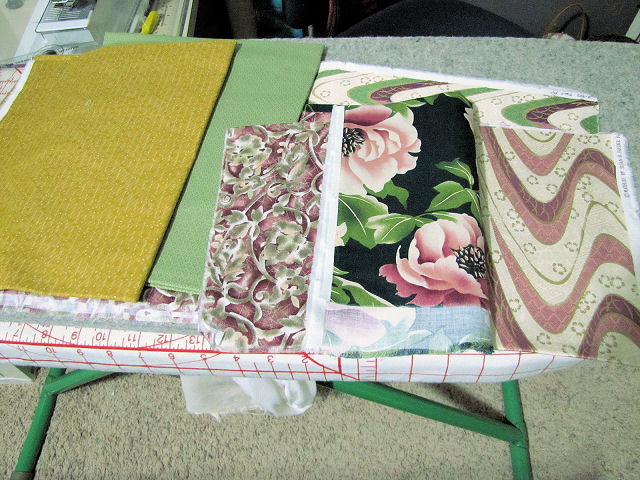
Here's another layer - a batik, one of my hand-dyes, and a bold contemporary fabric that I bought a lot of because I was so taken with it and it was on sale. I remember my husband asking what I would do with it, and replying that I didn't know, but if nothing else it could be backing. That was some time in the late 90's, when Susan Stein had a quilt shop in the Minneapolis MN area. I was directed there by someone who said I could find Cherrywood Hand-dyes there, and I was overwhelmed by what Susan was carrying - nothing like the usual dark and woodsy Thimbleberries-like quilt fabric popular at that time. Besides the hand-dyes, she carried such bright and modern contemporary fabrics, maybe the only such shop in that part of the country to do so. I was smitten. (And the hand-dyes were instrumental in my friend Judi and I experimenting and eventually selling our own line of hand-dyes.) Once I moved closer to that area, I visited her shop several times, bringing home this big piece that I've never found a home for yet. Perhaps I put these three pieces aside with the thought they could be used together.

This grouping kind of puzzles me. Again, no real recollection of why these ended up in the footlocker. I'm thinking these were in one of those Keepsake Quilting fabric of the month club offerings which in itself was reason for me to keep them together. Note my tendency to end up with multiple colorways of a print.There is an invoice with them showing I bought more yardage of  at least one of them - a lot more.

And here it is, 2 yards of the crane fabric that went with this oriental collection and that I've been thinking about ever since I set aside these negative leftover pieces for a second Peace quilt. Yes, I think it will do nicely since I think it is safe to say I'll never actually make the kimono-style jacket I originally bought this sateen yardage for. I'd forgotten about that leafy tan border running along the selvages which is giving me ideas for thread colors. Yeah, just a little bit excited about this.

But goodness, as I look at the fabric pulled from that footlocker, and the fabric still lurking in it that hasn't seen the light of day for perhaps years, my overriding thought is that I have too much fabric!

Saturday, May 28, 2022

My Gardening Efforts

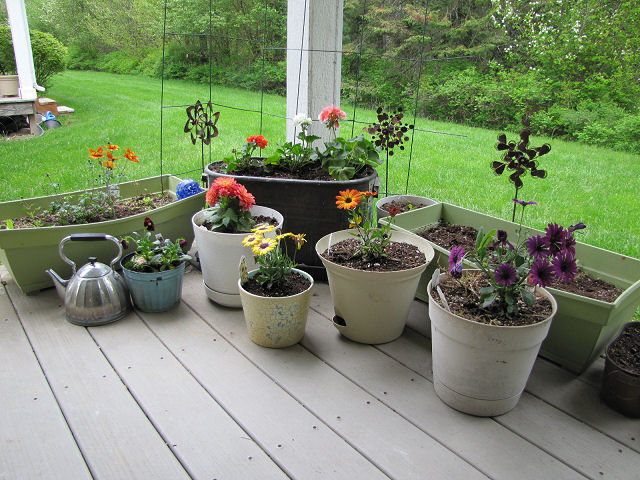
I promised to show you how I potted and arranged those plants that were huddling in the corner of my deck. It will look better once things fill out, the plants that wintered over have revived and started blooming and perhaps the few seeds I planted germinate as well. Let me tell you, it is a much better "after" view than the "before" view of dead plants and empty pots! If you look closely in the upper right hand corner, you will see that the syringa are doing their part too, having recently started to bloom all along the greenbelt behind our street of duplexes.

I was really drawn to yellow and orange blooms this year for some reason, but was sure to add this purple colorway to the orange one I picked out. I realized I was picking flowers like I used to pick fabric - if I couldn't decide which colorway I liked best, I'd buy some of each.

Here's the orange colorway along with this pretty yellow flower tinged with pink. Almost out of view in the upper left is a dahlia. I've never had dahlias before but know they come in so many varieties and colors. I hope this one does well in its pot. Could have bought different colorways of this one too but I only have so many pots on my deck! In the upper right is the pot holding a purple perennial whose name eludes me at the moment which is slowly re-emerging. Out of view on the left is a robust pansy which I hope does better than pansies I've had in the past. They seemed to be prone to mildew and bugs but this one looks much hardier. I have to try because pansies are a special  link to my mother and her mother who, I was told, always said pansies looked like little faces smiling up at you.

This is perhaps my favorite pick of the lot. It was a last minute grab after I thought I had the requisite number of new plants for my pots. It's called funny honey for some reason and because it seemed to have a spreading nature, it has gone in one of my long pots where I'm having a bit of trouble establishing anything perennial. I almost put it back, realizing how heavy on the orange/yellow I'd gone, but just couldn't resist.

I also have a big pot by my front steps that I've never been able to get to look like other people's large front step pots along my street which overflow with greenery and blooms. I just end up with a few blooms barely peaking over the edge. I truly am not much of a gardener, pretty much failing at every residence I've lived at to groom lush gardens. I love roses and tried them at several places only to have them go nowhere and be aphid gatherers. I've planted hundreds of bulbs over the years, never seeing more than widely spaced results in spring. Never could get foundation plantings to shield foundations with greenery and blooms. When we moved to Wisconsin, I swore off gardening, save to continue planting geraniums each year in that big copper tub - the one thing I have success with. So what to try this year? To my surprise, I brought home some double pentunias, a surprise because I have never cared for petunias, mainly because of the sticky secretions coming off them. But this pink double caught my eye and I thought maybe, maybe it could give me a better result.

I went back and got two more so the pot would be fuller with them. I'm hoping they will literally rise to the occasion.

And because they are giving me as much joy as the newly potted blooms on the deck, I share with you some closer shots of those wild syringas.


Tuesday, May 24, 2022

A Challenge Story

Here's a story for you - my quilts all seem to have stories behind them. This is a picture of the couch I said the mystery quilt I just mended goes with. Not a very good photo of the upholstery which really does have more green in it but it's the pattern that's important here. It was the inspiration for a quilt I made for a local quilt show challenge when I was living in Brodhead, WI. The theme of the challenge was Seminole, and I'd pondered ever since we'd gotten this couch about replicating that pattern in a quilt. But how to piece something so intricate? I hadn't been seriously quilting all that long, hadn't built up a large arsenal of techniques, and sat at the kitchen table with paper and pencil trying to work it out, about to give up.

And then my husband walked by, paused to observe, then said as he continued on by, "Naw, you'll never be able to work it out." Well, that was the goading I needed (as he well knew as well as he knew that I COULD figure it out) - challenge on! I used the challenge fabric in that center motif, a packet of gradated green Cherrywood Handdyes, and a few other fabrics from my stash. Not quite sure how I managed the math working out the strips that I did piece using Seminole piecing but I obviously did. It's not an exact replica but captures most of the upholstery design.

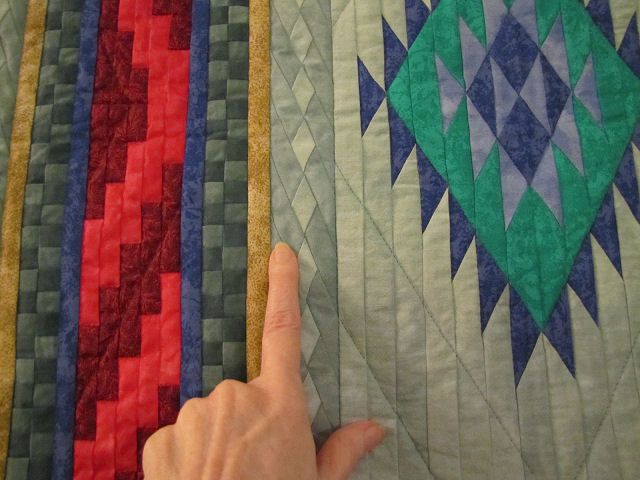
Look at those tiny pieces!

But that center motif - I just could see how it could be pieced using a Seminole piecing method. Instead, I used a modified version of Cynthia England's freezer paper template piecing method. There's even one template I missed removing - you can hear it crinkle when you press your finger on that place. I haven't had this quilt hanging in the livingroom for years though I've thought of it often, wanting it sharing space with the couch. I've finally dug it out to hang in the spot where I rotate quilts in and out. So wonderful to still love a piece this old (1996) and marvel at how I did it. I'm losing my patience for such fiddly work!

Sunday, May 22, 2022

The In Between Time

This week found me not quite knowing what to do with myself. I'd recently seen something about this phenomenon fairly common among artists. You make the big push to finish a project, setting all else aside, and then once done, you sigh with satisfaction but realize you hadn't thought about what the next project would be. You wander about, trying to remember what else you had in mind, whether it be a new piece of art or a bit of neglected housework. The driving goal that had kept you moving is gone and you've yet to decide on the next one, leaving you a bit uneasy in this in between time. Doesn't matter if your to do list is long or short, it can take a few days to find your bearings and get back to work. That's where I found myself and this is how I got myself going again, getting these plants that had been huddling in the corner of the covered deck until our nights quit dipping below freezing into their planters. Pictures of the final arrangement to come.
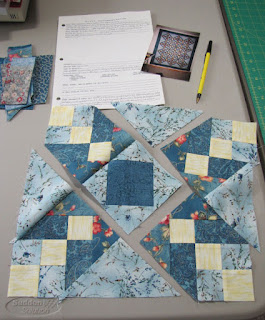
Then it was a ponder as to what my next "finish more" project would be. That set me on spin cycle so I decided to finish filling out the documentation sheet for the fat quarter quilt. That led to getting out those pieced sections that I figured were my step by step samples for making the blocks when I taught the class. Sure enough, when I laid them out, they will make a complete block when sewn together. And then what will I do with it? At least it will be out of the book.
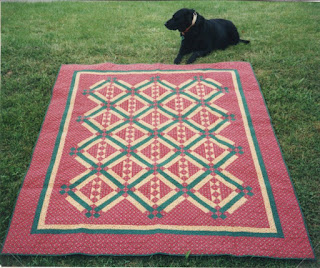
"Pennsylvania Eye Popper"

I sensed what I needed to do next before diving into another quilt project was something I'd been putting off: mending the quilting on a quilt I use all the time while I am sitting or napping on my couch. I completed this mystery quilt in 2000 and when I showed it to the group of ladies I sewed with at the time, they oohed and aahed and said "You're NOT going to USE it, ARE you?"Well, yes, actually. The colors matched my couch, it didn't have expensive fabric in it, and I really liked the pattern that unfolded as I worked through the mystery quilt directions.
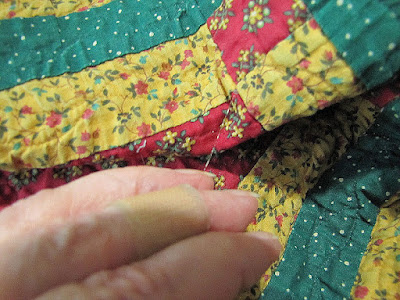
Look closely to spot the line of loose invisible thread in the center of the picture

So 22 years and several washes later after nearly daily use, it's not surprising that the quilt is showing some wear. I'd noticed lately that when I slid my had down to grab a piece of it to pull up over my lap or shoulders, a finger or two would slide right under a loop of stitching that had come loose. As time went on, I realized this wasn't just one bit of stitching, but quite a few places that had come loose. I'd used invisible thread on the top and cotton thread in the bobbin and I suppose that invisible thread was the culprit, wearing through the cotton thread. 
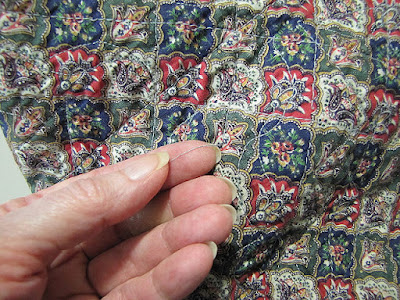
A strand of broken cotton thread on the back. I bought 2 colorways of that fabric!

I realized the sleeve on the back was coming loose as well, to the point that I finally took all the stitching out, never planning to hang it for display again. (Can you believe this got an Honorable Mention at the Ashville Quilt Competition?) Oh, I was NOT looking forward to fixing this, having worked on a different quilt whose stitches had broken for entirely different reasons. But time to bite the bullet while I still had the ironing board next to the sewing machine to rest it on as I sewed.
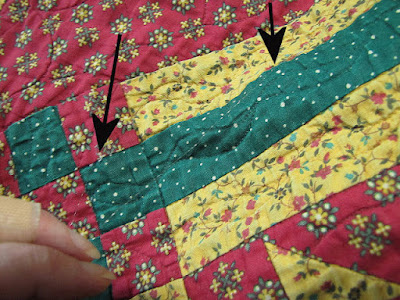
One of the longer failed stretches between the arrows. You can just make out the invisible thread looped over my finger.

I thought I'd found all the loops of invisible thread where I needed to sew new stitches and was a bit surprised to find that all of the stitches that had failed were the stitch in the ditch ones. All of the free motion stitching seems fine. Back over my legs that night, I purposely ran my hand over the entire quilt and found many more places needing mending. I tied yarn around the loops so I could easily find them when this went back under the needle. The failed stitching could be as short as an inch or as long as four. But I think I finally found them all and snipped off those loops on top. As always, click on any photo for a larger view.

I kept thinking, this is really something. I can't think of another quilt I own and have used that I've had to repair because of wear. Granted, this is some of the first cotton fabric I purchased for quilting before quilt shops with quality fabric became a thing and picked for this project because of that, in case I ended up not liking the pattern when the mystery was revealed. I even found one spot where there's almost a hole worn through one spot. I still have pieces of all of these fabrics so I could even patch it if it came to that. And I can't imagine replacing it with something new. This is my ultimate comfort quilt that I don't have to worry about being careful with. 

Also really something, my studio appears to have swallowed another tool. The curve-tipped scissors I keep by my machine for snipping threads close to the fabric were nowhere to be found when I sat down to repair this. Again, I've tried to retrace my steps, pretty sure the last time I used them was when I was burying those last thread tails on the fat quarter quilt, and have looked in all logical and illogical places to no avail. Again, I worry they fell into the wastebasket and went out with the trash. But if I stop looking, I suppose they will magically appear, just like that favorite screwdriver.

Saturday, May 14, 2022

A Name and More Shrinkage

Forgive the uneven lighting

Here it is on my bed - my fabulous fat quarter quilt nearly 20 years in the making! Yes, not much of an overhang but that's not an issue for me. I was just pleased that it dropped over the edges of the bed at the border.

It took an overnight soak in 20 Mule Team Borax and two washes with hour-long rinse cycle soaks with vinegar added to finally get all the cigarette smoke odor out. But I think I did. Didn't put it in the dryer though as one internet suggestion warned against it. Instead, I spread it out in the livingroom to airdry with a fan moving air over it. Here's the back showing the two reproduction fabrics on either side of the Dutch reproduction border fabric - I love it as much as the front!

I'd forgotten that when quilting the main part of the top, I'd left a lot of tails in the back to bury. I found most of them before the wash but found several more afterward. It's like this quilt refuses to be fully finished.

After I'd done this overall paisley quilting as an experiment, I was disappointed in it and wished I'd just quilted like I normally do - lots of stitching in the ditch and straight lines. And it bothers me a bit that changing bobbin thread to match the backing as I moved over the dark strips at the sides was not a practical option.

However, when I got it out again to quilt the border, I was surprised to now kind of like it. I was reminded of what Angela Walters always says about not worrying if you make mistakes or your stitches aren't even because when done, all you'll see is the beautiful texture. She's turning me into a believer. And goodness, can you actually see that tiny sliver of piping in the binding? Not sure what I was thinking to make it so narrow (maybe the widest I could do with the fabric left?). It's almost a conversation piece and I'm playing in my head what my descendants will make of it - lol. Certainly not necessary but all the same, a nice little accent.

All that was left now was to ink in a little information on the back. (Boy am I glad I don't have to sew a sleeve on!) I've been calling this my fat quarter quilt because its true name picked so many years ago is so very long. The original pattern was called "Hot Apple Cider" no doubt because of it cider-colored palette. But my palette reminded me of something else so I decided to call it "Blueberry Jam and Toast . . . With Eggs Over Easy!" I always use a Pigma Micron Pen when writing on fabric which is not always easy, the felt nibs catching in the weave. I've been seeing a lot about Pigma's newish PN pens - same permanent archival ink but with a plastic nib (thus the PN designation), so picked one up on a recent trip to Michael's. Oh My Goodness! It glides right over the fabric and leaves a beautiful line of ink.

Wool batting sample hand quilted on left, machine quilted on right

I'd measured this quilt before binding in order to estimate the amount of binding I would need and it measured 87" x 69" which was a little bit of a surprise. Before quilting it had measured 89-1/2" x 71, and while I am used to a quilt shrinking up a bit from quilting, this was more than usual, no doubt because of the density of the quilting. But since it has been so long since I've finished a piece that would be washed, I totally forgot about the additional shrinkage from the batting, and I lost a lot. Now my quilt measured 83 x 67-1/2. At one point in my traditional quilting journey, I got into making batting samples per Harriet Hargrave, the ultimate source for all things technical and otherwise having to do with batting. Few surprises, she offered, if you've taken the time to do a batting sample which among other things, will tell you how much shrinkage to expect when washed. I divided my samples in half, machine stitching on one side and hand stitching on the other (because it makes a difference sometimes in how much is drawn in). Out of curiosity, I dug out the one I did for the Hobbs Wool Batting I used in this quilt (above).

Total shrinkage of this sample: 6.5 - 7%

On the back side you record all the pertinent information: type of batting, type of fabric, if anything has been prewashed, starting size, size after quilting and size after washing. And there it is, a really high percentage of shrinkage with this wool batting (most cotton battings run around 3%). On a smaller piece it might not matter, but if you are planning a quilt for a bed that drops a certain amount over the sides, you'd do well to know how much shrinkage to expect and figure dimensions accordingly. You can lose 3 to 7 inches before you know it.

Over the years, I've settled into using pretty much the same few battings that give the different looks I want and that I am so familiar with how they behave so I haven't made a batting sample in a long time. I still have my stack of samples from when I was trying almost everything that was out there, and every now and then, pull them out for reference if I need a reminder of how a particular batting looks and drapes when quilted. Would I spend the time to make up a sample if I find a new batting to try? I should but I'd probably just sandwich up that quilt and hope for the best!

Sunday, May 08, 2022

A Little Spring, A Little Binding

Spring is finally ramping up although the temps are still cool and overnight it is still in the 30's. Still, that hasn't stopped the birches behind my place from doing their spring thing (above), neighborhood trees from blossoming and daffodils and hyacinths from bursting forth around the building where I went to early vote. It is all very uplifting.

Also uplifting is getting that binding on my fat quarter quilt. Here's a trick I picked up a long time ago, don't remember where, but I find it an excellent way to keep those long lengths of binding from getting tangled as you add them if, like me, you don't pin the binding on before starting to sew. You just fold the binding accordion style and thread the folds onto a large safety pin. This sits in your lap as you apply the binding, and as you need more, you just remove one fold from the safety pin.

As I turned the sewn-on binding to the back and pinned, I could view how evenly that bit of piping/flange showed. Not perfect, a few places where it is narrower than in others, but overall I am quite pleased, thinking "close enough for jazz." And I am also pleased with those corners where I lapped the piping rather than included them on the binding for a miter. If you click on the picture for a larger view, you can just make out the stitching along the binding seam which I did in a gold thread that matches the gold fabric well.

Doing the second thought thing, I wondered if I really should have done the piping between the border and the quilt top rather than in the binding. Nevertheless, it does give the edge a nice pop of color. Now for a good soak in vinegar and a wash. 

And since it's Mother's Day, and I've been back to scanning old slides, here's one from 1955 of little me being held by my mom, and her mother, my grandmother standing on the other side. My grandparents died when I was about 5 so I don't have many memories of them or photos either so this one feels very special.

Sunday, May 01, 2022

Piping or Flange?

I'd stopped by my local quilt shop to pick up some needles and got to chatting with the owner about this quilt and my tentativeness about adding the piping. She was quick to suggest that I merely needed to sew the piping to the binding so that the two could be applied to the quilt in one step. She took me over to a wall quilt on display to show me the flange that had been added in the binding. Yes, flange. She kept saying flange; I kept saying piping. Granted my piping which will show just 1/8th of an inch has no filling so may not technically be a piping, but the flange on this shop sample was very wide (more than a 1/4 inch less than a half?) so I could see why she kept referring to it as a flange. Couldn't resist a google and it appears that size may indeed be the difference between piping and flange, piping being narrow, flange being wide.

Be that as it may, I just couldn't bring myself to sew the piping to the binding first, mostly because of the bulk it might create at the mitered corners. I plan to machine sew the binding from the front after it has been turned to the back, and getting into those corners at the miters is tricky enough. But also because I don't trust myself to keep all layers even since so little of the piping will be showing. I guess it's another case of control for me. The piping is now machine basted in place and we'll see how evenly I can get that binding sewn over it.

Monday, April 25, 2022

A Little Embarrassing

A few weeks ago I got the word from the management company I rent from that there's a city ordinance requiring the flappers in toilets in rental properties to be replaced after a certain amount of time and our buildings had reached that magic number. So I was required to set up a time for the maintenance man to come by and do it to my three toilets, a quick repair, but one that made me realize I had some extra cleaning and picking up to do before he arrived. If you live alone, you understand how easy it is to let some housework slide and boy had I let it slide lately, what with the issues with my back. Plus two of the bathrooms are on the second floor with the stairs and landing having served as a dumping ground for things that needed to go upstairs or into the studio but not right away. Yeah, I even procrastinate on that and now I needed to make that stuff disappear to where it was intended. What's more, one of the upstairs bathrooms I don't really use as a bathroom since it is off the master bedroom which I use as a studio. I've delegated it for my paints and stamping supplies and boy, did I have stuff stacked all over the floor and on the toilet seat and tank where he needed to get in to work. While I've had years to hone my storage system for my quilting things, I've failed to get a handle on organizing these newer mixed media supplies. Thus, picking up and putting things out of sight in there was not unlike the archeological digs I encounter whenever I clear my work table. Oh...THAT'S where that went to. Hmm - forgot I saved those things. Oh yeah, here's something I set aside to be stenciled. And when I opened the cupboard under the sink to put away the organizer that holds among other things my paint brushes, I was dumbfounded to see a very large bottle of matte medium! I have no recollection of buying it, obviously, since I recently related to you how I gave in and bought some to try with my collage since everyone raves about it. Yeah, a little embarrassing!

Also a little embarrassing is the way I continue to drag my feet over finishing the fat quarter quilt. To be honest, I'm letting that piping intimidate me unnecessarily - not like the first time I've ever done it. But at least like the binding, it is pieced and pressed in half, ready to go. But the real foot dragging has been because of the terrible cigarette smoke smell that arose from the quilt after I dampened it in preparation for trimming. It had to go out into the garage to air for quite a bit before I could bring it back in and square it up. I'm still a little stumped about the smell, although I know it was picked up in that quilt shop where I taught the class so many years ago. The shop was next door to a bar, and even though the owner had air filters going, anything that stayed in that shop long soon picked up the smell. I know I washed all the fabrics before construction and no doubt used a little steam from the iron now and then when pressing that should have alerted me to any lingering smell. All I can figure is that it must have absorbed some of the odor while hanging in the shop, but not such that one would smell it until dampened. What a shock. Once I get the binding on, you can bet I'll be doing a deep soaking with vinegar and thorough washing before this goes on my bed.

Saturday, April 16, 2022

Easter Greetings

To those of you who celebrate, a blessed Easter. I also understand it's Ramadan and Passover, three major religions celebrating their individual major events at the same time (it doesn't happen that often). To everyone else, happy spring! Still doesn't look like spring in my neck of the woods (just south of us about an hour away they got up to a foot of snow the other day, and even more as you continue further south down the Idaho panhandle). But the arrival of these tulips from my niece, Vanessa, brought instant brightness to my days.

She sent chocolate too - how cute are these handcrafted hand-painted "eggs"? Worthy of the calories!

The tulips arrived just as this spring bouquet from my cousin Laura was starting to fade. I've been enjoying them for several weeks and they were the perfect tonic to my not quite winter not quite spring blues.

Wishing you beauty and brightness and the promise of hope and new life wherever you may be.