Showing posts with label Surface Design. Show all posts

Wednesday, October 01, 2025

Wrapping Up The Dyeing

Gads, could it really be the first of October? Seeing this tree when I pulled into the library parking lot last week left no doubt about how far into the year we are. However, I found some solace in this quotation from an essay by Joy Williams on the truth-telling of fall: 


“Fall is. It always comes round, with its lovely patience. If in the beginning it’s restless, at the end it’s resigned, complete in its waiting, complete in the utter correctness of what it has to tell us. Which is that we’re transitory. We’re transient, we’re temporary, we’re all only sometime.”
 

Another nudge toward acceptance might be the colors of the final dye runs for my friends. The reds, oranges and golds are definitely of the season. I'm very pleased with how these turned out, although the golds could have been a little deeper towards an orange. I think it's an old dye to blame.

I'd been holding back some earlier runs that had been rinsed but not put through a Synthropal wash because I knew I'd have more fabric in similar colors that could be washed with them. Here are the greens, sort of lime greens in the middle (struggling with camera to get every color right) but nothing that was very teal green even though I tried some overdyeing. On the bottom is the "teal green" that in no way is green. At the very top is a half yard dyed with some leftover purple and fuchsia dyes I think (I sort of lost track of the combinations I tried using up leftover dye solutions). That fuchsia makes it almost neon!

In the same way that my friend kept repeating "lime green" she also repeated "folded fabric". So I did two fat quarters folded different ways and put them in the "teal green" dye solution. The lighter portions do look like they are trying to lean towards a teal.

With the "precision" dyeing finished, I had fun playing with leftover dye solutions and came away with some stunners I may have a hard time giving up. This is the technique of stuffing a fat quarter into a tall narrow jar like an olive jar, covering with soda ash solution, pouring a little dye solution in and letting that set for about ten minutes while the solution starts settling to the bottom. Then pour a little more soda ash solution and another dye solution color on top and let sit overnight or up to 24 hours. 

Trying to get a closeup of the subtle texturing in the white part. 


Here's another one, the sort of thing we literally dye for.

And still with plenty of dye solution to play with, I dyed up three linen napkins that go with a linen tablecloth used at my grandparents' golden wedding anniversary reception. I've seen the pictures of its otherwise uninteresting yellow as it peeks through the lace tablecloth thrown over it. Not something I ever thought I would use but it came with a cedar chest full of other family treasures after they died and I've hung onto it out of pure sentimentality for over 50 years. But with the newfound skill of dyeing, I've often thought about cutting it up and overdyeing it, and now I know it can be done with excellent results. The upper two were done in bags, the lower one pinched in the middle to create folds falling down before putting in a glass jar.

I still have some dye solution left, and being raised in a "waste not want not" household, I feel I should do a few more one of a kind pieces rather than toss it. On the other hand, my dye powder supply overfloweth, and I have company coming in about two weeks which will require that flurry of housework in preparation. Maybe I should just quit while I'm ahead . . .

Tuesday, September 23, 2025

If In Need Of Encouragment

Blue Heron by Ellen Anne Eddy

I just read a wonderful post by quilt artist Ellen Anne Eddy and thought some of you might enjoy it too. Not to mention that it features many of her beautiful and quite different quilts. She certainly has a style all her own. Words of wisdom about tackling tasks (where are my big girl panties?) You can read it here.

I can relate a bit. That dye session for my friend looming before me was intimidating. As Ellen says of her own intimidating task, "So it sat in the corner. And I became afraid of it. I made a myth of it." I too had to reach a point where I had to find my big girl panties. And I'm having to do it again because I am not done and have ventured now into experimenting with greens and oranges, some with recipes, some without, some with dye powders that may have lost their potency. I am more comfortable when I can depend on the results. Case in point: my friend asked for teal which I assumed she meant teal green (some refer to a teal blue but not me) and I have a perfect recipe for that. Yet look at the fabric soaking in the bin pictured above. Does anything about that look green to you? I honestly don't know what happened.

She also keeps emphasizing she want some lime green. No problem. Again I have a recipe for what we named Key Lime and I mixed two leftover dyes that gave me exactly that. Then I started doubting myself. What if my idea of lime green isn't hers? When I googled lime green, these popped up, just as I suspected, more than one idea of what it is. At least my dye trial is in the ballpark.

I went back to the recipe to try again, doing two different amounts of dye solution with a fat quarter in each bag, and waiting a bit before adding another fat quarter in each bag (the dye solution activates once it hits the soda ash solution and gradually weakens over the first 30 minutes or so meaning fabric added later will come out lighter or perhaps really different). Pretty happy with the way this looks so far - gotta be her idea of lime green in there somewhere! However, I may overdye one of the darker fat quarters with a little blue to see if I can get something like teal green. May also take one of the fat quarters that was supposed to be teal green and overdye it with some yellow. Nothing to lose. 

Ellen again: "There’s no can’t like won’t, Sometimes we build myths about our work. “It’s so good.” “It’s no good.” “It will never lie flat” Almost all of that is irrelevant. I won’t know if it’s good for some while after I finish it. I need to stop the negativity and just step into the task". In between these dye sessions, I've had lunch with said friend, handing over with some trepidation the fabric done so far, and she loved it, said it was just what she was looking for. Whew! Exactly the encouragement I need to continue with this task. I am enjoying getting back into dyeing and trying a few experiments. Still fighting those intimidation demons (it's one thing to disappoint yourself, something entirely different to disappoint someone else) but spurred on by Ellen's words and the pleased expression on my friend's face..

Tuesday, September 16, 2025

Dyeing For A Friend

When a friend moved out of the area back in March, she wanted to give me all her dyeing supplies, including almost a full bolt of PFD fabric. I wanted to pay her for at least some of it, particularly all that fabric, but she'd have none of it. Instead, she asked that I dye some of it up for her, as the reason she was giving all that away was because her new home had no place for dyeing. Well, YES, I can do that, gladly! However, it wasn't until last week that I suddenly felt energized enough physically and excited enough mentally to finally tackle this task. It's been quite a while since I've dyed up some fabric so I knew I'd need to review the whole process, my notebook of recipes, and check my setup out in the garage. I initially felt a bit overwhelmed as when I asked what colors she might want, it was pretty much everything but blues. I also found the dye run worksheet from the last time I dyed and where I'd left off, i.e. what colors I had meant to dye up to flesh out my stash all that time ago. I needed to come up with a plan.

I started by inventorying my friends' individual dyes which I added to the inventory I'd made of my own dyes. Mine are oh so old now - the legacy of my late friend's and my dyed fabric business and a more recent friend's clearing of her art studio of supplies related to textiles. Even some more recent purchases I've made are getting on in years - 2017 looks like when I got them and dyed them up. Scanning through old posts, it looks like 2017 was the last year I did any dyeing except for some snow dyeing early in 2018 & 2019. Hmmm. Not like I don't have a pretty big stash of hand-dyes while my actual making of quilts, etc. has slowed a great deal which might be part of the reason dyeing has waned. At any rate, newer fresher more reliable results-giving dye powders are a welcome addition. I noted there were some I had not tried before, and those became my starting point.

I worked with half-yard pieces, using my standard 4-step gradation recipe on some and choosing select 2 steps for others. My friend indicated she didn't need a lot of lights, just mostly medium and dark values, so the 2 steps eliminated those lightest steps. I checked my old freezer bags for leaks but not very well apparently. I did six bags at a time and every time I had leakage. Guess I should just get new bags.

I got a pretty good rotation going, getting 6 bags of fabric dyeing to sit overnight each day, and while they were steeping, starting the processing of the previous day's bags of fabric. And oh look - the gloves that were fine the last time I used them to dye also now leak. Boy, soaking and rinsing takes so much time. By the end of the week and 24 half-yards of fabric later, I was totally worn out!

Results were mixed. These two were new to me and I absolutely love how the Mixing Red came out. The Jade Green not so much. Does that look like Jade to you? No, it is more aqua marine or turquoise and my friend had asked for greens not blues. 

I did 2 steps each of 3 different purple dyes: back to front they are Purple, Deep Purple and Grape. Ooo, I DO like how they came out. Hope this is not too much texturing for my friend but she did indicate she liked texture. 

These yellows were the last one I did and I'm not all that happy with the results. I think I was getting tired, a little sloppy with my measurements and not doing enough massaging of the bags. The one on top is a four step gradation from Golden Yellow dye and doesn't look anything like the swatches on my recipe. It lost all its yellow and the lighter steps may be destined for an overdye. The next one down is a four step gradation of the Lemon Yellow dye - the lightest steps may need overdying - and the last are two steps of Sun Yellow dye - a little hard to see in this picture but it's a slightly warmer yellow than the lemon yellow. 

So some successes and some disappointments - so goes hand-dyeing often. I still need to work out some greens for her - a teal green and a lime green from my recipes - and some orange and hope for the best. I've made quite the dent in her yard of fabric, will keep a fat quarter of some of these for myself and cut swatches of others for my records. But for now, I need to give my poor body a rest!

Monday, January 23, 2023

Just Take Me Out & Shoot Me . . .


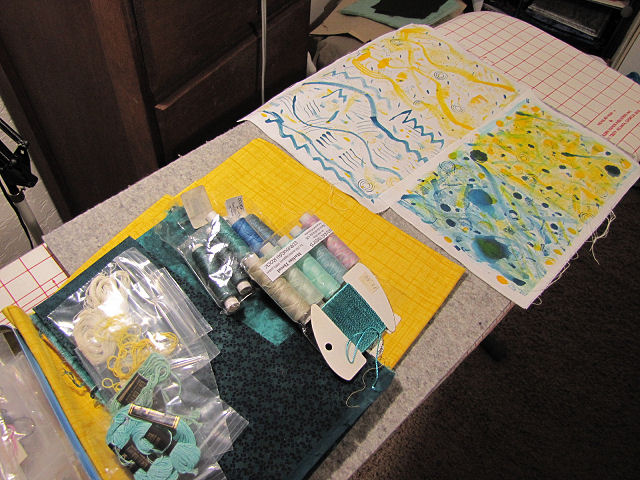
I must be feeling better. I let myself get enticed into signing up for TextileArtist.org's 5 day "stitch camp" - free of course so what is there to lose but some time? I rationalized it many ways: 1) I really do love hand stitching and haven't done any for quite some time; 2) it was billed as doable because of the way the project was divided into small segments over the 5 days; 3) I might see something new or a new way of doing something I'd already tried - you know, transferring parts to something I already do; 4) I could always just watch the videos and if nothing appealed, I wouldn't have to actually do the project; 5) did I mention it was free? Yeah, a lot of rationalization. And even though "mark making" was part of day one, something I've never liked doing in any medium, I was intrigued by the idea of "seeing things in the marks" to drive how you would add embroidery. That's pretty much in my wheelhouse, "Masks" being one of my best examples of seeing images to be picked out in stitch.

So I grit my teeth and did day one's assignment of mark making. One good lesson was the suggestion to pick just two colors (one medium, one dark) plus a light neutral. That really does simplify things. I chose teal and yellow and searched my stash for fabrics of that color as well as threads and floss for embroidery and paint for making those marks on the "winter white" kona fabric. The resulting painted fabric was of two kinds, one with dense marks and little white showing, the other with the marks farther apart with more white area. Accents of the opposite color on each area helps with a bit of cohesion. I did the dense marks first and really didn't like what I did, partly because I was learning how the paint was working with the various "tools" I tried. Before I did the less dense marks, I'd scrolled through the dedicated Facebook page to see what others were doing and spotted some really cool marks made with fork tines - I'd totally forgotten about that, so I got marks I liked better on that piece. (You can see the results and my pile of threads and other fabric in the photo above.)

But no matter, this painted fabric wasn't supposed to be a lovely composition because it would be cut into 2-1/2 x 3 inch pieces (don't ask - the teacher gave no explanation for that dimension and also said we could cut them any size we wanted). Pick and choose what to pair, looking for connections from one square to another, then overlap slightly and tack with small running stitches. Yes, no seaming here as the simple embroidery stitches suggested are meant to "blur" the joins. She was putting together up to 4 squares into a strip, but I could see others in the group were breaking from this idea of making a long strip to use more squares in rows, which is what I wanted to do. As you can imagine, after I pulled those 3 dark teal squares together as something embroidery could help make the marks flow one to another, I spent quite a bit of time arranging the other squares around them. At one point I actually had a second piece going, but dang, I couldn't help myself. I managed to use every single square in this one piece. No leftovers for this gal!

Favorite marks are the thin parallel lines made with a fork and the concentric circles from a spool end

Unfortunately (or possibly fortunately depending on your viewpoint), those of us with larger pieces immediately realized we would be adding embroidery stitches on them long past the day specified for the embroidery. But we don't really care. I enjoyed tacking the squares together, that rhythmic running stitch, and am equally enjoying pondering what to stitch where. Day 4, if one was done with embroidery, was to be time to assess the piece to see what bits of applique might be added to additionally blur joins and make the piece more cohesive. The last day talked about how to finish the piece, and I particularly liked an example where a piece like mine could be laid on a piece of fabric extending beyond like a border and where embroidery stitches could extend into it. I could see this sort of piece being framed.

This exercise of blending marks from one area to another reminded me of a quilt I made prior to 2006 I believe. A friend had challenged me to do something with a small piece of 60's polyester fabric with a bold print. I had some bias tubes left over from a Celtic applique project and they became the connectors between rectangles of that fabric, over the solid hand-dye. I'm getting a bit of the same vibe off my stitch camp piece.

Well, with watching the daily short videos and doing something each day on the piece, that took me through Friday, and knowing I could set the stitch camp piece aside, I spent some time Saturday and Sunday working on the baby quilt. Extra incentive, I was having lunch with a quilting friend today, and I'd told her the last time we'd gotten together about my plans so I really wanted to have something to show her. I completed the 4 light blocks and 8 split blocks with dark centers, plus one from the split block with the light center. Here are the rest of those blocks with their squares all arranged and ready for  joining, so half plus one done. I must admit that I feel Judi over my shoulder, telling me to quit so deliberately putting the different patches in place, to loosen up like she did once when we were on retreat and I was working on a mystery scrappy quilt. She "caught" me matching up fabrics, which I denied. She wanted me to just pull pieces out of a bag. a way of working that I do find very hard to do. So while I arranged these squares, I just told her to shush, important not to have two of the same fabric side by side! I got the impression she wasn't convinced. ;-)

Saturday, January 29, 2022

Another 5-Day Book Challenge

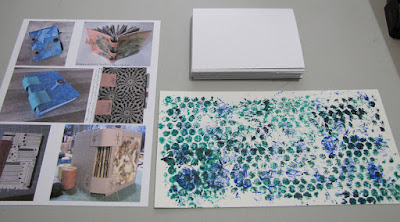
Examples of participants' books, my signatures & spine paper

I'm pretty pleased that I've kept to some of those things I wrote on my resolution word art journal page that I was sure would increase my productivity and keep me on track to do "more". This week it was the "dive into things I've been curious about but keep procrastinating giving them a try. When I watched the videos associated with Ali Manning's 5 Day Mixed Media Journal Challenge back in November, I wanted to try some kind of surface design technique on the watercolor paper that would be used to create spacers between signatures which I'd already prepared. Using bubble wrap painted with acrylic paint to transfer dots to the paper was high on my list. I've seen it done so effectively by others, but I was disappointed in my own efforts. I think I was in too big of a hurry and didn't put enough paint on the bubble wrap, and not evenly enough either for a clear stamping. Or maybe my bubble wrap had lost some air in those bubbles. I know the first piece I tried had big bubbles that flattened down quite a bit. The second transfer was done with a piece that had smaller bubbles but I had similar problems with not enough paint on the wrap I think. But I decided it was good enough because only small portions of the paper would be seen at any one time which you will soon see.

The spine which is cut the same height as the signatures is folded accordion style into 1 inch folds. Very handy that I have this 1 x 6 inch ruler to use as I guide for marking score lines for the folding.

Then the signatures are sewn into the valleys of the accordion using a 5-hole pamphlet stitch. You can see the "mountain" of the painted spine as it creates a spacer between signatures. This space will keep the book from bulging as collage elements or other things are added to the pages.

I alternated dark blue and teal green thread when sewing in the signatures to go with the blue and green paint on the part of the spine showing in the book. Not sure if you can tell that in this photo. This went under weights so it would be more manageable for the next step with it. 

Sylvia Weir's interesting paste papers

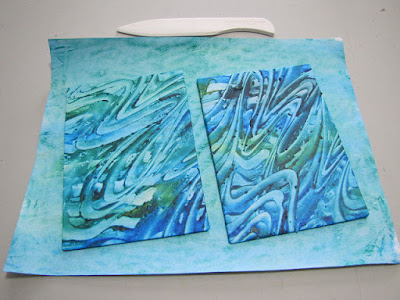
Day 4 of directions included the cutting of bookboard followed by gluing on cover papers. There aren't many, if any, people in the book club who enjoy cutting bookboard, not even Ali! It is very tough to cut and takes multiple passes with a knife to get through.  I was rewarded with perfectly square boards which hasn't always been the case. Then I got a bit too cocky and cut and glued my cover paper without rewatching the instruction video. After all, this isn't my first, or even my second time covering boards. The paste paper, the result of Sylvia Weir's experiments and passed along to me when I asked for more details when she blogged about it (not sure if this is something I want to try myself), is a little heavier than the cover paper I've used before and I didn't leave enough on the corners when I trimmed it for the turn to the back. Oh, the dreaded miter gap! But Ali has shown us how to fix this literal shortcoming and I will know better next time. The covers are sitting on another piece of Sylvia's paste papers which I will use for end papers after having spent time under weights.

Day 4 also included instructions for gluing the folds of the spine together (and why there was no point in decorating that side as it would never show.). I have had such good results in following the other thing I journaled on my resolution page - putting work in the studio first in the day - but I had a morning appointment which threw off the entire day. By the time I got to the studio, there wasn't much time left, and covering the boards took me longer than I anticipated. While the gluing process did not take much time today, I just couldn't fit it in yesterday. It too has to go back under weights to dry so I was unable to do the final steps to complete the book today as I had planned: attaching the covers to the text block, adding straps and closure and gluing on end sheets. Still mulling what I want to use for those straps anyway. I may or may not work in the studio tomorrow to complete this little journal since I often take Sundays off, but I have to add that I am pleased that I'm sticking so far to one other resolution I mentioned, that of putting away things as I go rather than waiting to the end of the project or just shoving them to one side or onto the floor. Gaining some good habits again!

Saturday, November 14, 2020

Getting Comfortable With Layering


Here's a little something I tried this week. My worktable is littered with leftovers from completed projects not worthy of being tossed and the end product of experiments I don't know what to do with. They stay on the table so they are only slightly out of sight out of mind. When searching through piles, I come across them and consider what I might do with them, come up with nothing and put them back in the pile or sometimes have a lightbulb moment. But this piece of Kraft Tex left over from a strip cut for a book cover and used to expend paint from a circular dabber I've always known needed more added to it.

Tired of looking at it and having recently gone through my collection of stencils, I had planned to use more paint to stencil something over the circles and was considering colors. I'm drawn to paint for stamping and the like but often shy away because I consider it a messy process that can be wasteful. About the time I decided green was the thing to add, I remembered this art crayon that I'd used so successfully in stenciling a pattern on Kraft Tex for yet another book cover. A slightly stiff brush is all I need to transfer the soft crayon through the stencil, and feeling totally in control (which I often don't with acrylic paint), I spent a relaxing hour working a layer of pattern over the circles.

Layering has never come easy for me. I look at what I have and fear I will ruin, not enhance it with another layer. This often is true when I get ready to add the quilting to a piece, quilt stitches actually a layer of their own adding not only delineating lines but texture that could overwhelm the designs in the top. Occasionally my fears come true, but usually I realize that last layer makes the quilt. As I forayed into surface design, I discovered I had this same reluctance to add layer after layer. Usually pleased with whatever I do on the first layer, it's hard to convince myself that adding something else will improve things, give the piece more depth and interest, even when I see successful examples in other artists' work. So this was a good exercise for me, starting with something I wasn't that enamored with in the first place so not much to lose, and seeing how much this second layer I knew it needed improved it.

You can see the stenciling and pouncing process referenced here at this blog post.

Saturday, March 23, 2019

Odds and Ends Snowdyeing

Looking back at my blog posts, I see that I did indeed do a session of snowdyeing last year, and somewhat similar to what I ended up doing on Monday - a bit of overdyeing of previous snowdyes that could be improved and a bit of folding and manipulating of undyed pfd fabric. You've already seen my snow-stacked and dye sprinkled setup in the previous post. Here it is 24 hours later, still with snow left to melt. But I can see around the edges that things looks promising. I always fear I'll get nothing but ugly results as I look at how the dye powder appears dissolving into the snow. But this time I used only two dye colors - the bright green which was so fabulous on the parfait piece, and the ultraviolet for contrast. I think I also sprinkled a little blue around the edges to use it up, or maybe some lavender. Not sure - I was winging it. It was so warm in the afternoon that I left the garage door open when I got home from my afternoon yoga class in the hopes that the sun and air would heat things up and get that snow melted!


I always have fabric in the bottom of the tub to use up perfectly good dye in the melted snow water. This time, inspired by Wisconsin friend Michele's experiments with dyeing wool yarn, I also tossed in some cotton yarn down there. You can just spy it through the plastic grating.


Finally, the snow all melted away and I was able to start rinsing and unfolding this batch and boy, did some of them surprise me! There was only one that I feel iffy about and even it has potential. (I have to warn you that my camera struggles with some colors so I've had to tweak these photos, sometimes with better results than at other times.) I'll show before and after photos together starting with some I rolled and scrunched. That method has you roll fabric around a cord of some kind and then push the fabric along the cord in a gathering motion before tying the cord to hold it in place. I remembered that I'd purchased some reusable zip ties from Dharma and decided this might be a good time to test them out.


First I tried them with the yellow fat quarter from the parfait dyeing session (seen under the zip tie package). This one I rolled on the diagonal and the zip tie was a little short to reach all the way across but I made it work and managed to just get the end of the zip tie in place. I used an ordinary twist tie from the grocery store to hold the point of fabric in place there at the middle.


And this is the result. While the yellow fabric was not a fail, I think this a grand improvement.


This photo shows the manipulations on two more from the parfait snowdyeing plus some undyed fabric. In the  upper left is another roll and scrunch, this time done end to end instead of on the diagonal with the mostly blue fat eighth. It was so handy to be able to cinch it tight with that zip tie.


And I am SO pleased with this result. I see water here. ;-)


In the upper right, I tried something I hadn't before, a way of twisting the fabric until it twists back on itself, using the mostly blue with ugly yellow/green from the parfaits (seen under the yellow scrunched in a previous photo). It didn't seem to pick up much new dye but it is altered just enough to make me like it better.


In the lower left you see a wide accordion fold which was then accordion-folded to create rectangles and then clamped to hold in place. I did NOT see this coming, although I did expect it to give me something of a windowpane effect Wowsa!


Nor did I expect THIS wowsa! Its folded before is shown in the lower right, starting with an actual square of fabric with a diagonal fold and then adding folds in the hopes of getting some kind of kaleidoscope pattern. Somewhere in my mess is instructions I'd found on how to properly fold for a kaleidoscope but I could not find it. So this is what happens when you wing it! Not sure what happened there in the middle, perhaps a fluke of the folding or how the random dye powder worked its way down, but it is challenging me to make it work anyway.


There were so many surprises in this piece, including the way there is an absolute glow of green around those outer motifs - only there in this piece.


Here's the last folded piece and the cotton yarn. I should note that I took the advice of another prolific kaleidoscope maker to do all the folding with a good press before soaking in soda ash solution. I've always done the folding when the fabric was wet and so always got less precise results. On this last piece of undyed fabric, I wanted to see if I could get lines going off in all different directions so folded randomly. The yarn (Lily Sugar & Cream cotton yarn) spools from the center so I carefully removed bunches starting from the outside and used twist ties to keep it all from ending up a tangled mess.


The yarn turned out wonderful. After rinsing, I put it in a net for the final wash in the machine. I had to replace my 18 year old washer a few months ago and this was my first chance to try it out with dye processing. I knew that if I didn't corral that yarn in some kind of bag I'd be very sorry. But even this bag was no match for the super duper spin cycle of the new machine. I had to laugh at the way multiple loops of yarn worked their way through the holes in the net. I pulled it all back in before tossing in the dryer, where it all stayed within the net.


And here it is before removing the twist ties and rolling into a ball. I love this combination of colors.

You're going to say butterfly or dragonfly, aren't you?

As for that randomly folded piece, it was the only one that I felt iffy about. It did not do what I thought it would at all. But it still may be usable - parts of it are interesting.

The ultraviolet reads more red here than in real life

Oh, there is one last folded piece, the one that was in the bottom of the bin. I didn't get a before pic of it but I just made random wide accordion folds both directions until it fit flat in the bottom. It soaked up all the dyes and amazingly, has specific areas of green as well as the ultraviolet and some colors in between. It's moody and reminds me of water too. And as I looked through this batch, I see the advantage of this kind of dyeing of multiple pieces with the same dye combination. I have pieces that I can use together rather than a bunch of interesting but unrelated ones. I've already got an idea peculating for two of them . . .