Showing posts with label Classes. Show all posts

Thursday, February 12, 2026

Are You Getting Anything Done?

Besides Superbowl Sunday and the Olympics, I haven't gotten much done creatively. Every once in awhile I've stepped into the studio for a few minutes and arranged leftover magazine pieces from the Collage Breakthrough Bonus class. But even with my new-found set of rules and eye for value over image, this one has been a bit of a struggle. Primarily, I did not have a good range of values and textures to choose from. And today I had to give up on a piece that I really wanted to include but just wasn't working. Oh yeah, I've done that pretty much all my quilting life, that trying to make something work just because I liked it so much. Old habits die hard! Setting that one piece aside allowed me to move forward, and my main goal became to strike an overall balance of the dark pieces throughout the collage. That big one at the bottom was the first piece I laid down and it felt like it anchored the piece. But as I drew things to a close, I realized I needed to have more dark at the top and in a few other places. Not a masterpiece, but I'm relatively happy with this arrangement, and will also happily dispensed with the few pieces of magazine left, and clear off the table. I feel an itch to go back to a fabric project (as my resolution of "realign" alluded to), either piecing some split nine patch blocks for a wall quilt long on my mind or finally quilting a smaller Stack n Whack quilt top that would look good thrown over the big trunk in my living room.

I've made some progress on my knee-high socks. I'm a few inches away from turning the heel on this first one. When I get to that point, I'll go back to the second sock that I paused after completing the toe and start the ribbing to the heel. But with Olympic competition having my eyes glued to the tv while I watch the sliding and figure skating, it might be awhile before I can make the switch!

Wednesday, February 04, 2026

Finishing Up The Collage Class

I've just finished the bonus class included in the free Collage Breakthrough series taught by Catherine Rains. Essentially, it was a repeat of lesson 4 but using magazine pages rather than scrapbook papers and your own papers made with a variety of methods using paint. For me it was a lesson in not being drawn to images on the page, which is the way I usually decide to add a paper to the bin, but to the blocks of colors in it. A well chosen ad, perhaps even large enough to spread across facing pages, would already have colors that work well together, and include a variety of values and textures. Printed on heavier paper would be a bonus as magazine pages can be quite thin which would complicate the gluing process. I pulled several pages from articles in our local Sandpoint magazine (couldn't find ads that met the bill) and decided on this one, because it seems to have the most variety of values with both quiet and patterned places. 

Again, we were to randomly cut a variety of rectangular pieces or other shapes from the page to be sorted into values and then quiet or patterned. I realized I could quickly do this using this Fiskar cutter. True confession, there weren't enough pieces for me to feel it necessary to do the sorting, just spread them out on the table somewhat grouped. This particular page was a challenge in terms of delineating values as there really wasn't really light areas and some of the dark areas were very close to some pieces I deemed medium. But as I worked through placements, I could tell I was getting better at it, but had to constantly remind myself about the suggestion (rule) to group not only different values next to each other but place two patterned and a quiet together or two quiet with a pattern.

I liked leaving the spacing between pieces on this one with the different spacers, both narrow and blocky, across pieces. I also liked that some of the randomly cut pieces showed discernible parts of the mammoths. It didn't make any sense to me to just think of the pieces as swatches of color. This collage tells a bit of a story I think. One downside of working with magazine pages though is the glare from the overhead light, which is why this picture of the final product is taken on the slant. I had to keep looking from the side as I worked to see what the piece I was placing looked like.

So that's that, or so I thought. My intention was to whisk the leftover pieces of magazine into the trash and clear the table of all this collage stuff. I turned the page so I could glue in the bonus class directions and the picture of Kat's demo piece only to have that facing blank page and the few mammoth pieces calling out to be used to make one more. I think I want to dispense with the boundary of a square and do my collaging to fill the entire page. I laid a few pieces out and yes, it's just like quilting and you can never quit working with the scraps!

I do think these exercises in paper have really helped improve my eye for thinking value first, which is something I've always struggled with in my quilting. Too enticed by the pretty fabric. The work with the magazine pages in particular pointed out to me how quickly I fell into old habits of not even thinking about it. I think I also learned a lot about working with and arranging odd shapes. That lesson with the floating triads was my favorite and I'm planning on doing it some more using fabric scraps in this sketchbook. I do think I can use that knowledge now when designing art quilts. It's another place where I've struggled; I'm thinking of a particular piece I've never been able to resolve that I may be able to now. So, very happy to say this was not a waste of my time. 

Friday, January 30, 2026

Almost Done With Collage Class

I meant to finish this collage from the last lesson in this series over the weekend but I wasn't feeling it. As I sorted through the paper scraps I was to use, I felt myself losing interest, tired of working with these papers and not particularly liking that we were to leave narrow spacing between pieces and then "join" them with thin strips. Even not happy working in the bigger 5 inch space. I was relatively happy with the first layer arrangement so started gluing pieces down that I was sure of, then walked away.

By Tuesday I was ready to finish this up whether I liked it or not, but something had changed since the last time I'd worked on it. Better attitude with less negativity about the spacings. I finalized the last few pieces, then idly placed a narrow strip over one section that went edge to edge. Hmmm - I think I like that. I even found a place to use two slivers trimmed off another piece, saved only because Kat had said to save even the smallest pieces. Of course, I scoffed at that at the time as I watched the demo and her tiny pieces, but now these slivers were perfect to fill a gap. I chose more long strips and a few short ones to complete joinings of the base layer and I was done - happy to have found places for some of the envelop security papers and another dark green.

Since finishing, I remembered something Kat said during a Q & A. Unlike what so many tell us to do when we don't feel in the right frame of mind and everything seems an effort - just keep going anyway - she admitted to times when nothing seemed to work and she just had to walk away knowing that whatever she ended up with when in that frame of mind would not be good work, no matter how hard she worked at it. My experience appears to confirm that. Good vibes equal good work equals happy artist! 

I've started on the bonus class so will have one last collage to share with you soon. 

Thursday, January 22, 2026

Slow But Steady Progress

I've worked on the next session of the Collage Breakthrough course (Lesson 3) over more than one day. We're still using 3 pieces of paper representing all three values and either two patterned and one quiet or two quiet and one patterned paper. This time though, we were encouraged to overlap the various shapes and not fill the 4" square totally, leaving blank areas to add "finishing touches". Still having a little trouble working in my green scraps on all so settled on the ones on the right side working together differently from the ones on the left.

So what are "finishing touches"? These are circles or Asemic writing done with gold, black, or white paint onto tissue paper so that their placement can be auditioned before gluing down. She shows how the excess tissue paper can be scraped away if you don't like the look of the shadowing effect. Well, I watched the video of the technique but had no desire to do pages of the three different colors and decided I'd deal with it later. In the meantime, I viewed how others in the class were doing this and could see how effective adding a gold accent that filled part of the blank areas and spilled over onto the collage was. Still didn't want to mess with making these. Then a lightbulb went on; I remembered a translucent plastic shopping bag with gold swirls and stars that I'd used on an art journal spread. Oh yeah! A quick answer to my problem. I quickly cut out a swirl to audition how it would work and it would work great.

I held off on finishing up this step as time was running out for watching the last of the videos before they disappear after tomorrow. Each lesson is a 30 minute recorded class followed the next day with a live one hour Q & A and demo session which is also recorded to watch later. You can guess which I do. So this week has been devoted to the two lesson 4 videos and the two bonus lesson videos plus one last video that was a cross between two lengthy "gallery" shows of student work and promoting her next step collage course which comes with a hefty price. (I'm good for now.) I had time after that last video to finish cutting and applying the finishing touches to my lesson 3 page and I'm pretty pleased with the result. I was pretty sure glue stick, which we've been using throughout this series, was not going to work on the plastic bag; a quick check proved me right. I'm pretty sure I used gel medium on that journal spread but didn't want to deal with the mess and cleanup that would generate. So I pulled out my trusty YES paste which worked nicely.

I've made a start on the blue knee high socks, finally mastering the tricky Eastern cast-on which makes a seamless join between the sole and the top of the sock. Normally when you knit in the round, it's like working back and forth on straight needles, except you go round and round without turning your work and have a hole in the middle. This cast-on eliminates the hole which would have to be closed up later. Since I discovered I had two sets of the required size of needles, I decided to work on both socks at the same time to more easily end up with soles and tops the same length.

Increasing stitches from 8 to 56 for the toe - ready to start ribbing

I'm working on being a little more balanced with how I spend my days. I'm so guilty of being all or nothing when it comes to things I want to do, which means I'll lose track of time when I get engrossed in something which then leaves no time in the day for anything else. And if I don't perceive that I have a big chunk of time to do something, I end up not doing anything at all. It would be easy to get to the end of the day, look over at my knitting and sigh, thinking there's no time left or I'm too tired. But I'm working on snatching small moments in between the big ones. The knitting on the socks is getting worked in this way: a few rows after breakfast before heading upstairs, a few more after lunch while watching one of my news shows. More in the evening if the shows I'm watching don't require my rapt attention while dealing with these increases. While some days I may be spending an hour or more on the collage class early in the afternoon, I also have found myself unexpectedly drawn into the studio for a few minutes to pull a few paper rectangles for one square on the page before continuing on to where I was originally off to. I'm also finding myself grabbing a small project like updating the blank book I'm using to record my yarns and care instructions in order to add one or two things while watching the tv.  I can get a lot done over the course of the day if I just become aware of these odd small moments and what I might fill them with. Very gratifying.

A part of me wants to knit all day sometimes - that all or nothing tendency I have. But I have other things to tend to as well, that need to balance my time throughout the day. As I think about my resolution word of realign, that need to find balance may be key. All or nothing just won't do.

Wednesday, January 14, 2026

A Broken Promise

Collection of papers including some from sample packs of Khadi papers

Not long ago, I made a promise to myself that I would quit being lured into spending a lot of time on free classes All those hours watching Sketchbook Revival videos over several years were the prime culprit - mostly enjoyable but not always useful to me personally, yet I felt obligated to watch them all. And then there have been the Laly Mille freebees, just couldn't stay away because collage and art journalling are things I'd like to master better. Most recently I think was the "year of light" taster on FB - not unlike the Sketchbook Revival series but an absolute slew of artists, but this time I was more prudent about which videos I watched and did not actually do any of the lessons, just took notes and printed off info. That's it, I thought, no more falling into the trap of signing up for classes just because they were free. However, in a weak moment in December, I followed a recommendation that came via e-mail to sign up for Catherine Rains Collage Breakthrough FREE multi-session class running for a couple of weeks in January. The thought was I could always opt out if I got into January and felt too short on time or stressed to do it, but it did sound like a good opportunity to learn more about collage which I still struggles with. 

I print out instructions to add to sketchbook

This is not exactly quilt-related as my previous post might have implied I'd be realigning to, but perhaps quilt-adjacent. After watching the welcome video, I could see Kat was presenting a different more structured approach, incorporating design principles a step at a time and in small formats with the emphasis of ending up with individual collages that were also cohesive with each other. Pick two colors from a cool palette or two colors from a warm palette to work with on all collages throughout the series. Separate your piles of papers into patterned and quiet papers, then each one of those stacks into light medium dark values. Just that exercise alone was instructional. Then start small with 2 inch penciled in squares to fill with just two pieces of chosen paper - one "quiet", one patterned - of different values, using a glue stick.

auditioning placements, temporarily taped in place

I'm working in a Mixed Media Sketchbook a made back in July of 2023. That's one of the problems with being in the book club - so many of those projects produce blank books that sit on the shelf waiting for a purpose. So it is pretty delightful to finally put it to use. It's designed with spacers between the signatures to allow it to expand as layers of collage are added to the pages. As the squares increase in size to 3 inches, I had to work over the center of the signature but it wasn't too bad. And now we are picking three papers that go together, one dark, one medium, one light, either two quiets and one patterned or two patterned and one quiet. All the while, you consider how each trio works with what's in the squares beside and above/below, and trying not to put the same orientation of the pieces as are in adjacent squares. Kat suggested maybe wait to glue down pieces in a square until all squares are composed in order to give the option of changing your mind as you go. These little pieces do scatter quite easily so I found it very helpful to use removable scotch tape to hold them together and to the spot they may reside in.

Compare to in-progress pic to note changes I made

Although Kat kept correcting herself whenever she said "rules" rather than "suggestions" or "recommendations" (heaven forbid anyone feel constrained . . .), I'm a strong proponent of learning rules first, and I am grateful for these simple ones she put forth that provide some structure. I so often let all that fabric I get out to work with overwhelm me and I do not always make the best choices when putting together a quilt be it traditional or art. I think I can use what I've learned here to make better fabric choices. I also like filling the squares in a sketchbook. With fresh eyes the next day, I could study what I'd done and what perhaps didn't work so well, While choosing pairings, I noticed how easy it would be to go monochromatic even though I had two colors (blue and green) in my piles - had to keep reminding myself to grab some green now and then which I could see made the grid groupings more interesting. When I moved on to choosing three papers, I sometimes caught myself choosing all patterns or a value too similar to another as I gravitated towards ones I really liked. Making a switch did make for a better coupling, one where I could instantly say, Yes, I really love that - which Kat encouraged, that intuitive instinctive knowledge over too much brain thinking.

Two more sessions to go as we move up to four inch squares and make a final single collage at five inches as we continue to work with the papers originally chosen and learning how to use even the smallest scraps that we've been encouraged to save. This has been fun and educational and can be done with fabric scraps as well which I would like to try. But just like when I'm surrounded by fabrics and cutoff pieces when constructing a quilt, my table is a mess of piles of paper that I will be glad to clear away soon, making room for a "real" project.

Wednesday, September 25, 2024

Sucked In Again

Someone should create an app that blocks all e-mails and websites offering free things, at least things related to art and crafts. I was going to make more trinket bowls but the free Year of Light Taster sessions I'd signed up for a few weeks ago out of curiosity suddenly started, and there I was, committing myself to nine days of art videos that would then disappear. I checked out how things were set up and found it very much like the Sketchbook Revival I participated in twice: A host artist (who I was familiar with from her videos on Sketchbook Revival) and 4 different artists a day presenting their classes in videos lasting anywhere from 20 minutes to an hour and a half. At least with Sketchbook School we knew we'd have a week or so following the last presentations to catch up or rewatch videos, but this taster kept stressing that all would disappear after the last day of videos. Not to worry though, the host said, just purchase the year-long "Year of Light" and you would have lifetime access to these videos plus all the other videos that would be shown during the year. I didn't check out the price of that but you can believe it is hefty, and hefty enough that the host was offering a 25% discount and payment plan. Wow . . .

Well, I got to watching. Techniques taught were predominantly watercolor with a few using acrylic paint or pastels, and a few teaching drawing skills with pencil. There was a little collage and mixed media that I found interesting, and my fave Laly Mille showed a transfer technique unlike what I'd seen before (and am anxious to try). The quality of presentations varied widely, some very fussy and having you sit through slow application of paint and layer after layer to reach the desired result, something I had no patience for, some I skipped because I'd been exposed to them in Sketchbook Revival, some good but could have been edited down, and some very well done and informative. I fast forwarded through a lot of them, and the ones of interest I watched clear through, taking notes on the printouts provided. Unlike during Sketchbook Revivals where I watched and did almost every lesson over the two weeks, I had no time to actually do any of these lessons, but would like to try the ones I took notes on eventually, hoping I can remember and make sense of the notes since I won't be able to re-watch any videos.

My brain was reacting differently from other times I've watched videos like this, it seemed. When I'd run across videos either too lengthy or not well done, I'd question if this was a good use of my time. Even on ones that interested me, I caught myself thinking how much easier some of the effects could be done using fabric. In fact, one session painting a night sky with moon and bare branches stretching across and over the moon, I HAVE done in fabric, more than once. And one showing how to paint bubbles with acrylic paint reminded me of the bubble prayers quilt I made using sheers and metallic thread for the bubbles. Feeling confused, I started to question why I was even interested in wielding a paint brush, except that I have all the supplies and it's a newish, unmastered technique I have dabbled in.

And all the while, I felt the pressure of time, knowing these videos would be going away, and feeling a certain anger at something presented as a fun, get a "taste" of the real thing which was simply a marketing ploy. Whenever someone shared that they'd been sick or busy with work or other life intervening things and "behind" or even not having been able to watch a single video, the chirpie Host would say, don't worry, just buy the year long class and you'll have lifetime access to all, or to those saying how overwhelmed they felt, you don't have to do every lesson, just pick a few. Nope, you certainly don't have an understanding of the people who would sign up for this sort of thing. We would want to take full advantage of such an opportunity for free classes. 

Granted, Sketchbook Revival is a bit of a marketing tool as well, but it is giving the opportunity to artists to showcase what they have to offer should one decide they'd like to pay for a class from them, but the main thrust is to get people using their sketchbooks again and giving them ideas of how to do that. This taster didn't feel that way to me at all; no, this was buy my pricey class, gains for you secondary.

By the last day which was yesterday, I have to say I was pretty burned out, watching or skipping through all those videos for nine days straight, and losing interest in the last set, asking myself the important question of how would I use what I might learn here and am I even interested in learning how to draw or paint the object shown? (No, I do not want to paint a fox. No, I do not want to sketch a bird.) I did watch two more but was glad I was done. Also getting overloaded with so many people posting their renditions of the lessons in the Facebook group even though some were quite good. In fact, I had to chuckle that a few came out better than the teacher's. In the end, the host relented to the cries of give us a few more days and did tack on 5 more days of access to the videos. Good on her. But I've seen all I need to see I think. Back to trinket bowls . . .

Thursday, April 25, 2024

Art and Not Art

 
Late in posting about my week of Flower Flow because of an annoying computer glitch taking hours of research and trial & errors to fix the problem. I am nothing if not stubborn and determined when this happens, and I am happy to say I appear to have found the fix and the old computer is speeding along doing everything it should. So that's the Not Art part, along with my return to knitting. After the bumps making that pair of socks, I found myself hesitant to dive into a sweater project, so I eased into it by swatching the three stitch patterns for the sweater. In all my previous years of knitting, I don't think I've ever knitted up a test piece to check gauge, just trusting that if I used the type of yarn and size of needles required, everything would turn out the right size. That may be why one of the sweaters I knitted for my tall husband with the long arms was so oversized that it could have fitted a linebacker over all his gear! I was pleased that this swatch showed I was right on gauge and the stitch patterns easy and providing a little interest. I've started the actual sweater now with the recently purchased mill end wool and am enjoying having my hands busy in the evenings while watching TV.


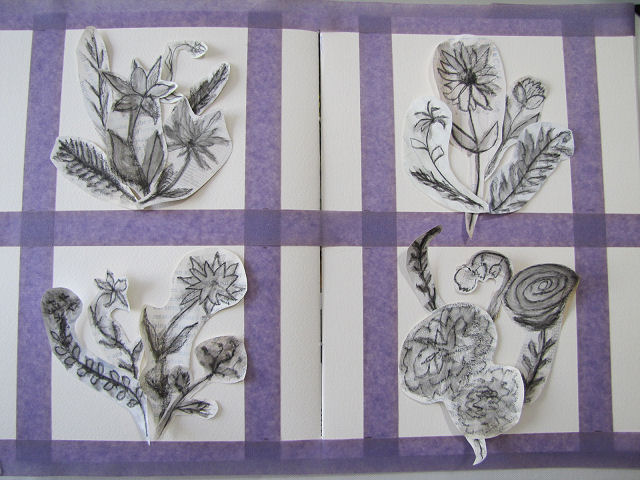
Now for the free workshop,, Flower Flow. This is the first section of the full class Laly Mille teaches, what they are now calling a "taster" with the idea that it might entice you to buy the course. I promised myself that this time I would not let any stage upset me, that I would stay open minded and not worry about my results. I allowed myself to have fun, and up until the very last step, it was fun. It started with "doodling" flower shapes with your non-dominant hand on papers that had been gessoed. I used some pages out of an old book and some blank receipts. I've never liked sketching exercises having you use your non-dominant hand but Laly demonstrated the difference in look when compared to ones made with your dominant hand. Not going for realistic here, not looking at reference photos, and using water soluble pencil and charcoal pencil that would be activated with gel medium to smudge and seal them. This was much more fun than I anticipated and the activation was magic!


Next step was to cut or tear out the individual flowers and pick favorites to gather into 4 groups of posies which you could then audition on whatever you were using for a substrate. Rather than cut 4 pieces of 5 x 5 watercolor paper as I did for the last class I took from Laly, I decided to work in the big art journal sketchbook, taping off 5 x 5 inch areas to work in. Later you will see my arrangements changed a bit when gluing them down and I wish I'd checked this photo at that point.


Now to add some color to the bouquets with pieces torn from magazines. You can see I have a bit of a pink hangover yet from the color challenge with Laly. Can I help it if the first things I ran into as I sorted through the bin of papers were the pink leftovers from that challenge? I wanted to use the big rose but at this point didn't know which group to add it to.


Finally, we get to do some collaging, the thing I want to get better at. I heeded Laly when she said this was just to add a little something to the page and some texture, so I didn't go hog wild covering every inch. Besides, I had that feeling that little of this would show in the end. I just repurposed some of the scraps torn off the doodle flowers.


Laly always adds paint to soften and blend this stage of the collage. I just can't get the hang of this even after watching her do it several times. Again, I told myself not to worry because I was pretty sure this layer would be covered up. (I was right.) Still, good practice. And if you look closely, I used a neutral color of paint all around the edges like a frame which did still show in the end (although I wished I'd used the other color I was considering which was more like the dark yellowish papers).


Time to make the final arrangements of the bouquets and adhere them with gel medium. I could feel myself tensing up as I'm not comfortable with my arrangements not going down exactly as I've carefully put them together but I had to shake that off and be happy with the outcome. After all, this is supposed to be play, not some masterpiece. And this arrives me at the awkward teenage stage, the place where you look at what you've done and either think it is a hot mess (not what I was thinking) or you know it needs more but may not be sure what (exactly what I was thinking). Laly gave instructions of what to be looking for to change and improve, contrasts in value and shape to add, even permission to paint out what we didn't like, add in more collage elements, pencil in stems and leaves we might have collaged over. I started with those small strips of pink to balance out the strong pink collage elements. A good start and followed Laly's suggestion of adding some straight elements to contrast all the curves of the flowers.


At this point, I knew I had to walk away from it for a bit. Had a lot of racing to watch over the weekend anyway. When I looked at it again on Monday I thought, not so bad after all. And I'd had some time to think about what I might do to improve it. Most of my flowers were pretty smudgy grey and Laly says she almost always adds some white or black as a final touch, so I whitened up some of the darker flowers with white gesso (the white gel pen and the white Maribu art crayon were too translucent). Then I wanted to "pink up" some of the other blooms and add green too which I did with my Inktense pencils, so inspired was I with what happened with the water soluble pencil. Really rewarding seeing the dull color come to life when a wet brush is added. Finally I used a black micron pen to clean up some of the smudged or covered up with paint outlines of the flowers and leaves, penciled in one small bud on a stem, inked the words "bloom, blossom, flourish and grow" on the pink horizontal strips and spattered a little green ink over each. I'm really quite pleased with the outcome. Click on the photo for a bigger view of details - I've left that photo larger than usual.

My worktable looks a lot like it does after a quilting project is complete, only it's scraps of paper, glues and paint that needs picking up and putting away. Several people taking the class commented that now they know the value of saving every scrap of paper while I was thinking this is just like quilting where I can't throw out a single scrap of fabric. There are leftover doodle flowers too, two that I really like but are too big for the 5 x 5 format, some that could go into another arrangement, a couple I really should just toss, and Laly mentioned that the too large ones could just go on larger paper while the other leftovers could make yet another smaller piece or on the front of a card. I think my too big ones may go on another page of this sketchbook with background collage that is not hidden from view and the others into a posie that could go on a small book cover. We shall see. For now, I should move on to the baby quilt.

Wednesday, April 10, 2024

Tidying up and Some Organizing

Taxes are done but I do need to gather up my copies and documents into a manila envelop for filing away, and tossing what doesn't need to be kept. There's always shredding to do as well - old bills and things no longer needing to be kept from the oldest tax file as I add the most recent one to the file box. But that can be done in bits and pieces. I got distracted when on the computer and decided it was high time to do some organizing of my photos, moving some into files and deleting others. These are the sorts of things I put off but irritate me whenever I access my two main photo files - one where I download pics off my camera or the internet and one where I temporarily put photos I've readied to upload to the blog before moving them into more permanent files. Both become a cluttered mess if I don't keep up with deleting and moving to appropriate files. Think of it the same as the piles of clutter on my worktable. However, one type of filing I do seem to keep up with is the organization of what I print out in the course of making books. I have two books made with those disks that allow you to add and remove pages, one for the monthly bookbinding instructions and one for the challenges and extra info like how to make bookcloth. Besides printing off directions and what the sample book looks like, I also like to print out any books others in the group have made with ideas I think I'd like to incorporate should I make the book again. There in the picture above is the latest challenge instructions and inspirational books duly put away.

This left me with a couple of quick finishes I've been putting off but will help with clearing off work spaces. In the course of going through the fabric stack that came off the floor when I had the rug cleaned, I ran across a few of these hot glue medallions I made back in 2019. Really liked the idea, wasn't sure how to use them. But the one I'd painted with the muted violet paint said, "How would I look on the cover of that "First Journal Challenge" book? I'd always thought it needed something, so auditioned the medallions, letting each sit for at least a day's worth of considering before settling on the violet one which picked up the same undertones as in the wrinkles across the paper. Wasn't sure about how to attach it (was NOT going to fiddle with my hot glue gun) and defaulted to PVA glue. If it doesn't hold up, I can always try something else.

And then there was the closure on the 2nd Celtic Weave Journal. I'd run the choices past members of the Handmade Book Club and of those who responded, all went for the wide flat elastic over the narrow green one. I was leaning that way too and felt it would attach well without leaving any lumps. First off was determining how far to cut the slits from the top and side. And of course, I cut the slits in the flap instead of the cover - I've been making all sorts of small mistakes like that lately. Fortunately, the unevenness of the handmade paper camouflaged the cuts which were on the inside anyway. Then I inserted the ends of the elastic (see arrows), securing them with Fabri-Tac.

Now I could cut pieces of double sided Scor-Tape to length to attach the flaps to make packets. Here the protective paper is ready to be peeled off.

And here is the flap folded over, adhered top and bottom to make the flap.

This is essentially the same type of closure as on my commercially made book I'm currently using for quotations. I like that the elastic does not go totally around the book.

And the elastic really does match the color of the leaves embedded in the paper. I may have made the elastic a bit snug, but I do know how elastic tends to give over time, and this is a book I think I will be adding to over many years.

I did spend some time yesterday on the resolution word art journal spread, trying to do some blending with paint and adding a few more strips of paper here and there. I'd like to get it finished up because I am taking another one of Laly Mille's free five day classes starting next week, more practice in collaging, and instead of using 4 individual small pieces of watercolor paper as she suggests, I think I will just work in this large art journal. It's a good deadline for something I think I have dawdled over too long. I definitely got stuck in that "awkward teenage stage" and can tell I am still struggling with not wanting to cover things up once on the page. But I think I had a bit of a breakthrough yesterday and am eager to proceed with my most recent thoughts. Will share when finished!

Tuesday, September 26, 2023

Succumbed Again . . .


I have plenty enough to keep me occupied, but say "free 3 day workshop" with an artist I follow and try to learn more from on the subject of mixed media art journaling and collage, well, I can't help but sign up. Knowing how Laly Mille presents these workshops, I knew what I was getting myself into time wise and that with each workshop being recorded, I could watch the videos according to my schedule. And my weekend schedule was full of motorcycle racing! Thus I haven't gotten very far on doing the actual work, but I'm already finding this Abstract Color Challenge to be helpful. I figured if nothing else, sticking with her direction to choose just one color plus some neutrals to work with would help simplify things so I could focus on other things. As you can see from the photo, I chose pink, not because I find it difficult to work with or a color I don't particularly care for, but because, unlike my go to's of teal and rusts, I tend to stereotype it as suitable for girlish quilts, not "serious" work, and difficult to sell if used in an art quilt. Time to get over that and see what I can do with pink.


I was surprised at how very much mixed media supplies I own or have pulled from magazines that are pink. Lots more to work with than I thought I would have. But before doing any work on the small 5 x 5 inch pieces of watercolor paper that would make up the series we'd be working on, we were to fill out a questionnaire about color. No, not questions like what are the three primary colors or what do you mix together to get green. No, it was more assessing how we work with color in general, what are your favorite colors and why, and when and why do you try new color schemes or combinations? My answers inveritably hinged on my experience working with fabric, but also pointed out my stumbling around with paints and what colors to have in my collection. She also sent us this link to Color Meanings which had a lot of info new to me. You might enjoy checking out what your own color preferences mean.

Next was doing some journaling in pencil across our watercolor squares, where I addressed pink directly, admitting that I love seeing pink sunsets and of course pink flowers as well, so why not more pink in my art? Day two we could start choosing collage papers and as usually, I floundered. Such a tiny space! She said it was so we would not be intimidated but I found it intimidating anyway because I always have such big ideas and big pieces of collage designs and have difficulty cutting them up/down. I had to sleep on it. Doing my usual mulling before dropping off, I came up with an idea and plan and got it going the next day. Needing to give it more thought and watch more workshop videos, it has sat in what Laly calls "the awkward teenage phase". Oh, yeah, lots of awkwardness there but with her next steps suggestions, I can see how to get past it now.


In the meantime, the birches out back have given way to autumn and our cooler weather, as have other trees in the neighborhood. We are to get quite a bit of rain this week so spending time reading and working on the challenge and getting back to sewing should be easy to fit in (she says with a laugh). I leave you with Susan Gaylord's wish:

"May autumn's bounty sustain and comfort us as the days shorten and the light recedes."

Sunday, March 19, 2023

My "Hope and Freedom" Art Journal Page


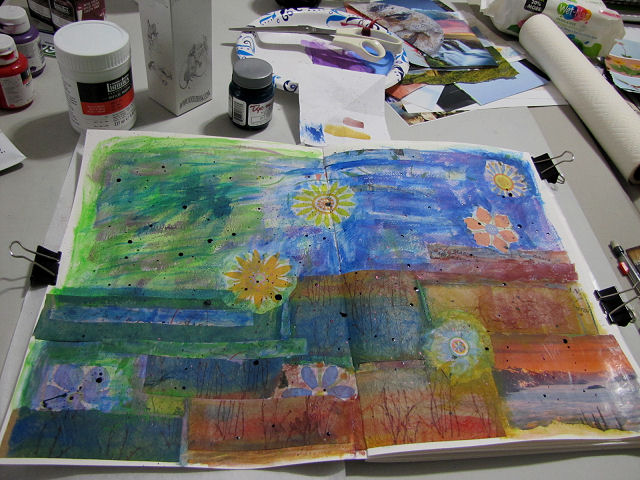
Well, here it is, finished at last, my rich and image-laden version of Laly Mille's retreat theme of "choosing a focal image evoking a feeling of flight, lightness, hope and freedom in your heart." My "dream" for my page was to revolve around my desire to improve physically enough that I can get back out on the trails and even travel a bit; that's my idea of hope and freedom right now. I'd originally wanted to use a particular moon image, but it ended up being too big and just not right for everything else I was doing. It dawned on me though, as she suggested birds, butterflies, dragonflies, kites or even balloons, or perhaps something that is akin to a talisman, that my encounter with a blue heron when I lived by the lake became a symbol of so many positive things for me. I hunted through my bin of ephemera and came up with a heron to add to my page.

In contrast, I can't help but share with you Laly's finished page, which might help you better understand why this became such a struggle for me. I honestly didn't care for it very much, not nearly like I cared for other of her pages I'd seen. There were so many things I couldn't buy into for my own page. Like those flowers, growing from the "seeds of our dreams" represented by dots of paint in the ground portion. I did however extend the reeds stamped on my "ground" papers where they had been cut off.

In her wrap up session, Laly summarized the three steps she'd taken us through: working intuitively (I'm so poor at that - I usually have concrete ideas in my head), working intentionally (that's more me and this part went better), and finishing touches (a chance to step back and see what needs fixing, adding details and magic, no more big decisions - well, I'm not sure I was there yet on the no more big decisions). The first thing I realized when I stepped back was that she had worked all the way out to the edge of the page and I had not. It was a place I could add light as she encouraged, framing a bit with the bright green on two sides and the ocher yellow on the other two sides. Then I inspected the images I'd laid down, noting that even the ones with torn edges (which I never thought I'd do but really grew to like the look) did not look integrated, but just stood out too much. I worked a little green around the edges of the heron image (and also went over the gray lines of heron itself to help it show more, ditto on the legs and reeds) and got very brave in trying my hand at extending out the waterfall with acrylic paint. Somewhat successful.

On the other side of the page, I had that square of the hiker standing between two trees and my attempt at blending with paint wasn't getting me anywhere. Then while watching that extra page Laly timelapsed for us, I saw how she dealt with the same thing by collaging along the edges. Shortly after, I came across some pictures in one of my magazines that had ferns just like the ones in my image. Sure enough, I could tear portions of them to add on two sides to extend out my image and blend it better into the background. If you look closely at the larger image, you can just see the torn edges of what was added. Hard to believe that little bit of added fern made so much difference.

Here's that timelapse page of Laly's, much more of the style I like and what I'd hoped she'd be teaching. I don't so much need lessons on art journaling as I need more help with the technique of collaging. But one of her bits of encouragement to just walk away when stuck and come back later with fresh eyes turned out to be very valuable as my time "ignoring" what had become a frustration became time when new ideas and solutions like this one presented themselves.

Another example: Perhaps my favorite part of art journaling is adding text, and I was chomping at the bit to do so. While waiting for the retreat videos to be posted, I'd torn some pages out of the altered book I've been working in, laying them on the table (cardinal rule of multi-media work apparently is throw nothing away). In one of those serendipity moments, I looked down at the page on top to see the first sentence of the first paragraph starting with the words you see above. Oh yes, this was going to be the central text of my page. It really spoke to me of changing attitudes and seasons and how soon the snow will suddenly be gone and it will be warm enough to hike. The flower from the tissue paper I'd glued in the middle of the page for some reason but never got covered up as I'd hoped now became the sun with the addition of the collaged swirl, outlining of the petals and some yellow paint. But I'd not settled on anything else for text.


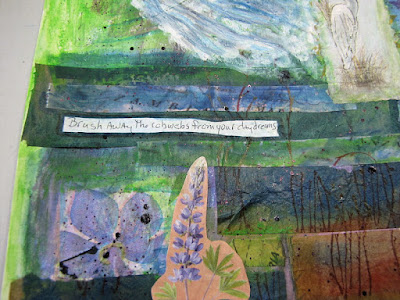
And then during a break in working on my page, there I was in the car, listening to a Moody Blues cd and I heard the perfect words for the rest of my text additions, and the perfect encouragement for my slightly gloomy demeanor lately as I wait for healing and good weather. A few more "fixes" with colored pencil here and there and I decided I was done.

In the end, I did much of this my way, but really did appreciate what Laly had to offer. I took the plunge to try incorporating a lot of different mediums to learn more about them and if I liked them (I still really like those Marabu Art Crayons, need to learn a different approach to acrylic paints, love how much better gel medium works as an adhesive than the thinner matte medium, enjoy Art Graf water soluble blocks over watercolor paint, never would have thought to use colored pencils had she not mentioned them, was pleased with the way both Micron pens and my fountain pen worked over the gel medium but drops of either ink or Dynaflow paint took forever to dry). I laughed at her description of that middle stage when you get stuck as the "awkward teenage stage" and that you just have to quit listening to the inner critic and either focus on what IS working or just go away for awhile. And ultimately remember that "art journaling is a time for learning and for growth. It will make you a better artist." I will have to add that to my reasons for art journaling, which have been mostly to get a thought or concern onto the page with something other than writing. Finally she stressed that these pages are not for masterpieces (and mine surely are never that, even when successful).

I'm sure you've run into plenty of references to the inner critic, but I'd not heard it described quite this way before and loved the image it evoked: 

"Sweet voice of the inner critic! This little gremlin is the part of your brain whose job it is to keep you safe from change, ANY change, even positive change. The best way to silence it is to keep going, keep showing up, take action and get creating."

Oh my gosh, the gremlin sure has my number because I really do hate change! Pretty evident during this retreat too, as I kept fighting against suggestions and directions I didn't want to take. It was all better when I took a break and quit fighting back. Will try to keep everything in mind that I experienced and learned when I dive into my next art journaling page.


Monday, March 13, 2023

Progress and Some Theories


My first layers "hot mess"
 
“I begin with an idea and then it becomes something else.”
― Pablo Picasso
 
So encouraging to run across this. It definitely describes my creative process. And it particularly seems to be true about my art journaling. I've been mulling over an idea for a page in the altered book I've been working in, collecting a few images and words, wanting to try something for the background layer and then topping it all with a translucent napkin layer like was taught in my Handmade Book Club recently. It's kind of a negative theme, a group of things that I think I want to buy, would look good in, an opportunity to travel. And then I realized, none of this is going to happen so I might as well be realistic about it. A case of who am I kidding. Thought I'd use this for my retreat art journaling page. But wait, Laly wants us to dream, dream big, bring light to our pages and maybe surprise ourselves when the dream comes true. Ugh. Not the mood I'm in at the moment, but I resolve to play her game. I think about being able to get out on the trails again, and even to travel a bit now that I've had some work done on my back. Spring is not here yet so I still have time to heal more, hoping I can indeed do some of these things I did all the time before the pain stopped me.

Example of painted and stamped papers, only willing to spatter with ink

But as you can see, even following her bright and supportive and inspirational guidance, I ended up with the same dark overall appearance that shows up in a lot of my work instead of a more light and airy look. (She kept saying not to worry at this stage - if it looked like a hot mess, then you were where you were supposed to be!) And as I progressed through the videos I realized I'd been adding steps before they were presented, an overlapping of instructions. And both made everything else about working on this page harder. For instance, my chosen collage papers made a lovely little vignette across the lower half of the page when I was supposed to be choosing strips and bits to create "texture" and then paint and draw over them. I do not want to paint over these nor add much over them. (A big thanks to Kathy Loomis for her comment on the last post mirroring my own feelings about this practice of "disappearing" beautiful papers and images.)  Her own page was so different from others I've seen her do and I didn't care for it much, but I still let her get into my head, influenced by the composition she was developing even though she kept saying not to copy her exactly. My original idea envisioned multiple images clipped from magazines scattered over the page; she only required we use a single focal image pretty much centered. Ah me. So it was a frustrating week that at times left me totally undone and the page is still not totally finished.

A saving grace: in her wrap up video, she showed a time lapse of another page she'd just done and it was exactly what I thought she was going to teach but hadn't (perhaps she felt that technique would be too complicated for many of the students trying out art journaling for the first time?), and I picked up a few ideas of how I can improve the things about my spread that are still bothering me. And she has this thing about wings representing your creativity taking flight, so her last little ritual was having us close our eyes, focus on our shoulder blades, and feel our wings. "Are they starting to flutter a bit, open up?" she asked. Ironic smile from me. I didn't want to make her feel bad by responding that my wings felt a bit crumpled, maybe even with a few holes in them. ;-) But learning has happened, sparks and epiphanies emerged seemingly from nowhere, soaked up her positivity and encouragement, and I'll be showing the results soon.

Before I ran across the Picasso quotation, I'd been over on Austin Kleon's tumblr where he posted an "In Conversation" video you might find interesting and talked about The Centre For The Less Good Idea, pulling this quotation off its website:

"Often, you start with a good idea, It might seem crystal clear at first, but when you take it off the proverbial drawing board, cracks and fissures emerge in its surface, and they cannot be ignored. It is in following the secondary ideas, those less good ideas coined to address the first idea’s cracks, that the Centre nurtures, arguing that in the act of playing with an idea, you can recognise those things you didn’t know in advance but knew somewhere inside of you."
 
And yeah, this has always happened to me and I used to fight it, determined to make that good idea work even when I could see it wasn't. A longer version of what Picasso said. And I am hoping this is what's happening with my journal page and the others that are already brewing in the back of my mind.
 
I also found interesting because it happens to me all the time, his post about "We all have three voices." How often does the voice inside your head (the thinking voice) compose a perfect few sentences but when you go to write them (your writing voice) or speak them (your speaking voice, you can't capture those exact thoughts in those words again? I can definitely see how this relates to the difference between your good idea for a work of art and what actually tumbles out into reality. Funny things, our brains.

Monday, February 27, 2023

A Hodge Podge Week

There was focus. There were diversions. But things got done. I made my final choice of border quilting design for Naomi's quilt. Was intending to do the one on the left but it ended up not being wide enough, so I opted for the more elaborate one on the right which is the perfect width . . . and has hearts! I cut strips of the quilting paper, folded it into fourths accordion style and taped one end over the design. As I finished tracing that section, I folded down the next quarter and continued tracing, repeating until the entire strip had the design transferred to it. This length is for the side borders.

Then I unfolded it and taped it to this cutting mat, laid a blank strip over it, taped it in place and traced the design onto it. (And discovered a glitch in my method of transferring from the book which resulted in several of the heart loops being stretched - but I like it.) Repeated one more time for a top border which was longer to include the corners. And that is where I got stuck. No matter how many times I tried, how many breaks I took, how much mulling when not in the studio I did, I couldn't figure out how to turn the corner of this border design. Yes, I could just continue the design straight across the corner but you know me. I wasn't about to be defeated, and finally last night I came upon a solution that I think will work. Need to transfer it to the other corner, then trace the complete design onto the last paper strip. Quilting should resume this week.

In the midst of this preparation for border quilting, I switched gears to work through a video class offered by my Handmade Book Club. The video was going to disappear at the end of the month so I had a deadline pushing me along. Here's my setup for working on botanical drawing with India Ink.

The first part of the class was devoted to making a small Japanese stab binding book. Luckily, I had one on hand that I'd made back in 2020 when this binding was an offering of the month. I made three different ones, with this one having signatures of rice paper so that I could experiment with gelli prints in it. Hmmm, never got around to trying that so was happy to use it for this class.

Before drawing in our books, it was advised to make some marks on a scrap piece of paper to get used to the way the brush and the India Ink played on the paper, and seeing the difference between full-strength India Ink and some that had been diluted.

Then it was on to painting/drawing in our books, following what the instructor, Amy Maricle of Mindful Art Studio was doing in making leaf shapes and stems. I'm using a pretty hefty rock to hold down the cover and pages as I go. I also inserted parchment paper between the page I was working on and the next page. Even though I doubled over each page before inserting into the binding, sometimes the ink bled through.

I couldn't seem to get my brush to do the thin-really thick-back to thin strokes that she was getting. After a few more pages of copying her designs, I did as she suggested and struck out on my own. I quite by accident found myself making these "broken" leaves that I really liked. If you look to the left, you can see how the dark ink shows through the two layers of rice paper. I rather like that as well. Interesting to see the faint image of the following page showing underneath the current one. I'm thinking of ways I can capitalize on this as I add work to this book.

This is perhaps my favorite page, simple and minimalist.

Finally, a really big diversion: the start of motorcycle racing season this weekend. I watch most of the races on my computer, and there is always content before and after the race that doesn't require me keeping my eyes glued to the screen. Since this computer is part of my office setup, sometimes I can work on bills and paperwork, sometimes I can do something creative, and this time I picked up my stitch camp piece and added a few more stitches as I listened. I really haven't done much with it, but it does sit on my printer so I see it everyday, pondering what to do next. This time it was to add running stitch spirals in more of the dark blue circles, and some whipped running stitches, a stitch that is new to me. I use a single strand of embroidery floss to make the running stitch, then "whip" this shiny 3-ply thread under the running stitches. It's a little like couching. I honestly can't remember where that thread came from and I'm only guessing that it must be rayon, but it is certainly my favorite teal blue. I still have no sense of where I'm going with this, just trying to read the marks and envisioning what stitches might enhance them. I've always thought there was a sense of water flowing through the center so hope my stitches bring that out.