Friday, March 29, 2013

Bubble Prayers - Letting Go

Bubble Prayers - Letting Go by Sheila Mahanke Barnes 2013
Artist Statement
I recently helped a friend through a grueling three months of medical testing and treatment far from our homes while her friends sent up "bubble prayers" with the help of a cheeky fish bubble maker. In times of hardship and despair, we send up petitions to whatever higher being we believe in once we realize we cannot control our fate. Sometimes we see signs our prayers have been answered. Other times it appears they have not. Yet we must keep letting the prayers rise, letting go of our need to control, trusting that whatever the outcome, our petitions have been answered.
 

I'm finding it hard to believe that this is my first art piece of the year. I have to remember that I battled a lot of recurring illness over the winter as well as getting used to the new residence and studio. The last month has had the feel of a slow convalescence, both physically and with my art - slow steps back to stamina and confidence. It may have taken longer to resolve this original design than one would normally expect, but I have to admit to being pleased with the results and  glad that I did not rush the work, force it along. A good beginning.


When last I gave an update on its progress, I had many questions about how I would attach those arms. I made a pattern out of freezer paper, ironed it to the right side of the fabric and marked around it with a white pencil. I knew I would not be doing needleturn applique so no need to add a seam allowance, just carefully cut on the white line.


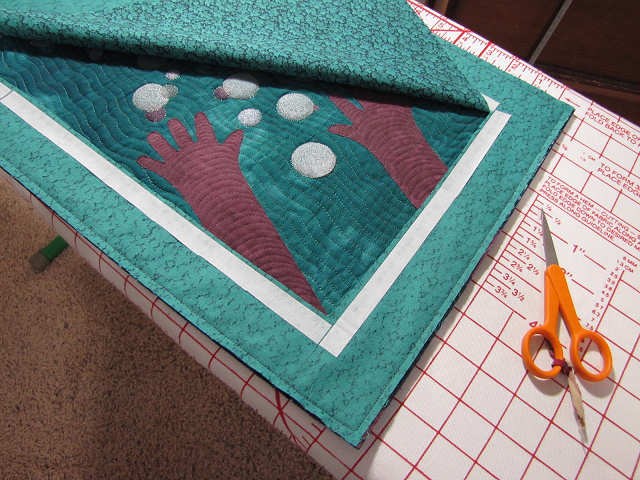
I toyed with the idea of layering it over either a piece of felt or thin batting and quilting it off the quilt top, then attaching it to the quilt top with a zigzag stitch around the edges. I was worried that the quilting texture of the top would somehow show through in a bad way. I had a small quilting test piece though, so laid a piece of the hand-dyed cotton over it and tried out my quilting pattern. Absolutely no need to add a layer of anything under the arms so I pinned them into place.


I quilted crescents up the arms and fingers using the same invisible thread I'd used in the borders. This worked very well and there was very little fraying along the raw edge. So nice not to use fusible web.


I'm not a big fan of edge finishing with facing but this piece dictated that I do just that. I squared up the quilt and cut a piece of the same fabric used for the backing a fraction smaller than the quilt itself. If this had been a larger quilt or if I'd been short on fabric, I would have cut strips for the facing. Instead, I marked a line all the way around 2 inches from the edge as a guide and pinned it right sides together with the top. Then it was just a careful trip around the outside edge, sewing facing and quilt together with a quarter inch seam. I stopped one or two stitches short of each corner and stitched diagonally across rather than pivoting at the exact corner. This makes poking those corners out a bit easier.


Usually facings are handsewn to the back of the quilt, but I didn't want to do that hand sewing. So this is a little experiment to see if I could get away with fusing the raw edge instead. Here I've positioned half-inch strips of Steam a Seam fusible along my pencil line and did a quick fuse.


Lifting the facing away from the quilt top, I made a small snip and carefully rough cut near the fusible to remove the excess facing fabric. I came to regret my choice of Steam a Seam as the paper released during the next step and the tacky fusible stuck where it shouldn't. Wonder Under or even Misty Fuse would have been a better choice of fusible.


Not everyone recommends understitching before pulling the facing to the back, but most do. You can never get into the corners and in this case I couldn't get closer than about an inch and a half. To understitch, you pull the facing out over the seam allowance and stitch very close to the seam on the facing side. A tried and true seamstress trick, it supposedly helps everything roll to the back, but with the thickness of batting in the mix, I'm not sure it helps enough to be worth the extra step. Anyone out there have an opinion on that?


Before turning the facing to the back, I slipped a small cutting mat between it and the quilt top so I could use a ruler and rotary cutter to trim the raw edge even with the fusible. Now it is like doing a pillowturn backing; you need to trim the corners to remove bulk and I have found rounding like this rather than making a diagonal cut works best. Then poke out those corners as you pull the facing to the back. I had to steam and iron the edge quite vigorously to get that bulky seam allowance towards the back. Then it was quite simple to fuse the raw edges of the facing as I smoothed it toward the center with enough tension to be sure it held the turn in place. Since my facing and backing fabric are the same and a print, you cannot see where facing ends and backing begins. I'd definitely do the fused edge again, but maybe place it so the finished facing would be narrower.

I should note that I've had a dickens of a time getting accurate color representation with my camera. The picture of the finished quilt as been tweaked somewhat, but I still get the sense that it is reading more blue than green. I was anxious to get this up on the blog so have not tried an outdoor shot yet. However, this piece has been like a chameleon, changing color repeatedly depending on the light source. Has been driving me crazy - one minute the teal background looking like it doesn't go with the batik border one bit, the next change in lighting showing it a perfect match. 

Tuesday, March 26, 2013

Thrift Store Shopping

Over the weekend, the local thrift shops had their version of a shop hop - cards to be stamped as you visited each store, drawings and refreshments, and 50% off some of their already low-priced merchandise. Two of these thrift stores are on my daily walking route and I've been surprised at how strong the siren call is as I pass. But I've been good about putting on blinders and continuing on my way. Frankly, I'm not good at thrift store shopping. Others show me the great items they've found but I only see the sort of thing I've already given away. There is one exception to that, the reason I avoid shopping at these stores too often - Men's silk ties!  Do I need to add more silk ties to my collection? No. Did I let the chance that I could pick up a few more at an even greater discount lure me in? Of course!


The first store only had a few ties and fewer still that were silk. Of those, none were of particular interest. Where once I bought almost every silk tie I ran across, lately I've become more discriminating. The second store had a larger selection and I came away with 5 6 (sheesh, I can't count) I feel are great additions to my collection. My criteria as I make my choices starts with, do I love the print. The one above is my hands down favorite of the day. Color also weighs in. I was drawn to the subtle green one next to it and was delighted to discover that it had a very tiny textural print. Should be a great blender.


So pattern and color are important, plain garden variety striped ties rarely  making the cut. Not only is this an interesting pattern, a bit art deco in nature, it is a brighter color than one usually finds in ties.


I not only like the grey and blue color of this tie, but the pattern reminds me of one of the Zentangle patterns. I'm a sucker for that sort of connection. The blue tie next to it has no pattern or texture at all - a rich lovely solid which, like lighter value ties, I don't often run across. That leads me to the final criteria if a tie has passed the rest. I check for snags and stains. Some of the tie fabric is extremely prone to snagging, so if I am seeing pulled threads or other irregularities, I generally pass it up. As for stains, I know that some or most would probably wash out, but with so many great ties out there, why buy a stained one unless the stain is small and inconspicuous and the tie fabric is just too good to give up?


I waffled a bit on this last tie, but decided to add it to the pile because I do think it is an interesting geometric pattern. I think I probably have too many in this color, but what the heck, it was one of two I got with the 50% off tags. Total for my purchases? About $8, and that's not much to pay for such beautiful eye candy. Oh yeah, and they really may work into a quilt some day.

Sunday, March 24, 2013

Linoprint Class

I've been wanting to take a printing class, specifically one where I could learn how to make my own linocuts, for several years. I know these classes are available on line, and I often teach myself techniques through books or magazine articles, but for this, I wanted hands-on instruction in a classroom with other students. There's an arts organization in town whose emphasis is workshops for all ages and levels, but printing classes don't come up on the roster often. Two years ago I signed up for one that didn't fill so was canceled. The next year the timing of the class didn't fit my schedule. But this year, to my delight, both schedule and content matched up plus enough students enrolled for it to be a go. I was particularly excited that the teacher planned to include printing on fabric, not just on paper. We had our first class last Monday.

Granted, the 5 session class isn't costing me much, with all materials supplied, except for fabric for one of the last sessions. Still, my usual high standards left me a bit frustrated and disappointed with the instructor, whose teaching style is much different from my own. Whether sharing techniques for free with my guild members, or formally teaching for pay at a quilt shop or guild, I always provided handouts, an overview of what I'd be covering and talk about tools and other supplies. I'd demonstrate steps with students gathered around if appropriate. Then as students dived in on their own, I would circulate the room, giving encouragement, one-on-one assistance and tips for greater success. And I would check periodically to see if I had been clear or if there were additional questions. I modeled my teaching style after those I'd studied under, both well-known instructors and those plying their skills out of the spotlight, those who ran a classroom best suited to my needs as a student.

This teacher, however, seems to be of the "just dive in and do whatever" approach. She did give a very quick explanation of the different types of lino materials and spent a little more time going over the cutting tool and blades. But there was no handout upon which we could jot notes and reference later, and she moved things along too fast for me to be taking notes. I was hoping she'd spend some time talking about actual designs and repeat patterns and have some examples we could copy, but again, she very quickly skimmed over the basics while she drew her own design and told us to just draw whatever we wanted. There are only 4 of us in this class; two of us are obvious novices (although the teacher seemed surprised we'd never created a linocut before), two appeared to have at least some experience in doing this. Thank goodness for the student sitting next to me who recognized that we two novices needed more than verbal instruction and pulled from her bag a book with lots of design motifs to get us jump started.

My irritation peaked, I suppose, when it came to the actual transfer of design and cutting, the main reason I wanted a hands-on class. I asked for clarification about which part of the design to black out before cutting and got the response that whichever I wanted, it didn't matter. Ok, yes, I suppose in the big picture that is true, but I'd already voiced that I really struggle with visualizing what to leave uncut. Just give me some guidelines and once I get some experience, then I can tweak them to my needs. I got my design transferred and realized I didn't have the first idea where to start cutting or with which blade. I finally got her to come over and show me how she usually approaches it, which blade to start with and  how to hold the handle and tile while she did the first cuts on my design. It would have been nice to have watched her demo first and not had to call her over for help.

And this kind of continued for the entire class - her going off to do the next step without calling all of us over to watch, not explaining why she was doing what she was doing (the best way to remember something is to know the why behind doing it that way), and then leaving us wondering just what we were supposed to be doing next while she sat looking on. I truly felt like I was floundering, unclear as to what exactly she wanted us to accomplish, frustrated that I could not figure out how to get even coverage of ink on the block for a clear print and unable to draw from her any tips when I pointed that out. Again, it seemed she subscribed to the "learn by doing" school as all she would say was that I'd eventually figure it out. Again, it was another student who came to the rescue, suggesting that the ink might be drying out on my palette and I could rinse it off and start with fresh. This seemed to jog something in the teacher's mind as she went and got some spray bottles and suggested we could mist the ink on the palettes. This was about the time she brought out the babywipes too, as several of us had left the room to grab paper towels from the bathroom for our inky fingers.

I know this is getting to be a lengthy rant so I should say the class wasn't all bad. As it went on, the teacher started giving more direction in terms of the process of tweaking the design with test prints and playing with our linocut by making multiple prints per page in varying configerations. And then within the last half hour, as we hung up our still wet experiments, she pointed out strengths and interesting configurations and why they were working as well as how they might be used. She started to divulge what would happen in future classes and the project that would be the culmination of our experiments. I wish she'd done more of this at the outset. Perhaps her approach to teaching comes from years teaching art to really young kids, a fact gleaned from casual conversation. Yes, they would not be looking for handouts and lengthy explanations and demos. And it is true that most artistic people are not as left brain and direction driven as I am.

Which is why I spent some time viewing videos and reading instructions on line last week. I learned that I needed to keep brayering the print ink until it made a velcro sound (yes, I heard that happening when my teacher set up her ink palette but she never said that was the goal) as that was a signal that the ink has reached the proper tackiness to adhere to the paper. I learned that it is a good idea to "sacrifice" a block to cutting with each of the blades to get a feel for how each works (that would have been really helpful in this first class, answering a lot of my questions). I learned that generally speaking, you do black out the part of the block that will not be cut away, which instantly cleared up my mental visualization problem. I learned that at least one instructor suggests carving away the larger portions first, then working into the smaller, more detailed areas, which made lots of sense. Overall, reading and watching a dozen demos cemented in my brain the process, and left me much more comfortable about continuing this exploration.

Because in fact, once I fiddled with my first block (the diamond one) and started on a second, I could feel how fun and addictive linocuts could be. Initially I was a little uptight and blanking on ideas. Towards the end, the ideas were starting to flow and I'd run out of time to try the variations popping into my head. Not unlike a typical day in the studio.

Tomorrow's class we will be cutting stamps from erasers - something I've played around a bit with already. I'll be bringing my sketchbook that has some ideas from that play that I didn't follow up with. Hopefully, that bit of preparation will make the class go better for me.

Saturday, March 23, 2013

Third Monday Art Group

My little art group met this week, this time braving a bit of a snow storm to come to my house. I really enjoyed having them in to see my studio set up, and of course, it's so much easier to "show & tell" when you don't have to pack it up and tote it somewhere else. I could share some older art as examples of my exploration of presentation and edge finishes, fabrics up on the design wall that are inspiration for a future series and a couple of non-art projects like my half-square triangle quilt which is ready for machine quilting. Had I been going off to someone else's house, I probably would have taken just the bubble quilt. Minimal progress has been made, but progress all the same. I am just plain timid about quilting borders, which I remembered is why I developed some of my mounting techniques such as this one which allow a fabric border that doesn't need to be quilted.


Anyway, after seeking opinions, staring endlessly and considering what would happen when I added the arms if the border was not quilted, I knew I just had to do it. Trial runs are always important, and I like to leave enough extra batting around the quilt so that I can test threads and motifs right next to the actual quilt. If you look closely (click on photo for a larger view), you can see I tried a green thread on the right, but I was afraid any color thread would become a distraction and change the overall color of the border batik. Haven't used it for years, but invisible thread seemed the best option and also allayed my fears of my less than perfect quilting "ruining" the quilt. 


Once I started quilting that border (starting from the center of the border near the seam and working my way out to the sides), I instantly saw that, although subtle, the quilting added, not detracted (in above photo top border has been quilted, side has not). I then confidently quilted circles throughout the borders. (Technical note: if you quilt with invisible thread, you want the smallest hole possible in the fabric; I use a #60 microtex needle and a 50 wt Aurifil thread in the bobbin.)


Enough about me. While we are still missing Robin (who is basking in the Arizona sun and attending lectures by the likes of Pat Sloan and Larkin Van Horn), Meg and Donna were in attendance. Meg has been working on this "cartwheel boy" which is indeed a quilt but of a sort presenting its own challenges. Even with a stiff Pellon interfacing, hanging it by one leg allows the other to succumb to gravity, so there was much discussion about how to stabilize it. As for edge finish, she tried wrapping the fabric to the back but found that too fussy. She ended up loosely stitching along the edge of the fabric and then painting the exposed batting and interfacing in colors to match the fabric. It looked good but I could sense the painting was one more step than she wished she had to take.


More experimentation is on the way because she wants to add more kids to the mix. For instance, here's "cartwheel boy's" friend. 


Meg transformed the drawing before our eyes as she "dressed" it much like one would a paper doll.


Donna is still working on a large piece at home that is not ready to be transported, so she brought some older work so we could get a feel for the creative journey she's been on. This is one of two fabric portraits of relatives she brought along, done with a technique learned in a workshop. She also brought a couple of baby quilts made for grandkids, stopping by to pick them up on her way to our meeting. I wondered why we could not hear the howling of said grandkids at their quilts being absconded. ;-)


One of the things I love about groups like this is the opportunity to share resources, and the sharing started right from the first meeting with my passing along a magazine with several articles pertinent to Donna's current work, and CDs of older art quilt exhibits. This time it was Donna doing the sharing, graciously lending us her copies of Masters volumes I and II. I've been wanting to get a look at these, although I don't think I want to add them to my collection, so it is wonderful that Donna is willing to share these with us. 

Tuesday, March 19, 2013

Catching up on drawing lessons

At the rate I am not posting here, one might think not much is going on in the creative journey, but that would not be entirely correct. I've done more quilting on Bubble Prayers, started assembling the mystery quilt blocks into rows, met with my art group and started a linoprint class, among other things. I'll be blogging about these soon, but for now, I'll share a couple of new Zentangles. I've got the book back, but have missed a few days, so have been doubling up on the "daily" Zentangle®* lessons. I share this one because it includes Pepper tangleation, which is a pattern that so amuses me - it is just plain happy and fun. The stripes remind me of the rolling farmland of the Palouse. That thing in the upper right corner didn't work out as planned, plus I messed up the direction of the strokes in one section. Ah well, all a learning process.


Most exciting is that I've come to the section of the book where we can now add color to "Zentangle Inspired Art" or ZIA. This was a quick little draw so I could try that out with my colored pencils. I do like that. It's good to be back drawing on a somewhat regular basis. It does my head good, can feel it strengthening my eye and design skills.

***************************************************************************************************************
*The Zentangle® art form and method was created by Rick Roberts and Maria Thomas and is copyrighted. Zentangle® is a registered trademark of Zentangle, Inc. Learn more at zentangle.com.

Thursday, March 14, 2013

More Art Deco

After posting yesterday about that art deco building I saw on my trip, you can imagine I was pretty amused to find my Zentangle lesson today was on "geometric rectilinear patterns" which, the lesson points out, Art Deco style incorporates. I definitely love art deco and I definitely enjoyed this lesson. And again, I am seeing some familiar quilt block patterns in Cubine (attic windows) and Beeline (baby blocks).

Wednesday, March 13, 2013

A Quick Road Trip

I took a little break this weekend to visit friends who live along the Columbia River Gorge in Oregon. I was hoping for slightly more spring-like weather but it is still early. Even so, these magnificent crocuses greeted me when I arrived at their house.


And the morning I left, the trees at the motel had burst into bloom.

On the way home, I had lunch with another friend in Yakima, one who loves to show me the city's assets, and so I got a little tour after our meal. Yakima admittedly gets a bad rap, but it has a thriving art scene and some interesting architecture in its downtown core. My friend particularly wanted to show me The Larson Building. Who'd a thunk one would find an art deco building of such magnificence in the high desert farm and ranch country of central Washington? The detail and marble floors of the entrance and lobby rival those of the Plummer Building in Rochester, Mn that I was so awed by.

Of course, I did not have my camera with me, but I have hunted down some info on the internet for those who might be interested. And I hope to get back to take some reference pictures of my own. 

For historical info on A. E. Larson and detailed descriptions of the building that he constructed in 1931, see here.

For pictures of the building and information about the revitalization effort of the downtown core, see here.

Ok, those pictures are really going to frustrate you, so for a couple of great pics of the lobby and additional information about the building, see here.

For a close-up of the entryway from outside, go here.

And finally, for a close-up of the upper part of the building's detail, go here

Wednesday, March 06, 2013

Whew - That Was Close!

The joy of working with hand-dyed thread such as Oliver Twist is its wonderful subtleties and unpredictable variegations. The stress of working with it is knowing that those wonderful characteristics mean that the spool of thread you use up today will likely be enough different from the replacement spool to be noticeable. I also have a difficult time gauging how much is on a spool since it is wound on long cardboard tubes unlike what is typically used for other brands of thread. More than once I've thought I had plenty to complete a project only to look up and see how very close I am to running out. Luckily, today I made it through the background quilting with a little to spare.

Now more decisions. Should I also quilt the border? I'm tempted to quilt circles, outlining some of the ones in the print. And I also have to decide about those arms. Can they go directly over this quilting without the texture shadowing through if I want the arms to remain unquilted? If I do quilt them, I'm thinking of doing it over a thin batting before attaching them to the quilt. I'm thinking a slightly lighter mauve thread would give them some life, but I am also considering a slightly lighter fabric. Decisions for another day. Outside opinions welcome! 

Saturday, March 02, 2013

Bubbling Along

"Art must be visceral enough to provoke an emotional response but durable in its commentary."
Laura Beach in "Related in spirit, Divided by Style" - The Magazine Antiques, May/June 2012
I've started the quilting on my bubble quilt, still unsure I can capture the emotional commentary that is my intention, but oh, my bubbles are sparkling now! That's Sulky Sliver opalescent stitched around each circle. It sparkles with changing colors like an opal and is one of my favorite metallic threads. 


I recently looked through some cds of art quilt exhibits from quite a few years ago. It always interests me to view some of these early efforts for two reasons: first and foremost, I note whether the designs look dated or have stood the test of time proving their "durability" and second, I check the names of the artists to see if they are still in the spotlight, still making art. The list of players has experienced a real turnover that I have not been able to keep up with, but there are still familiar names from ten to fifteen years ago still prominent in this movement. I think those that have succeeded the best, survived the years of fads, experimentation with technique and materials, and economic challenges are those whose art meets the criteria listed in the quotation above.


Oh, that I make even a few visceral yet durable art quilts before I die.