Saturday, December 31, 2022

Dead Week

You saw a shot of my sticky buns for Christmas morning, and here are the Raspberry Ripple cookies I made on Christmas day. I used to make these every Christmas but haven't for quite awhile for one reason or another. Determined not to let another year go by, eating up the jar of raspberry jam bought just for them on other things instead, I got them baked before preparing the turkey breast for the oven. They turned out particularly good I thought. A great start to "dead" week.

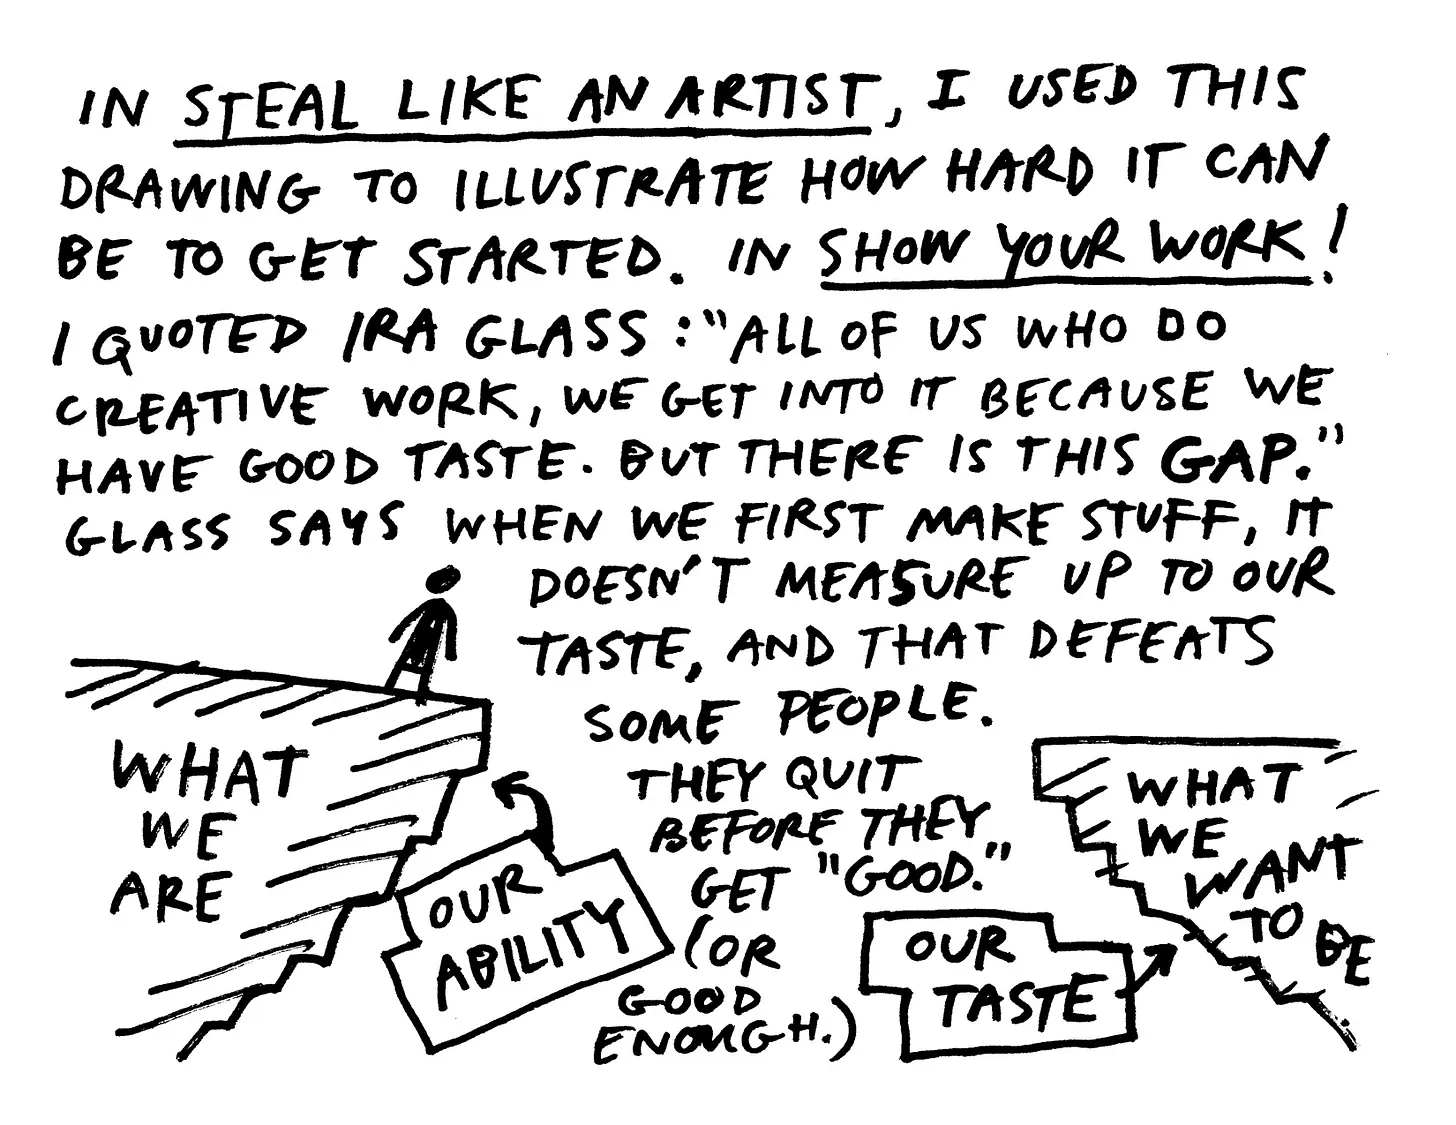
I'd never heard of this term before last week and I'm not sure I agree with it, but here is the explanation according to Helena Fitzgeraldin her piece All Hail Dead Week, the Best Week of the Year":

Dead Week… is a week off from the forward-motion drive of the rest of the year. It is a time against ambition and against striving. Whatever we hoped to finish is either finished or it’s not going to happen this week, and all our successes and failures from the previous year are already tallied up. It’s too late for everything; Dead Week is the luxurious relief of giving up.

All I could think of reading this is that she surely doesn't know any quilters or other creative types. How many "dead" weeks did a scramble to put the finishing touches on a quilt so it could be counted in that year's tally, not slop over into the next year. I don't do that quite so much anymore, but found myself pushing to get the Peace II quilt's sleeve on so that I could say I finished it this year. Not ready to "tally up successes and failures" until at least New Year's Day. I have to say though that as I lay in bed one night going over in my head the steps to making a sleeve, I found myself floundering in remembering the steps. Could it really be that long since I've had to make one to hang a quilt? Apparently. But it eventually came back to me and I put the last stitch in not long ago.

Fortunately, cutting and applying the binding so I could feature it in my Christmas blog post did not pose serious memory lapses. I opted to do the stitch in the ditch from the front with the same gold twist thread I'd used on the satin stitching. I wasn't totally sure about that but decided to take an "oh well just go for it" approach, knowing I could always take it out and redo with my other choice, black thread. It's a subtle touch I think I like just fine.

Forgive the hastily taken photo but I did want to show the complete quilt here, even though it really should be steamed along the edges after applying the binding and have a proper length of dowel or slat for it. Done done done . . . and on "dead" week!

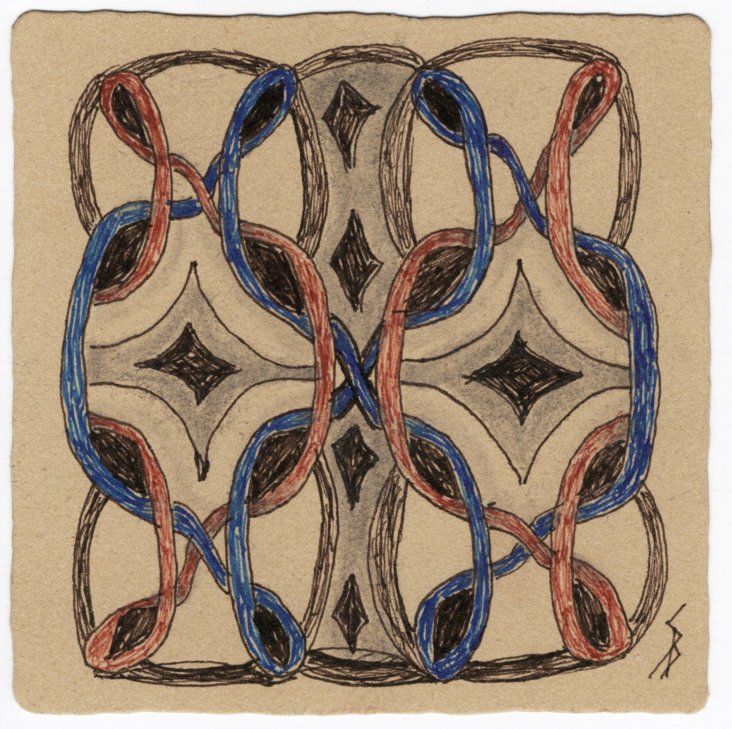
How have you spent the week between Christmas and New Year's? When I was in school or working for schools, it was always a vacation week so a chance to relax, read, knit or crochet, and enjoy the extra sweets that the holiday always brings. This last week I've caught up on a few things, including adding notes and quotes from the book study selection I've been working through to that coptic journal I just finished - very satisfying. I'd planned to find time to play with these two new Zentangles because they looked so holiday-ish to me but somehow it didn't happen. But I felt like I caught up on a lot of little things that make me feel more ready to welcome the new year.

Speaking of, it's about time for me to go fix my traditional turkey enchiladas and crack open some bubbly. Aren't these two bottles of Prosecco cute? I opted for splits this year since a medication prohibits me having alcohol tomorrow or Monday when the Rose Parade will be held, something I generally watch while sipping orange juice and champagne. So a full bottle would go flat before I'd have a chance to finish it. I couldn't resist these as Prosecco is what my racers pop open on the winners box at the end of a race. Have never had it so I'll see what the big deal is. ;-) Hope you are having a good end to your "dead" week!


Saturday, December 24, 2022

Wishing You . . .


Wishing you joys old and new.

Peace Quilt II bound

Wishing you peace.

Homemade Walnut Sticky Buns

Wishing you merriment that good food, drink, family and friends can bring during the holidays.

City crews hard at work

And especially wishing you and yours safety this Christmas.

Monday, December 12, 2022

Caught Up Yet Behind

Santa arrived early at my door (along with another 8 or so inches of snow) - a sweet treat from my sweet cousin and a reminder that I've done nothing toward Christmas preparations, save for the turkey breast bought early and stashed in my freezer. The plan was to at least work on cards over the weekend but I was also determined to finish the book challenge first.

And I did at last, only a week late! The stitching of the signatures was going really well when I noticed I'd be running out of thread before the back cover could be secured. I wasn't the only one with this issue and several theories surfaced, including that the original example from the teacher had two less rows of that chain stitch so her directions for figuring how much thread to reel off may have been based on that rather than the directions she gave for punching the additional holes. I partly blamed my shortage on the heavier and waxier thread I used. At any rate, she'd shown us how to add thread using a weaver's knot so all is not lost.

Except that I couldn't get the weaver's knot to "snap" and hold the thread the new length was being added to. I tried several times, even getting out a photocopy I'd taken from a library book showing several useful knots. I had to laugh that at the end of the instructions for the weaver's knot, it said that if you couldn't get the knot to hold, just make a square knot. So that is what I did. A little messier but since this is a book I'll be using, I really don't care, especially since it is in the last signature of the book. In the picture you can see I remembered a couple of helpful things when sewing in signatures: 1) use finger cots on thumb and second finger to help pull the needle through - there's always a bit of tug of war, and 2) clip the next signature to be sewn to the previous signature to keep it from flopping around until you get a few stitches sewn into it (lower left).

There it is, all neat and tidy from the outside. One problem though . . .


I tend to tighten my stitches quite a bit because of a disappointing experience where I was not careful about that and ended up with a wobbly book. However, too tight and the covers spring open. Not equally this time, and with a little pulling and jiggling I was able to even up the amount of spring front and back and think the rest will resolve as I use the book.

The book was designed for the addition of tabs. I didn't really think I needed tabs for the way I plan to use this journal, but as long as the covers were sized to accommodate them and I had some of the cover paper leftover to make a few, I went ahead and added them.

 cover measure 5.75 tall x 4.75 wide

So there we go, all done, and I'm already collecting the bits of paper I've scribbled thoughts and quotations on that will now be transferred into this book. Not done in 5 consecutive days nor even 5 non-consecutive days, yet done within a two week period where life managed its usual intervening. Pretty pleased with that and now onto the holiday preparations and binding the Peace quilt.

Monday, December 05, 2022

Too Many Shiny Objects

Front and back cover paper collaged on one sheet

So much for focus last week. I had little, and rather than work the daily lessons of the book challenge DAILY, I did day one on day one (which took a little longer because I fiddled with making a file that would print lines on my paper before cutting and folding into signatures), then allowed other things to take up my time the next few days. Too much on my mind right now, a yoga class I didn't think started until next week, too much reading to do, and too many things in the first few lessons that I either dread doing or was uncomfortable trying. Day two dealt with making cover papers by collaging on printer paper and adding a layer of decorative napkin over the top - it goes translucent so the collaging underneath melds with the designs on the napkin. Well, I didn't have any such napkins and wasn't interested in tracking down and buying a whole pack, but knew decorative tissue paper would give the same effect. Unfortunately, what I had of that was too dark for anything underneath to show through. But I have a plethora of saved used teabags which I thought should work the same, and I had a particular theme for this book so really didn't need to layer additional designs over the top. Or so I told myself. I used a big chip brush and matte medium to stick all my pieces down and had a terrible time with it. I was just following what was demonstrated and had forgotten how magazine pages (where my collage elements came from) react with matte medium . . . not well! Curling, wrinkling, and parts of the bigger pieces not staying glued to the substrate once dry. It also didn't dry very clearly making for some cloudy areas I didn't like. I overlapped some edges of the tea bags and that didn't work quite like I anticipated. It's been too long since I last did this sort of thing, and belatedly remembered a different kind of medium and brush that works a lot better for me. I need more practice more often at this collaging bit! On the bright side, the collage elements were quite bright and I liked that the teabags knocked that back a bit.

This project required book board for the covers and I really struggle with cutting it. You have to use a metal ruler and unlike my quilting rulers, my metal ruler has cork on the back which still slips on the board and raises the edge of the ruler a bit off the board such that the cutting blade can slip under it giving you an uneven cut. So this time I followed the suggestion to flip it over, then realized I could run painter's tape along one side to help hold it in place. Really helped but I still had to make more than twice the number of cuts to get all the way through the board than the teacher does when demoing. I really do hate cutting this board . . .

Covers are 4.75 x 5.75

But once that was done, the next steps were ones I've done before and pretty straight forward. In spite of the issues I had making the cover paper, it wrapped around the boards just fine. The teacher showed a new step of inserting a filler paper cut from a file folder in the center where the edges of the cover paper end and otherwise create a bump when the end papers are added on top. That was a neat trick.

Before turning the cover paper to the back, you cut away triangles at each corner so you can have a nice neat unbulky miter. I have a lot of these corners saved, not sure what to do with them. I guess I was in a mood; I kept looking at them on the table, not wanting to save them but knowing I would and wondering how I might use them when it occurred to me I could glue them in each corner over the end paper. Oh, I really like how that looks. I may find something to add to the center but for now, the boards were done.

Yesterday I made my template for punching sewing holes in the boards and signatures, then got them all punched. I thought I might even start sewing things together, but I also wanted to watch some of the question and answer sessions held each day. And of course, I had to get out thread choices and ponder which color to use. I decided the orange was too matchy matchy and not the color I wanted showing inside the signatures (that paper is a mint green). I'm going with the black.

I'd still like someone to explain to me where the time goes . . . I never get to everything I think I can accomplish on a given day. Always a step or two behind. Of course, sleeping in on several days didn't help. ;-)

Monday, November 28, 2022

Class Work

Not a lot to show for the week, but I did hunker down and work through the rest of the first week of videos in that on-line colored pencil class. The video I'd originally watched but seemed to be missing finally showed up farther along in the class, so yes, they revamped things a bit. There are 4 people giving instructions and it's a little disconcerting that they often contradict each other on how to use these pencils, but I'm seeing how trying out the different ways is leading me to decide which is working best for me. There was more instruction on shading and blending, this time with combinations of colors, and a section on using a blending stick or tortillon. It noted that you could substitute a q-tip for the blending stick, and I got the best results using that. As a wrap up to the week, we were encouraged to use our newfound skills to color in our choice of two sketches we could download. As you can see, I haven't gotten very far on mine.

There were a couple of hours devoted to interviewing two of the teachers which didn't add practical knowledge to what had already been shared in my opinion. Felt a bit like wasted time. So as I listened, I decided to swatch out my Inktense pencils. I'd already done that on a strip of watercolor paper when I first got them, keeping that strip in the tin with the pencils, but I enjoyed this additional swatching and having everything in one place. Think I will also swatch a few examples of blending some of the colors.

My Handmade Book Club is presenting another 5 day challenge starting today, and me being unable to resist, have gathered supplies to make this small coptic binding journal. But that Peace quilt was still spread out on the work table waiting for me to square it up and I definitely need that space to work on this book. Incentive enough to quit putting it off, and to my relief, this one was not as difficult to square up as the first one was. Plus I realized that the extending backing I was trimming off was wide enough and long enough to piece together for the binding. I don't think I've ever had that happen before but I am happy about it! I've set all that to one side but with the book making divided into 5 short sessions, there may be time to cut and piece the binding and even get the binding sewn on. We'll see how organized and focused I can be.

Hoping you all had the Thanksgiving you were wishing for. I did, including swapping the traditional turkey for ham. As I checked in with friends and family, I discovered many also had non-traditional menus, all sounding very yummy. There has been snow, and more snow today, so I hope you and yours also had safe travel over the holidays. I'm so happy I had nowhere I had to go!

Monday, November 21, 2022

Ink & Colored Pencils

I decided to give the Peace quilt a rest last week, partly because the next step of squaring up will be tricky, if doing it on the first one is any indication, and partly because I had some very good luck with a Zentangle from a new series and felt motivated to continue with a colored pencil online class I hadn't looked at for way too long. So long in fact that my password to get into Sketchbook Skool no longer worked after they did a revamp of the site awhile ago. Let's start with the Zentangle, this one a different approach using "reticular" (the blob shapes) rather than a "string" as a guide and working in a circular format. This particular "fragment" that goes into the "reticular" is called MRTH (mirth) and boy do I like it! In fact, I think I would have been perfectly happy to stop right here.

But I continued on filling each reticular, the outer ones getting those extensions that look like stamens. Just using a black micron pen. You can see I penciled in the steps on the facing page for future reference. Again, I could have stopped right here and been happy. However, if you know anything about Zentangles, you probably know that the final step is shading and often brings the piece to life.

I wish I hadn't proceeded with the shading. I didn't like how they showed the graphite along the curves. It didn't work on my mirths which I think were smaller than theirs. And then they added white chalk pencil for highlights. Perhaps if I had been using an off-white tile like they were, the white chalk pencil would have made more sense as a highlight. I just didn't like what happened during this whole shading process. But I still love this Zentangle as a whole.

As for the colored pencil class, one of the advantages is that you can go at your own pace and when you come back to class, it takes you right to the session where you left off. But as I said, they have revamped their website and my class had been set back to as if I'd never started it. The last thing I remember doing is diligently sorting through all my colored pencils to put them in order and swatch them - see this post from July 2019. I quickly went through the first lessons to review, and I think some of them I'd done are no longer being shown or were re-shot. Good thing I took notes.

So here's where I started up again - experimenting with different types of layering and blending. I really enjoyed doing each one, finding it relaxing to slowly lay down the color and build it up in different ways. It showed pretty graphically which of the techniques worked best for me. Then there were short sessions with two different teachers, one showing how he does his initial sketch with black colored pencil rather than a graphite pencil or pen, something I'd not considered, then building up the color, and the other showing how she does her initial sketch in a light color of pencil that kind of goes with what other colors will be laid down as the sketch progresses, again, something I'd not considered. Examples of each are at the bottom of the page shown above.

Inktense before and after H2O activation

Then there was a session on using watercolor pencils and I got a chance to actually do some sketching with my Inktense colored pencils. I've experimented a bit with transferring them onto fabric but that's about it. It was really fun to sketch that chicken from the catalog cover, all dull, then see the colors come alive when touched by a wet brush. Next I need to try out the blending of different colors of regular colored pencils as demonstrated on a leave drawing, and also swatch those Inktense pencils and experiment with blending different colors of them to get new colors. Gotta say, I enjoy being a student.

Hard to believe Thanksgiving celebrations are this week, November scooting by so fast. I'll be staying close to home, and may even see a little snow over the next few days, but it won't last as they predict a warming trend into the weekend (40's!!!). May you have safe travel, if travel you do, and may you enjoy any family get-togethers that come your way.  And if you can eke out a little time to yourself, I hope you spend it creatively!

Monday, November 14, 2022

More Nervous Quilting & Something Got Out Of Hand

Let's start with that got out of hand thing. I decided to try the last zentangle in the series I've been working through. It's a variation on a tangle called MI2 or Me Too and I thought this one would be straight forward as Zentangles go and done with a Micron pen and some pastel chalk pencils for added color, no metallic pens. Plus I really like these tangles that do that over and under thing which can make them look more complicated to draw than they really are. You can also see the effect of working on both sides of a translucent tile. This one though would be easy to work up on regular paper and I decided to use one of the somewhat pricey "official" tan tiles I bought at one point. It really is true that the Italian paper they are made from has such a different feel to it and works up so nicely.

You start by making the curved lines, mirror images both vertically and horizontally. And wouldn't you know it, as I started to draw the third column, I swung my curve to the left instead of the right, stopping about halfway down when I realized I'd messed up. Ok, no panic, as a Zentangle principle is that there are no mistakes, no erasing, just invitations to create a new design element. So when all the proper lines were drawn and color added (with pen), I googled the tangle to see how I might make that errant line a part of the design. I was surprised at what I found and delighted that I could make this almost too simple Zentangle into something more. You can see the options here

I started by continuing the curve to meet the curve below, and continued adding curved lines in the middle section and then around the outside. And then once again, I managed to make a series of curves along the bottom curving in instead of out. Well, I hadn't planned on coloring in these added lines but now I had to in order to cover up this new error - they are the dark brown ones. Yes - no matter what they say, this was a mistake! I liked the diamond shapes added to the How To Draw MI2 examples and I really felt the two big open areas needed something in them. And then that narrow space running down the middle. Yikes! I need to stop and was not at all sure I liked where this one went. I added shading, twice, and have left it out on my desk since stopping the fiddling, and I have to say it has grown on me. But wow, things really did get out of hand while working on it!

Now for the nervous quilting. Here you see that section I said in the last post would be smooth sailing after having all those inch-long runs in the section above. I failed to remember that the center circle swoops into it creating more short runs, but not as short, before allowing for some long stretches again. Really finding this tedious, all this starting and stopping but there was more of it facing me in the last section to be quilted, the circle.

The thread on the spool was showing signs that it was getting down to the end, but it didn't seem like I had that much quilting left as I circled from the outside to the inside. I forgot on the first few places where the quilting had to stop and start on the other side of a motif opening that I could just raise the presser foot and slide the quilt to the next starting spot without breaking thread. With thread at a premium, I could not afford to waste any thread. You can see those places where I carried the thread across to the next spot.

And it's a good thing that I did. On the first Peace Quilt I pulled all thread tails to the back and then fused the backing over the lot so I wouldn't have to bury threads. See this post and this post to see what that was like This quilt was sandwiched normally and I simply could not bear the thought of burying that many thread tails so decided I could live with the look of pulling up the bobbin thread and doing the 5 or so locking stitches close together before taking off, then repeating at the end of the line of stitching. As I worked my way farther into the circle, I could see how little thread was left and feared I wouldn't make it. And if I'd been pulling threads to the back at every start and stop, I would not have. Whew! Talk about close!!!

Monday, November 07, 2022

Foot Dragging

I had two trips last week into the nearest "big" town about an hour away so was not super productive on the art front. It did not help that I kept dragging my feet about which Zentangle to do next. This one is based on the Zentangle I mentioned I decided not to do because I wasn't too keen on the tangles used. But the more I thought about it, the more I wanted to give it a try, using a different tangle. I couldn't get beyond the vision of bubbles being trapped by the overlying lines. So I gave it a go on my own terms. It came out looking like a shell rather than the trapping net I thought I was going for.

I used green metallic gel pen for the bubbles and blue metallic gel pen for the encasing lines - it may have looked more like I envisioned had I used black micron pen instead like they did. I could have done a better job smoothing the graphite shading on the lines but I found myself rushing at the end. As I reviewed the video to jog my memory, I also remembered a possible reason for my wanting to skip this one. The two gals demoing couldn't stop fussing as they drew, adding a little bit here, some more bits there when really, it wasn't necessary. At one point, the gal not drawing finally told the one who was to stop, it was fine, and lets go to the next step. Just when I thought the Zentangle was complete, they'd add another step, some more shading around the outside, the pastel pencil for the background (which I did with the Art Graf). They were obviously enjoying extending this out, not wanting it to end but goodness! I begrudgingly admit that the final outer shadings did pull it together and helped that look of a shell come through. And I do like it now.


This one sure has bling!

Also dragging feet on the machine quilting. For one thing, my thread choices have had me doing what I think of as nervous quilting. That is when you've chosen a thread used enough that you are not sure how much is left, if it will be enough, and know you cannot buy more because it has been discontinued. That's the problem with all my Ultra Twist threads that quilt up so beautifully. Another company bought out the one that made this thread, replacing it with their version that simply doesn't quilt up the same. Anyway, staring at the partial spool won't make anymore thread magically appear on it, so may as well cross my fingers and get on with it.

But that's the second thing making me drag my feet. The next section to be quilted was one with multiple short runs. Not only does that use more thread with all that starting and stopping, but it tries one's patience as well, and my patience, or perhaps tolerance, for this sort of thing is in short supply. Not helping that I've been fighting to keep the quilt in place and not catching on anything as I quilt, and then it knocked a tin of straight pins onto the floor. Luckily I have one of those telescoping wands with a magnet end to pick up the mess without bending! But I hunkered down yesterday and forced myself to complete these short runs on either side of the rectangles and now it is smooth sailing down longer stretches to the bottom of this section.

Speaking of smooth sailing, those out of town drives last week were most enjoyable. I like driving that stretch of road and all the cottonwoods and birches along the way had finally turned that beautiful golden yellow we'd been waiting for. Driving like that isn't bothering me anymore, more progress on the surgery front. And I have missed being able to take scenic drives because I really do love driving. However, might not love it so much tomorrow. A winter storm blew through today, not leaving much more than a couple of inches of snow, but it has been windy with temps not getting much above 25 degrees. Old man winter knocked loudly on our door and my last gasp geranium blooms have gasp their last. Crossing fingers again that the roads will be cleared and dry by the morning. Or at least sanded.

Monday, October 31, 2022

Wrapping up #INKtober

This is it, the last day of #INKtober 2022 and my drawing for it! Assessing my experience with daily drawing using #INKtober prompts, I noticed several things that I think led to my success. First, my decision to do my best to keep it simple and quick. Nothing like knowing a drawing will soak up an hour or more to make one procrastinate but a ten to fifteen minute block of time was easy to fit in, even on the busiest days. I also found myself remembering and practicing the fact that one does not have to draw every line, that often something can be hinted at with just a few strokes. No need to get complicated though I tend to get caught up in details. 


But in sketches like this, details can sometimes muddy the picture and even obliterate what one is trying to capture. But truth be told, this last week started to feel more like a chore than fun, probably because of distractions that arose as life intervened. 


Still, when I ran across the quotation below a few days ago, I thought, yeah, there were days that felt like that, both in the drawing and in the living.

"We make our way through Everything like thread passing through fabric, giving shape to images that we ourselves do not know."

– Rainer Maria Rilke –

 More quilting on the Peace quilt ensued, three actually to my surprise. It is making a difference. I don't think I'll keep up with the sketch a day but exchange it for some time at the sewing machine each day. The usual once or twice a week I sit at the machine isn't nearly enough. I'm reviewing my work at the end of each session with criticism and a tad of disappointment that I haven't sewn those lines straight enough, being sloppy. I'm maybe a bit in the "energy gap" that Ira Glass speaks of when talking about how hard it is for creatives to get started. Austin Kleon illustrated it this way:

https://substackcdn.com/image/fetch/w_1456,c_limit,f_webp,q_auto:good,fl_progressive:steep/https%3A%2F%2Fbucketeer-e05bbc84-baa3-437e-9518-adb32be77984.s3.amazonaws.com%2Fpublic%2Fimages%2F5df3766e-ca77-4824-80b8-c44fadc43d55_1650x1275.jpeg 

I know based on past work that I am good, but right now as I get back into it after a long time off, I think I'm not good enough. I hate it when I catch myself thinking, "Good thing I'm making this just for me." While I don't expect perfection, I do have my standards and at least on this quilt, I'm not living up to them. Next time . . .

Monday, October 24, 2022

Some Hits, Some Misses


I stand corrected. I said I hadn't done any quilting in the week leading up to my last post. Before I sat down to start the parallel quilting in the "border" area of Peace Quilt II, I checked my engagement calendar where I make note of work on quilting projects and found that I did indeed do a little quilting that week, finishing the stitching along the satin stitching of the applique. Why I didn't remember doing it in that week I can't imagine. I'm using the same thread on the sateen print as I did on the lighter hand-dye of the first Peace Quilt but because I am using an 80/20 cotton batting rather than felt, the quilting has more dimension. This is one of the "misses" of the week only because the quilting lines are a bit wavy here and there and in a couple of spots I didn't turn the quilting very well. But at a distance, that doesn't much show. At least it's going quickly. I find I don't have a very long attention span anymore and think the hour I am limiting myself to must be up only to find I'm not even half there.

My 3-month post op appt though was a hit. Gauging by how I got up from a chair and walked down a hall, the x-ray tech thought I must be there for a 6 month post op appt until she looked at my chart. Both she and the PA said I was progressing better than a lot of patients and now have no restrictions on bending and twisting, as long as doing so doesn't cause additional pain. Make no mistake, I am not pain-free yet but much better than before the surgery, and I was reminded that full recovery takes a year. Had to laugh when the above Garfield cartoon showed up in my paper a few days later. Ah yes, this has been my thing since surgery, merely waving at my toes, but at least now I can start working on waving at them from less far away.

As for my #INKtober drawings, some had to be done quickly because the first part of the week was busy with appts and errands while others I had more time to research and work on. But even so, most are not too bad. "Bluff" and "Bad Dog" are based on memories: motorcycle rides that ended at bluffs along the upper Mississippi River, and the pup who constantly escaped from her wire kennel and once neatly chewed the toe off a relatively new pair of snow boots. And I was relieved to find a definition of "Booger" that did not require me to draw someone picking their nose!