Saturday, August 31, 2013

Place Holder

Just so you won't get bored while you're waiting for me to do something interesting again...  After a day of big fluffy cumulus clouds, the sun set with nothing but these streaks in the sky. They looked so odd to me, penciled in - so I tried to capture them. The camera couldn't focus well, kept going for the nearby tree, the rooftops, but I think you get the idea.


And then I noticed a puff of cloud had joined the streaks, and was picking up a different tint from the setting sun.


Zooming in, it showed its own streakiness.


And moments later started to fade.

Wednesday, August 28, 2013

Remember This?


It's now this:


After coloring in the stamp, I contemplated what I could add around it. First is was the circle border, and then the flowing feathers, although in Zentangle terms they are called "flux". I pondered further whether to color any of that in, and as you can see, coloring won. All this done a bit at a time over many days. Slow, relaxing exploration that I almost hated to see come to an end today. But I have more pages to fill so it's ok.

Monday, August 26, 2013

Due Diligence Dyeing


I appreciate those who are encouraging me to believe that in dyeing fabric there are no mistakes. But seriously, if you are going for a particular color or set of colors in a dye run, and you have a recipe to insure that's what happens, and you fail to follow the recipe correctly, then what you end up with is a mistake, albeit one with a silver lining. My less than perfect dye session with my friends did give me some nice colors, but not exactly what I was going for. So I cleared off my "art cart" and set it up as a dye station, got out the recipes and dyes, and spent most of the week processing the results. First I redyed the purple gradation which oddly enough was not all that different. I could see the difference more in the darker values. But at least I was more diligent about agitating the bags so the texture and dye dispersal is more even.


Then I redid the color family. The recipe is call luscious berries, but because I used the same distribution for the two dye stocks, all I got was a lot of blues. This is what I wanted, the full spectrum of dark fuchsias to purples to blues. Much happier.


Here are the two sessions side by side - the by-the-recipe group is on the left, the error-filled group on the right. I think I am so done with purple now.


With that taken care of, I moved on to a color family recipe that Judi developed after I left the partnership. Mmmm, guava fruit. I'm glad I didn't try this one on my can't-keep-my-recipe-straight day.


And yes, I was careful to agitate bags, but still got great texture. I really want to use this group in a quilt, but haven't figured out just how yet. Maybe strips. It's kind of a sunset sort of group. I better hurry - I can feel my friend Sherrie scheming how she can spirit these away from me - I think they are just her colors.


And then I had some fun with the leftover dye stock. This is something I got onto back when we were still researching about dyeing. Any tall narrow jar will do, like what olives come in. Fill partially with soda ash solution, stuff a fat quarter of fabric in until totally submerged, then pour dye stock in and let it slowly seep to the bottom. In this case, I used the yellow from the guava run first and let it seep for about 10 minutes, then added a little more soda ash solution and the bubble gum pink from the guava run, letting the jar sit undisturbed for about 24 hours.


And this is the result - love it! The white section at the top is what was at the bottom of the jar, getting little and no dye. 


I had some tone on tone fabric Judi & I had dyed when we were still experimenting and I never cared for how it looked. I thought maybe over dyeing the green with the purple dye might improve it but I was wrong. It's still so bad it is hiding under this little piece which I am so in love with. This was just a scrap of tone-on-tone in an off-white, and I am wishing I had more of this fabric to dye. I may work this little piece into a handbag or padfolio. The back isn't bad either, the vines much more subtle.


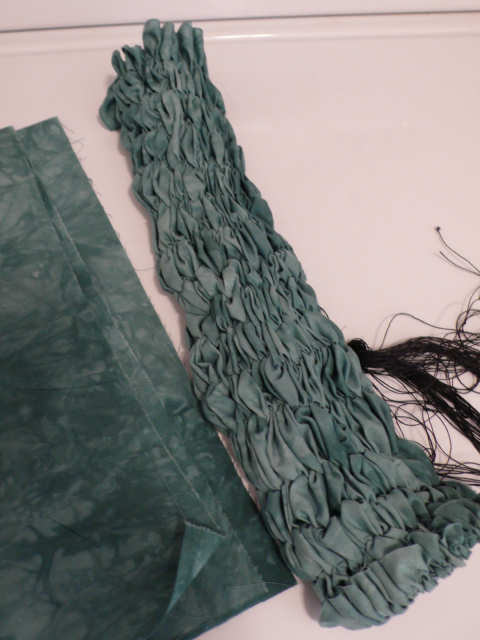
I also put a piece of pfd fabric a little smaller than a fat quarter in each of the lightest yellow bags of the guava run. I rinsed the excess dye out of them, and then while still wet, wrapped them on PVC pipe, scrunching them down shibori style. I'd mixed the end of the soda ash solution into the leftover purple dye stock and poured it slowly over the fabric till it was covered - not too much because I didn't want it seeping too far into the folds. The freezer bags keep things from drying out while these batched for a couple of hours.


And voila! The truly gratifying magic that dyeing can be! I wasn't sure I did the wrapping and scrunching right but boy, I definitely got the effect I was going for - a little like golden sun on water.


The second piece was wrapped the other direction and I was able to get more of a twist after scrunching so it has a slightly different look. Both these were a bit difficult to capture accurately in the photos, but these are pretty close.

Besides being pleased with my results, I'm pleased with how my work stations functioned. I'm not a big fan of dyeing outside and my last house did not have a garage or basement to work in. Here, the art cart is in the garage for the messy part, and the door into the house leads right to the washing machine and kitchen for the final processing. I'm putting the dyes away for awhile, but it's nice to know I have a quick and easy set up when I'm ready for more.  

Wednesday, August 21, 2013

Dyeing with the Art Group

I finally made good on my offer to lead a dye session with my Third Mondays art group, tapping into the dyeing supplies my friend Judi bequeathed me. After staying away from dyeing for probably 15 years, it was good to refresh my memory and share our method with my current friends. I quickly found myself going into teacher mode and dispensed with the idea of getting pictures for the blog - just a little distracted anyway and hoping I wouldn't skip any important steps! So all you get to see is my results after I got home.


I decided to include basic gradations, color families and random play in our session, all done in freezer bags per Adriene Buffington's book, Hand-dyed Fabric Made Easy. Judi and I had adapted the original 7 step gradation recipe to 4 steps which is what we used this day. I dyed up a purple using fuchsia and indigo dye powders mixed together, but in my distracted state, mis-measured so these are a little more red plum than the purple plum I was going for. Still a pretty color that is missing from my stash.


I would have preferred them to have less texture, but boy, is this wonderful or what?


Next we used two dye stocks to create a color family, but again, I made a mistake as I kept one eye on the others and lost track of the order of distribution of my two dyes. There should be some fuchsias in there. To my amusement, half of these trend toward a lavender gradation and the other half towards a periwinkle gradation, two recipes I'd pulled out to dye up after our session. Now I may not need to.


This is the flip side of the fabrics shown in the previous picture. Again, way too much texture with nearly every section of each fabric crossing all values of the run. To get a more solid fabric and even color, I should have massaged the bags several times once the fabric was added. Judi and I had a huge blow-up over this once. She just didn't want to take the time to keep agitating the dye runs and insisted most people buy hand-dyes for those textures. But I had just spent an afternoon folding and re-folding gradation packs to find areas that when viewed from the package's end would show the 4 value steps. When the textures are this all over the place, it's hard to convince the customer they are really buying a gradation. She finally saw my point and saved those wonderful textures for the one-of-a-kind specialty pieces. With my mis-measurements and my wild texturizing during this session, I felt Judi was getting back at me!


Now that "my girls" had learned the basics, it was time to play - experiment with manipulating the fabric and tossing whatever leftover dyes were around into the dye bath, no measuring. This really is a favorite part for me and I took the opportunity to try overdyeing some fabric. One fat quarter would be folded, the other I shiboried with a whip stitch over folded edges.


They both went in with the fuchsia/indigo dyestock left over from my purple gradation. There wasn't much left of the original green showing through when it was done.


My instructions for the shibori were vague so I didn't know how long or deep to whip stitch or how far between the rows. It was a whole lot of stitching for minimal results - it was supposed to produce curling leaves. 


You can sort of see how that would happen had my stitches been longer and deeper. I may try this again and not use such a dark dye to over dye.


Now for the stars of my dye session. I just love the drama of this fat quarter that was loosely rolled and coiled in the bag. I started with the leftover fuschia from my color family, borrowed a yellow from one of the girls, put in the fabric and poured the rest of the indigo dye stock over it. I only "mooshed" the bag a little - I didn't want lose all of the lighter dye with too much mixing.


This is from the same bag, the fat quarter being accordion folded, twisted, and then coiled into the bag. Fabulous.


And on closer inspection, I found what I so often find in dyed fabric that has been folded in some way - faces. This looks like Pharaoh to me.


This one looks more native mask guy.


And along the bottom, owl and a friend - can't quite decide what that is. Any suggestions?

So lots of more or less happy accidents for me which means, I get to redo my color family if nothing else. And Pandora's Box has been opened...I've got plans for other dye runs before the week is over and my group wants to make this an annual or semi-annual event.    

Sunday, August 18, 2013

Color in Sketchbooks

I've noted that quite a few art quilters/fiber artists/multi-media artists are turning to sketchbooks to sharpen their skills and powers of observation. I myself, occasionally sketch. so know the appeal. But pencil or ink sketches are not enough - we want to add color to our sketchbooks and travel journals, not unlike famous artists have, and watercolor is often the means of choice. Just a wash of color across the page, or a picking out of the main characters by brushing in some color between the lines. I haven't touched watercolor paints since I was a kid, and frankly, the thought of it freezes me up. 

But colored pencils...I admit to having a bit of a love affair with them. As in all affairs, this one has not always gone smoothly. It's not the pencil's fault, but my own for diving in as if I knew what I was doing, and then being disappointed with the results. But I've persevered, learning why the pencils did not behave as I wanted and easing into a comfortable relationship of experimentation without expectation and thus less likelihood of frustration. Ask a little less, get so much more. I am so enjoying adding color to my stamped button booklet, the coloring process as rhythmic and soothing as drawing itself. 

Tuesday, August 13, 2013

Two Kinds of Progress

What's so special about this empty bookcase that I'd be blogging about it, you may well ask? It represents another step forward toward settling in and putting down roots in my "new" abode. How much longer can I refer to it as new? In just a couple of months I will have been here a year, yet the garage is still full of boxes to unpack. I've got lots of good reasons and lame excuses for that, including the fact that the books could not come out until I decided what to do about the book case. It either needed to be repaired or replaced, and I ran out of time to decided. It was easier to let the movers load it up with everything else and store it in the garage while I decided.

I've been missing my books though and the boxes that held them were holding up my plans for reorganizing the things that will legitimately stay stored in the garage. And I'd left a space in the studio to accommodate the bookshelf. I've been excited about this studio space being large enough to hold everything related to my quilting, something I've not had the luxury of before. And the bookcase is a sturdy one, not needing much in the way of fixing. I had company coming who could help me carry it up the stairs to the studio - a golden opportunity not to be missed. So I figured out what I needed to fix it, completed the repair, and here it sits, ready to be filled again with reference books, inspirational books, pattern books and more. I've been bringing armloads of books a little at a time from the garage between stints at the sewing machine, the full boxes being much too heavy for me to manage. Some titles are greeted with "well hello old friend" while others beg the question "and I decided to move you because...?" I did let go of bags and bags of books before the move, but I probably could have winnowed even more. That's the way nearly every move has gone for me, always a few things that come along for the ride but upon arrival I question why I thought they should.


The quilting on the half-square triangle quilt is coming along, all the horizontal and vertical seams stitched and the diagonal seams as well. I'm starting to quilt the diagonals going the other direction, but there is no seam there for a guide. I pondered this a bit, wondering if I could eyeball a straight line from row intersection to row intersection, but although the space to traverse is only 4 inches, I know from experience, I'll wander off the line. I thought about using masking tape as a guide, but decided that if I just had a mark to shoot for in the middle of that cross seam in each square, I could keep the line straight. That pin looks to be the perfect solution - quick and easy to place and remove as I sew.

I have to admit that I'm starting to tire of this mindless quilting which was just what I needed when I dived into it a week or so ago. My mind is thinking it wants a bit more of a challenge again, which is probably a good sign. It is toying with an idea for fabric postcards using up some more leftovers from Judi's African quilt. It just may let this quilt take a break while it sees if the idea will work. The nice thing about having two machines is that I can switch to the postcards without having to change the set-up on this machine. The other machine is ready and waiting...

Sunday, August 11, 2013

Surprise in the Garden

It takes a year of living at a new place to discover what the previous occupant has done in the way of landscaping. In my case, I am renting and do not have to worry about watering or mowing the lawn, but apparently upkeep of the only garden space along one side of the building is up to the renter. There are bushes of various kinds that everyone in this development has, obviously put in by the management company when the townhouses were first built, but from garden plot to garden plot you can see customization by tenants - on one side of me there were tulips this spring. On the other side, they have planted a bed of pansies. As for my little strip, it looks like nothing was ever added, and I am not that crazy about what is there. In fact, the mystery plant above had what I referred to as anemic-looking white blooms on it this spring that barely showed. But look at what it is doing now. I love those fiery-red pods.


As I took a closer look, I discovered something has been chewing on the leaves, exposing an underlying structure that surprised me. Based on other leaves I've seen reduced to their vein structure, I would not have expected this rigid symmetrical grid, would have expected something that looked more organic. Must be a lesson in there somewhere, don't you think?


Saturday, August 10, 2013

A Pretty Rubber Stamp...

I'm still quilting away on the 1/2 square triangle quilt; all the vertical and horizontal seams have been "ditch stitched" and I've started on the diagonal lines now. Nothing interesting to show there, so instead you get the next installment of working in the stamped button booklet. This page has this marvelously intricate stamped design that I decided to color in with my Prismacolor pencils.


I'm using a set of Verithins since the spaces in this stamp are so small, and many in the set had not been sharpened yet. So I took the time to sharpen them all so I would not be interrupted once I got going. Meticulously sharpening all those pencils reminded me of elementary school, believe it or not, and the first of the year ritual of going up to the pencil sharpener at the front of the classroom with a fistful of new No. 2's. I remembered class clowns who used this pencil-sharpening routine to get attention and/or irritate the teacher. I remembered how much I wished we had at home a real pencil sharpener like the big crank one attached to the classroom wall or teacher's desk. My mother was a teacher, for goodness sake; why did we not own one of these wonderful things? Funny the memories a simple act like this can raise.

Am pondering what if anything to Zentangle around my beautiful little stamp.

Wednesday, August 07, 2013

A ZIA for you

I spent some time quilting on the half square triangle quilt this afternoon, but it was not easy to pull myself away from my back deck where I had enjoyed my lunch and a little reading. So I extended my time outdoors by working on a page in my button booklet before heading in to quilt. I'm trying out a new tangle called "weben" or "weave" in English. Thinking it would make a good background behind these rectangular designs.


You may recall that I got out my stamps and added designs to each page of the booklet in preparation for drawing some Zentangles® around them. Technically that makes these Zentangle Inspired Art or ZIA's. Here's what I started with - designs from my Celtic stamp collection.


Here's the end result. I'm always timid when I get to the shading part (done in pencil) but it is the shading that brings Zentangles alive. I went over the shading 4 times before it felt dark enough, could perhaps have shaded even more. But I like this and think "weben" is a tangle I will use again.


Monday, August 05, 2013

The Wonders of the Internet


I continue to marvel at the connections I make by virtue of having an on-line presence. Recently I received an e-mail out of the blue from book artist Susan Kapuscinski Gaylord asking if I'd be interested in participating in a project to distribute free copies of her book, Art Lessons - Reflections From An Artist's Life, through the networking site BookCrossing. Her plan was to send one copy of the book to one person in each of the 50 states and 10 provinces, and she was in need of someone in Idaho. Would I be that person?

Leery of unsolicited e-mails offering something for free, and having never heard of either Gaylord or BookCrossing, some research was in order before responding. I soon learned that this was on the up and up, and that Susan's specialty is art book making - something that I am very interested in. In fact, some of her work is included in Cover to Cover which I own (and so I guess I had heard of her). A quick look at the description of the book she'd be sending along clinched it - I was sure this was a book I'd want to read and pass on...because that's the deal if I accepted - the book is not mine to keep but to pass along, recording that "catch and release" on BookCrossing so Susan can follow its progress. You can read about this project in her own words on her blog here.

So a free book to read and share from an artist who I am guessing found me through my blog during an Internet search - how wonderful is that? So I said yes, and the book arrived Saturday. It's only about 40 pages but filled with just the sort of personal reflections, quotations and gentle advice we struggling artists need to hear...even if we've heard some of it time and again. It's such a quick read but full of things to ponder that I plan to read it several more times before sending it on its way. I'm thinking I may need to buy a copy not just for myself, but several more for gifts. Thanks, Internet, for bringing Susan and her book to me.

A sample of the personal story the author/artist shares