Monday, January 30, 2023

Naomi's Quilt Moving Along

I've not done more on that stitch camp piece, mostly because it's one of those things good to work on with something else going on like a video that doesn't take that much attention, and I managed to catch up on all of those already with the stitching I've done. It remains by my computer screen so I can think about what to add next but in reality, I now want to switch my attention and efforts back to that baby quilt. I finished piecing the rest of the blocks, spent a little time arranging them on the design wall (this time friend Judi didn't seem to mind my care) and today finished sewing them together into a top ready for borders. Was unsure about how to resolve placement of blocks on those extra rows top and bottom, probably should have sketched it out instead of just imagining in my head, but I think this arrangement works fine.

I picked up glasses last week, a new prescription that I really should have had made up a year ago, but maybe not as my prescription had changed again some at my recent checkup. I knew I'd been struggling with tiny print, but as last year wore on, I felt more and more like my eyes were straining all the time, and that change in prescription proved I wasn't imagining it. Everything is clear now with no added effort which of course makes any sewing that much more enjoyable. And since I was pretty sure I didn't want to go without glasses while the new lenses were being made (they'd have to send in my current frames to have the lenses fit to them), I spent an inordinate amount of time picking out new frames. I love the frames I've had for quite awhile now, continually get positive comments on them, but to be honest, I'd started looking at myself in the mirror and thinking, "I'm really tired of you!" New eyes in 2021, new back in 2022, I guess new frames in 2023 were warranted. I really like them!

Monday, January 23, 2023

Just Take Me Out & Shoot Me . . .


I must be feeling better. I let myself get enticed into signing up for TextileArtist.org's 5 day "stitch camp" - free of course so what is there to lose but some time? I rationalized it many ways: 1) I really do love hand stitching and haven't done any for quite some time; 2) it was billed as doable because of the way the project was divided into small segments over the 5 days; 3) I might see something new or a new way of doing something I'd already tried - you know, transferring parts to something I already do; 4) I could always just watch the videos and if nothing appealed, I wouldn't have to actually do the project; 5) did I mention it was free? Yeah, a lot of rationalization. And even though "mark making" was part of day one, something I've never liked doing in any medium, I was intrigued by the idea of "seeing things in the marks" to drive how you would add embroidery. That's pretty much in my wheelhouse, "Masks" being one of my best examples of seeing images to be picked out in stitch.

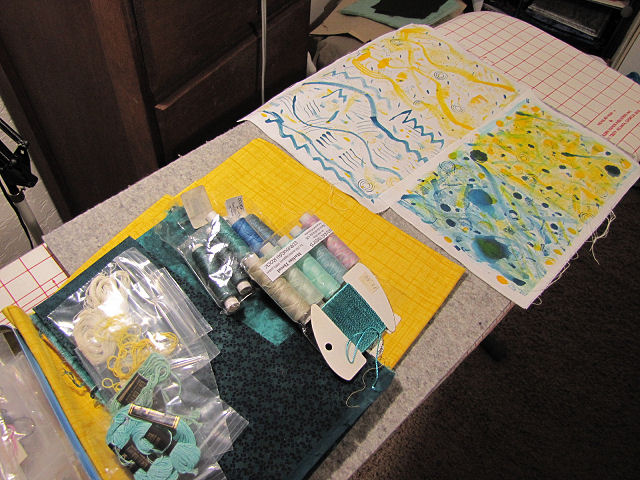
So I grit my teeth and did day one's assignment of mark making. One good lesson was the suggestion to pick just two colors (one medium, one dark) plus a light neutral. That really does simplify things. I chose teal and yellow and searched my stash for fabrics of that color as well as threads and floss for embroidery and paint for making those marks on the "winter white" kona fabric. The resulting painted fabric was of two kinds, one with dense marks and little white showing, the other with the marks farther apart with more white area. Accents of the opposite color on each area helps with a bit of cohesion. I did the dense marks first and really didn't like what I did, partly because I was learning how the paint was working with the various "tools" I tried. Before I did the less dense marks, I'd scrolled through the dedicated Facebook page to see what others were doing and spotted some really cool marks made with fork tines - I'd totally forgotten about that, so I got marks I liked better on that piece. (You can see the results and my pile of threads and other fabric in the photo above.)

But no matter, this painted fabric wasn't supposed to be a lovely composition because it would be cut into 2-1/2 x 3 inch pieces (don't ask - the teacher gave no explanation for that dimension and also said we could cut them any size we wanted). Pick and choose what to pair, looking for connections from one square to another, then overlap slightly and tack with small running stitches. Yes, no seaming here as the simple embroidery stitches suggested are meant to "blur" the joins. She was putting together up to 4 squares into a strip, but I could see others in the group were breaking from this idea of making a long strip to use more squares in rows, which is what I wanted to do. As you can imagine, after I pulled those 3 dark teal squares together as something embroidery could help make the marks flow one to another, I spent quite a bit of time arranging the other squares around them. At one point I actually had a second piece going, but dang, I couldn't help myself. I managed to use every single square in this one piece. No leftovers for this gal!

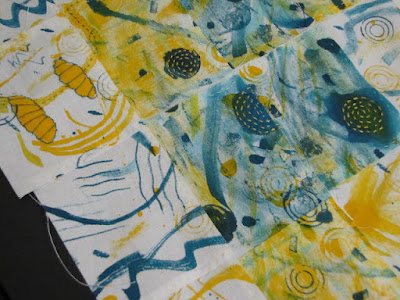
Favorite marks are the thin parallel lines made with a fork and the concentric circles from a spool end

Unfortunately (or possibly fortunately depending on your viewpoint), those of us with larger pieces immediately realized we would be adding embroidery stitches on them long past the day specified for the embroidery. But we don't really care. I enjoyed tacking the squares together, that rhythmic running stitch, and am equally enjoying pondering what to stitch where. Day 4, if one was done with embroidery, was to be time to assess the piece to see what bits of applique might be added to additionally blur joins and make the piece more cohesive. The last day talked about how to finish the piece, and I particularly liked an example where a piece like mine could be laid on a piece of fabric extending beyond like a border and where embroidery stitches could extend into it. I could see this sort of piece being framed.

This exercise of blending marks from one area to another reminded me of a quilt I made prior to 2006 I believe. A friend had challenged me to do something with a small piece of 60's polyester fabric with a bold print. I had some bias tubes left over from a Celtic applique project and they became the connectors between rectangles of that fabric, over the solid hand-dye. I'm getting a bit of the same vibe off my stitch camp piece.

Well, with watching the daily short videos and doing something each day on the piece, that took me through Friday, and knowing I could set the stitch camp piece aside, I spent some time Saturday and Sunday working on the baby quilt. Extra incentive, I was having lunch with a quilting friend today, and I'd told her the last time we'd gotten together about my plans so I really wanted to have something to show her. I completed the 4 light blocks and 8 split blocks with dark centers, plus one from the split block with the light center. Here are the rest of those blocks with their squares all arranged and ready for  joining, so half plus one done. I must admit that I feel Judi over my shoulder, telling me to quit so deliberately putting the different patches in place, to loosen up like she did once when we were on retreat and I was working on a mystery scrappy quilt. She "caught" me matching up fabrics, which I denied. She wanted me to just pull pieces out of a bag. a way of working that I do find very hard to do. So while I arranged these squares, I just told her to shush, important not to have two of the same fabric side by side! I got the impression she wasn't convinced. ;-)

Monday, January 16, 2023

Cut And Sew

Some people count sheep when they can't get to sleep. I found myself counting squares and blocks one night last week while trying to drift off to dreamland. I've been a bit surprised at how this project has energized me, and it's been difficult NOT to lie awake thinking about it and envisioning it. But back to the counting. I suddenly realized that I did not cut enough squares, had miscounted the number of blocks, at least I was pretty sure of it, and when I checked the layout diagram with my work sheet, I had indeed shorted one kind of block by 2. Those extra light blue squares I cut? Now I needed to add two more to them because they were no longer extra, and cut a few more other squares as well - see the figures on the right that the pen is pointing to. Made me glad I'd left some of those fabrics out in a "just in case" moment which was more just in case I don't like the value of some of the squares I cut, not just in case I hadn't cut enough. I'm pretty sure this gaff is because of the extra row top and bottom I plan to add.

With the correct number of squares now waiting, it was time to make the half square triangle units that turn this nine patch into a split one. There are many ways to make these units and I've probably tried them all, settling on the method Judi describes in her directions.  It has proven to be the best method to get perfect results. It starts with layering a dark and light square, and in most directions, drawing a pencil line diagonally from corner to corner as a guide for then stitching a quarter of an inch on either side. I go one better by using this quick quarter ruler that allows me to draw instead the actual stitching lines. By lining up those corners in the center slot of the ruler, one can run a pencil along both sides of it to mark the sewing lines.

I generally put in a few pins to keep the layers from shifting, then it's off to the machine for some chain stitching, down one side of each square and then down the other.

Cut the threads between the squares and line up a ruler on those corners to slice down the middle between the rows of stitching.

Time for pressing. I generally do the "press seam to the dark side" but I've also made this block by pressing the seams open, and that is what I decided to do this time based on the kind of quilting design I'm thinking I'll use.

Not done yet. The size of the starting squares produce an oversized half square triangle unit that now is trimmed to a perfect 2-1/2 inch square with that diagonal seam ending right at the corners and no distortion. A little extra work but so worth it and only a little bit of waste in the trimming. Here you see the 45 degree angle of the ruler lined up on the diagonal seam with overhang to be trimmed.

I've laid out an arrangement of squares for each of the three kinds of blocks along the top of the photo and you can see my pile of trimmings from squaring up the half square triangle blocks. Now I really CAN get to sewing blocks together.

Monday, January 09, 2023

New Year, New Project

I know, I know. What happened to "continue finishing projects"? Well, there's a new kid on the block as of December 24 and she needs a quilt. And not just any kid, but the first grandchild of my late artist friend Judi. When I first got to know Judi, her two kids were grade school age, and I watched them grow into fine adults while Judi and I also grew our friendship. We were briefly in business together, making and selling handdyed fabrics, and even after I left the business, I made samples for Judi's vendor booths and often helped set them up and man them. Now that she's gone, I contemplated what kind of quilt she might make for this granddaughter, then realized I could make a very special quilt using the last of Judi's hand-dyes that I inherited and a pattern that she had come up with to show those fabrics off. Time to get out stacks of fabric and start auditioning.

Judi based her design on the split nine patch block. I actually taught a quilt class using the patterns she put together and that I'd made samples for, Spring Fling and  Country Star, so I got out my files with patterns, instructions and handouts - I've never been able to break down those class files I accumulated! And then, while looking for something in the bottom part of my roll-top desk, I realized there was a lot of things there I couldn't remember exactly what they were. More files and notebooks and to my surprise, Judi's original hand drawn and colored optional settings for using the split nine patch block and the prototype for the pattern cover which includes my name. While I'd planned to use similar colors as in the Spring Fling quilt, I didn't necessarily want to use that set. In these original options, I found the setting I wanted to use - the one in the middle.

I also want to make the quilt rectangular rather than square so will add a row of blocks top and bottom. This all necessitated me doing some calculations of how many of three different kinds of blocks I would need and then how many of two different sizes of squares in light and dk/medium values I would need. Now the cutting could begin! The camera had difficulty picking up the light purples as light purple but the other colors are pretty close. I cut a few additional light blue squares as some of the last blues that I cut are perhaps too dark for the light areas. We shall see. Sewing commences this week.


Sunday, January 01, 2023

Welcoming Another Year


For last year’s words belong to last year’s language
And next year’s words await another voice.
And to make an end is to make a beginning.
- T.S. Eliot, Little Gidding

I've been thinking about my resolution word for 2023 for several weeks now. Three years ago I chose "GO" as encouragement to get in the studio and just do anything. The next year I realized I had lots of partially finished or ideas for projects that I still wanted to work on so the word was "FINISH". Well, I didn't get all that far down my list so the next year was "MORE" as in keep on this track and finish more projects. That unexpected surgery this year kept me from finishing as much as I hoped, but I'm not giving up on the idea, still wanting to stay on that track.

So the word for this year, as you can see added to that sign taped on my studio door back in 2020, is "CONTINUE". The more I thought about that word, the more I realized how loaded with meaning it is for me. Not just to continue working on these old projects and ideas that still interest me but in general to continue with all facets of my life that got put on hold, to continue reaching beyond my four walls, living those things I could only dream of doing at some point as I struggled through this year. I feel buoyed by the thought. "Continue" may not sound very exciting, even mundane, but to be able to continue with my life at this point isn't mundane at all, but indeed exciting. As we age, life throws more curve balls at us, not to mention health issues and the loss of friends and relatives. So much gets harder and it's no wonder a person might just give in and give up. But I'm not going that route. I'm going to continue . . .

"Unfurl yourself into the grace of beginning." - John O'Donohue


*********************************************************

For previous year's resolution words, see these posts:

2008 - Freedom
2009 - Calm
2010 - Focus
2011 - Refocus
2013 - Perseverance
2014 - Explore
2015 - Fearless
2016 - Light
2017 - Endure 
2018 - Refresh
2019 - Wing It!  
2020 - Go! 
2021 - Finish 
2022 - More