


Well look at that! We'd gotten a dusting of snow the night before but I thought yesterday was supposed to be rainy.

It snowed lightly all day but with not much accumulating - only a couple of inches. Definitely helped put me in the mood to finish up writing on Christmas cards.

But today it has warmed with gusting winds. All this is melted off the trees, roads and lawns. Beautiful while it lasted.

Can you believe it? My deck plants are hanging in there still! On closer inspections, I can see that the local deer that pass through have nibbled some leaves off the geranium but otherwise it is holding up.

I think it may be because we haven't really had a hard freeze yet. Just chuckle at that lovely yellow snapdragon bloom.

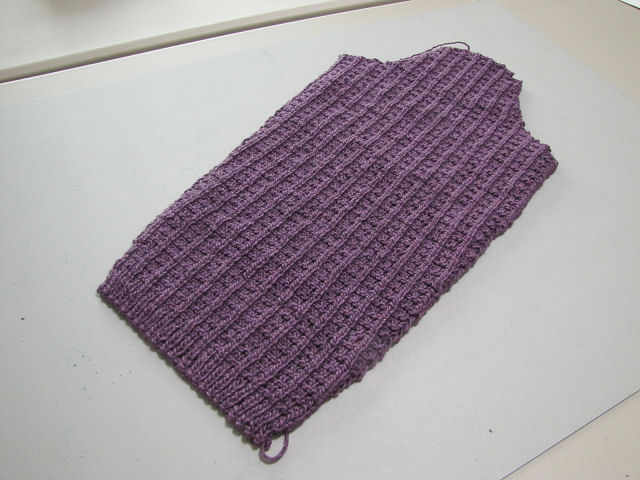
Still dawdling on sewing together my sweater but did get as far as to realize that these quilting clips might be perfect for holding the sections together as I sew. I may have to get another package because these are working great. With most of my holiday preparations taken care of, I think I can convince myself to focus on finishing this up now.
How are your holiday preparations going?

I've been working on a new book structure this week, something I've had in mind to give a friend for far too long. Time to get it done so it will arrive by Christmas. It's from the April Handmade Book Club offering and when I first watched the video I wasn't sure about it, but a bit intrigued. It was billed as a way to use up leftover papers for the signatures (you can make it any size) and quickly sew into a book with a cover that is just glued onto the first page of the first signature and the last page of the last signature. I'd pulled the image with the saying "Don't Let Anyone Steal Your Joy Today" off the internet (no attribution), thinking it would make the perfect cover for a "What was the very best moment of your day?" notebook.

I've yet to try a "quick and simple" project that didn't take me longer than anticipated and wasn't full of problems. There was so much I had to think through as I went through the steps. At first, I was delighted to find enough leftover papers from a different project to make 4 signatures measuring 5" x 4-1/4" when folded. I was equally delighted to find a document I'd made to print lines across the 8-1/2" width could be quickly edited for my 5" height. I got the lines printed, folded the signatures and put them under weights while I puzzled my next steps.
I decided to print the cover image plus a different one for the back cover onto matte presentation paper in order to get the best colors. It's not heavy enough though to be a cover on its own but it was suggested that a flimsier paper could be glued to card stock or a file folder to give it added strength. I wasn't sure how the paper would react to glue but remembered I had 6" squares of double-sided Scor Tape. But then I started worrying about how the printout would hold up as a cover as I read through the directions of how to treat the printed page. My ink is not the archival kind the is water resistant. I thought about a tip Laly Mille mentioned if your inkkjet printouts ran or blurred when painting over them: just spray them with workable fixative first. Aha! I do have fixative on hand so after applying the Scor Tape to the images and doing a test run on different images, I sprayed them with fixative. Once dry, I trimmed them to size, stuck them to a file folder and trimmed again.

Now for the sewing. Instructions suggested a "cutting" method rather than punching holes which required clipping all four signatures together and "sawing" with a crat knife across the folds down through all paper layers. I was not the only one who struggled with this, finding first of all that my biggest clips would barely open wide enough to capture all signatures, and second of all the sawing took way more time than if I'd just made a quick template and punched holes in each signature individually. Even on the video instructions, the teacher's cuts did not make it through all pages, and many of us found the same, ending up needling holes the rest of the way. The binding itself was done a bit differently to create link stitches rather than true coptic stitches which are stronger, but this was primarily meant to be more a notebook for making lists with glue added over the spine for strengthening. But first, those covers needed gluing to the first and last page, kind of tricky but I got them on. I let them dry for a bit before wedging the book between other books to keep it upright for the spine gluing. Ohhh, I wasn't at all sure about that step and feared the glue would show white on my buff pages. But after a night of drying, it had gone clear. Whew! It opens nicely, does lay pretty flat and will make a nice gift. Will I make this structure again? Not sure, but at least now I know some of the pitfalls.

I thought I'd be able to post a picture of a finished sweater today but the suggested tubular bind off of stitches around the neckline ribbing took way longer than a traditional bind off would. It is done using a regular needle (which you should be able to see in the picture) to wind around and through stitches before dropping them off and it seemed slightly different from the sewn bind off I did on the grey socks but with the same effect - a slightly stretchy finished edge. I worked on it through three tv shows last night! I found I had to have the instructions right next to me to keep track of where I was in the sequence, couldn't seem to keep track otherwise. By the way, picking up stitches with those markers spaced along the neckline really did make that process easier.
So now I'm ready for the final stage: sewing the sleeve caps to the sweater armholes followed by sewing up the long seaming of the sides and sleeves. I am resisting this part, realizing I'm feeling a lot like I do when I get to the binding on a quilt. Actually setting in sleeves when I made my own clothes found me similarly resistive. Definitely not my favorite part. I did a quick check of sizing after the binding off was done, slipping my head through the neckline opening and holding the sides together with my fingers. It will get a blocking after all the seaming is done but it looks like the fit will be just fine.

Finally tackling the dreaded finishing touches to my sweater, getting those shoulder seams whip stitched together so I can knit the collar. I've never liked picking up stitches at the neckline, always feeling that it is a guessing game to get the right number so stitches evenly distributed. It's been a long time since I've done this and thought to check a reference book I have on hand to see if I was doing it right (I wasn't). And that is where I found the helpful tip for distributing the stitches - use stitch markers to break up the neckline evenly! Almost a "duh" moment. I did some math and came up with a breakdown of 7 sections of 15 stitches each. I'd bought a packet of safety pin-like markers back when I was knitting socks, didn't even know they existed until they were used in a PBS knit & crochet show I'd started watching. They worked like a charm. Onward!
I'm having a hard time adapting my routine to the time change that brings darkness so early to the day. I am so used to walking between 4:30 and 5:00 or so when I know my mail will be waiting for me as I pass the mail locker on my way by, but now it is almost dark by 4:00, so an earlier walk it is and a second trip to the mail locker after dark. Any change in routine leaves me floundering for awhile and wanting to resist it but I'm trying to be more positive this time. For instance, I'm meeting different people walking their dogs at this earlier time. Still, I'm getting caught out by the switching around and not getting into the studio as I want. The day just magically disappears even faster it seems. How are you coping with the time change?
And do you have plans for Thanksgiving? If you are traveling, may it be safe and delay free. If you are hosting, may all conversation be light and loving, and all food comfort for the soul.

I got another trinket bowl made, using up the last of the blue ark fabric and what was left of the pinks. But that raindrop fabric - it will go into many more bowls, it looks like. That strip you see is four double layers that will take 3 swipes of the rotary cutter across its width. Many more long lengths for wrapping around clothesline. I'm not as happy with this one as the others, not liking my decision to just go as far as I could with the first inner pink which made that second round short, and wishing I'd had some blue, even if a different fabric, as accent around the top to balance the blue in the center.

And we got our first snow over the weekend - only a few inches that quickly melted off even the lawns, but more is due in tonight and tomorrow. Oddly enough, my deck garden doesn't seem to mind. Small excitement on the home front: a new refrigerator got delivered today. The old one was starting to make some disturbing clunks when the condenser shut down. As a renter, appliances are included so getting a new one doesn't cost me a thing. Ditto with new sets of blinds for the upstairs bedrooms. Those bedrooms facing west get the afternoon sun and the plastic clips holding the vertical blinds in place started snapping from deterioration. Now I have working blinds again and really appreciate having a great maintenance man to install them. In the meantime, I've noticed that the new refrigerator sounds slightly different when running, causing me to cock my head to figure out what that sound is. Shouldn't take long to get used to it though.
 |
| South of the Colorado - Basketweave turning by Charliewood Art |
Goodness, the last few weeks have been full of distractions and diversions that can kept me from having much to share. I'm guessing hearing that I've gotten to some document shredding and filing, finished updating my various journals, received positive reports from my regular 6 month followups with my rheumatologist and dental hygienist and got my car serviced for winter aren't the sort of thing you come here for. I've also had some computer wars that I finally resolved today so hopefully am ready to get back into regularly scheduled blog reports. In the meantime, I ran across a woodworker whose artistic renditions either fool you into thinking you're looking at a woven basket or that puzzle you over how he did that. It's Rich Charlson, a Montana farmer who turns wood in his spare time. But don't think he's some amateur for he has been honing his craft for about thirty-five years and has many accolades to his name, Go check out his many bowls, crosses and even wall hangings at Charliwoodart.com.

I have had so many distractions and diversions and things to stress out over, little time to unwind in the studio. So the other night I pulled out my knitting again, knowing I didn't have too many more rows to go to finish the second sleeve of my wool sweater. I was so right to think I wouldn't have enough yarn to finish it and so lucky I was able to get more of it. The arrow points to where the last of the originally bought yarn ended and the additional bought yarn was added in order to finish the top of the sleeve. Of course, you also need a bit of yarn to join front and back and sleeves by hand and also more to knit the neckline ribbing. An extra skein was definitely what I needed. As the shop owner commiserated when I told her my sad story of being sure I wouldn't have enough, "Don't you just hate it when those yarn amounts aren't right?" So I guess it happening must not be rare.
By the way, still enjoying autumn colors. Though some trees are dropping leaves, many more, like the cottonwoods and birches, are clinging on. Had to make the hour drive to the "almost big city" yesterday which is mostly through the countryside and thoroughly enjoyed seeing so much brilliant yellow along the way.


I spotted some rather scraggly flowers next to the walkway, but pretty all the same.

The cottonwoods have finally amped up their color, and the birch trees are following suit. I took these pictures along the service road next to the dog park.


They are at their best when the sun hits them.


I don't have pictures but have noticed some trees that have turned color in what seems an odd way. At least I don't remember noticing before how some trees have both yellow and orange leaves in different parts of the tree. And one tree at City Beach had yellow leaves close to the trunk while the outer leaves were orange red. You really had to look closely to see those yellow leaves hiding underneath. And while many trees are at peak, others have leaves that are stubbornly staying green. What are you observing in your neck of the woods?

You might remember that my resolution word for this year is organize. After the first big push early in the year, I haven't thought much about it as I've just delved into various projects. Well, maybe I've thought of it a little bit as I note things I've continued to stack on the end of the work table. The filing never seems to end. But here is another part of my procrastination problem. I see things I might want to print off to place in a journal or my book of quotations, or something short enough I could just copy into one of them by hand, but instead of doing it on the spot, I end up saving the image or link to one of several places. If it is found on Facebook, I save it to a file I've titled "When I have time" because that is exactly when I think I'll get to it as well as articles I want to read but right now I don't have the time. Sometimes I download it to my computer where it can sit for a very long time, sometimes just waiting until I have enough to fill a page when I do get around to printing them. It would take just a few minutes to deal with things like this as I run across them, but I so often procrastinate until I think I'll have more time.
Well, this past week or so, I decided to take the time, and I've been doing some organizing of files and photos on my computer and going through all those Facebook saves and getting them printed off. I'm down to the last page in my quotations book and am looking forward to transitioning to the Celtic Weave book I made. My Gratitude and Memories book hasn't been touched in a long time but some of the saves definitely belong in there. There was even directions and photos of a transfer method I've been meaning to try for a very long time, but I needed it printed out to make it happen.
While in the midst of this, an e-mail directed me to some hiking trails a bit south of me that I was unaware of. I've been wanting to go somewhere new so maybe I will try one of them. For once, I did not save the link to Pocket under the Hiking tag but printed off the info right then (upper left). Pretty proud of myself for that!
Now to get them trimmed to size and glued into their proper places. Let's not procrastinate there too . . .

You may think the above photo looks familiar but it is not a re-posting. I was emptying my studio wastebasket when I spotted the long strips trimmed off along the selvage when making the pillowcases. They'd gone immediately into the trash because the printed area next to the actual selvage was so narrow - no reason to save these. This was before I caught on to the idea of using up scraps from the quilt to make trinket bowls. I did a quick measure and there was exactly the width of print that I cut for strips to make the bowls. There were usable scraps from the pillowcase cuffs as well as 4 inches of raindrop fabric (seen at left) to continue cutting up, so it all looked like enough for another trinket bowl.

And indeed it was.

I decided to look a little deeper into what was in the bag where I'd been tossing fabric scraps I thought I could use for bowls. There was quite a bit of a fabric used as backing for another baby quilt I'd made for a nephew's baby, one where the mother had a specific pattern and fabric choice in mind. I never really liked this fabric - too kind of 60's pop for me but at least had teal in it which is a favorite color of mine. One nice thing about these narrow strips that wrap around the clothesline is that much of the print becomes indistinguishable so I knew this was a good use for this fabric I'm not keen on. You'd never guess what it looked like before being cut up and it pairs well with the raindrop fabric.
I also found more pink strips in that bag, puzzled as to where they came from but they will go into yet another bowl with this floral, still working on making it all go away. But this is reminding me too much of the biblical fishes and loaves story where no matter how much they gave away to the thousands of people being fed, there was always some left over. Quilters and their scraps apparently have the same problem. ;-)

Leaves seem reluctant to change their colors in my part of the world, that is, save for a group of maples in a park I frequent.

They are a rich red which draws me over for a closer look.

The cottonwood trees, though, can't seem to muster their usual bright golden yellow I love, if they are turning at all. Their hearts don't seem in it, any more than my heart has been into what waits in my studio this year. Oh, there have been splashes of interest, bursts like those maples, but the interest and drive I once had waxes and wanes. Age? Health? Shift of priorities? I don't even take as many inspiration photos as I used to. And yet, I still study clouds on my walks and couldn't help but try to capture some stunning ones yesterday, having no idea how I might work them into a textile piece - clouds are really hard to capture in fabric and thread! Not even easy with paint!


Someone should create an app that blocks all e-mails and websites offering free things, at least things related to art and crafts. I was going to make more trinket bowls but the free Year of Light Taster sessions I'd signed up for a few weeks ago out of curiosity suddenly started, and there I was, committing myself to nine days of art videos that would then disappear. I checked out how things were set up and found it very much like the Sketchbook Revival I participated in twice: A host artist (who I was familiar with from her videos on Sketchbook Revival) and 4 different artists a day presenting their classes in videos lasting anywhere from 20 minutes to an hour and a half. At least with Sketchbook School we knew we'd have a week or so following the last presentations to catch up or rewatch videos, but this taster kept stressing that all would disappear after the last day of videos. Not to worry though, the host said, just purchase the year-long "Year of Light" and you would have lifetime access to these videos plus all the other videos that would be shown during the year. I didn't check out the price of that but you can believe it is hefty, and hefty enough that the host was offering a 25% discount and payment plan. Wow . . .
Well, I got to watching. Techniques taught were predominantly watercolor with a few using acrylic paint or pastels, and a few teaching drawing skills with pencil. There was a little collage and mixed media that I found interesting, and my fave Laly Mille showed a transfer technique unlike what I'd seen before (and am anxious to try). The quality of presentations varied widely, some very fussy and having you sit through slow application of paint and layer after layer to reach the desired result, something I had no patience for, some I skipped because I'd been exposed to them in Sketchbook Revival, some good but could have been edited down, and some very well done and informative. I fast forwarded through a lot of them, and the ones of interest I watched clear through, taking notes on the printouts provided. Unlike during Sketchbook Revivals where I watched and did almost every lesson over the two weeks, I had no time to actually do any of these lessons, but would like to try the ones I took notes on eventually, hoping I can remember and make sense of the notes since I won't be able to re-watch any videos.
My brain was reacting differently from other times I've watched videos like this, it seemed. When I'd run across videos either too lengthy or not well done, I'd question if this was a good use of my time. Even on ones that interested me, I caught myself thinking how much easier some of the effects could be done using fabric. In fact, one session painting a night sky with moon and bare branches stretching across and over the moon, I HAVE done in fabric, more than once. And one showing how to paint bubbles with acrylic paint reminded me of the bubble prayers quilt I made using sheers and metallic thread for the bubbles. Feeling confused, I started to question why I was even interested in wielding a paint brush, except that I have all the supplies and it's a newish, unmastered technique I have dabbled in.
And all the while, I felt the pressure of time, knowing these videos would be going away, and feeling a certain anger at something presented as a fun, get a "taste" of the real thing which was simply a marketing ploy. Whenever someone shared that they'd been sick or busy with work or other life intervening things and "behind" or even not having been able to watch a single video, the chirpie Host would say, don't worry, just buy the year long class and you'll have lifetime access to all, or to those saying how overwhelmed they felt, you don't have to do every lesson, just pick a few. Nope, you certainly don't have an understanding of the people who would sign up for this sort of thing. We would want to take full advantage of such an opportunity for free classes.
Granted, Sketchbook Revival is a bit of a marketing tool as well, but it is giving the opportunity to artists to showcase what they have to offer should one decide they'd like to pay for a class from them, but the main thrust is to get people using their sketchbooks again and giving them ideas of how to do that. This taster didn't feel that way to me at all; no, this was buy my pricey class, gains for you secondary.
By the last day which was yesterday, I have to say I was pretty burned out, watching or skipping through all those videos for nine days straight, and losing interest in the last set, asking myself the important question of how would I use what I might learn here and am I even interested in learning how to draw or paint the object shown? (No, I do not want to paint a fox. No, I do not want to sketch a bird.) I did watch two more but was glad I was done. Also getting overloaded with so many people posting their renditions of the lessons in the Facebook group even though some were quite good. In fact, I had to chuckle that a few came out better than the teacher's. In the end, the host relented to the cries of give us a few more days and did tack on 5 more days of access to the videos. Good on her. But I've seen all I need to see I think. Back to trinket bowls . . .

When I started the first of these trinket bowls, I wasn't feeling very well, but I thought well enough to sit at the machine wrapping fabric strips around clothesline and slowly stitching the coil together. And in fact I did feel well enough to do that, that is until I had to make a decision about changing to a different fabric. Where I stopped to take a picture for this blog post was where I could switch to, say, the blue fabric or continue up the sides in the raindrop fabric. I wasn't sure how far the blue strips would go and in my muddled state, I simply couldn't make up my mind and walked away . . . for over a week until I felt better. By then I'd thought it over and had a plan to just continue up the sides and switch to the blue for the last two rounds. And was disappointed with the look, plus the bowl was slightly larger than mine that I was using as a guide, and I'm not sure why. Was the clothesline slightly thicker, or the less wide zigzag not pulling together the coils as much? Whatever the reason, I forged ahead, deciding the next one would use up all the pink fabric and it pretty much did. But was smaller than the first - go figure! I had some orangy pink for the center of the last bowl, filling in the gap to the place where it shapes up the sides with raindrop fabric and doing the final 4 rows in the blue now that I knew how far each strip would go. In size it falls somewhere between the first and second one. I think I like it best although the pink one is very likable too.
There's still maybe a 4 or 5 inch selvage to selvage strip of the raindrop fabric plus other wider lengths that run parallel to the selvage but otherwise, the rest of the fabric that went into the quilt has been used up. I like the way the raindrop fabric worked up in the trinket bowls so may put it in the bag where I have other fabrics suitable for bowls. in the meantime, quilt and pillowcases and bowls are now boxed up ready to send off.
 |
| Spotted on a recent walk |
There is no such thing as time going straight on to new things. This is an illusion. Okay? And clinging to this illusion makes it difficult to understand oneself and one’s life and what is happening to one. Time is repetition, a circle. This is obvious. Day and night, the seasons, tell us this. Even so, we don’t believe it. Time is not a circle, we think. Spring screams the opposite to us, of course, and summer seduces us into believing that we’re all going to live forever. Winter couldn’t care less what we think about time. But fall cares. Instructive, tactful, subtle, fall is a philosophy all its own. Occult, secretive, taking pleasure in sleep, in rest. Fall’s comfortless, honest rot. In the beginning in most places it’s showy, the better to mask its melancholy: raging leaves and spanking breezes, edgy with the real cold. And that special, solemn light. For fall is for melan- cholics and those in love. The torchy sort of love. Forget spring. Spring is nothing but promise, a reproach to melancholics. Spring makes us forget the deal, whereas fall is the deal. The unutterable, unalterable deal.
Fall is. It always comes round, with its lovely patience. If in the beginning it’s restless, at the end it’s re signed, complete in its waiting, complete in the utter correctness of what it has to tell us. Which is that we’re transitory. We’re transient, we’re temporary, we’re all only sometime. We will pass and someone else will take our place. Our pursuit of living founders each time we remember this. Fall is the darkening window, the one Hart Crane had in mind in his poem “Fear,” the window on which likes the night.
Found in Ill Nature: Rants and Reflections on Humanity and Other Animals.
 |
| Only some of the stacks of fabrics I went through |
I really liked the idea of using up the big pieces of fabric left over from making the rails baby quilt by making it into pillowcases, and thought it wouldn't take me long to make up three for the other kids in the family. I'd found several free pillowcase patterns on line and chose the one from AQS partly because it used a little less fabric in the main part of the case and the cuff seemed simpler. I made a few changes like not cutting two separate main and cuff pieces, thus eliminating one long seam, and found I could get two cases out of the ark animal fabric and one out of the raindrops. That part went quickly enough. But as you can see, picking coordinating/contrasting fabric for the cuffs sent me for an agonizing trip through my stash that lasted several days. You know the drill: pull potentials for auditioning, find a few that might work, nothing seems quite right, and finally, when looking in a spot you forgot to check, you find a perfect candidate, then another and decide you really like that one you spotted in the beginning. Ahhh, all three cases now have cuffs to match. (And I have to say, the process reacquainted me with a lot of beautiful fabric I must find a use for.)
 |
| Me and my mother 1968 |
Both sets of directions gave the option to just zigzag or machine overcast the seams but I knew with this fabric there would still be a mess of threads after washing. So I opted to make French seams, a technique I learned when I made this dress for a high school prom. That floaty chiffon overdress absolutely had to have its seams encased, not just to keep raveling under control but because they could be seen through the chiffon.

You know me, I like things nicely finished and I'm very pleased with these French seams and the way the cuff folded over and was stitched down a bit from the edge, looking very much like a commercial pillowcase.

But these did take longer to make than I thought they would. I did do a lot of pinning which I suppose many people would not, but again, it assured a good looking product in the end.

Now I've started on the trinket baskets I wanted to send along as well. It won't use up all of the raindrop fabric (I don't think) but here is what was left of the ark fabric and the various pink fabrics I used in the quilt that could be cut into usable length strips for the baskets.

It's been awhile since I've made these so I had to spend some time going over directions and finding my notes on machine settings and changes that make a full basket into a short lipped saucer shape like this one. And this first one is going very slowly as I get my wrapping and coiling rhythm back.
In the meantime, I've finished sleeve one of my lavender sweater and yes indeed, it did use up slightly more than one skein, meaning I definitely will need at least some of the extra I was able to get.
 |
| Round Lake State Park |
A case for vacation: “A lot of writing consists of waiting around for the aquarium to settle so you can see the fish. Walking around muttering seems to hasten the process. Taking public transportation nowhere helps. Looking out the bus window lets the back of your mind move forward. Don’t listen to anything but natural sound. Don’t look at anything you have to turn on. This is about the pleasure of silence. This is not meditating; this is reacquainting yourself with yourself. Something interesting might enter your head if you let it alone.” Abigail Thomas
I
don't think that only refers to writing, but to any creative outlet. I have the luxury of being able to do this often, tap into this "pleasure of silence". Today was one of those times.
Goldilocks got her "just right" weather today so off I went and this is where I spent some time. I was surprised that more water wasn't flowing through here and what was didn't make a sound, even though some flowed over and around rocks. I was wondering if something was wrong with my hearing it was so quiet, if not for the very loud woodpecker. Up on the upper trail I spotted a deer browsing in the trees. I stood stock still while it tried to decipher what I was. When I finally moved on, it took off but not far. Turns out there were two or three more in those trees, just calmly watching and chewing. It was a day not to grab for a camera but just take in the sights and smells and the feel of the breeze against my skin and its sound through the trees. Refreshed.

I am stubborn. I try to avoid cliches or puns when naming my quilts. I strive for something more than "For (quilt recipient's name)". But as I mentioned, an obvious name for this quilt for my goddaughter's baby was alluding me. But not really. Every time I spread it out on the table,"Pretty In Pink" popped into my brain. NO, my stubborn side said, that's a movie title, one I've not even watched, and probably sending a message I don't want to send. And yet . . . this quilt IS so pretty in pink. So I gave in, inking the info on the back of the quilt. I usually use a micron pen to do my inking, and more recently, their plastic nib versions. Had a blue one I've used before, but it seemed to have dried up. I've had a lot of issues with that recently with micron pens I've purchased either at the Michael's store near me or added to an internet purchase from some place like Cheap Joe's. It's making me wonder how long these pens have sat in stock, because I have pens I bought years ago but don't use often that still work fine. Was about to change to a black one when I had a thought. Could I use one of their brush pens instead, since I had one of those in blue? Yes! In fact, a brush pen may move even better over fabric when using a light touch.

I am so pleased with my choices for the quilting. After finishing all the arrows on the blocks, I wondered if I shouldn't add more lines. I decided to wait until I'd quilted the sashing to make up my mind. The arrows were a take on one of Angela Walters' "dot to dot" designs from her recent series, Dot to Dot FMQ Challenge Quilting Along, such an easy method of quilting with straight lines. But for the sashings, I was considering several of her more curvy designs like serpentine or ribbon candy. I've done neither of these before and wasn't in the mood for practicing or setting up my machine for free motion quilting. As I stared and considered, it occurred to me I could put into practice more dot to dot quilting in that sashing, using the seams of the strips in the blocks as my "dots" to shoot for. This worked so well and when I spread out the quilt again, I didn't feel I needed any more quilting in the blocks. Thanks, Angela, for influencing how I approached the quilting on this piece.

When making baby quilts, I've gotten in the habit of quilting the baby's name somewhere within the quilting designs. This time I reserved the border for adding her name, interspersed with hearts. My script may not be the prettiest but the variegated thread hides some of my inconsistencies.

So here it is, ready at last to send off to baby Briar. But first, I'm going to make some pillowcases from what I have left of the Noah's Ark fabrics. I have quite a bit and have no desire for it to go back into my stash. They can go to the other kids in the family.