Tuesday, April 30, 2013

WWJD


For as much time as I've been spending in the studio, I've seemingly made little progress on the African quilt. It's been a constant game of musical fabrics as I dig through available fabrics and ponder WWJD - what would Judi do? Because I tend toward a lot of structure and precision in my own quilting, I think a lot of people envision my work space as neat and tidy, all under control. To the contrary, when I'm designing by the seat of my pants, the studio soon becomes chaos.


Yesterday got particularly chaotic as I worked to resolve two problematic areas and felt panic setting in as the clock quickly ticks down to my self-imposed deadline. Four rulers and some books joined the fray.


I'm determined to have this done to take with me to Judi's celebration of life service. I leave on Friday and want to have it done by the end of the day tomorrow. Somewhere in that chaos are solutions.


Not just chaos on the work table though. There's chaos on the sewing machine table so close to the design wall.


There's even a bit of chaos on the floor below the design wall. Solutions could be there as well. A neat and tidy, organized and structured way of working this is not.


But eventually, one must quit second guessing and just start cutting and sewing parts together. Before leaving the studio last night, I thought through what I needed to do today in order to finish without panic on Wednesday. It started in a simple place - extending the length of this strip to fit its space. Getting a good match can be tricky - I started by pressing the 1/4 inch seam under so I could line the pattern up on the piece to be added.


Didn't quite get it right the first time...or the second either, and even this is not perfect, but it's pretty close and close enough.


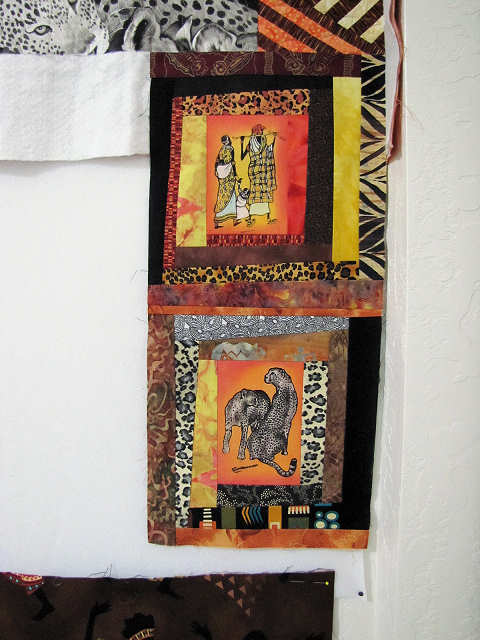
Here's where the strip will go, although I still have some measurements to work out before I can sew it on. The rest of this section is all seamed and can't be added to the section below until the strip goes on. The left part of the picture shows that entire section - my apologies for the poor lighting.


There are two large areas that have been giving me fits because they are too large for just fabric but I didn't have any more blocks to fill that space. I dug through some of the animal fabric to see if I could find more motifs and came up with two possibilities, including this giraffe. I could have made more progress earlier if I had not been trying so hard to get out of making more blocks. But in truth, when I asked What Would Judi Do, it was pretty obvious...Judi would be making more blocks. So I sucked it up and copied as best I could her crazy log cabin piecing technique to fill a critical space.


The rest of that space finally got resolved with the heart block and the leopard's head. That part of the quilt really benefits from the grey colorway of that leopard.


The heart and leopard are part of the other problematic area which I'll be working on tomorrow, and so can't be added to the section below yet. But yeah, oh hurray, that huge section shown above did get seamed together today.  If you compare these pictures to ones in the last post, you may be able to see how much the arrangement changed over several days.


And so I met my goal while a late spring snowstorm blew through, and am on track to finish this up tomorrow. Will be working out a new applique and then the final seams can be sewn.

Friday, April 26, 2013

A Little Applique & A Lot of Angst

Wonder Under, my Wonder Under...you are indeed a wonder. About 24 hours after fusing, I cut out my applique motifs and tentatively tried removing the release paper. Instead of scoring with a pin, I used the other method of rippling a small section back and forth between my fingers to see if any of the paper would pop. It did, I could get a fingernail under, and it pretty much came off without a glitch. Guess it's a good thing I didn't toss it after all.  I positioned the crescents by eye after removing the freezer paper under this section. (I'm keeping the rest of the paper pattern on until I join all the sections.)


Here are all the appliques ready for satin stitching. It didn't take nearly as long as the first round I did which I was grateful about. Judi had used yellow and red thread, not black, on two of these and I did not have a perfect match in my collection, but I think what I found is close enough. I've cut the backgrounds oversized as I'm not sure of the finished dimensions of these blocks yet. Depends on where they end up in the design.


That was yesterday. Today, the units of that paper pieced design got sewn together, the machine has been moved and I'm back to working out dimensions on graph paper, staring at the design wall, auditioning fabrics, moving things around and thinking. I was hoping not to have to do another applique block but I've got some pretty big gaps that may call for at least one more. Frankly, it was a frustrating day with no epiphanies, not much falling into place, although I did salvage a small leftover piece of that incredible border in just the right width to add below the two pieced blocks on the left. Beyond that, I need to let this sit overnight and try again in the morning with fresh eyes. Because at the moment, I am fresh out of ideas. 

4th Quarter...and I'm Not Talkin' Football

I've been working on the last quarter of my friend's African quilt, the part she had not developed even a little, although she'd set aside 3 pieced blocks and a large appliqued panel for it. I'd been thinking about what blocks and fabrics to duplicate in this last section and started playing with placement on graph paper.


Just like her idea to repeat the large zigzag section from the first quadrant in the third, it seemed logical to repeat this large design from the second quadrant in the last. The applique block to the left of it can also be repeated in a smaller size and the blue shield fabric may work as a filler piece. Hedging on whether or not to duplicate the applique block on the lower right.


This designs looks ultra complicated, but Judi had broken it down into just two different sections that could be paper pieced, 4 of one and 6 of the other. I decided to default to my old friend freezer paper for the patterns, and my fuzzy brain suddenly remembered that I did not have to photocopy the pattern onto it, but could use this nifty needlepunch method. Just trace the pattern onto the top piece of your stack of freezer paper, "tack" the stack together using the tip of an iron, then "stitch" along the lines of the paper with no thread in the needle.


I also remembered what I learned from Judy Mathieson about "chunking" your fabric pieces in advance. Basically you are cutting the shapes a little oversized which allows you to control grain lines and saves some fabric. When you have multiples of the same section to piece, you can chain stitch if you have all your pieces cut in advance. 


On this pattern, the triangle in the middle goes down first and although I could have cut oversized triangles, I opted to just cut rectangles and trim the excess. Starting with a piece cut with 1/4" seam allowance is another of Judy's tricks. Just fold the freezer paper pattern back along the perforated line, line up your ruler and trim.  


Now you can take the piece that will be sewn to it and line it up just as if you were lining up two pieces of fabric to be seamed normally. You can also easily see if that second fabric is lined up right to cover its portion of the pattern - very helpful with angles like I'm working with here. You can either leave the paper folded back like this and sew right next to it (and then it can be used numerous times) or fold the pattern back out and stitch on the perforated line. Since I will not be reusing these patterns, I sewed through them. When you press the seam, the added section will stick to the freezer paper and you repeat the process of folding the pattern back along the next line, trimming the exposed fabric to 1/4 inch, lining up the next fabric and stitching.


Here are 2 completed units from the back. The one on the right shows how there will be extra fabric extending past the outside of the pattern. The one on the left has been trimmed to include 1/4" seam allowance all round.


And here are the two sections as they will be sewn together. There are 3 of these pairs in the design, separated with the diamond design. I was going to sew all those sections together and then add the applique crescents when it occurred to me how much easier it would be to satin stitch around those appliques before the units became one long piece. 


So I set my pairs and diamond units aside and moved on to the applique, tracing not only the crescent shapes but the shapes for two other applique blocks. I wasn't looking forward to fighting with my recalcitrant Wonder Under again but didn't really have a choice. Was already thinking of what else I could get done after fusing to the appropriate fabrics as I knew I'd have to let them set for at least a day. On a whim, I checked a cutout from the heart block that had been sitting for over a week, to see if the paper was still refusing to release cleanly. To my amazement, the paper popped right off! I have no clue here about why all this is happening, but it gave me hope for these next appliques. On this fresh batch the paper was willing to lift some after cooling but still pulled up fusible in spots so I moved on.


I'd been thinking about using this design in the 4th quarter, partly because there was a short strip of the black and yellow squares left over from this longer one. And I wanted to repeat the flower applique anyway - maybe I can use the two together.


I had to search through Judi's patterns and fabric to figure out how she did this. At first I assumed it was more paper piecing. But instead, I found strips of the two triangle fabrics with angled ends. I'm pretty sure she just cut the triangles from those strips using some kind of template for a guide for the angle. That is not a 45, 30 or 60 degree angle like you commonly find marked on rulers. Again, fuzzy brain took awhile to remember how to do this but finally remembered the trick of taping a template to the underside of your ruler. Because of the width of the strips, I could line up the triangles pretty easily so that when the seam was pressed, top and bottom were even. This is a tricky shape to line up properly. I probably should have made it three diamond shapes instead of two but I let the length of the black and yellow piece be my guide.


Not much else I could do that day, except fussy cut more hands and their spacers, pin a few things to the design wall, and start the lengthy process of pulling and auditioning fabrics, getting the brain working on positionings and solutions. Once I finish the applique blocks and their satin stitching, the machine I use for that and its stand will have to be moved so I can access the rest of my design wall.

Tuesday, April 23, 2013

Last of the Lino Printing

I've been working away on the last quarter of the African quilt but am not at a point yet to show you what I've been up to. Instead, I'll show you the results from last night and the previous week's lino printing class. Last week we were to finally print on fabric and I took both a piece of commercial batik as well as some white muslin to print on. My frustration with this class continued as we had to wait for the teacher to cut yet another eraser design for her chosen demo project - napkins. I cut my spiral stamp while I waited, finding the smallest v gouge easier to use than trying to cut this with an xacto knife.


We used Jacquard Textile paints on our homemade ink pads, and I was not impressed. No one was getting strong colors so it wasn't working like I had hoped on the batik. Worse yet, I couldn't get it to pick up on the linoblock which was what I'd planned to work with. You can see the difference between the eraser stamp and the linoblock above.


So I moved on to my white muslin. I like my flower stamp on its own, but I really don't know what to do with it in multiples. Your eyes are not blurring by the way. I first stamped with a purple paint, then restamped slightly offset with yellow. That didn't work quite to plan either. I went back to the spiral stamp, turning it differently directions and except for the paleness and inconsistency in coverage, kind of like this use of it.


I almost didn't go to class last night, knowing it was one more session of little help and floundering. But I'd paid for 5 sessions, I was going to go to five sessions. I'd thought a lot about how we'd used those inkpads, being told to dampen before brushing on paint. I wondered if the dampness was effecting the thickness of the paint and if I'd have better results if I applied the paint without wetting it. It did seem to help, particularly with the linoblock. I finally got some prints so I could see how this one worked, again playing some with orientation. I like this block, I decided, if I could just get the right paint on it. Not sure how well you can tell from this picture, but I was also playing with darkening the blue to more of a navy. I think the paint should have been mixed off the pad, but we'd gotten no instruction on that, just told we could mix colors on the pad.


The cross is a pattern from the book The Quilted Cross by J. Michelle Watts. I applied yellow paint to one side of the pad and orange to the other and overlapped them in the middle. If only the coverage were better - I really like this. The lines from the gouging printing also was a surprise but one that I like. On the right is more experimentation with orientation. I'm thinking that brayering the paint on the linoblocks would be a better way to go and I'm interested in trying a less translucent paint. There was talk of trying screenprinting ink as well as the Jacquard Versetex that I've used with great success in the past. Click on any picture, by the way, for a larger view.

So I've ended my 5 week course, and I still have no better idea of how I might use block printing in my work. I did enjoy the actual making of the blocks and stamps, but I was hoping to get more instruction on designing blocks and ways of printing with them. I think I may need to sign up for Dijanne Cevaal's online class afterall. Reading her class description makes me sigh - everything I thought I'd be getting in this hands-on class and didn't. (Scroll to the end of this lengthy post to find it.)

I will leave you with this little gem gleaned from The Woodcut Artist's Handbook by George A. Walker. It came at the end of a section on "Making the Drawing" and made me laugh out loud:

"Check your work in a mirror one more time before you begin cutting the block. Is it art? When asked that question, Andy Warhol replied, 'Art? Isn't that a man's name?' Once you - and only you - are satisfied with the image on the block, then you're ready to start cutting." 

Wednesday, April 17, 2013

Filling in the Blanks

In the previous post, I'd completed the applique blocks for the 3rd quadrant of my friend Judi's African quilt, and was ready to make those final decisions on placement and what would fill in the blanks between. The picture above shows Judi's design wall when I took this project over. The pieces of paper are the patterns for blocks she had not complete yet but was pretty sure about where they would be placed. She'd used these and the finished blocks to help work out dimensions on her graph paper master. But as I mentioned before, she was planning on auditioning fabrics, had no firm selections at this point. Lots of blanks to fill in and some latitude on shifting blocks within those general areas.


I've tried to remain aware of what's going on in the quadrant in the opposite corner from this one, repeating fabrics and colors to maintain a balance in what could quickly become disjointed chaos, but also maintain the asymmetry going on in the rest of the quilt. It was important to bring in some of the turquoise because of that but also because of the turquoise in some of the dancer's blouses in the panel running long the bottom. I was a bit surprised at how good a strip of that turquoise looked next to the lion panel, so much so that I nearly bordered it all in that fabric. But nothing else in the quilt was handled that way and it just seemed too much for that section. Even a 3 inch strip on the side or a 4 inch strip on the bottom alone wasn't working. This tug and pull nearly derailed my progress as I kept auditioning various fabrics and shifting things back and forth over two days. I finally had a breakthrough when I let another obsession, those hands, get a trial run. The eureka moment was when I decided to use not one fussy cut set of hands, but several with fabric spacers in between. Several fabrics got auditioned for those spaces, but when I let go of my desire for a large uninterrupted piece of that turquoise next to the lions and laid the hands over it, well, problem solved.


With this one decision, I could see how the rest of the strips should fall. I stepped back pleased, but was a little concerned that the treatment of the strip with the hands was more me creeping in than an option Judi would have chosen. "Well, Judi," I said to the ether, "What do you think? Do you like it?" No bolts of lightning, nothing fell off the design wall, I decided she must be ok with it.


Of course, this section also has to balance with the one above it and I think it does. Now on to the last section for which Judi had set aside some blocks but had not started designing. I'm on my own now in more ways than one. I got the call yesterday that she had died around noon after lapsing into a coma Sunday evening. Yeah, it looks like my big breakthrough came not long after she'd gone into that coma, and it's nice to think that she was indeed guiding my hand before she passed to the other side. I will miss her good advice, both quilting and personal, and so many other things.  

Saturday, April 13, 2013

That Unproductive Feeling

I wanted to show my progress on the African quilt this week, but there was nothing to show. I was mostly working dimensions and arrangements out on graph paper, staring at the design wall, auditioning fabrics, thinking. Hard to take meaningful pictures of that and hard to believe I was making any real progress when fabric wasn't getting cut or seams sewn. Then I ran across an article about creativity where I least expected it, in April's Good Housekeeping Magazine, with this highlighted and writ large on the page:

Creating doesn't always feel productive. It means pausing, playing, and sometimes failing. *

Exactly what I'd been doing for two days. Funny how seeing this in print made me feel so much better about those days, even though it is something I already know and understand.

Yesterday felt much more productive and photogenic. It was time to tackle some applique. Judi had one pattern drawn out to size, the other a simple heart I could manage myself. I'd already done the dithering over background fabric so it was time to trace, fuse, cut and fuse.

Two hitches though. Although there were several pieces of black fabric in Judi's stash, there were only some small scraps left of the deep dark black in the other applique in her quilt. If you've ever compared black fabric, you know that when put side by side, some look positively grey. Her other blacks were too different for me to be comfortable using them. I found one black in my own stash that was closer although still not that blackest of blacks. Would have to be close enough.


Judi is too far gone to answer questions anymore, so I had to guess what fusible she had used on the others. I know that she uses a lot of Misty Fuse, but her finished blocks felt too stiff for that. If not Misty Fuse, then she uses Wonder Under. I made some samples and decided Wonder Under must be it, and I had a 2 yd length - more than enough. I laid the fusible over the patterns and trace on the paper side, then fused them to the black fabric and carefully cut them out.

If you've used Wonder Under, you know that sometimes it's tricky to lift up an edge of the release paper to start the removal. Scoring with a pin usually gives you a place to work without chancing messing up the raw edge. However, I could not get the paper to come away from the fusible, but instead the fusible clung to the paper and pulled off the fabric. I've never had this happen before. Working with the heart, I tried reheating and letting it cool several times before finally throwing caution to the wind and pealing the paper back while still hot. I had some frayed edges and knew I had to figure out a better way for those other shapes.


I put out a plea for help on Facebook and got some good advice. My Wonder Under is probably a bad batch, not enough slick stuff on the paper. Paint it or pitch it! As for what I'd already used, one suggestion was to leave it until the morning, when the paper might more easily give way. Putting it in the freezer was another option. It turned out that giving it some time did help. Now after scoring, I could work my needle under the paper and it started to pop off.


However, there were still places where the web stuck to the paper. But this was good enough to salvage these pieces I'd already cut. I still needed to do the heat and quick peel on one of the skinny spokes of the ship's wheel-like motif.


An easy way to arrange applique on your background is to place the background fabric over your pattern. If you are lucky, you can see the pattern through the fabric (if not, using a lightbox usually works). This worked well for the larger applique block. For the heart I could use a ruler to help center it on its background.


Once fused, it was time to satin stitch around all those raw edges, which turned out to be a blessing. If Wonder Under is working properly, the edges stay pretty clean as on this applique that Judi had done. With my struggle there were lots of places with thread frays and the satin stitching cleaned things up. I used a titanium needle which does not pick up the goo from the fusible like a regular needle does. Judi had given me 50 wt Gutermann cotton to use for the satin stitching.


I spent nearly 5 hours slowly and carefully maneuvering around all those edges, much longer than I thought it would take. But it is done and the blocks look great. Now I can move on to cutting filler pieces and joining it all together.

*The Happiness Project: Create a Happier Life by Gretchen Rubin

Tuesday, April 09, 2013

Another Linoblock Class

Spring break is over and it was back to my linoblock class last night. We spent half our time making three ink pads and then were cut loose to "do whatever" again. Well, that's not totally fair. The teacher is giving hints of direction but I had to laugh when the gal next to me looked confused when we'd finished our pads and the teacher said to go into the other room.  She said exactly what I was thinking: "And do what?" The teacher looked startled, and then realized she hadn't actually given us clues to what was next on the agenda. I think we all thought we were going to use those ink pads but she said, "oh no - it will be awhile before the glue is dry. You can cut more blocks or play more with the ones you already have." The gal laughed and said, "Oh good, I thought I'd missed something." Glad I'm not the only one sensing we need a little more instruction.

I'd identified two things that are hindering me in coming up with workable designs. First is the rectangle shape of the linoblocks and erasers originally provided to us to work with. I was really yearning for a square design or at least something a little larger. Second, if I planned to use the s curves, I needed a motif to fit inside the negative space created in one of the design repeats I came up with (see this post). I rummaged around in the supplies and found a larger eraser that had been cut into a square and a larger linoblock to experiment with. I didn't spend time cutting the spiral I worked out on the eraser, knowing that I have the tools to do it at home. Instead I concentrated on cutting the design on the lino block, one I hope will give me a more overall textured design when printed side by side. I got the idea for this from Cynthia St. Charles, someone I think of as a master at this sort of thing. She had just cut a bunch of new blocks and they are such an inspiration to me. You can find links to the blocks on this post which shows her "sampler" test run of the designs. This post shows a different test run that includes the block that inspired mine. As for my test run, there really wasn't enough time. I may have to dig out my paints and try it out before next class.

As for the making of those ink pads - I've run across instruction for making your own as well as for making a padded surface to print on but never took the time to try making them. I know it is simple simple but it's just one of those things I never got around to. By the time I'd decide to do some stamping, I wouldn't want to delay with making the pads. I was actually pretty happy to learn that for the print pad, I could use foam core board - always have scraps of that around. The teacher's preferred padding is two layers of acrylic felt covered with muslin that is pulled to the back and duct taped in place. I didn't get a tight enough wrap on mine the night we made them but now have remedied that. For the ink pads, she uses 3 layers of cotton/poly batting covered with muslin. She instructed us to tack the batting layers together at each corner before adding the muslin. The glue that took so long to dry was really just to hold the muslin in place once turned to the back in order to make stitching along the edges easier.

A funny thing happens when women pick up needle and thread. During the first two classes, we didn't socialize much with each other, so concentrated were we on drawing, cutting and testing our blocks. But as we sat stitching our ink pads, the conversation flowed, stories were shared and the laughter began. Dare I say there was a fair amount of bonding between these 6 women of a certain age, not unlike the sort of thing that goes on at quilt guild meetings as members sit and stitch? If you question the power of the needle to loosen women up, I only need tell you that once we went into the other room to start drawing, cutting and printing, things went mostly quiet again until we started putting supplies away and gathered our things to go home. Amazing.

Sunday, April 07, 2013

The New Project

I've taken on a labor of love. The quilt above belongs to my closest of friends, Judi, the one I supported during her three months of medical treatment at the Mayo Clinic last summer. It's an original design, commissioned by relatives who live in South Africa, and has been in the works for longer than she would like to admit. A few years ago she got serious about getting it under way, having collected fabrics and researched authentic African symbolism. But like me, she let her art quilting take priority as well as caring for her parents, and it wasn't until her own health went into decline last year that she realized she had to get moving on this quilt. She made good progress after returning home from Rochester last September, but medical issues, pain and weakness continued to plague her. After a return trip to the Mayo Clinic late last December, she was told that the cancer had spread in spite of their treatment meant to keep it in check until a liver donor became available. Game over, as they say, and she returned home with the priorities of getting her affairs in order, enjoying time with family and friends, and finishing this quilt. What you see is half of what will be a bed quilt, pieced and quilted as 2 separate quadrants - easier for her to negotiate than a full-size quilt top. She thought she could quilt these quadrants herself but a sudden downturn in her condition made it impossible for her to manage it, although she continued brief stints sewing and designing the third quadrant. The machine quilting has been taken on by a friend who lives nearby and who has completed several African-themed art quilts of her own.


Alas, between her liver disease and the liver cancer that compounds it, she has not been able to do any sewing since February. I visited her last month, thinking perhaps I could work on it there with her to guide me, but she barely had the where-with-all to talk and enjoy my company. I decided that, if she would let me, I'd just bring it all home and do my best to get the last 2 quadrants of the top together. We went over her mostly completed design ideas for the 3rd quarter, talking placement and dimensions and possible fabric/color choices, and then I packed everything up - an eerie and sad thing for both of us. Now those two completed quadrants are pinned to my design wall as well as the bits of the 3rd quadrant she was able to finish.


I knew this would be challenging, both from an emotional and technical viewpoint, but I was not prepared for the wave of emotion that washed over me when I pulled her working file out last week and started sorting through her sketches, notes and patterns. I've been dealing with the reality of losing her for so long, going through a long bout of depression (which she chastised me for - get to work, she admonished! You don't know how much time you have!), and then holding it all at arms length so I could get on with things and also be strong for her during our weekly talks, and the visit, that it caught me off-guard. I've had my moments of tears, sure, but this hit me in the gut like hearing the news of her diagnosis for the first time about a year ago. Thankfully, the worst of it passed quickly although the residual sadness tied to this task and the situation in general lingers. Yeah, now you know why "persevere" is my resolution word this year.


So where to begin on a quilt that is not your own, whose design is a work in progress and which is emotionally charged to boot? Studying the sketch, I decided to start at the easiest place - sewing these two blocks to each other. Toe in the water.


The zigzag design in this finished section was to be repeated with the same fabrics, so it was the next easy and logical step.


I began sorting through her fabric, looking for the four for this design. This is just a fraction of the fabric stash she amassed for possible inclusion in this quilt, and she sent it all home with me to play with.


She had drawn the pattern to size by hand on graph paper, a method she has always preferred over designing on the computer. The zigzag is composed of 6 unique blocks best sewn using the paper piecing method. Gads, I haven't paper pieced for so long that I had to sit studying this and bashing away at the cobwebs in my brain for a bit to remember where to begin.


After a few fits and starts, I finally got my head around the process, cutting and sewing with only one minor hiccup. Here are the 6 individual units ready for trimming.


And here are the units sewn together, perfect matches everywhere - the definite advantage of paper piecing.


True to form, I got distracted by the trimmings - there be mountains in those triangle castoffs! I'm reminded of the Badlands, if they were crossed with the red rocks of Arizona.  These are set aside now for a future quilt.

Next up, tackling some African symbols in applique. This is part of the technically challenging part as I only have the symbol pattern but no guide for fabric or color choice. Judi's comment when I asked what she had in mind was that all along she'd just been holding up fabric until one looked right. Yes, of course. I do the same thing. So the tricky part is to continue with her vision so the quilt looks cohesive and not like it was designed by two people. I know her and her work so well, I should be able to pull it off. Fingers crossed.