Tuesday, June 27, 2023

Just Playing

This has been on my mind for a long time and now that the challenge books are out of the way and I'm eager to start going through the other book projects lined up with their directions and materials, I thought I could kill two birds with one stone. "Real" painters are quite passionate and insistent about swatching your paint colors, to get a feel for how they react on paper and their true color once mixed with water or other colors on a brush. You can probably guess that true to form, I've wanted to swatch my watercolors but never made the time. But I made time this weekend.

Here was my thought. I'm planning to make another 5 Day Mixed Media Journal Challenge in a larger size. It's the one with the accordion fold spine that I had painted with acrylic paints. Journal pages painted with acrylic paint have a bad habit of sticking to each other, or just to an opposing blank page. When I got my journal out to refresh my memory about its construction, those parts of the folded spine sticking up between the signatures had to be gently pried away from them. So after some thought, I hit upon the idea of using watercolor paint instead to bring some color to the spine.

A "what if" posed itself. What if I paint the spine paper while I swatch? I knew there'd be lots of paint left on the brush after painting each tiny swatch square so rather than waste it, I could expend it on the spine paper. So I can't start that book project until I do my swatching. I decided on inch wide vertical stripes on the paper because the accordion folds will be made at each inch. Kinda iffy about this now that it is done. Maybe need to add some pen drawing over the top, zentangles? Note: I actually have two watercolor paint palettes. My original purchase was a nearly half-price mini Sennelier set. These paints are quite pricey but even with my limited knowledge and  experience, beautiful to work with. But I was frustrated that I couldn't manage anything resembling pink with the red that's in it. So when a larger palette went on sale with only a few duplicates and a red that would dilute to a pink, I splurged on it. It also has a purple that I would soon need.

Because there's actually a third bird to kill here. I'd finally gotten around to putting the plants I'd bought into various pots and planters early in the month and in doing so, had broken off a stem full of blooms off one of them. I put it in some water and studied the flowers, ending up doing a simple sketch of them. A few days later, I matched their color to a colored pencil and added that to the sketch. 

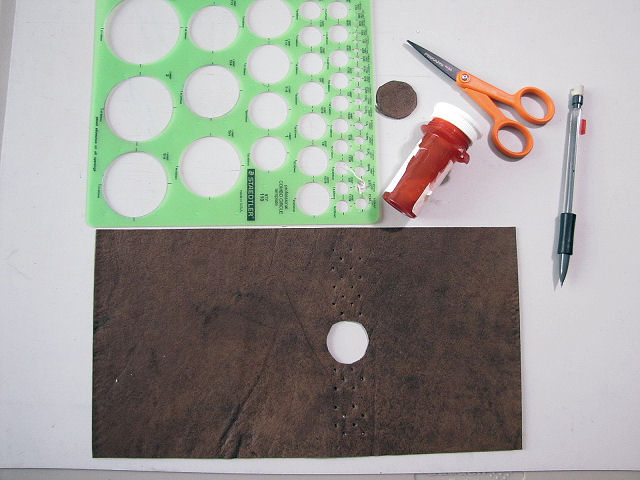
But because of a certain watercolor artist's videos about bringing the garden in and making simple botanical sketches, I was compelled to try that too. Again, I wouldn't be using much paint and I could do it while I swatched, using my colored pencil sketch for reference. Nothing to write home about, but it was a chance to get a feel for how to use the brush and how the paints flowed (or didn't flow) on this mixed media sketchbook page. Also in the picture at the top, everything is laid out on a new investment: Tim Holz Media Surface Mat. Not cheap but I think it will definitely reduce some of my frustrations when working with inks and paint. It's a non-stick surface that is also heat resistant (i.e. you can use a heat gun over it and hot glue dripped on it won't hurt it) and the corners are slightly weighted to keep it flat. The flip side sticks to almost any surface - it's rock solid on my work table. A big improvement over the freezer paper I'd begun to tape down shiny side up on my table.

The deck garden is a sorry sight at this point. All that was blooming when I bought them have spent those blooms. Most that had buds only saw those buds dry up rather than open up. A few scraggly pink blossoms have emerged, and I'm sure once our roller coaster weather settles, the rest of the blooms will come. In the meantime, the pot by the front steps has taken up the slack. While pondering what I might buy to put in it, the violas from last year have come back with a vengeance! They are now showing 4 or more inches above the rim of the pot, saying, "No need for anything else!" We'll see how long that lasts, but in the meantime, they are a cheery sight as I come and go on my walks.

Tuesday, June 20, 2023

Last of the Little Library Book Challenge

The final binding in this challenge is a staggered running stitch. Really quite simple as long as you remember that not all signatures have sewing holes in the same place! I used leather from the smooth leather bomber jacket on this one and was moved to get those pieces of marbled fabric back out. The one used to line the cover is one on heavier fabric but what about this one which is very similar but on very thin fabric? Could I cut it into partial signature wrappers? Yes I could! And to make it easy on myself, I used Scor Tape to attach them to the signatures. The only down side to this was the way the Scor Tape gunked up my awl as I punched sewing holes.

A "feature" we could add if we wanted to was a peep hole in the spine, one of the reasons I wanted something decorative along the fold of my signatures. I tried several ways of marking the hole before cutting and used applique scissors to make the cut. The teacher warned not to expect our circles to be perfect but I was still surprised at how difficult it was to follow the line I'd drawn, so yeah, my circle opening is not perfect.

But it worked perfectly fine all the same. Again, enjoyed the option of using two different thread colors.

I didn't particularly care for the closure option, but we were encouraged to experiment to come up with our own anyway. I've had this buckle for the longest time, since my mother in law decided she was done with sewing clothes and offered me some of her things. Could never figure out how to use it until now. I love how it looks.

I chose a 24lb specialty Southworth Granite paper to fancy this one up a bit. It will end up being a gift like the last one too, if I can bear to part with it.

The inevitable gap between signatures which in this case also exposes the hole in the cover spine. Not sure that I like that.

And as always, I pen my name, the date, and kind of paper in the signatures along the back cover.

A lovely little trio of books, all about 4-1/2 x 6 inches, ones I wouldn't mind making again, perhaps with Kraftex covers and different types of closures and slightly larger sizes. This staggered running stitch one in particular is calling out to me to end its asymmetry by adding a 5th row of stitches to even things up. It'd still be staggering. ;-)

Tuesday, June 13, 2023

Book Two of the Little Library Challenge

Honestly, things would go faster if I quit thinking about ways to deviate from the suggested materials, not to mention, just work on the books in order. Once I started doing that, convincing myself I can try the many ideas floating through my head on additional books after I finish these first three, things moved right along. I already showed you a sneak preview of book two - the cover with its sewing holes punched and an edge turned back to reveal the lining. Above you can see the inside of the cover in the background as I hold the signatures that I've put decorative wrappers around. You may remember that I started saving security envelops for the interesting patterns and I had a few from some oversized envelops, big enough to match the size of my signatures. I've not done the signature wrap thing before, not really understanding the why of it, but tried it here as it was a suggestion to help bulk up the signatures.

The back of two of these wrapper had a bit of printing that needed covering. Just quickly cut strips from the leftovers that are held in place with Scor Tape.

It dawned on me that I'd made this book before and was unhappy with how the signatures didn't fill in the gaps between them and came up with a solution after much pondering. This time I chose to really load up each signatures with almost twice the recommended number of sheets. There - nice and fat. But I must admit, it was a bit hard to get the awl through all those layers when it was time to make the sewing holes.

The binding is called a Long Stitch with Packing and while not as difficult as it looks like it might be, it can be tricky to get those wraps from twisting and pulled up next to each other. In the book I made before, I used a hemp thread that I waxed myself. This time I used a heavily pre-waxed linen thread and oh my, what a difference! I was given a tip on how to move the wrap up which also made a difference, but without the wax from that heavily waxed thread grabbing on to the wrap above it and holding it in place, I still would have struggled. Yes, you can make do but sometimes having the right tools/supplies makes the job much easier. Using two different colors of thread as I'd done on the first book per suggestion from the examples was something that wouldn't have occurred to me to do, but is so much fun.

Here's the finished book complete with a leather strap closure. The strap was cut from a welted seam, threaded through two slits on the flap and finished off with an piece of elk horn with a large hole in the center.

I cut the cover across a seam so that it would angle across the front but not fall where I had to punch a hole in the spine for sewing.The two slits in the flap allowed the strap to create a place where a pen could be slipped.

I dithered over using these security envelop wraps for this book as I had originally thought I'd make the third book's cover out of black Kraftex where the grey would coordinate so well rather than stick with leather for all three books as in the examples. But this was one of those times when I realized I just had to get on with it and finish this one up for a friend who will need all those pages and the convenience of the pen holder which I don't believe I could have pulled off with my Kraftex idea. Using them here influenced my choice of lining a bit, going with the fabric that had some black in it. I think my friend will love it, probably more than my other idea, which of course I could also make for him at a later date. :-)

The last book is actually done except for the closure which I am still deciding on. I know what I want to use, just have to figure out how to attach it.

Tuesday, June 06, 2023

The Little Library Bookmaking Challenge

The leader/teacher of the Handmade Book Club that I belong to periodically makes available for a small fee to those outside of the club a class to learn how to make a particular bookbinding (members automatically have the class included in their monthly fee). As a rule, you make one book in which, besides how to make a particular binding, you learn several bookmaking basics, like the importance of paper grain, cutting bookboard, what kind of thread to use. Whether you know nothing about bookmaking or have been making books forever, everyone agrees there are new things to learn and sometimes surprisingly, you end up with a beautiful and usable book. But for some reason, said teacher and her team decided that this class, presented as a 5 day challenge, would show how to make not one, but THREE little books, each with a different binding method. Even those of us who have been making books for awhile were surprised and daunted. Say a prayer for the newbies! And being presented with 3 books and three times the possible options, I definitely spent days floundering. Not unlike how my quilting projects go, I couldn't just quickly choose an option and get on with it. But when I finally did, I started having great results. It helped a lot when I finally decided on which signatures and binding to use with this beautiful teal suede from a Goodwill woman's blazer (not as good of a deal as my 99 cent bomber jackets but still pretty inexpensive) and started deconstructing it. One part of a sleeve had a section big enough for a cover, but I was still dithering over linings. In the end, none of the marbled fabric worked as well for me as the ones pulled from my slightly heavier cotton stash. That one on the left ended up getting fused to the inside of the cover.

Now to my signatures made from 90lb mixed media paper. One would think they would be plenty thick enough to fill this cover but this binding has wider gaps between the signatures than most. Many people were compensating by adding "wraps" around each signature - a decorative piece of paper that could be the full width of the page or less, of a heavier or lighter paper. I've not used wraps before but I had a bit of an aha moment over a piece of paste paper a friend had given me and left over from using it to cover the boards of a different book project. Too big to toss, challenging to figure out what it was big enough for, again that beautiful teal I cannot get enough of. But wait - about the same height as my signatures and if cut into 4 six inch long pieces, each piece wide enough to wrap around the signatures showing about an inch on front and back. Beautiful! These were held in place with glue stick as there were random paint marks on the back and then the stitching holes could be punched in each.

As for the cover, it too needed stitching holes punched in the spine and a button chosen and sewn at the center of it. No dithering over the button; I knew just which one to pull from my button jar. In high school, I'd made myself a long midi skirt out of (what else?) teal wide and narrow wale corduroy which was a wrap around design with buttons down the top edge of the wrap. Yes, THIS button and its buddies. As for that paper punch, it's a 1/16" hole punch that in the past I'd discovered does a pretty good job of punching sewing holes in leather. Otherwise just using an awl, the holes tend to close back up. It has a two inch reach so can't quite make it to the center-most holes, yet this soft cover can be gently rolled to allow the punch to reach them.

The example from the challenge teacher showed using different colors of the stitching thread, another opportunity to freeze up over decisions, but by now I was pretty sure of my direction, choosing white and orange threads to make the chain stitches securing the signatures. I've always liked the look of teal and orange, which explains my lining choice as well. 

The closure is a simple piece of elastic that loops over the button on the spine. Looking at it now, I think I intended to angle cut the top and bottom corners of the front edge of the flap. Could still do that. Doesn't that rusty orange elastic look great?


A peak inside showing the lining fabric and signature wraps as well as the gap between signatures. The teacher insists we will be adding things to the pages (like collage) that will bulk up the signatures and fill up the space. I honestly don't know yet what I'll be using this for, only that I love the finished results which is a bit of a surprise. I'd considered not making this one at all because I didn't think I liked the chain stitches on the spine. But it definitely grew on me, and it is a surprisingly quick and easy stitch.

I unexpectedly ended up on a very long phone call today or I might have the second book in the trio ready to show you. I realized that this is one I've made before, with some alterations, and I'm making alterations again. Here's as far as I've gotten: fabric chosen and fused to cover and holes punches, the signatures await sewing in.