
The leader/teacher of the Handmade Book Club that I belong to periodically makes available for a small fee to those outside of the club a class to learn how to make a particular bookbinding (members automatically have the class included in their monthly fee). As a rule, you make one book in which, besides how to make a particular binding, you learn several bookmaking basics, like the importance of paper grain, cutting bookboard, what kind of thread to use. Whether you know nothing about bookmaking or have been making books forever, everyone agrees there are new things to learn and sometimes surprisingly, you end up with a beautiful and usable book. But for some reason, said teacher and her team decided that this class, presented as a 5 day challenge, would show how to make not one, but THREE little books, each with a different binding method. Even those of us who have been making books for awhile were surprised and daunted. Say a prayer for the newbies! And being presented with 3 books and three times the possible options, I definitely spent days floundering. Not unlike how my quilting projects go, I couldn't just quickly choose an option and get on with it. But when I finally did, I started having great results. It helped a lot when I finally decided on which signatures and binding to use with this beautiful teal suede from a Goodwill woman's blazer (not as good of a deal as my 99 cent bomber jackets but still pretty inexpensive) and started deconstructing it. One part of a sleeve had a section big enough for a cover, but I was still dithering over linings. In the end, none of the marbled fabric worked as well for me as the ones pulled from my slightly heavier cotton stash. That one on the left ended up getting fused to the inside of the cover.

Now to my signatures made from 90lb mixed media paper. One would think they would be plenty thick enough to fill this cover but this binding has wider gaps between the signatures than most. Many people were compensating by adding "wraps" around each signature - a decorative piece of paper that could be the full width of the page or less, of a heavier or lighter paper. I've not used wraps before but I had a bit of an aha moment over a piece of paste paper a friend had given me and left over from using it to cover the boards of a different book project. Too big to toss, challenging to figure out what it was big enough for, again that beautiful teal I cannot get enough of. But wait - about the same height as my signatures and if cut into 4 six inch long pieces, each piece wide enough to wrap around the signatures showing about an inch on front and back. Beautiful! These were held in place with glue stick as there were random paint marks on the back and then the stitching holes could be punched in each.

As for the cover, it too needed stitching holes punched in the spine and a button chosen and sewn at the center of it. No dithering over the button; I knew just which one to pull from my button jar. In high school, I'd made myself a long midi skirt out of (what else?) teal wide and narrow wale corduroy which was a wrap around design with buttons down the top edge of the wrap. Yes, THIS button and its buddies. As for that paper punch, it's a 1/16" hole punch that in the past I'd discovered does a pretty good job of punching sewing holes in leather. Otherwise just using an awl, the holes tend to close back up. It has a two inch reach so can't quite make it to the center-most holes, yet this soft cover can be gently rolled to allow the punch to reach them.

The example from the challenge teacher showed using different colors of the stitching thread, another opportunity to freeze up over decisions, but by now I was pretty sure of my direction, choosing white and orange threads to make the chain stitches securing the signatures. I've always liked the look of teal and orange, which explains my lining choice as well.
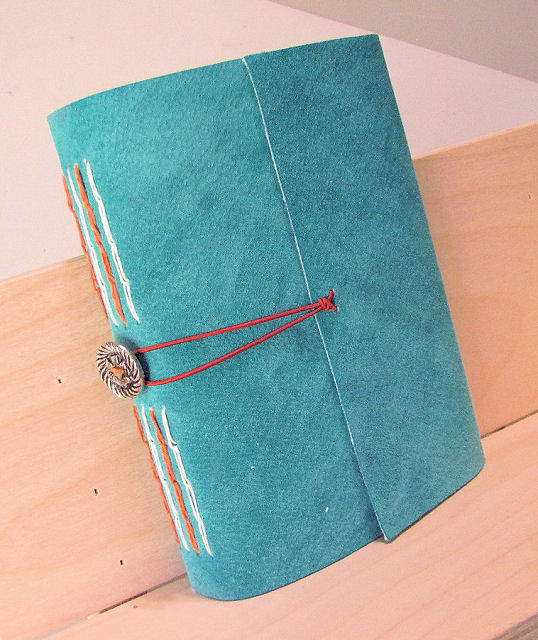
The closure is a simple piece of elastic that loops over the button on the spine. Looking at it now, I think I intended to angle cut the top and bottom corners of the front edge of the flap. Could still do that. Doesn't that rusty orange elastic look great?


A peak inside showing the lining fabric and signature wraps as well as the gap between signatures. The teacher insists we will be adding things to the pages (like collage) that will bulk up the signatures and fill up the space. I honestly don't know yet what I'll be using this for, only that I love the finished results which is a bit of a surprise. I'd considered not making this one at all because I didn't think I liked the chain stitches on the spine. But it definitely grew on me, and it is a surprisingly quick and easy stitch.

I unexpectedly ended up on a very long phone call today or I might have the second book in the trio ready to show you. I realized that this is one I've made before, with some alterations, and I'm making alterations again. Here's as far as I've gotten: fabric chosen and fused to cover and holes punches, the signatures await sewing in.
4 comments:
Your group certainly has some interesting challenges. But, I'm so easily distracted...SQUIRREL! I'm stuck on wrap skirt & buttons...BUTTERFLY! I do like the fabrics & embellishments you've chosen very much! What a fun project for you! SQUIRREL! Jan in WY
I KNOW, Jan! All I want to do right now is make books! So many options as I scroll through pictures of how others have customized their books, and I'm building quite a "stash" of papers (not buying but noting things that come in packaging that I can repurpose) and collage images from magazines, etc - it's a whole nuther rabbit hole. I do wish I could find a picture of me in that skirt - must be one somewhere!
BTW over 4000 people signed up for the challenge and a lot of non-members are now members. Don't know how many are actually in the club at this point but a lot and from all over the world. It's a great on-line community.
Lovely to see that you are still making hand-made books! It makes me want to start doing it again too -- but then I still have something like 50 blank journals in my stash from the old days! Perhaps some hand-made INK would be just the thing on those pages!
Michele, it would definitely be one way to start filling some of the books I've made. One topic that repeatedly comes up in the club is, now that we've made this blank book, what do we put in it? I kinda envy those who already know and have pages with things on them already, just needing to be bound together. And like all things we make, even if some get given away, one starts running out of people to gift them to. :-)
Post a Comment