Friday, February 27, 2009

D is for Double Needle


Time to experiment with the next letter in my Surfacing Group's Alphabet challenge. I haven't been getting any sewing done this week, so it was nice to take a break to just sew for a bit. The most common use of the double needle (or twin needle as it is often called) is to make pintucks. So my question was, how can I use this feature to create design or texture on a piece of cloth that could be incorporated into a piece of art?

I bet there are a lot of features on your sewing machine that you've never tried, right? As I paged through my instruction book, I realized just how much my machine will do and I never think to ask it. The instructions reminded me that the machine came with a pintuck foot - specially grooved on the bottom to run over the pintucks I'd be building so that the rows would line up perfectly. The machine also came with an assortment of needles, including a double needle. I think this one is the smallest spacing between needles. For bigger pintucks, there are double needles spaced wider apart.

I just left my machine setting on default. If tension is not adjusted, or is tightened slightly, the ridges will automatically form as you sew. I used scraps of muslin for my base and white thread. Imagine how differently these would turn out if the thread was of a contrasting color.

I started at the top left with traditional rows of pintucking. Then I moved on to see what would happen if I sewed gently curving lines of pintucks. The curves need to be gentle indeed, and as expected, there was some distortion of the fabric between the wide spacing of the tucks. Then I tried crisscrossing single lines of pintucks.

The middle sample shows rows of pintucks following the curved edge of the fabric. Then I ran some lines partway down the piece and crossed them at right angles with another set of pintucks. I like this effect a lot.

Finally, I went back to my curves, but instead of single pintucks, I stitched multiple rows of curved tucks, then tried double rows crossed. I think this technique has a lot of potential, and that there is more that could be done with them. For instance, I think I will try painting the samples to see if I can highlight the tucks with color.

Of course, if you loosen your tension, the fabric will not pull up, and you will have nice even parallel double lines of stitching. That could be useful also, but for today, this was enough.

Thursday, February 26, 2009

A Gift of Hope


It may be snowing outside today, but a friend sent me a bit of spring in the form of this lovely handpainted mug. Just what I needed!

Tuesday, February 24, 2009

Arts & Crafts Influences


I am quite a fan of the Arts and Crafts movement, and have just finished reading The Arts and Crafts Movement in the Pacific Northwest. The picture above comes from that book and is from a 1901 printing of Tennyson's The Lady of Shalott. The beautiful graphics are the work of Will Ransom. The intertwining elements look both Celtic and Art Nouveau to my eye, graceful and interesting. If you are familiar with Suzanne Marshall's work, you can see where she gets much of her inspiration.

Saturday, February 21, 2009

Goodies


These two big boxes arrived in the mail last week. My mother-in-law has given up on quilting for several legitimate reasons, and I am the happy recipient of her castoffs. I know, I know. If any of us decided to get rid of our quilting things, there is no way we could fit them into two boxes. But this is the second time she's taken up quilting and dropped it for other things, so she never did have the accumulation of quilting-specific items that the more rabid of us amass.

I credit this woman for kick-starting my own obsession with quilting. She didn't introduce me to it, but because she had taken a class and decided to make each of her adult children a quilt, I suddenly had someone to talk about quilting to, and to eventually collaborate on a project with. It was hand quilting the queen size top she had appliqued that made me realize this was the craft I wanted to devote all my time to. It wasn't long until I phased out my other needlecraft to concentrate on quilting.

My husband and I were the first recipients of her quilt-for-each-child efforts. I was so grateful because she chose my favorite pattern at the time, one that I fully intended to make for us - a log cabin quilt. Now I wouldn't have to and could move on to other favorites! This was back in the late 70's, I think, and before she was able to finish it, we'd traded in our double bed for a queen. Of course, she was doing this in secret so couldn't sputter her displeasure to us as she refigured the number of blocks she'd need to add and the extra time it would take to hand quilt it. Yes, she hand quilted a queen size log cabin quilt. Well, back in those days, nearly everything was hand quilted. And by the time she got to quilt number three, she had had her fill of making big hand quilted bed quilts. That's how the collaboration came about. I was having an awful time finding the time to piece or applique tops, but I could always find minutes here and there for the hand quilting that I so enjoyed. If she'd make the top, I'd quilt it and bind it. It could be a gift from both of us. And after that quilt, I'd found my true creative love and there was no turning back.

And here we are in the next century, where no one thinks twice about sending a top out to be machine quilted, where quilting fabric and a plethora of threads, books, patterns and gadgets are readily available, unlike those days when she and I were first learning the craft. I have let it take over my life while she realizes she just doesn't enjoy the process as much as she enjoys the finished product, and that there are other things she would rather spend her time on. I can respect that. And gladly accept what little she's collected along the way. In those boxes I found the small pieces of many fabrics she'd bought for the Baltimore-style applique she got interested in after seeing some dimensional flowers I'd made. Those fabrics may be15 years old, but still usable. There's a zip-lock bag of Christmas-themed fabric which may be even older. Then there's other relatively small pieces of more modern fabric from a recent class she took to familiarize herself with "modern" techniques like rotary cutting and flip & sew. There's also major yardage for a 2nd wall hanging she'd planned to make for her dining room. The first one she made last year and is bright primary colors; this second one she wanted to be more Christmassy. But then reality sunk in and she knew she wasn't up to it, just didn't have any interest in pursuing it or struggling with it. So I've offered to make her something from the fabric and she is grateful. Well, it's not much to ask, especially since she was gifting me her things.


There were other odds and ends but the most personally exciting thing in the boxes was a bag of hand-dyed velvets and cotton sateens. These are really cool, and came from her childhood friend Lois T Smith of Machine Quiltmaking fame. Besides teaching machine piecing and quilting, Lois also dabbles in fabric dyeing and these are some of her efforts. A nice connection and something I'm sure will soon work its way into my artsier quilts.

Friday, February 20, 2009

Sailing


Here's a little fabric postcard I finished up today. You might recognize the background fabric - it's what I trimmed from the giveaway postcards in this post. I really can't throw anything away. I had a sketch of sailboats from my visit to the area before moving here - amazingly one of the boats was the exact size I needed. Chalk this up as one more piece of unfinished business completed.

It will be months before the boats will be back on the lake, but one can dream. Snow is still covering the ground and stacked high around buildings, ice still hugs the edge of the lake. However, the sun is gaining strength. I ate my lunch sitting on the sun-drenched porch this afternoon, with no need of a coat. Could spring be far off?

Wednesday, February 18, 2009

The Magic of Heirloom Machine Quilting

Before quilting:


After quilting:


After washing:


There's not as much difference between the last two pictures as I had hoped, but if you look at the larger versions, you may see more puckering in final version. That is the magic of heirloom machine quilting. The combination of invisible thread on the top and the cotton batting shrinkage after washing leaves the quilt looking more like an antique, the quilting lines showing up not as hard lines of color but as shadows and depressions, much like hand quilting would leave. The shrinkage and puckering also help to mask a multitude of sins.


Once again, I misjudged how long it would take to work through a step on this quilt. The binding that I thought might take two days to complete went on without a hitch in one. Have I really lost my knack for estimating this sort of thing or am I just remember other projects that were actually larger and more complicated than this one, thus taking longer on all counts? In this picture you can see why I didn't bother with the bias binding. The stripe hardly reads as a stripe at all. The binding is completely sewn by machine. I cut my binding a scant 1/8" wider than normal so that when I turn it to the back, there's plenty extending over the seam line. I pin and stitch in the ditch from the front, again using invisible thread.

Remember my intent for the year, taking care of unfinished business? Well this is a huge bit of unfinished business wrapped up. My design wall is now blank and ready for the next bit of unfinished business to work on. About 8-9 yds of fabric are now used up from my rather large stash of reproduction fabrics. I finally have a quilt to curl up under when I'm reading on the office couch. Yeah, yeah, yeah!


The finished size of this quilt is about 75" x 64" - a nice lap size quilt and about 4 inches smaller all around than the top was before quilting. That's about 5% shrinkage rate. This is something I don't think is talked about enough, although if you look at most batting packages, they state a percentage of shrinkage to expect. Of course, if you don't use cotton, but a polyester batting, you may think you have avoided the shrinkage issue. But just quilting a top will cause it to shrink, the amount dependent on how dense the quilting is. In this case, I lost 2 inches in the quilting and the other 2 inches in the washing and drying. While this shrinkage is fairly unnoticeable on a smaller quilt, it is something to remember if you are making a quilt to fit a bed.


And now for a small rant. The pattern used for the crow's feet blocks came from the book Memory Quilts in the Making, compiled and edited by Rhonda Richards (Oxmoor House). My guild members who made the starter blocks for this quilt immediately let me know there was a major error in the cutting instructions. Using the dimensions provided resulted in the skewed block shown above where half of the points don't extend to the edge of the block. We worked out what the correct dimensions should be but not before several members got frustrated and gave up on making a block at all. This particularly angered me since I'd already made a quilt from a different pattern in this book, and it too had a major error in cutting instructions. As an accomplished quilter, I struggled to figure out what I was doing wrong before realizing it wasn't my mistake but the pattern's mistake. If an experience quilter like me was confused, no wonder so many novice quilters give up on quilting all together, thinking it must be them. This book in particular is geared toward the type of quilts that would typically be made by less experienced quilters, so to me it is a crime that more time was not spent proofing the patterns. Once I can almost forgive, twice is now getting on my nerves. If I use any other patterns out of this book, it will be with suspicion for sure.

Tuesday, February 17, 2009

Risks of Immersing in Our Digital World

For those of you like me who are not good at multi-tasking, nor working in the midst of a lot of noiseand distractions, take comfort in this interview of the author of Distracted: The Erosion of Attention and the Coming Dark Age.

Of particular interest to artists, I would think, would be this:

Our society right now is filled with lovely distractions — we have so much portable escapism and mediated fantasy — but that's just one issue. The other is interruption — multitasking, the fragmentation of thought and time....This degree of interruption is correlated with stress and frustration and lowered creativity. That makes sense. When you're scattered and diffuse, you're less creative. When your times of reflection are always punctured, it's hard to go deeply into problem-solving, into relating, into thinking.


The interview ends with this observation from the author (Maggie Jackson):

Dark ages are times of forgetting, when the advancements of the past are underutilized. If we forget how to use our powers of deep focus, we'll depend more on black-and-white thinking, on surface ideas, on surface relationships. That breeds a tremendous potential for tyranny and misunderstanding. The possibility of an attention-deficient future society is very sobering.

Monday, February 16, 2009

A Pleasant Surprise


I worked steadily on my crowsfeet quilt last week, but weekend arrived before I completed all the quilting. I really wanted to keep plugging away at it, but the adult in me wagged a finger and said I had to be responsible, switch my emphasis to tax matters over the weekend. But today I could get back at it, and to my surprise, I finished the rest of the quilting in a few hours. I truly thought I had at least two sessions worth left, so this indeed was a pleasant surprise to find myself ahead of schedule on the very first day of the week!

Perfection it is not. The grid lines are anything but straight and even. But then again, once it is finished, I don't think that will be terribly obvious. And if it is, it really doesn't matter.

While quilting along, I was reminded of one of the advantages of doing one's own quilting. It's an opportunity to spend extended time with the different parts of the top, revisit fabric combinations, soak up the interplay of line and color and pattern and value. I discovered two blocks in particular that I decided were my favorites even though their individual fabrics were not at the time I put them together. I was choosing combinations more for variety, to flesh out the color scheme and balance the fabrics in the blocks made by others. Over the week spent, not in construction, but in observation of the quilt top, I grew to like and appreciate it much more than when I first finished putting it together. If I had sent it off to a quilting service, I'd miss that extra interaction, that second chance to really get to know my quilt.

It also gave me time to contemplate the binding. I'll be using the border fabric after all, cut selvage to selvage. That process begins tomorrow.

Thursday, February 12, 2009

Playing with Cardboard


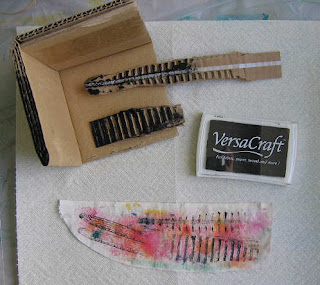
Before I sat down to quilting this morning, I did a quick trial of an idea I saw on Karen Stiehl Olson's blog. It utilizes the inside of corrugated cardboard as a stamp to transfer lines to cloth. Just tear back the outer paper to expose the corrugated stuff in the middle. I was in a hurry so just grabbed a swatch of fabric and a stamp pad to give it a go. No reason why you couldn't use paint applied with a brush.

One of the pieces of cardboard had a tear strip on it - you know, the thing you pull to open the package. That's the print that shows a solid line going down through the middle of the row of short lines. I can see real possibilities for different interesting effects. The cardboard could be cut into various shapes, with wavy edges, with some of the outer paper remaining.


The most interesting design, though, came from inking the cut end of a piece of cardboard (it's on the left of the top picture). If my surface had been padded better, I would have gotten a cleaner transfer of ink. Click on either picture for a larger view.

Of course, I'm sure placing the cardboard under cloth and either dry brush painting or rubbing would give interesting results too. But I left that for another day. Instead, I finished the diagonal grid stitching in one direction on the crowsfeet quilt. That felt like real progress! I'm more than half way to done.

Monday, February 09, 2009

Unseeable Progress


I don't want you to think I'm not doing anything, I'm just not doing the type of quilting that shows up in pictures yet. The Crowsfeet quilt has gotten its first stabilizing lines of quilting, stitching in the ditch of the seams between the blocks, long, loong, looong lines of stitching in many cases. But the guiding ditches run out at the border, so I extended them with painters tape. Regular masking tape would work just as well. Since I'm not concerned with perfection, this is quicker than marking with pencil, more durable than chalk.


Now I am filling in the grid lines between the rows, using the seams in the blocks as my spacing guide. Rather than lay down more tape to guide me across the open spaces of the alternating plain squares, I've attached the metal guide to my walking foot. You can see it here on the left of the foot, running along the already quilted line. This is going to take awhile.

I'm using Hobbs Organic cotton batting with scrim. Not sure why I have it in my batting collection, but by the description, I gather it is similar to Warm & Natural cotton batting (quilt up to 10 inches apart!). But I think it is nicer, a softer hand, and it's organic!

Thursday, February 05, 2009

Frost & Lines

We've had lots of fog lately. I've woken the last two days to trees trying to convince me it had snowed overnight, but in fact, they are just covered with frost from the fog. Today, I took a photo walk to try to capture some of this effect. Above is a closeup of a huge pine tree.


By the time I got out to do this, some of the frost was melting off and the light wasn't the best. While I could see frost shimmering on the slender whips of willow branches, I couldn't capture the effect on camera. So I just stood under the biggest of the willows and pointed my camera straight up into the tangle of branches.


You just KNOW I can do something with these curving trunks!


Click on any of these pics for a larger view.

If you are a relatively new reader, you might be interested in this 3-year old post where I talk about how I see and this one that shows how I have converted this inspiration into my work. There are more pictures there of trees, of course. I may have to review this to see if I still see the world around me in quite this way. I suspect it may have shifted a bit.

Tuesday, February 03, 2009

On a Roll


Oh, look...it's a work table capable of doing work on. Compare this picture to how it looked a week ago here. Yes, I can't stop now that this crowsfeet quilt top is ready for layering just because there's no room to lay it out. It bends my rule of how I planned to clear off my work space, but not to worry. I carefully removed the various stacks to my bedroom down the hall and they can be re-installed once this is all pin-basted. In the process, I found a few things I could actually put away, which was good news.

Thanks for the comments on this quilt. Yes, Chris, it's the imperfections that often draw me to an antique quilt and, though not blatant, the little things that are off in this quilt make it fit nicely into that tradition. And since it isn't destined to be scrutinized by the quilt police, there's no point spending a lot of time to make every little thing perfect. Welcome to the blog, by the way. I'm glad you're enjoying it. Katney, thanks for your thumbs up on the triangle/border fabric. Although a little fussy to work with, I really like the effect of the stripe which makes the center portion look like it's floating. Plus you can't imagine how good it feels to finally use up all those yards of fabric bought many years ago!

I constructed this entire quilt top on my old Viking 990, which performed flawlessly. Basic seam sewing is what it excels at, although it occasionally gets cranky and skips stitches or breaks the top thread. Not this time. It was almost like it was showing off, especially when the new Sapphire arrived and got set back up. I could almost hear the old 990 saying, "See? She may have bought you for your newfangled bells and whistles, but she always comes back to me. While you're off in the shop, I'm right here keeping production going." It's right, you know. I DO think of it as my reliable work horse and I never plan to get rid of it, no matter how cranky it might get.

Monday, February 02, 2009

Virtual Retreat - Day 3

I didn't get back to my "retreat" until afternoon on Sunday due to a previous commitment at church. Just as well. I found myself in an emotional mess at the the thought of my retreat weekend coming to a close and how much I missed this group of friends, how much I'd miss this brief bit of extra connection with them. Plus, yes, the sore muscles were complaining and wanting me to ease the kinks out before subjecting them to the rigors of "extreme" quilting again. I also needed a little more thinking time to work out how to approach the borders. Before quitting the night before, I'd tried a rough sketch of my big yardage to figure out the most efficient way to cut borders and still have enough left for backing.


I suppose I was dreading this part the most because of the long lengths of fabric I'd be working with and the lack of clear table space to do it in. I decided the better part of valor here was to trust that the ombre stripe was printed on grain and that the fabric could stand up to being ripped. Here I am making that first rip - a 5-2/3 yd strip 6 inches wide. It worked great and I didn't even need to trim off the "bruised" edge. It pressed flat without distortion and only needed to be trimmed to length. I measured the quilt top while it hung on the wall and double checked once I'd pulled it off by measuring in sections against my cutting mat. Everything miraculously matched up.


And now that it is ready for quilting, there are two things that bug me a bit. One is that bright purple block which indeed sticks out like a sore thumb. It's not so much the dark purple, I've decided, that is so bright, but that clear light purple background. I suppose I should figure out a way to tone it down but I'm not sure I'm that motivated. The other that bothers me is the fabric in the corner triangles. I tried several options using the ombre fabric, but nothing looked right, not even running the stripe diagonally. So I opted for the same fabric as the alternating squares rather than belabor the point any more. It's not the prettiest quilt I've made. In fact, it reads really dark, darker than I anticipated. It could have been a cheerier quilt had I used a lighter background. But then, if I'd used a lighter background, I would hesitate to use the quilt once finished. I have another dark quilt I've happily and guiltlessly used on the couch for years, even tossed over the dog without fear. I wanted this new quilt to be the same sort of thing, and it certainly will be.


As for my experience attending a virtual retreat? It certainly had its upside.
I didn't have to pack up all my stuff and lug my machine halfway across the country. I didn't have jet lag, I undoubtedly did not eat as much as if I'd been there. It gave me a focused and specific time frame in which to work. It reminded me what it was like to push beyond what is comfortable, easy. It may have primed the pump, so to speak, given me a different sort of kick start for daily studio work habits. I'm sure I got much more done than if I'd been in the same room with those quilting friends of mine. But for me, retreats are not so much about how much I can get done as it is about being with other quilters. The interaction and intimacy can't be replicated from 1400 miles away. Better start saving my pennies for next year...

Virtual Retreat - Day 2

Some quilt retreat attendees hit the ground running, sew late into the night and rise early so as not to miss a single minute of quality sewing time. I am not one of those attendees. I ease into the weekend, more interested in the social aspect of the gathering than the actually work I can accomplish. Not being an early riser at the best of times, getting up early at a retreat to dive into work just isn't going to happen. Ditto if the retreat is virtual. It takes some time for me to sweep away the cobwebs, have that first hit of caffeine take hold. So Saturday morning found me hitting the snooze button and savoring the memory of the progress I'd made the day before. I'd had time to think a bit about those setting triangles and border fabric and of the two I thought would work, both needed to go through the wash. First order of business upon climbing out of bed, then, was to grab that fabric, dump it in the washer and make some coffee.

The upside of going on this virtual retreat is no 26 hour train trip to a part of the country even colder than where I am now, and no distractions as I work away. The downside of this virtual retreat is no distractions as I work away, no laughter in the room, no one to consult with over the inevitable fabric dilemmas, no stimulus from seeing what others are working on. Texting only goes so far. So, remembering how I spent Saturday morning at last year's retreat, I grabbed my coffee, sat in a comfortable chair and called my friends. Ah yes, I could hardly hear the person on the other end of the line for all the cackling in the background. Dang! So I made her describe it all to me, tell me what each person was working on, related what I was getting done. Gab, gab, gab. Finally, we both realized it was time for me to get off the phone and to work. The fabric was ready to go into the dryer and time to take the next step.


Choosing this ombre fabric for the triangles made my job a little more difficult, but I really didn't have anything else that fit the bill. I actually had two pieces of this, one piece not quite 2 yards, the other 5-2/3 yards. Both, I'm sure were one of those deals where I bought the end of the bolt (a sneaky way to avoid having to decide on a specific amount to buy). The larger piece was on heavy discount, costing me about $2.75 a yd and bought, no doubt with the quilter's famous rationalization: "It could always be used for backing." Indeed, in this case, this much yardage will provide not only backing but the border strips as well, while the smaller piece will give me my setting triangles. Normally, setting triangles would be cut from a large square cut on the diagonal both directions producing 4 triangles. There are charts that tell you how big that square needs to be. Unfortunately, if using a stripe, the square method is out because it produces triangles with stripes running two different directions. However, you can cut these triangles from strips instead. Just cut your strip 1/2 as wide as the dimension for the square and make cuts at a 45 degree angle. Here I've used my large square up ruler, placing a strip of painter's tape diagonally to help guide its placement on the strip. You have some waste at either end, but not much.

I didn't think this through 100%. I should have lined up the stripes differently in the strip so they would fall at the same distance from the long edge. Fortunately, I had the proper number so that all the ones on both sides were identical while the ones used at the top and bottom matched each other too. Visually you only notice if you look carefully, and remember, this is not something that will be for show, where if someone does notice it will be a big deal. I'm going for endearing quirkiness here, something that will make a future heir or quilter smile as she/he speculates on the conditions leading to the "imperfections" making this an interesting find. At least, that's the story I'm stickin' with...


I had a harder time sustaining my work ethic this day. I was already feeling the pain from my marathon work of the day before. I was pooped already, and not a little bit bummed at being only virtually connected to my friends at the retreat. There was a fairly big chunk midday when I simply couldn't make myself go back in and sew. But heck, I experience that at real retreats too, so didn't beat myself up over it. A walk revitalized me, and before the day was over, I'd added those triangles and sewed all the rows together. More climbing up and down off that chair. More reaching and stretching at the design wall, more hunching over the sewing machine, and the table too as I now had to do a lot of pinning before stitching. More awkward hefting of the iron as I pressed those long seams. More aches and pains requiring a few glasses of wine and a long soak in a hot shower at the end of the day. But man, was I pleased and excited! This was the point I expected to get to on Sunday, not Saturday. I'd told my friends I'd be happy if I just got it ready for borders by weekend's end. Now it looked like the borders would get on it too.

Virtual Retreat - Day 1


"I hurt"

That was my physical state
as I sat exhausted at the end of the day yesterday. My weekend "retreat" was over and I'd outdone myself. I'd spent three days hunched over the machine, getting up and down to press, to square up, climbing up and down the chair being used as a step stool as I pulled blocks and rows of blocks down off the design wall and put them back up. Seriously, how did those women in the 1800's working out of cabins and small houses manage to put their blocks together with little if any space for laying them out? How did they cut the big pieces? The preponderance of quilts with blocks turned the wrong way, that don't lie completely flat, that are wider on one end than the other tells us that this lack of workspace did effect their final product. Had they the large tables and design walls we now use, they wouldn't be complaining about a few sore muscles, I'm sure. But I AM complaining! Or at least certain parts of my aging body are complaining. It's a stark reminder of my thoughts after making my last large quilt back in 2006 - physically, logistically, it's getting increasingly difficult for me to work on bed-size quilts, and I don't know how many more, if any, I have left in me. They would have to be special for me to tackle them. Which is why, nearly three years later, I've just completed a large quilt top.


"I'm stoked!"

That was my emotional state as I climbed the chair for the last time. Remember those crowsfeet blocks my WI guild made after I moved to Idaho? They arrived in December 2006 and I wanted to make them into a quilt large enough to snuggle under on the couch, have those ladies close around me. So that meant I had to make additional blocks, which I did in March and April of 2007. I arranged them on the design wall, considered fabric for alternate blocks and sashings, then went on to other things. They've been taunting me daily and more recently singing a siren song - high time to do something about it. The idea of pretending to be at a retreat gave me the permission I needed to move this project to the top of the list.


I "arrived" at my virtual retreat late morning. Here are some strips I'd cut earlier in the week, and my cell phone so I could text my friends at the actual retreat. Are you there yet? What's for lunch?


The strips were to sew around each block. When working with blocks made by others, there's always slight variation in the finished sizes you have to work with. In this case, there was nearly a 1/2" difference between the smallest and largest blocks. By sewing extra fabric on all blocks, I could then square them up to the same size (although I decided to "let out" a few seams on those smallest blocks first). This picture shows the squares of fabric that will alternate between the pieced blocks. I'd cut these ahead of time too.


This is the inevitable truth about traditional quilting, at least for me. Seldom do you buy the proper amount of fabric specifically for a particular quilt project. Instead, you buy fabric as you fall in love with it, as you find it on sale, as you pick it out as a souvenir of the quilt shows you attend. You buy it in increments of fat quarters all the way up to 6 yard lengths, again depending upon your budget, your good luck at finding it on sale, your thoughts of what you might do with it. In the end, when you get ready to make a quilt, you often find you do NOT have enough of what you need, and you bought the fabric so long ago that your chances of tracking down more of it are next to nil. And of course, you don't want to spend even more money and time searching for a substitute fabric. So you figure out how to make do, use what's on hand. In this case, I didn't have quite enough fabric for all the strips around the blocks. A survey of my extensive reproduction fabric stash produced only one fabric close enough not to make a fuss in the grand scheme of things. This is a scrap quilt, one that will be considered a utilitarian quilt, one that will never hang on the wall or go to a show. In the best tradition of utilitarian quilts of the 1800's, we are making do here or doing without.


Usually I underestimate how long various steps in the quilting process will take, but I surprised myself this time be underestimating just how much I could accomplish in a focused day of sewing. I think I put in around 8 hours total, realizing things were moving along faster than I expected and not stopping until I got to this point: all the blocks are sashed and squared up and sewn into diagonal rows. The only thing the rows are lacking are the setting triangles at each end. Ideally, they would come from the same fabric as the alternating squares. But life is anything but ideal - I don't begin to have enough left of that fabric for the triangles. Tomorrow I will have to peruse my options. Tonight, it's time to celebrate with a glass of wine!