Monday, February 27, 2023

A Hodge Podge Week

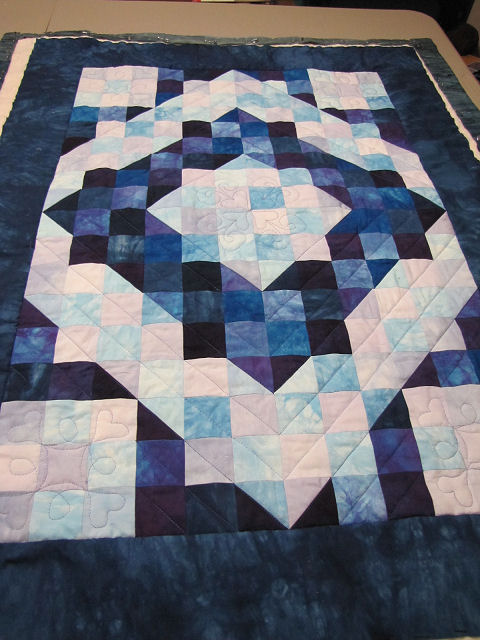
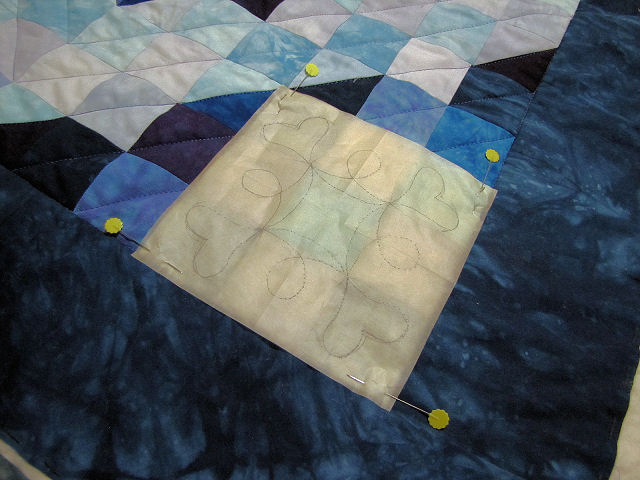
There was focus. There were diversions. But things got done. I made my final choice of border quilting design for Naomi's quilt. Was intending to do the one on the left but it ended up not being wide enough, so I opted for the more elaborate one on the right which is the perfect width . . . and has hearts! I cut strips of the quilting paper, folded it into fourths accordion style and taped one end over the design. As I finished tracing that section, I folded down the next quarter and continued tracing, repeating until the entire strip had the design transferred to it. This length is for the side borders.

Then I unfolded it and taped it to this cutting mat, laid a blank strip over it, taped it in place and traced the design onto it. (And discovered a glitch in my method of transferring from the book which resulted in several of the heart loops being stretched - but I like it.) Repeated one more time for a top border which was longer to include the corners. And that is where I got stuck. No matter how many times I tried, how many breaks I took, how much mulling when not in the studio I did, I couldn't figure out how to turn the corner of this border design. Yes, I could just continue the design straight across the corner but you know me. I wasn't about to be defeated, and finally last night I came upon a solution that I think will work. Need to transfer it to the other corner, then trace the complete design onto the last paper strip. Quilting should resume this week.

In the midst of this preparation for border quilting, I switched gears to work through a video class offered by my Handmade Book Club. The video was going to disappear at the end of the month so I had a deadline pushing me along. Here's my setup for working on botanical drawing with India Ink.

The first part of the class was devoted to making a small Japanese stab binding book. Luckily, I had one on hand that I'd made back in 2020 when this binding was an offering of the month. I made three different ones, with this one having signatures of rice paper so that I could experiment with gelli prints in it. Hmmm, never got around to trying that so was happy to use it for this class.

Before drawing in our books, it was advised to make some marks on a scrap piece of paper to get used to the way the brush and the India Ink played on the paper, and seeing the difference between full-strength India Ink and some that had been diluted.

Then it was on to painting/drawing in our books, following what the instructor, Amy Maricle of Mindful Art Studio was doing in making leaf shapes and stems. I'm using a pretty hefty rock to hold down the cover and pages as I go. I also inserted parchment paper between the page I was working on and the next page. Even though I doubled over each page before inserting into the binding, sometimes the ink bled through.

I couldn't seem to get my brush to do the thin-really thick-back to thin strokes that she was getting. After a few more pages of copying her designs, I did as she suggested and struck out on my own. I quite by accident found myself making these "broken" leaves that I really liked. If you look to the left, you can see how the dark ink shows through the two layers of rice paper. I rather like that as well. Interesting to see the faint image of the following page showing underneath the current one. I'm thinking of ways I can capitalize on this as I add work to this book.

This is perhaps my favorite page, simple and minimalist.

Finally, a really big diversion: the start of motorcycle racing season this weekend. I watch most of the races on my computer, and there is always content before and after the race that doesn't require me keeping my eyes glued to the screen. Since this computer is part of my office setup, sometimes I can work on bills and paperwork, sometimes I can do something creative, and this time I picked up my stitch camp piece and added a few more stitches as I listened. I really haven't done much with it, but it does sit on my printer so I see it everyday, pondering what to do next. This time it was to add running stitch spirals in more of the dark blue circles, and some whipped running stitches, a stitch that is new to me. I use a single strand of embroidery floss to make the running stitch, then "whip" this shiny 3-ply thread under the running stitches. It's a little like couching. I honestly can't remember where that thread came from and I'm only guessing that it must be rayon, but it is certainly my favorite teal blue. I still have no sense of where I'm going with this, just trying to read the marks and envisioning what stitches might enhance them. I've always thought there was a sense of water flowing through the center so hope my stitches bring that out.

Wednesday, February 22, 2023

All But The Borders

I didn't manage to do something in the studio every day last week - life intervened at the beginning of it - but I did make good progress on adding quilting to Naomi's quilt. There's a real temptation not to put any quilting in the 4 inch borders but that would just be laziness on my part. I'm considering a looping design which I would trace out on strips of the Golden Quilting Paper. I really like the look of the diagonal quilting through the diamond areas, deciding after all not to free motion any design in the light area.

In the end, there wasn't much dithering over which thread colors to choose for the quilting. I think I knew from the beginning that these two - a variegation of light lavenders and the darker one of blues and purples - would be my choice. If nothing else, I could tell they were favorites by how much thread was already used up off these spools.

Once all the walking foot quilting was done, I pinned the papers with the free motion designs in place with flat flower head pins - it worked really well.


The design fills the corner areas nicely.

The center design though doesn't reach out into the outer points. I'm considering either adding a heart in those spaces or quilting in Naomi's name - or both!

Of course, when you quilt through papers, the paper needs to be removed and I saved that task for Monday of this week, when I checked out a local charity quilting group. I've known about it for quite awhile but they meet on the same day as my art group met, the irony being that I'd invited a quilting friend to join my group at about the same time she invited me to join this group! Well, my group isn't meeting right now so no more excuses! Apparently they had a larger than usual turnout and lots of finished or near finished charity quilts to show during show and tell. A little bit of business and then it was nose to the grindstone as machines started humming, cutting began and pressers stood at the ready to iron seams and binding strips. Their quilts go two places, first to cancer patients, and any extras to a homeless transitions organization. It's been a long time since I've done charity quilting, and yes, I've felt a bit guilty about that, and I had a very good feeling about this group. AND I got all my papers removed from my quilt before it was time to go home. I'm sure I'll be back. Here's an article from 2016 that tells a little more about the group and its origins.

Monday, February 13, 2023

A Better Week

Now this is evidence of a week more like I used to put in - every day on the engagement calendar noting what was accomplished in the studio. I can think of many words to describe what got me in there each day: focus, determination, goals in bite-size pieces, discipline. As much as anything, I managed to overcome the little voice saying, "Oh, it's too late in the day, not enough time left to do anything," and just went in and did something whether it was for 15 minutes or an hour. And of course, progress was made without overtaxing myself on any one day. I still can't muster the endurance I once had to work for hours at a time, but I'm making peace with that change and doing what I comfortably can. It really helped that I set my mindset to accomplishing just one thing each day, even if it was that quick 15 minute one. I am pleased.

So it started with piecing the batik for the batting, digging out some batting, giving the top a good press, and layering it all up for pin basting. I'd been mulling how to quilt it for awhile now, knowing there'd be some straight-line quilting done with a walking foot, but I planned to do some kind of free-motion motif in the center and four corners. The last three or so baby quilts I've made I've quilted without marking, or with very little marking. It was freeing and easier than anticipated, but for some reason, I was shying away from the idea for this quilt. And thus I consulted my extensive library of books devoted to quilting designs. That yellow folder, by the way, is stuffed full of designs I've pulled from magazine. I am awash in ideas and I must say, I have some beautiful patterns at my disposal, enough to make me long to use them in some hand quilted beauties. Hand quilted wholecloth quilts still draw my attention but I doubt I'll get back to doing that sort of thing.

I settled on this design from Harriet Hargrave's Heirloom Machine Quilting for the center and decided that tracing it onto Golden Threads Tracing Paper so I can pin it to the quilt, sew through it, and easily remove it afterwards was the best plan. Generally speaking, I'm not much into hearts on quilts but I did use them on the last baby quilt and these are pretty subtle as heart motifs go. The paper is held in place for tracing with a removable scotch tape.

I couldn't find quite what I wanted for the four corners - either too big or too small or not quite the right motif. Then it occurred to me that one from Pat Holly and Sue Nickels' 60 Machine Quilting Patterns that was just a tad too big could be modified to work if I eliminated the large hearts encircling the smaller ones. Perfect! I traced away and plan to transfer the design to the other 3 papers by stacking them with this one and sewing on the lines with an unthreaded needle. But as I auditioned it in the corner space and compared it to the center motif, something bothered me about it. Finally it dawned on me - the hearts were very different shapes, the center one a bit stylized as it cinched in to a point, the other one having quite rounded and fat hearts. Hmmm. Well, I guess I have to pare down those fat ones. After a few strokes, I thought to lay the paper of the other heart design to discover that the hearts on each were about the same size so I could just trace the center motif hearts inside the fat ones and get the eraser out to remove the lines I no longer needed. Problem solved!

Now it's time for the inevitable choosing thread. I do have a lot of thread on hand and there are several of these that are good candidates. I'll do the straight line quilting in the dark areas first, then tackle the freemotion areas while I continue to mull how I will quilt the borders and the light diamond areas. They are about the same width and I'm considering putting the same motif in both.

Monday, February 06, 2023

Plugging Along

Again I have that problem with not quite knowing where the week went, but I did get borders on the baby quilt. Since I am pulling from partial pieces of the hand-dyed fabric, I did have to piece one border to get it long enough, but I don't think that will show much after quilting. Every time I work with this quilt, I am amazed at how soothing this color palette is, especially the mingling of the lights. Hoping it has the same affect on baby! Running into somewhat of a problem though as I searched through my stash of Judi hand-dyes as the pieces big enough for backing very much clash with the top, and though piecing a backing is an option, I don't have enough truly big pieces of the right colors to make that an easy task. So I turned to a stack of batiks. Judi may have dyed her own fabric and used it in her quilts as well as selling it, but she also shared my love of batiks and I came away with quite a few good-size pieces when another friend of hers and I split up her stash. But again, somehow the color I need was not in there, except for this one. There were two pieces of it, neither large enough on its own, but I plan to cut to eliminate some of those dark grayish brown areas to join two pieces with the most blue.