Thursday, April 29, 2010

April Challenge for June

Untitled, textile 12 x 16 framed
Sheila Mahanke Barnes 2010

June & I decided, due to our individual renditions of "March Madness," to skip a month and resume our challenge in April. Time to produce a new original work to inspire the other. This is what I came up with, something that scratched a number of itches I've had of late: working with rectangles rather than squares, creating with a monochromatic palette, incorporating photo images printed on fabric with an inkjet printer, collage, and exploring further how thread color laid down in closely-spaced parallel lines effects and is effected by the color of the fabric it runs across.

I have several artists to thank for the way I approached this piece. Connie Rose gets the biggest nod for helping break through my block about using digital print images. I've been following her collaging, both fabric and paper, much intrigued. Then she embarked on a journey of incorporating digital prints into her collages. With this first effort, the lightbulb finally went on in my head. Use the digital print as the focal point, adding fabrics and shapes playing off what's in the print. Simple, right? But a simple concept I'd not put together on my own.


I have many photos I'd like to use pretty much as is. Above is a view that caught my eye, below it the cropped version. That cropped version got printed on fabric last fall and has been on my design while ever since, wondering where it should be used. With Connie as my guide, I now knew.


Another artist I follow, Annabel Rainbow, also dabbles in a type of collaging in some of her work. I've admired her backgrounds made up of overlapping oblongs. (You can view examples of this here.) I'm sure that is why my mind had wandered to working with rectangles. I couldn't remember exactly how she went about it, but I knew that in the end, it was all fused down. As I usually do, I probably combined features of several approaches I've run across to come up with my own version that went like this. I don't really like working with pre-fused fabric, so opted to lay out my pieces over a piece of Decor Bond, fusible side up. Positioned my digital print and started auditioning blacks and greys - my monochromatic palette. Only, the printed fabric image wasn't really black and white - I think it has faded a bit, developing a pale green tint just like the gradating qualities of my hand-dyed black fabric.


After much deliberation, trial and error, trading out of fabrics and shapes, I finally made myself say, "good enough" for this study. You can see the gray fabric got jettisoned and my new monochromatic palette became teal. I didn't overlap my shapes as I thought I would - will try that another time. I just overlapped them enough so there was no issue of the white base showing between the shapes. I fused the whole thing to the Decor Bond. The digital print was backed with Steam a Seam 2 lite since I would not be stitching over it at all.


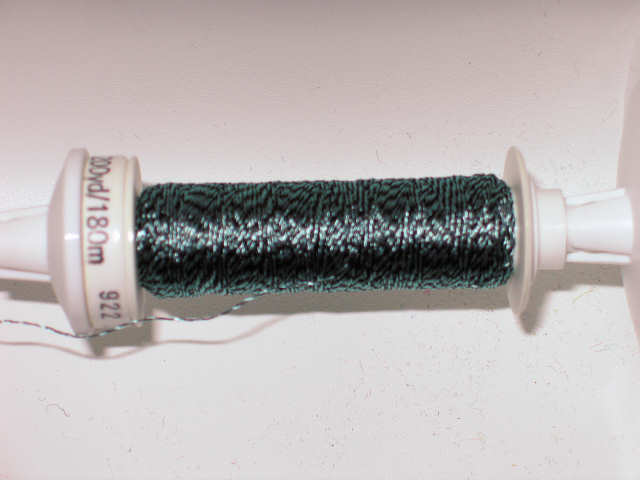
With the Decor Bond as stabilizer, I started stitching, not quilting. I opted not to use any batting or backing since this will be slipped into a frame. This Sulky Ultra Twist thread looks grey & black, but really, the grey shades to that teal green just like the digital print.


And it's the only color thread I used, as I laid down rows of closely spaced parallel lines, most running horizontally but some running vertically as well for a little added interest. Over light fabric, it looks quite dark, over dark, it reads light. It nearly disappears over the large print.

Don't really have a name for this yet., except a reference to the site of the photo: Culvert at Chuck's Slough. Any thoughts?

Friday, April 23, 2010

Unexpected Color


While waiting for spring to burst forth, I noticed some unexpected color in these very red branches/trunks. It is a relief to look at green grass again, but it will be even more joyous when the peonies, azaleas and rhodies get going soon.

Things are a bit quiet on the sewing front. Been struggling with some computer issues among other things. However, I have started work on my April challenge for June. Can't show you what I'm dreaming up for her yet, but I can tell you I am experimenting some more with fabric collage.

Saturday, April 17, 2010

Life


Life is convoluted...twists and turns, doubling back, crossing over and through other convoluted lives. And is more interesting for being so.


And yet, is it not a relief when life straightens out, if only for a short while, the hard edges softened, hope of something lovely blossoming soon within our grasp?

Friday, April 16, 2010

Another filter


I discovered a different effects filter in my Corel Paint Shop Pro software. At the bottom of the list I spotted "user defined" and gave it a look. To my relief, this filter also has a random button which gave me this result. There are dozens of boxes one can fill in with various values if one only knew what one was doing.

Here's the original photo, taken through the windshield as I drove down the Columbia Gorge. I wanted to capture the almost silver effect of the sun glancing off the river. Only later did I remember I had my polarizing sunglasses on so the photo didn't look very much like what I was seeing.


I ran across this observation in an article about plein air painting regarding collecting reference material versus creating a finished work:

"The sketch is a true statement of things as you found them; the picture is an arrangement of these things as you wish them to be." Landscape painter John F. Carlson.
This thought made me feel a little bit better about my use of random filter settings. I take lots of pictures, most I realize more for reference than for actual reproducing. If I run them through random filters, it is still my creative sense that is deciding that a certain result or "arrangement" is a good one, manipulated as I wish even if I didn't slide the sliders or enter the values myself. That manipulated photo above is giving me ideas...

Sunday, April 11, 2010

St. Hilary Star


I thought it about time I showed you the Stack-n-Whack stars I've been talking about. These are the two I finished eons ago (you can see part of the other top using a different pattern but same group of fabrics). The blocks are huge, finishing to about 20 inches, and while not difficult to piece, they have many pieces and require a bit of attention in order to get those pieces in the proper spot. More about that later.


The inspiration, if I remember correctly, was a yard of a reproduction print based on the "St Hilary" silk damask designed by John Henry Dearle for the William Morris collection by the Woodrow Studio London. Follow this link to see the actual design as shown on the cover of a Dover Book. While not the typical large motif suggested by the stack-n-whack method for making kaleidoscope blocks, you can see in the above picture, it worked nicely in the Medallion Star and also the Venetian tiles patterns in Bethany Reynold's second book, Stack-n-Whackier Quilts. I cut as many pieces as I could from that yard of fabric, which determined how many blocks I would have for each of my versions of Bethany's quilts. I'm used to altering patterns to fit the fabric on hand, rather than buying exactly what I need for a particular pattern.


I'd pieced all the kaleidoscope centers for the stars before packing this project away so long ago. Thank goodness, because even with some of the other piecing started on the star I worked on today, it's the only one I finished. Yeah, West Country Buddha, these are not speedy blocks so no finished top today! Here you see some of the major units laid out to get an idea of the sequence. Notice all the triangle units that look the same size although they are added to different shapes in the block. They are all the same size so you'd think they are all cut the same, right? Wrong...and thus the need for careful attention in the construction process. I think I'm remembering why I set this project aside...


Here is the layout diagram from the book. Note that some of the triangles are half square triangles (the bias edge runs along the angle) while others are quarter square triangles (the straight of grain runs along the angle). There are left side points and right side points, mirror images in terms of which side the half-square and quarter-square triangles are on. The triangles added to the corner units are also a mix. This is all done so that when the block is sewn together, all the grainlines run parallel to the block's edges. I've heard of quilters who plan and cut their blocks this way to eliminate any grainlines on the diagonal. I may be pretty fussy, but I decided long ago I wasn't THAT fussy. However, since Bethany went to all the trouble to figure it out and present so well in her patterns, I followed her instructions. She also gives pressing directions, and I have yet to find an error in any of her patterns. I so appreciate that attention to detail.

I'll keep pecking away at this as the week progresses. I think a block a day is a reasonable goal at this point, so the remaining three will soon be done. Then I have to figure out how I thought I was going to set them. The mind is very foggy on that.


Saturday, April 10, 2010

Hint of Spring


The plan was to spend the afternoon in the studio. I hadn't anticipated how warm it would get, how good the sun would feel after the cold wave and wind of the last few days. I took my lunch out on the porch, read the mail, couldn't make myself go back inside. So I took a walk, picked up branches from the storm, raked a few leaves blown up against the fences. My yard still looks pretty dismal, with only a few daffodils brave enough to bloom, but over at the neighbor's, these glorious tulips glow. Gives one hope...

Once I got my fill of fresh air and sun, I unpacked my sewing things from the trip, got out those stack-n-whack stars and figured out what I was missing. Turns out that had I given myself more time to go through the pattern and my piles, I only needed to include two strips of fabric already cut plus cut two more strips from that green. Oh, well - everything is cut out now and I'm ready to dive into piecing tomorrow.

Friday, April 09, 2010

Hood River Fun Part II

Frankly, I didn't take a lot of pictures on this trip - I still was not totally recovered from my March Malady and I'd taken so many when I went down last year. There was a run into Portland before the exhibit reception where, among other things, we paid a visit to Fabric Depot. Oh, my - I'd not been before and could see as soon as I walked in the door what a dangerous place it is for any lover of textiles. One of the things on my list to look for was silk organza and I didn't have to walk far to find it. I could have spent all my time just in the silk section, but as you can see, I made it to the extensive batik section as well. Thank goodness they were having a sale, and friend Judi graciously offered her 40% off coupon to me to help defray the cost of that very expensive silk organza. But it is 54 inches wide and shades from blues to greens to even a yellow. So for someone who is not sure what she is going to do with silk organza, I feel I bought a piece that gives me lots of options. The tan fabric with the tree trunks and leaves is also silk, a jacquard that is so me I had to get some. And no, I don't know how I will use it, but I think it will go very nicely with some other silks in my collection and may end up as a background. That one batik is another fabric that shades, this time from blues to browns. I can see sky, water, ground, tree trunks coming from it. As for the thread, it is Sulky Ultra Twist which I understand is being discontinued. They didn't have the color I was looking for, in fact only had a variety of greens and a pink, so one of each came home with me. They did have the YLI heirloom silk thread in the navy I needed. And I also bought a package of black elastic cord, something I want to try as a closure on padfolios. So I was a very happy camper, even though there wasn't time to explore the entire store.

There were torrential rains that day as we zoomed down and then back up the gorge. Spring is much further along there than here in Northern Idaho, and the variety of greens on display did not escape my attention. Every imaginable shade and value was represented, some so bright and fresh. How do I forget this such that it is a surprise every year? We also witnessed the most remarkable rainbows created by the spray being kicked up by the cars as the sun dipped near the horizon behind us. None of us remember seeing anything like it, and of course none of us had a camera to try to capture it either.


Judi and I sewed off and on the next few days. The master bedroom in her new house has been converted into a wonderful studio space for her and her mother, Julia, who paints. They set up a table for me and this was my view. You can just make out Julia's in-process watercolor paintings on the table. With views like this, how could they not be inspired?

So what did I work on while there? Since I drove, I packed up my sewing machine and two very old UFO's. And there lies a cautionary tale. While at the quilting retreat the previous weekend, I remembered a stack-n-whack project I'd started at least 7 years ago. I remembered making 2 of the huge intricate star blocks, and cutting out the rest of the pieces for 4 more. A perfect project to work on out of my studio, right? I didn't pack up my sewing things until the morning of the day I was to leave, so when I unearthed this project from the bottom of a bin, I didn't have a lot of time to figure out exactly how I had left it. I'd forgotten that I had wrapped it up with another stack-n-whack project - farther along but using the same grouping of fabrics - and was confused about some of the triangle pieces lying loose outside the ziplock bag that obviously held my pre-cut pieces for the stars. I did find one note indicating I needed to cut more diamonds from a specific width and length of pink fabric, so cut that off and threw it in. Looked at the neatly stacked units and trusted they were all that I needed. Put aside the uncut pieces of fabrics and at the last minute, grabbed some of those "extra" triangles just in case I needed them. Grabbed the shoebox with my other ancient project for the trip, appropriate threads, a few rulers and other supplies and I was off.

Once I got set up to sew on the other end and started going through the instructions and what I'd brought , it didn't take long to realize how faulty my memory about this project was. I'd forgotten that half of the stars had pink points and the other green. There were no green diamonds cut, and I'd brought none of the green fabric along. Oh, well, I thought, at least I can get the two pink stars together. But again, I'd forgotten so much about this pattern, and it turned out I didn't have enough of the appropriate pieces to complete even one of the stars. (and yes, I DID need those triangles I'd thrown in at the last minute.) Sigh. I sewed as many parts together as I could, then made copious notes about what I was missing and what went with what. I'm determined not to put this back in the bin until I finish cutting and piecing while all this is fresh in my mind!


As for the other project, it is probably even older, and was originally all I was planning to take on this trip. Fortunately, everything I needed was in that shoebox, my notes made sense, and the work was very straight forward. Basically, it will be a simple scrappy quilt from reproduction fabrics made into half-square triangle units. I'm using the method where you layer two fat quarters right sides together and cut strips on the bias. In my case, the strips are 3 inches wide. I had most of the fat quarters chosen for this project already cut into strips, so it was a matter of sewing the strips together as you see in the picture above, mixing the different prints up in the sets to give the most variety to the resulting units.


Then, using the special bias square ruler, you start cutting your squares, lining up the diagonal line with the seam. and the size of the square (in my case 3-1/2") along the raw edge. This is a fairly quick and very accurate way to make lots of these units and more detailed instructions can be found in books that cover basic quilt techniques. I've pressed the seams open to reduce bulk at the intersections when the half-square triangles are sewn together.

Of course, I had visions of getting all of the 360 or so half-square triangle units sewn and cut before coming home, but we had plenty of distractions. I decided not to count how many units I cut (no use depressing myself) but instead counted it a major accomplishment to get the remaining fat quarters cut into strips and all of the pairs of strips sewn together. I plan to keep this project from going back on the shelf too, even though it is very far down on my list of priorities. It's such a simple concept and I'm anxious to get the border fabric out of my regular stash. I'm also very aware of the fact that these fabrics don't speak to me quite the way they once did. So it would be good to get this made up, ready to pass on to someone who might love it more than I. Or perhaps I'll be surprised at how much better I like it once those fabrics are mingling together all over the completed top.

Thursday, April 08, 2010

Hood River Fun


I'm back and still unpacking from the Hood River trip. This time I drove, and there were those windmills along the Columbia Gorge that so fascinated me on my last trip down this way. Gotta do something textile-oriented with those images.


The "Fiber Art Now" exhibit was one of the best I've seen and definitely worth the drive to see. The exhibit runs through May 2nd so still plenty of time to see it. In the meantime, here's a sampling of some of the fiber art on display, taken quickly so may not be the best representation of the real thing. My friend, Judi, took a different direction in subject matter for this show, creating some whimsy with her mermaids and fairy quilts.


Here's another fairy quilt, larger than the others. For perspective, the fairy is about 12 inches high. Click on this or any picture for a larger version to enjoy the detail.


I was quite excited to see Trisha Hassler's metal and fiber work in person. I first ran across her in the book Speaking in Cloth: 6 Quilters, 6 Voices from the Coos Art Museum exhibit of the same name. I could tell from the photos that her work demanded to be seen in real life and I was not disappointed. This is truly layered work, and the cutouts in the metal add a unique dimension to her work. There were several of her pieces I'd love to take home with me, but alas, not that much discretionary money in the budget.


Patricia Spark is a feltmaker, weaver, printmaker and glass beadmaker. Here are two of her felted works which I really liked. Felting is one of those things that I appreciate when done well (which these are) but have no desire to do myself. That one on the left could have come home with me too.


Rhonda Harris is a long-time Hood River resident who works a bit more traditional/contemporary in her quilting. She loves color and I found her work for this show quite striking. I was disappointed that my photos didn't capture the saturation of the colors in her fabrics. This is her beachballs series, and if you click on the picture and study the fabric, you will see why she named them that.


This is part of her series using Aboriginal designed fabrics. Framing these larger pieces really set her work apart.


More from the Aboriginal series.


I was delighted that my Internet friend and challenge partner, June, came up from Portland for the show. If I look a little tired there, well, I was as it had been a busy day. We stayed at the same motel, and I invited her and her husband, plus Judi, over to my room afterward for a little show and tell. I thought all of them would enjoy seeing some of the pieces I've done for our challenge close up. And enticing them with a bottle of wine didn't hurt.


Finally, here's my friend, Judi, with the three pieces she made for the February "Red" exhibit. More about our time together in the next post. We DID have some fun!

Thursday, April 01, 2010

Fiber Art Now!


Well, I'm off again, this time headed west to Hood River, Or, where my art quilter friend, Judi Kane, is taking part in a fiberarts exhibit at Columbia Center For the Arts. (One of her art quilts is shown above - the fairy at bottom left.) Check out the Fiber Arts Now page for details. If you're in the area, stop by for the artist reception Friday April 2 from 6 - 8 p.m. The gallery is located at 215 Cascade Street and the exhibit runs through May 2nd. Fourteen artists from Washington and Oregon are participating and there is also an opportunity to take a fiberarts class from one of them.

Back in a few...