Showing posts with label Piecing. Show all posts

Thursday, December 11, 2025

Going With My Heart's Desire

I'm getting there - down to adding a final border and then quilting the holiday banner. But I'm nearly out of bobbin thread and late posting this week so thought I'd pause to show you my progress. Above you see all the small and odd shaped pieces ready to go (strips for borders are pinned to the design wall), the small pieces of paper on each one labels so I know which piece is which when I start following directions to join everything. There were enough different pieces to use up every letter in the alphabet! You may note two things here: first, wasn't I contemplating ditching the pieced letters for appliqued ones? Yes, yes I was. And as I cut the final little piece and stood back, it dawned on me I'd just cut all the pieces for those letters, so I guess they were going to get pieced!

The other thing you may note is, in spite of encouragement from Jan in the comments on my last post to just go with the lighter sprigged fabric for the background, I instead used that warm tan, the fabric that I was first drawn to. Sometimes your first instinct is the right one, and believe it or not, when I did one final audition with sashing strips laid out on each fabric to form the size of the letter blocks and the pieces of a letter placed within, I was very surprised to find that the pattern in the lighter fabric fought for dominance over the dark green shifting it back while the darker fabric let the letter shine. It gave the whole thing a much warmer look, more my heart's desire, that rustic country or antique look that I am so drawn to. I've struggled a bit with my camera to capture it accurately but the picture at the top does a good job. 

I proceeded with piecing those letters, which I feared would be a pain, but they really were not. Everything matched up really well, and except that there were lots of short seams, they came out well. I added sashing on each side and sashing with cornerstones on the other sides, and when I spread it all open on my work table, it was instant joy! Honestly, I was filled with such happiness - loving the fabrics and how they worked together and loving how well this was going. This section now has a tan border and the checkerboard borders on three sides.

Next up would be fusing applique to the curved section that would be at the top of the "joy" section. The pattern called for a heart with "commas" on either side, but I'm not one much for hearts on my quilts (although there have been exceptions). When I looked at the picture of the Christmas quilt I'd made for my mil, I was reminded that it used bows and holly leaves appliques. I wondered if they were sized to fit in this new space, and got out the binder with its documentation file to see if I had saved templates. Yes I did, and yes they were the perfect size. Ah yes, these are the moments that justify to me my penchant for documenting and saving!

And here they are, fused in place and waiting for some stitching. Sylvia had encouraged me to use some glitzy thread around the letters, and I had indeed been thinking to do that. Two of the fabrics do have gold highlights on them, and a little gold thread holding down the edges of  the leaves and bow would be a perfect accent.

Ok, that wasn't so bad, once I stopped procrastinating . . . but I was heaving sighs of wishing I didn't have to tackle the next step - curved seams! Not one, not two, but three of them. You'd think I'd never sewn a curved seam in my life but in fact, I've sewn more than I can count and some so tight they should have been appliqued. Kind of a master at it in fact. I think I was sighing because to do these seams well, it takes a lot of pinning. But even that went fairly easily and soon they were all done. And once again, the finished look filled me with so much satisfaction and, yes, joy. And I think part of that joy is because of how well designed this pattern is, with good instructions and no errors to complicate things. I could just go on autopilot and get pleasing and precise results. That surely hasn't been the case with that knitted cardigan; the contrast couldn't be more obvious. 

I want to thank my "coaches" and "cheerleaders" who commented on my last post. Your insights and encouragement really do help me soldier on! Now. back to the studio to fill that bobbin and get the last border sewn on. :-) 

Tuesday, June 03, 2025

Quest Completed

I've been working on the orphan block tote bag in fits and starts, most sessions ending with "my head HURTS" from all the working out of dimensions and figuring out construction sequences. But it's all together now, my quest for a big bag for my knitting over. I said I wanted a big bag and it is BIG: 10 x 16 x 16 inches tall. 

The headaches were of my own making as I tried to be clever about hiding the seam allowances on the inside rather than just making a separate lining. My solution not only "encased" the seam allowance but eliminated additional seams on either side of the blocks. Not sure you can what's going on here but basically I pinned a piece of fabric on front and back of the blocks' sides and turned inside out after stitching - look ma, no exposed seam allowances.


The bag is so big because I decided on a two inch border all round the 12 inch blocks. I'd sewn a two inch strip to the bottom of each block before adding the side fabric that had an extra 2 inches on each end to form this border after pressing. I'd been mulling strap attachments when I noticed another bag of mine had straps that did not feed through a top seam of the bag but extended down the fronts. Aha! So I sewed a band along the top that when turned to the inside would provide that two inch border on the top of the blocks.

I'd considered some kind of stabilizer on this band but abandoned the idea since I'd not stabilized the sides, counting on the double layer of fabric to be enough. I turned under a seam allowance and pinned the turnover to the inside, attaching it with machine stitching in the ditch from the outside. The inside of the bag is on the left. I also ran some stitching along the folded edge to stabilize it.

I made some straps that would finish two inches wide to fit in that 2 inch border space on either side of the blocks, its raw edge ends to be caught in the bag bottom's seam. Again I'd wondered about using stabilizer inside the straps but was beyond being interested in fussing with that. (So ready to be done with this!)

I used the same narrow topstitching I'd used around the top of the bag to attach them and stabilize the parts becoming the handles.

Now on to the last step, the dreaded setting in of the bottom. I really did think long and hard about this step from the beginning, but because of my other design choices, I couldn't opt for an easier way. And my "clever" way of encasing raw edges of the seams was not going to work here. I also had to trim the pieces I'd already cut for the bottom, the dimensions arrived at when I'd thought I could extend it like I had the sides to form the bottom border of the blocks. I made a bit of a mess of the 90 degree turns needed to set in the bottom section but close enough for my needs.

With the bag essentially sewn together, my speculation about needing to add a really stiff stabilizer between the inner and outer bottom pieces was spot on. And the easiest way to hide the bottom seam allowance might be to wrap the inner fabric piece around the stabilizer. Here I've used a Roxanne marking pencil which I'd found out does not easily erase as advertised. This was a good place to use it up where it will never show, marking the quarter inch seam allowance for a guide to placing the stabilizer.

I cut some Stiff Stuff interfacing left over from the Eisenberg Fountain quilt. It hadn't worked as I had hoped on that quilt but it worked perfectly for this bag bottom. I applied Heat and Bond to the fabric (normally I don't use this fusible except when making books but I didn't have large enough pieces of either Steam a Seam or Wonder Under on hand), centered the Stiff Stuff within the lines and carefully turned the edges over the Stiff Stuff and fused. Turned it over to complete the fusing to the Stiff Stuff. There, a nice stiff insert for my bag.

Oh how I wished that I could continue fusing but I decided it would be much easier just to run some glue over the seam allowances and plop my stiffener into place. I had a box that was the right width but not quite as long as the bag bottom but better than nothing for having something solid to turn the bag inside out over. I had a narrow strip of the Heat and Bond that I decided to use to at least partially fuse the two bag bottoms together. Here it is with its protective paper removed before adding the stiffener bottom.

Still a bit tricky but not as tricky as fusing would have been, I worked my way around the seam allowance applying some Fabri-Tac old enough to refuse to squeeze out of the nozzle so applied with a glue spatula and pressing the stiffener in place. To my relief, it fit and held. Turning the bag right side out, I could now make that final fuse of the inside and outside bottoms.

I loaded up the yarns and knitted sections of the eyelet cardigan and the bag is more than big enough. In fact, it might hold all the yarn I have waiting to be knitted up.

Knitting projects lined up - need another bag?

It really could have used either some stabilizer or extra padding in the sides, band around the top and straps, but on the other hand, I like that it so easily flops closed to keep the dust out since most big knitting projects take a lot of time. I'm satisfied and rather pleased to have these old blocks out where I can see them. And I'm reconsidering what I said about not needing more pillows . . . 


Thursday, March 13, 2025

What To Do With Orphan Blocks

Today I fired up the sewing machine and completed piecing a block I'd used for demonstration in a class I taught when I still lived in Wisconsin. This was not just to show the sequence of sewing pieces into sections but also which way to press seams for an easier and flatter joining of those sections into the finished block. I think I've put off sewing the block together because I really didn't know what to do with it. The quilt itself that was the sample for the class is done and on my bed. I don't need another patchwork pillow, which is a popular way to use up single blocks, not to mention the color doesn't fit any room decor except maybe the bedroom, but I no longer can wedge a chair into that room on which for it to sit. I'm not into table runners either, another way one sees lonely blocks fleshed out into something usable. I've added a single block onto a ready-made tote and also have a tote a friend made from a block I'd appliqued but didn't care for but suddenly looked good on that tote, but I have so many totes, I hardly need to make another. So what to do with this orphan block? I do have a printed panel (to the right of the block) that I bought from Angela Walters which I plan to use to practice her quilting designs (true confession - I was taken with the color as well as the design and also purchased a coordinating print) that is close in color but it doesn't feel quite right to pair them up into a wall hanging, for that is what it would be. I do have quite a bit of paisley and other fabrics leftover from making the top; surely I could come up with something. Any suggestions?

I found this little piece folded in the stack of that leftover fabric. This isn't exactly an orphan block but another result of a class I taught showing how to use ruler templates to cut pieces for Drunkard's Path blocks, then how to sew those curved seams. When arranging blocks, I was intrigued by this arrangement that looked a bit like Indian architecture. I did add a narrow border around the outside, thinking I could make a small wall hanging but it obviously has never happened. And look at how the blue fabric has faded. It must have happened when it was up in the shop where I taught - I had a sample quilt's back totally fade out where it was hung against wood paneling - or it might have been displayed in the shop's window. At any rate, it's hard to get excited about finishing it. What to do? 

This all got me thinking more about the orphan blocks I have stored away in a drawer, knowing that there were two problems with finding a way to finish them off (besides what I've mentioned above): 1) some are quite large, and 2) they are too diverse to be worked into a single quilt (although I do have a memory of making a rather wild charity quilt from different sizes of leftover blocks). The one above is one of the larger ones that if memory serves was from a block exchange where I ended up winning the blocks. Again, quilt made not needing this block, but I still really love it.

Now we're getting way back into my "origins" of quilting. I had a limited amount of the blue fabric but it reminded me of a shade of blue I'd seen in antique quilts and I made up these two blocks. No recollection of why I chose these patterns, but I'm pretty sure if I'd had more of that blue, I would have made more blocks to make a sampler quilt. Now that I have them out again, maybe I should reconsider making them into a tote bag for my knitting. Hmmmm . . . 

Nearing the end of single blocks, here are two that again, I have little recollection of. I used to cut up leftover scraps into what I then considered usable sizes and saved off-cut triangles as well. I'm pretty sure these were just me playing around with leftovers.

This one though is a real treasure in my book. After we moved to Wisconsin and I wasn't working anymore, I'd gotten serious about learning how to quilt. Quilting magazines at that time ran ads in the back for quilt shows and block contests you could enter. I got very into making blocks for various contests, even winning a few awards. This one came out so well that I took them up on the option to have it returned. It's a state block (Michigan Star) and I soon found myself dreaming of making a quilt with a block for every state in it. I went so far as to start researching and printing out patterns for state blocks (which is how I ran across my signature Idaho Beauty block) and collecting fabric in this same green, rust and peach palette, squirreling it away with this block in that same drawer where I started keeping the various orphan blocks. I find the palette a bit outdated now and I've lost interest in making a full state block quilt but I still love this block. And again, what to do with it?

This last one isn't exactly an orphan block but it IS a single small block that needs a home. I got the chance to see a lot of Hmong textile art when I lived in Wisconsin, so intricate and finely made that I knew I could never replicate it. So I bought a few small zippered bags with different types of applique and embroidery work on them and then this one 5 x 5 inch block. I'd totally forgotten about it, buried so deep in that drawer. It needs someplace special for sure. But I have no idea where that might be.

So help, my good friends! Any ideas?

Wednesday, June 12, 2024

Ready To Layer

The rails quilt is finally together and ready to layer. Still struggling to get a decently lit photo with true colors for you. All I can say is that I so like how it has come out, that it is so PRETTY and that is partly due to the fact that the pinks are slightly different. I was concerned that not all my pinks were a clear strong pink and I had to use some that were more muted and even with a slight orange cast. Now I see how well they work together and make this a better quilt.

These colors are more true, and I took this to show how I carefully placed the sashings and borders so the raindrops are all falling down. They don't do that in the blocks however; that would have been too much fiddling to figure that out before piecing and decided they could just represent the swirling storm the ark sailed through. It was only upon studying the picture that I realized that border was NOT on the right direction.

Glad I caught it now rather than while I was smoothing the top over batting or even after pinning. I would have been furious. I'm already a bit put out with myself. I was being so careful and double checking before pinning. Don't know how it happened . . . although I may have been looking at strips in a block turned the other way rather than at a sashing. Well, easy to fix although time consuming any time you have to get out the seam ripper!

Thursday, June 06, 2024

Back to Rails

I finally got into the studio today to continue work on the rails baby quilt. Finished sewing the block quarters into full blocks and sewed the sashing spacers between blocks to create rows. Took a break at that point to snap this poorly lit and possibly confusing (I just put the blocks up on top of what is already hanging out on my design wall) picture for today's post so you could see how it is coming along. Next step is to sew the long sashing spacers between rows and then the narrow border strips all round. I'll soon be layering for quilting.

Egging me on is this picture my goddaughter shared of her and her six month old baby that this quilt will go to at her graduation at Baylor in Texas. She has been working on this degree for at least 14 years, a lot of the classes taken on line, juggling a job and a growing family. How proud we all are that she graduated Magna Cum Laude with a doctorate of nursing practice (DNP-FNP).  Now if only she lived closer so she could be my NP. . .

What else have I been up to? Well, I did knit those final few shaping rows of the purple sweater's back. While my yarn may be going farther than I originally thought, I still think I will come up short for two full sleeves. Still waiting for the yarn store to get in their next order of these mill ends but it did occur to me that this company also sells regular skeins of yarn and perhaps I can find this color elsewhere, although not the same lot. We shall see as knitting progresses on the front.

And between motorcycle races (and there were THREE different series racing over the weekend), I finally made the final decisions of how to distribute the last of the bedding plants bought nearly a month ago. I've been watching them carefully, placing them tentatively on the pots I think they will go in, rushing out to water when I see them drooping. They have been ever so patient with me. They went much farther than I thought they would, took more time to transfer than one would expect, and I had to pull three pots out of the garage that I didn't use last year. This is a tentative arrangement, and one or two of the pots may go out on the front steps to keep the pot of snapdragons company.

As usual, the star of the show are the geraniums. They never fail to please.

New to my garden are the begonias, which are giving those geraniums a run for their money as top pleaser. Two in this small pot, four in a much larger pot which is a candidate for out front.

The snapdragons and the mystery bloomer went in the long planter per spacing directions. They'd better spread out and fill the space. The matching planter has one of the mystery bloomers and two of the dianthus. The other two are in a separate smaller pot and although growing tall, have no blooms yet while the ones that waited so long for a home are popping a bloom.

The pansies looked so much more robust than they have in previous years so I snatched several up. Yellow ones in a separate pot and two rich colored ones in a bigger pot.

And marigolds. I don't generally add those because I've never liked the smell when you brush up against them. My college campus had them everywhere, no doubt because of ease of growing them and they do add bright color. I decided to succumb this year in order to add some orange to a mix that was heavy on purple and pink. One in a small pot, the other two in a larger pot which may be another candidate for the front steps.

It felt really good to get this done - I didn't realize how much it had been hanging over me for so long. I still need to hose down the deck to remove the spring pollen and the dirt I spilled (too much rain again), and then I will be ready to enjoy the heat wave expected this weekend as I sit on the deck and enjoy my spring flowers.

Wednesday, May 22, 2024

A Different Way Of Working

Working around what's not put away from the last mixed media project

Making slow progress on the rails quilt. All those quarters are now pressed and arranged and I've begun sewing them into 12 inch blocks. I am getting there. Just short stints, but as they say, those moments when you do get something done add up quicker than if you do nothing at all. Yes, a pep talk, and here's another.

Ran out of room on the table, ironing board steps in

Austin Kleon has once again led me to an artist I am unfamiliar with but who has an interesting outlook on what comprises "success", Steve Albini. I may not recognize his name but he is well-known enough to be interviewed for The Chicago Sun Times. When he was asked, "Do you feel successful," this was his answer:

“To the extent that I could care about that, I would say yes,” he replied. “I’ve lived my whole life without having goals, and I think that’s very valuable, because then I never am in a state of anxiety or dissatisfaction. I never feel I haven’t achieved something. I never feel there is something yet to be accomplished."

Wow, I was not expecting that. No goal setting? When I think about it, setting goals has been something stressed throughout my life - through the examples of others, by my parents and teachers, by the business world when considering a career or even just jobs to pay the bills (a mini-goal in itself), by every bit of advice about being a successful artist . . . I can barely think of any facet of life where one is not pressed to set goals, and I've dutifully complied. But I also recognize experiencing what he says he doesn't sans goals, anxiety and dissatisfaction. And I've always had that aplenty, in exactly how he goes on to describe:

 "I feel like goals are quite counterproductive. They give you a target, and until the moment you reach that target, you are stressed and unsatisfied, and at the moment you reach that specific target you are aimless and have lost the lodestar of your existence."

I'm not sure I totally agree with goals being counterproductive. I've often felt they were quite helpful in moving me along. However, now I'm wondering if this is why I've been a bit happier since stepping away from art quilting and exhibiting and getting back to quilting for myself and others as well as dabbling in things that I have no plans of ever exhibiting or trying to sell. Oh, I still have frustrations and self-induced stress at times, and have often been told I'm too hard on myself but it definitely feels different now since I've given up setting so many goals for myself and try to just do what makes me feel good and happy, working on setting aside pressure from within and without. He continues:

"I’ve always tried to see everything as a process. I want to do things in a certain way that I can be proud of that is sustainable and is fair and equitable to everybody that I interact with. If I can do that, then that’s a success, and success means that I get to do it again tomorrow.”

I've always been a process person too, and wanting to be proud of what I do and the way I strive to support people, and I do think I've been fairly successful at that. But the way he wraps it all up definitely makes me smile and want more, that getting to do it again tomorrow. And the interviewer sums it up similarly after asking Steve about retiring (which he shares will be when his hearing goes): "Until then, he’ll do what he loves, every day. Which is the best definition of success I can imagine." Me too.

Monday, January 16, 2023

Cut And Sew

Some people count sheep when they can't get to sleep. I found myself counting squares and blocks one night last week while trying to drift off to dreamland. I've been a bit surprised at how this project has energized me, and it's been difficult NOT to lie awake thinking about it and envisioning it. But back to the counting. I suddenly realized that I did not cut enough squares, had miscounted the number of blocks, at least I was pretty sure of it, and when I checked the layout diagram with my work sheet, I had indeed shorted one kind of block by 2. Those extra light blue squares I cut? Now I needed to add two more to them because they were no longer extra, and cut a few more other squares as well - see the figures on the right that the pen is pointing to. Made me glad I'd left some of those fabrics out in a "just in case" moment which was more just in case I don't like the value of some of the squares I cut, not just in case I hadn't cut enough. I'm pretty sure this gaff is because of the extra row top and bottom I plan to add.

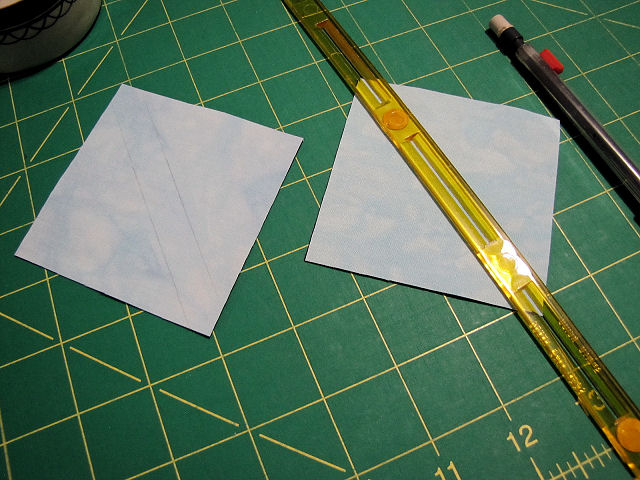
With the correct number of squares now waiting, it was time to make the half square triangle units that turn this nine patch into a split one. There are many ways to make these units and I've probably tried them all, settling on the method Judi describes in her directions.  It has proven to be the best method to get perfect results. It starts with layering a dark and light square, and in most directions, drawing a pencil line diagonally from corner to corner as a guide for then stitching a quarter of an inch on either side. I go one better by using this quick quarter ruler that allows me to draw instead the actual stitching lines. By lining up those corners in the center slot of the ruler, one can run a pencil along both sides of it to mark the sewing lines.

I generally put in a few pins to keep the layers from shifting, then it's off to the machine for some chain stitching, down one side of each square and then down the other.

Cut the threads between the squares and line up a ruler on those corners to slice down the middle between the rows of stitching.

Time for pressing. I generally do the "press seam to the dark side" but I've also made this block by pressing the seams open, and that is what I decided to do this time based on the kind of quilting design I'm thinking I'll use.

Not done yet. The size of the starting squares produce an oversized half square triangle unit that now is trimmed to a perfect 2-1/2 inch square with that diagonal seam ending right at the corners and no distortion. A little extra work but so worth it and only a little bit of waste in the trimming. Here you see the 45 degree angle of the ruler lined up on the diagonal seam with overhang to be trimmed.

I've laid out an arrangement of squares for each of the three kinds of blocks along the top of the photo and you can see my pile of trimmings from squaring up the half square triangle blocks. Now I really CAN get to sewing blocks together.

Tuesday, May 24, 2022

A Challenge Story

Here's a story for you - my quilts all seem to have stories behind them. This is a picture of the couch I said the mystery quilt I just mended goes with. Not a very good photo of the upholstery which really does have more green in it but it's the pattern that's important here. It was the inspiration for a quilt I made for a local quilt show challenge when I was living in Brodhead, WI. The theme of the challenge was Seminole, and I'd pondered ever since we'd gotten this couch about replicating that pattern in a quilt. But how to piece something so intricate? I hadn't been seriously quilting all that long, hadn't built up a large arsenal of techniques, and sat at the kitchen table with paper and pencil trying to work it out, about to give up.

And then my husband walked by, paused to observe, then said as he continued on by, "Naw, you'll never be able to work it out." Well, that was the goading I needed (as he well knew as well as he knew that I COULD figure it out) - challenge on! I used the challenge fabric in that center motif, a packet of gradated green Cherrywood Handdyes, and a few other fabrics from my stash. Not quite sure how I managed the math working out the strips that I did piece using Seminole piecing but I obviously did. It's not an exact replica but captures most of the upholstery design.

Look at those tiny pieces!

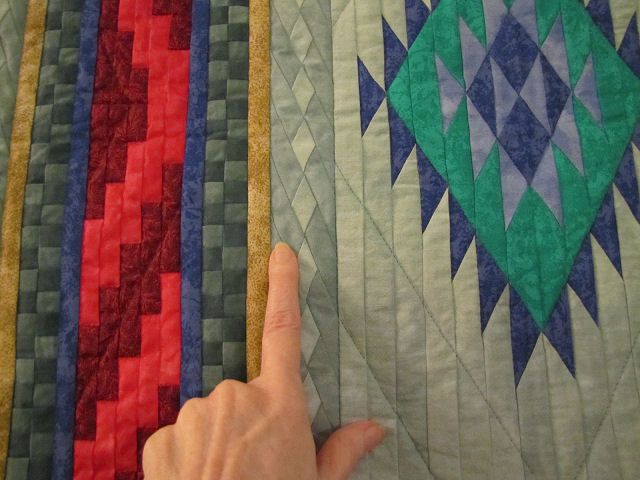
But that center motif - I just could see how it could be pieced using a Seminole piecing method. Instead, I used a modified version of Cynthia England's freezer paper template piecing method. There's even one template I missed removing - you can hear it crinkle when you press your finger on that place. I haven't had this quilt hanging in the livingroom for years though I've thought of it often, wanting it sharing space with the couch. I've finally dug it out to hang in the spot where I rotate quilts in and out. So wonderful to still love a piece this old (1996) and marvel at how I did it. I'm losing my patience for such fiddly work!

Saturday, July 03, 2021

That Idaho Beauty Block

Clockwise from upper left: Idaho Beauty, Washington Star, Wisconsin, California Snowflake

A few posts back, Sylvia mentioned that she was not familiar with the Idaho Beauty block, and to be honest, I don't think that in the many years I've been using it as my signature block and part of my e-mail address I've run into a single quilter who had heard of it. Like many quilt blocks, this design goes by several names, sometimes dependent on fabric and/or value placement, and according to Barbara Brackman's Encyclopedia of Pieced Quilt Patterns (which my mother-in-law gave me in 1993), six in this case. I'm guessing that Devil's Claws is the most familiar name for it, but I can thank Clara Stone's 1906 Practical Needlework: Quilt Patterns for adding Idaho Beauty as a name for this block.  This wasn't the only block with Idaho in its name but it was the one I liked the most. And I can thank Barbara's book for leading me to the other 3 state blocks that I incorporated into the above quilt called Personal Geography: States I Have Lived In.

Close-up of hand quilting boldly done with blue thread

I made this quilt for a contest in 1994 for a sampler quilt contest sponsored by the now defunct Northwest Fabrics & Crafts store. I'd moved to Wisconsin with no plans to go back into the workforce, but instead to devote my time to really learning how to make quilts and about the history behind them, and this hometown store provided my first quilting fabrics. Once I'd gained some confidence and perfected some skills, I scoured the ads in the several quilting magazines I subscribed to for information on contests I could enter, both block contests and quilt contests. Yes, this was before you could find this sort of information on the internet and also before digital cameras and learning the finer points of taking evenly lit and square-on photos to submit with entry forms. (Click on any photo for a larger view.)

This photo shows a little of how the border was pieced

To my disappointment, it didn't get accepted into that contest, nor into several others I tried being held in other parts of the country, but it did get into several including ones in Florida and Asheville NC that included judging sheets with the returned quilt. I got surprisingly good marks for such a novice, but one judge did ding me on my not so mitered corners on the binding. After successfully overcoming several how-do-I-construct-this-idea-I-have challenges of the sashing and border, I could not figure out how to turn those binding corners which ended up somewhat rounded with tiny gathers. I convinced myself that I liked that look and decided to bravely go with it, but no judges were fooled. I now know there IS a way to make rounded corners and bind them and that wasn't it!

This was also before the availability of quilting software for designing, and I worked out my setting and borders on graph paper probably colored with felt pens or markers, and drew full size templates for the sashing and border pieces on newsprint (I still often do this). The idea for the compass sashing came to me, like so many other quilting solutions, while I was trying to fall asleep. As you can see in the photo above, I "auditioned" a striped border as well as the one I eventually used which seemed to echo the lines of the center compass. My husband noted that "your quilt is exploding, little pieces scattering everywhere", and I picked up on that idea in the description I submitted with my entries, saying "The octagonal border accentuates the feeling that the design is expanding, just as my horizons expand with each move." Marketing, I swear, it's all about marketing! The finishing touch was to ink with permanent pen all the addresses where I'd lived on the back of the quilt, matching them with the proper state block.

How do I know all this after all these years? Is my memory that good? I know all this because of the documentation file I filled out and placed in a binder with the other quilt documentation files I'd been keeping. I'd been doing a little of this, mostly notes on the back of photos, but at some point someone in one of those magazines I'd been reading talked about the importance of documenting your quilts and had pre-printed manila envelopes covering all the pertinent information you should note and giving you a place to store additional information, photos, patterns, judging sheets. Well, I'd been a secretary for so long that this was right up my alley, an aid to organization and filing. I ordered up a set and I was off. I soon devised a revised version of this original one, changing some of the categories to reflect better the sort of information I felt important. I've especially appreciated added fabric swatches as often the camera doesn't get the colors quite right. I've faithfully filled out these documentation files to this very day and am so happy I've taken the time. Where I once thought I'd never forget the details of each quilt I made, I now sometimes struggle just to remember their names. But with these files, here is the entire history of each quilt along with my thought processes and feelings as I worked through each. You can click on the photo above and below and know pretty much the full details and history of this quilt.

I often continue writing on the back

Before you ask, I think I've used this block in only one other quilt, just a single big block with a wide border. I've made a stamp of it though, to use on the back of framed pieces along with my information, and it shows up on my business cards and as my avatar on some sites. However, once I did get some quilt designing software, I mocked up a full-size quilt with just this block, in white and teal, with teal sashing and borders and star block cornerstones. Even have fabric set aside, but I've never gotten around to making it. Perhaps still some day . . .