
Some people count sheep when they can't get to sleep. I found myself counting squares and blocks one night last week while trying to drift off to dreamland. I've been a bit surprised at how this project has energized me, and it's been difficult NOT to lie awake thinking about it and envisioning it. But back to the counting. I suddenly realized that I did not cut enough squares, had miscounted the number of blocks, at least I was pretty sure of it, and when I checked the layout diagram with my work sheet, I had indeed shorted one kind of block by 2. Those extra light blue squares I cut? Now I needed to add two more to them because they were no longer extra, and cut a few more other squares as well - see the figures on the right that the pen is pointing to. Made me glad I'd left some of those fabrics out in a "just in case" moment which was more just in case I don't like the value of some of the squares I cut, not just in case I hadn't cut enough. I'm pretty sure this gaff is because of the extra row top and bottom I plan to add.
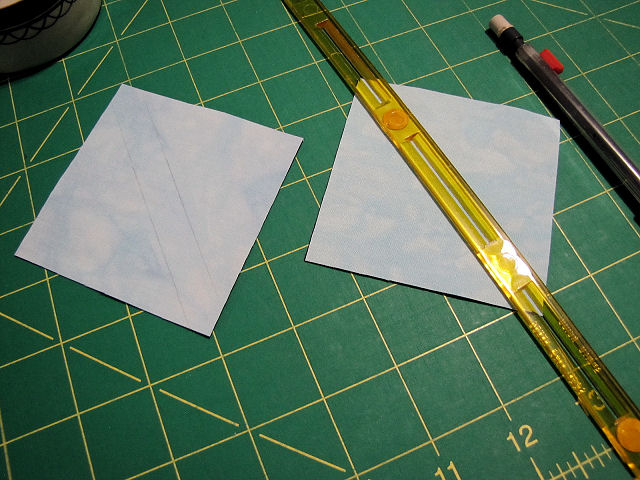
With the correct number of squares now waiting, it was time to make the half square triangle units that turn this nine patch into a split one. There are many ways to make these units and I've probably tried them all, settling on the method Judi describes in her directions. It has proven to be the best method to get perfect results. It starts with layering a dark and light square, and in most directions, drawing a pencil line diagonally from corner to corner as a guide for then stitching a quarter of an inch on either side. I go one better by using this quick quarter ruler that allows me to draw instead the actual stitching lines. By lining up those corners in the center slot of the ruler, one can run a pencil along both sides of it to mark the sewing lines.

I generally put in a few pins to keep the layers from shifting, then it's off to the machine for some chain stitching, down one side of each square and then down the other.

Cut the threads between the squares and line up a ruler on those corners to slice down the middle between the rows of stitching.

Time for pressing. I generally do the "press seam to the dark side" but I've also made this block by pressing the seams open, and that is what I decided to do this time based on the kind of quilting design I'm thinking I'll use.

Not done yet. The size of the starting squares produce an oversized half square triangle unit that now is trimmed to a perfect 2-1/2 inch square with that diagonal seam ending right at the corners and no distortion. A little extra work but so worth it and only a little bit of waste in the trimming. Here you see the 45 degree angle of the ruler lined up on the diagonal seam with overhang to be trimmed.

I've laid out an arrangement of squares for each of the three kinds of blocks along the top of the photo and you can see my pile of trimmings from squaring up the half square triangle blocks. Now I really CAN get to sewing blocks together.
1 comment:
I get doing quilt 'math' while falling asleep...been there; done that! And I love rulers! The quick quarter ruler looks very interesting! I'm also a big fan of trimming to the needed size despite taking a bit more fabric. Thanks for sharing your progress! Jan in WY
Post a Comment