Friday, November 27, 2015

Belated Greetings

What a motley crew...but it's MY motley crew!
Belated wishes for a Happy Thanksgiving to my readers who celebrate that. Even though I wasn't entertaining guests or being one myself, I did pop a turkey breast in the oven and fix yams, mashed potatoes, gravy and cranberry sauce to enjoy while remembering my recent family gathering. I believe this is the only picture we got of all of us together, thanks to the quick thinking of a nephew and an accommodating waitress. We're a family of storytellers and the storytelling pretty much trumped thoughts of picture-taking since some of us hadn't sat in the same room together for years.

While the turkey roasted, I got in a little more work on the new batch of padfolios. That is, once I'd reintroduced myself to my sewing machine. I swear, when I sat down and turned it on, it said, "Excuse me, do I know you?" Then after setting it up for freemotion stitching, it got testy. Needle would go down but the presser foot failed to follow so I kept getting error messages. So I apologized profusely for neglecting it all these months while focusing on beading and other things. Eventually it forgave me and we got down to work. (But truly this is a worry - possible signs of a motherboard going south.) 


This is my homage to my recent spate of fall color palette photos I guess. You may recognize the oak leaves as ones I cut into stamps. I still had the test prints so it was easy to trace the leaf outlines onto freezer paper lightbox style and use them as templates to quilt around rather than actually stamping images onto the fabric. I do not have the skill to quilt these particular leaves unmarked and this method relieves the stress. Thread choice is always a hold-your-breath proposition for me, even using the "pooling" method of auditioning. I was thrilled that this King Tut variegated thread worked just like I'd envisioned.


Here you can see how I used these templates, in this case maple leaves ironed to another cover for the same process. Once the outline is stitched, the template is peeled away so the veins can be stitched. In this case I used a red-orange YLI machine quilting thread with a very subtle medium to dark variegation.


I'd decided to use the red for several reasons, including this solid red fabric I'd chosen for the lining. I'm thinking I'll use a different thread for the satin stitching to finish the edge, probably the King Tut variegated thread you see here which has some yellow in it. I think it will pull things together. I'm also thinking I might like to introduce a bit of color on the leaves, judiciously with the Derwent Inktense pencils.

These are the only two padfolios of the bunch with autumn themes but I like this idea so well I no doubt will use it again. What do you think? 

Tuesday, November 24, 2015

Linings and Pockets

This is what happens when you go back to work...

I was only going to do the first fusing of the Peltex to the nine padfolio covers I had cut (I'd found one more fabric in the stack that I decided to use) and get right down to adding some decorative stitching to them. But no - it was too enticing to start rifling through my stash for coordinating linings and pockets fabric first. Rather than experiencing the frustration of past such rifling, i.e. how could I have so much fabric and not have anything that works, I found myself moving from one area when it came up zilch to the next without any of that negativity. And I found some very cool pairings. I've not finalized all of them yet, but have options for all. I think it will become clearer which to use once the stitching is done.


And I've been doing a little knitting in the mornings and evenings while catching up on favorite tv shows. I love the way this hand-painted wool yarn I bought back in September is working up. The darker colors blend more than this photo would imply, but that green really does pop, just a few stitches worth at a time. It's a bit like looking down through water to see the kelp floating under the surface. You can just make out the zigzag pattern I am using for the first time. Really loving it as well.

Thursday, November 19, 2015

The "Fresh" Factor

Perhaps you remember me saying I'd be taking a fresh look at ideas for padfolio covers. One of those ideas would be to reassess my collection of hand-dyed fabrics, the ones with lots of texturing and patterning. I had one of those little epiphanies that I should have had a lot earlier, something that would make determining the suitability of a fabric easier. I've taken a piece of plexiglass from a 12 x 16 inch frame and marked it with the outline of a padfolio as well as lines delineating the front, back and flap. I know - probably an obvious move but one that eluded me even though I've done essentially the same thing with a template in my computer program where I test out photo manipulations for my covers. But when working with actual fabric, I've been squinting instead and trying to envision in my head where those breaks between front and back and flap fall, just where proper placement might be. No more! You can see above how well this works. It would be even better if I trimmed off the excess plexiglass but I don't think I have the proper tools for a clean break along those lines. I've already experienced how easily it cracks when I picked it up along the center of one side - thus the masking tape around the edges.

So I've made a start at that assessing of the stash with a stack of smaller pieces out of my late friend's stash, pieces hard to categorize as one color or another, or patterned in a one-of-a-kind way that make them difficult to file away in my stash (which you KNOW is organized by color). Here you can see a few of the eight covers I cut, some of which will have leaves quilted over them, some of which the stitching is still to be determined (perhaps just straight parallel lines), some of which might even get a little stamping. Some have pockets cut from fabric left over from their cover but most pieces weren't big enough for that. I'll pick out pocket and lining fabric after the decorative stitching is done.

Saturday, November 14, 2015

Things I've Been Saving To Share

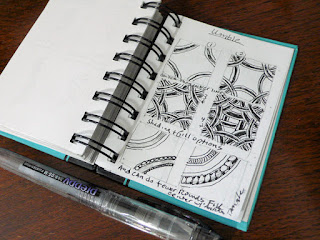
A new tangle. This is the little notebook where I copy the step-outs for future reference. Besides loving to use Zentangles as frames, I also love the ones that overlap and intertwine. They lend such complexity (and this one creates a frame as well) but when you know the sequence of steps, are really quite simple to draw. This one, called Umble, can also be shaded in different ways, other marks drawn in the center rather than blacking it out, as seen in the bottom two squares.

Why I ask what you think and truly want an honest answer.
“It is hard to judge your own work, no matter who you are. If you are successful, there is the added danger that people might not be honest. My wife, by the way, is absolutely fantastic—she has no ­respect for me. I can hand her a script and she will tell me straight out that it’s boring. And that’s invaluable.”

- Michael Haneke
And why, perhaps, I find it so hard to be satisfied with some of my work.
"If we never felt pleasure from anything we wrote, we’d stop; but if we were completely satisfied, if we didn’t feel the urge to move beyond what we have accomplished or to take on a new challenge, we’d lose interest…" Peter Turchi on Csikszentmihalyi’s concept of “flow” for writers

A 3rd century bce silver plaque from a horse harness. I'm a little obsessed with Celtic designs and this is an early one. So very many of them were based on threes, in my book not the easiest configuration to get even. Surely I can find someplace to incorporate this.

A thought I appreciated hearing. I'll be the first to admit that my design skills are often lacking (which is why I've been turning to art journaling exercises). You can depend just so much on "serendipity" and "working intuitively" before it catches up with you. But I swear, many quilt and multi-media artists don't get that. And so it was affirming to run across this on Laura Kemshall's blog:
My aim with these classes is to help the students make the art quilts that they want to make. I think three things are needed - ideas, design and technique. Ideas must always be the students own, technique is easy to come by, it's design that's the tricky one. Knowing what to do and why, understanding why a design 'works' and why another doesn't, that's what I think is often the step that's not covered so much, and the one that we've been tackling bit by bit in our Adventures.

Vickie Moore's recycled catalogue card

Something that made me sad and led to something that made me smile. I'm so old school about so many things, and really do miss the old library card catalogs. It hadn't occurred to me that there was some central place that printed and sent out these cards, but there was...emphasis on the "was". I learned this from a Smithsonian article, The Card Catalog Is Officially Dead. Shed a tear... However, the source that led me there also led me to several sites showing how artists are using the discarded cards from libraries that have converted to computerized versions (and yes, there are still some holdouts). Most of these endeavors left me cold. Sure, you can take a bunch of cards and put them together to make a dress, or some other object with no connection to the cards themselves. But not artist Vickie Moore, interviewed here. "I use obsolete library card catalogue cards as canvases for miniature pieces of art.  The subjects, authors and titles on the cards help suggest imagery for me to use." Her mouse on a motorcycle above really did make me smile and I loved that the text on the card and the imagery of the art were related.


Three more silk ties. Yes, this is an addiction. I may need an intervention. Pickings were mighty slim at the two second hand shops along my walk. Why I even went in is up for speculation - I think I was in a mood. So I was a little relieved that there were only a few ties on display at either place, and those not of the silk variety. And yet, a few days later, I was back at one of them, actually to see if a large pottery vase was still there (the teal glaze caught my eye not to mention the $1.99 price tag). The vase was gone, but a few more ties had been put out. Now do you blame me for picking up these beauties? I might actually gift one of these to a nephew who wears ties to work.

Friday, November 13, 2015

Is It Done?

You wouldn't know it from the blog (and my lack of posts thereon) but I have been diligently working to finish up Masks. I finished stitching beads into the eyes of the antler buttons I'd glued in place, wondered if I should add more buttons, then decided I'd know better after I got rid of that excess batting and backing along the edge. I'd originally intended to apply a facing following the natural unevenness of the edge, but two things changed my mind as I proceeded with the beading. First of all, I became very fond of that soft raveled edged all round. It seemed to play up the tribal feeling of the masks. But more importantly, I realized that especially along the bottom, I had not left enough room past some of the beading for a seam allowance. Still, I needed to do something along that edge in place of the basting stitches that would be removed. I settled on an uneven cross-stitch similar to what I'd done around the eye squares. As I was trying to decide whether to use the blue or the reddish pink thread that had gone around the squares and knowing that neither was probably right, my eyes finally picked up on the fact that I'd purposely used a variegated brown thread to quilt areas near the edges. Ahh - perfect tie-in.


I'd run the quilting stitches all the way out to the edge thinking they'd be caught in a seam. Now I needed to trim away the batting so it wouldn't show but not inadvertently trim away any of the raveled threads, and I'd given myself very little wiggle room in which to do that. After trying different scissors, I settled on these duckbill applique ones. The batting is Hobbs Thermore which is a thin polyester, and it cut away quite easily if I held the excess taut and angled the scissors just so. I managed only one nick in the backing fabric and no loss of fringe - pretty good in my book.


But now what to do about the backing? I considered trimming it flush with the top and fringing it out too but I sensed the edges could use a little stabilizing. I decided to try trimming it so I could turn it twice to the back, leaving about a half inch "facing" that I stitched in place with a running stitch. I felt the running stitch would give a bit more stability than a slip stitch along the edge and now that it is done, I think I am right. And of course, it is totally reversible if I change my mind and want to go back to the idea of fringing it like the front.


Here's how it looks from the front - free fringe, no batting or backing showing, and somewhat primitive-looking cross-stitches. For all the well-meaning people who over the years have advised me to loosen up, told me I was too uptight and concerned about perfection, I say, HERE! I CAN do it...but I must feel it is appropriate to do so. This quilt told me it must be that way and it got no argument from me.


Now it went up on the design wall for a good look. I'd used the equivalent of Cocoa Chanel's admonition to "Before you leave the house, look in the mirror and remove one accessory" with my "face" buttons when auditioning them. I'd pretty much put everything I had somewhere on this quilt before admitting that they were taking over, not adding to the story. A lot of them got set aside, and later I could see why specific ones needed to be left off, even if the quilt called for more buttons. I still had one of three similar ones that I decided needed to be added back on to fill a space and perhaps help move the eye but it was an iffy call. I decided to plunge ahead and just add it. I really like those red beads in the eyes.

The final rendition of Masks? (26W x 29L)

So it is finished - well, except for sleeve and label - or so I thought. When it went back up on the design wall for this picture, I started having second thoughts. At one point I'd toyed with the idea of dangling some wooden beads along the bottom then dismissed needing them. They fit the theme and have dark markings that might balance out that dark right edge. I'd have to mix some other beads in but I think I have something that would work. I'm wondering if they would be the final touch to pull it all together. And I'm also wondering if I should add another round of beads in the hat of the right mask. I've used every single green bead but still have some of the red and white. Also wondering if I should bead some white lines in the upper portion of the left mask hat. Or am I fiddling too much? I just suddenly found my eye a bit confused at what it was seeing so of course thought adding more beads was the answer. What do you think?

Monday, November 02, 2015

More Leaves, More Surprising Colors

Part of the crew who wore me out - nephews left, brother/sister-in-law right
You'll have to bear with me - I've been good for very little since my visitors all left, save for the Zentangling and an eye that continues to pick out color palettes in the turning leaves. I have to admit, I've been much distracted by the views outside my living room and studio windows. There's a continued urge to match up what I'm seeing with fabrics in my stash, but I've done this before and know that I will go nowhere with it right now - too drained from company, still struggling with getting my syndrome under control, perhaps being affected by an additional medicine thrown into the mix. Everything takes awhile to kick in and for the body to adjust to it - I should see some improvement in another week or so. And I had one of those little revelations as I sat on the couch, studying the chocolate browns, peachy reds and mustard yellows just beyond the back yard, then shifting my eyes to "Rolling Along" which currently sits leaning up against my fireplace. Yes, all those colors I want to pull from my stash are actually right there in that piece.

Multi-colored maple leaf

I resist, too, picking up leaves to bring home and press since I have a vast collection already. But a few still manage to intrigue me in some way other than just that they are pretty leaves. Take this maple leaf, for instance. I'd gotten out of my car and looked down at the wet pavement strewn with maple leaves of various colors (one of those times when I wished my cell phone could take pictures). It was a lovely natural arrangement, some yellow, some red, turned this way and that. And then this one - multi-colored as if it couldn't make up its mind which color to turn. I feel I have seen more of this sort of two toned turning this year than usual. Memory, however, is a slippery thing. Perhaps muscle memory is over-riding the truth of autumn leaves. Perhaps as a child, I cut out so many leaves from construction paper that my brain came to believe a turning leaf is one solid color. It's a theory, and maybe if I bring enough of these real leaves of many hues home, I can retrain my brain.

Autumn Splendour by Sheryl Meech

I was quite amused, then, to run across this quilt, Autumn Splendor by Sheryl Meech in New Zealand Quilter magazine yesterday. Sheryl says this was conjured up from her memories of Central Otago holidays. Obviously, her memory is better than mine.

Quaking aspen leaf

This leaf, however, came home with me for a different reason. I walk by a stand of quaking aspen most days, their leaves some of the more brilliant yellow in the area. They too are beginning to fall to wet pavement, with nothing too special about them except perhaps their shape. No need to drag any home, until I noticed this one definitely NOT yellow. It's more of that peachy yellow orange, very much like a hand-dye in my collection. The back is quite a bright yellow so I really don't know why the front is so very different. It's also quite small, less than 2" across at its widest point. I generally get sucked in by the really big leaves.

Playing with antler button placement

I've rallied a bit the last few days and have been staring down my Masks quilt. You might recall that I had just a little more beading to do after getting final input from the art group, but that still requires a little bit of decision making, visualizing, pondering (Oh just get ON with!). I've been collecting antler buttons for awhile now with the intention of adding them to this quilt - each button I bought looked like a face to me and would augment the quilt's theme. Today I played with placement and took several shots including this one to remind me of my last arrangement before starting to sew some of them down. This is by no means the final one, but I did get a feel for which ones would definitely end up staying where they were.

Faces...I see faces. Do you?

And so I committed. I applied some Gem Tac to the back of the ones I was sure about and stuck them in place - they are there to stay. Then I started additionally securing them by stitching a bead in each hole. I feel better for having taken this small step. I can feel my indecision subsiding, a surety of direction replacing it.