Wednesday, November 30, 2005

Interruptions and Distractions

Well, I'm just a little frustrated right now. I've been away from the studio for two days, working on a guild newsletter. My humble goals for the week include machine quilting and binding my Willow Leaves and experimenting with a 3-pocket purse design. I knew Monday and Tuesday would be shot because of the newsletter, but that was ok. I got some little things attended to as well so that today I could start fresh and unencumbered.

I didn't have the most auspicious start to the day, however, and spent the rest of a slow morning working through some exercises in Twyla Tharp's The Creative Habit. (I'll reference this book more in the future, I'm sure. I'm finding it very helpful.) Some good stuff to think about and I made a connection I hadn't before. I definitely felt it was good use of the hour or so I spent on it, and it left me invigorated.

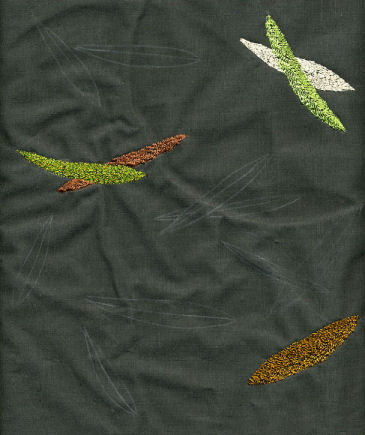
Once I settled in the studio, though, my old nemesis, Indecision, came to call. This is not an important piece as such, so any fabric should do for the backing. Indecision decided to bring Perfection along, and I found myself searching for a more "perfect" fabric than just muslin. Wish I had a grey, but I don't. Mmmm, what's in this basket that might work? Nooo, not quit right. Well, I ended up poking around in my hand dyes, batiks, plaids, you name it, because now I was looking for more than backing. I'd moved on to something that might add spark to the piece through the binding. Auditioning went on for some time when really, I just needed to find any old thing for the back. Eventually, I got the muslin out and in the process looked at the browns stored with it. Oh good grief! Ok, I'll use this bit of print that looks like blades of brown grass because it has the same shape and feel as my leaves. I set to one side the candidates for binding , spray basted my layers together and realized I was out of time...

...Out of time because in the midst of this fabric search, I'd been interrupted by a UPS delivery. It was a book order placed on behalf of my guild and included an updated book for a class I'll be teaching in January. Had to check that out right away as well as carefully page through the other books I'd not seen yet. It was the wrong thing to do on two counts: My updated book did NOT include the method I'd planned to teach; and one of the other books was all about a method I'd been wanting to try - one I thought I was putting my own unique spin on, but instead, it was all right there in this book. So no matter what I did with the idea, it would just look like I'd been following this book. Talk about miffed and deflated on both counts!

So my experience today reminded me of my on-going struggle to stay motivated and on task and how difficult it is to put the little adversities of the day out of one's mind so that real work can get done. I managed to channel my irritation over the class book snafu into instant action that resolved at least a part of the problem - enough of it so that it isn't eating away at the corners of my consciousness and distracting me. As for the book detailing my "original" creative idea, I was put in mind of Carol Bryer Fallert's Stars of Africa which on the surface looked like just another "Stack n Whack" quilt, but of course was nothing of the kind. I concluded that I just need to pursue my idea anyway, and in my own way, and not worry about where others might assume I got it.

I'm hoping tomorrow will go better. That I can keep the distractions and interruptions at bay. That my little Willow Leaves piece will get beautifully quilted. That I will not let frustration get the better of me.

Sunday, November 27, 2005

Willow Leaves: Technical Info


Here's the end result of my free-motion embroidery efforts, ready to layer and quilt. It measures about 12" x 21". I have mixed feelings about it but since this was a first effort, I am not displeased. Much to take forward into the next rendition. For those who might like more technical information, here are some details about the process and my opinions about them:
  • I marked the leaves on the background fabric with a soapstone marker. This is one of my favorite marking tools because it can be removed so easily but doesn't rub off too quickly as some chalk markers can. So if I didn't like a leaf placement, it was easy to rub it away and reposition. On this dark fabric, it was easy to see while I stitched.
  • I used Sulky Super Solvy Heavier Water Soluble Stabilizer spray-basted to the underside of the background. I've used this before and really like how it works, and because it is water soluble, I know I'll be able to remove all of it easily (as long as I am willing to soak the piece before it is finished). The only thing I didn't think about beforehand was that by spray-basting, I'd have to smooth the marked fabric onto the stabilizer, risking removal of my markings. I flipped the piece after laying on the fabric so I could better smooth things in place.
  • I also used a hoop to prevent puckering. This is still a mystery why you have to use stabilizer with a hoop and vice versa, but having tried it both ways, I know the best results come with the use of both. I started with a spring hoop which was easy to use and guide under the needle. That is, until I'd done enough embroidery that the stitched parts were ending up between the inner and outer hoops. The teacher who taught me the basics had warned not to use these kinds of hoops because she felt you couldn't get the fabric as taut in them and because if the fabric/embroidery was thick, they would suddenly spring apart. Well, she was right. So when I got to that point, I switched to a simple wooden hoop with screw tightener, the inner hoop wound with cloth tape for extra grip. I found it clunkier and harder to control than the other hoop but I had no choice but to use it.
  • I used 40 wt rayon thread and a #75 embroidery needle for most of the stitching. I changed to a #90 embroidery needle when I tried blending two different colors of threads. I ran both threads through the single needle and thought I'd have to loosen my tension, but found that I was getting odd loops of one or both threads when I did. On my Lily Viking, a #2 tension setting seemed right. Although I liked some of the shading I got doing this, it seemed to give the leaves a "furry" look compared to those done with a single thread. Better I think to just have more thread colors on hand. I also tried a Mettler silk thread which is about the same thickness as regular cotton sewing thread and not shiny, but I felt I couldn't get as refined of an effect with the thicker thread.
  • The piece seemed fairly pucker free before I removed the stabilizer. I cut away the excess before soaking according to manufacturer's directions. Some places were a little tricky getting into because of tight quarters and the spray-baste. I thought duck-bill applique scissors would be the safest, but in the end I switched to a short pair of embroidery scissors and watched my step. Once I laid the piece out to air-dry, I could see that something was causing puckering around all the leaves. Can rayon thread actually shrink? Because something was causing the leaves to draw up. I decided to press the piece while still damp - from the backside on a slightly padded surface - but not all the leaves were willing to cooperate. I re-wet the worst offenders and aggressively ironed them into submission. In the future, I think I would try ironing the embroidery while it was still quite damp.
I worked 3 days on the embroidery (I didn't track hours but I'm guessing somewhere around 6-8). Prior to that, I'd spent just a little time taking pictures and printing them, rough-sketching my idea and coming up with the technique to make it happen, followed by an hour or so of searching for fabric and auditioning threads. As I pulled the piece out of the machine for the last time, it struck me that it was ready to quilt, which was just a little unnerving. Why, you may ask? Well, because I am so used to even my simplest of projects taking weeks, months, years to get to the quilting stage, of spending countless hours staring at a piece as it hangs on my design wall considering, mulling, tweaking it until it feels right, feels done. To have a piece come together so quickly is a shock. Fortunately, I'd already considered how I wanted to quilt it so it cannot even demand time on the wall for me to brood about that.

Friday, November 25, 2005

Grunt Work


Before I would allow myself to proceed with my willow leaves inspiration, I needed to complete some machine quilting on this lone star quilt - a very belated wedding gift for a nephew. That's the way I've always worked, several projects going at once, but in different stages of completion. Needing to get one to a particular stage before allowing me to start up a new one. In this case, the lone star will be both hand and machine quilted, and the hand quilting could not proceed before a minimum of machine-quilted stabilizing was done. Hand quilting is evening work; machine stitching of any kind is day work. I must finish all the machine sewing of a kind before I'm willing to change the set-up/needle/thread for a different kind. These are arbitrary designations set by my personality, among other things, and while originally thought to make me more efficient, they often hold me back. But I digress...

This stabilizing stitching was just stitching in the ditch along seam lines within the star and along the border with invisible thread - nothing very creative there. It requires a certain amount of skill, but not extraordinary skill. Any good technician can achieve it. It requires a certain amount of physical labor, wrestling that big quilt through the small opening of my machine. It becomes boring after a time, the hum of the machine hypnotizing, and it is easy to lose both concentration and enthusiasm which leads to stitches that jump out of the ditch or become uneven. It becomes grunt work.

I first made this connection to grunt work when showing my process to a friend who had received one of my quilts as a wedding quilt. He knew nothing about sewing, let alone quilting, but my obsession with it coupled with the gift led him to want to know more. He wanted to see all the steps from conception to completion. So I showed him about choosing a block (perhaps with special significance to the recipient), selecting colors and fabrics, playing with sets. I showed him how I used my computer program to help with that as well as figure yardage amounts and print templates. I demonstrated cutting the block units and deciding the best way to join them. As I sat at my sewing machine ready to chain stitch squares together, I concluded with, "Well, and the rest is just stitching all the pieces together...grunt work, I guess." I think it was the first time I'd thought of it in those terms. But if you think about it, every creative endeavor has its share of grunt work. In many cases, the artist turns this grunt work over to craftsmen to carry out, then takes the work back to add the final creative touches. Other artists perform every step themselves. For some the grunt work is physically impossible. For others, it is just one more pleasurable part of the process.

Once I got past the first few embroidered leaves for my willow piece (see previous post), I found myself getting in a groove not unlike the one I'd just experienced with the machine quilting in the ditch. Although not as physically demanding, it was certainly mind-numbing and not particularly creative. The creative part had already been done - shapes marked on fabric, threads selected. Nothing left but the grunt work and I wasn't sure I was enjoying it. Stitches would suddenly stray outside their boundaries. My mind wandered off. How many more of these dang things are there? A tiny voice whispered, "This is why they make computerized embroidery machines."

In order to make grunt work palatable, I think you have to enjoy some part of it, be it the sound of the machine or the rhythm of the hand-stitch. I love both, fortunately. I also love seeing the design come to life as work progresses. This is what I was latching onto with the machine embroidery. Yesterday, I made it a little more interesting by experimenting with blending threads. For this piece I am restricting my thread choice to rayon because of its shine, and I soon discovered I had a limited selection of browns and golds. By running two threads through the needle, I expanded my options and created variations I could not anticipate. That was a bit creative and certainly more exciting than just watching a leaf emerge in a pre-determined color.

I finished the last of the leaves today, re-stitching the last one three times before being happy with the color. Trust me, removing embroidered stitches is no fun, but the first two color choices simply weren't right. It was rip them out or never be easy with the piece. I want to try this again with a different set of threads, but my best sense is that this is not a technique I love. Useful, but not my favorite. I'll post a picture tomorrow after I've removed the stabilizer.

Wednesday, November 23, 2005

Where Does Confidence Go?


I overcame a major hurdle today. I've been "circling" an idea for a week and a half, brainstorming to determine what technique would best help me represent my idea. Actually, I came up with 3 or 4 ways I could approach the design, and of course, the one that seemed the best was the technique I have the least experience with. And that became the hurdle. For two days I found ways to keep me from beginning, everything from trying to find the "perfect" background fabric to running errands. Today I had no choice but to begin or admit defeat, so I plunged ahead. So what if I've only had one class in free motion embroidery, and that was ages ago? So what if I "ruin" this piece and "waste" fabric and thread? I'll never learn and get better if I don't give it a try. The first few stitches were shaky, but each leaf got better and I became more relaxed and focused. Why had I spent two days lacking the confidence to begin, doubting my ability? No, these are not perfectly done, but they are better than no leaves at all. The jury is still out as to whether I like this method and will enjoy doing more of it, but by the time I finish all of the leaves, I should have enough skill to consider this one more option in my arsenal of design solutions.

When I was very young, maybe 5 or 6, I rifled through my mother's box of embroidery floss, found a needle, and stitched very crudely "Surprise! Happy Birthday" on a small scrap of fabric. I was insufferably pleased with myself, thinking it a great piece of work. My mother did not let on otherwise, her pleasure and enthusiasm evident when I presented it to her. She announced that it was perfect for polishing her rings and she promptly placed it in her jewelry box. Many times I witnessed her using it and carefully returning it to its place. She nurtured my confidence.

A few years later, I started sketching - animals mainly. I got pretty good at it, I think, and when I ended up in the hospital several times, I whiled away some of the hours drawing. Several of the nursing staff were young and showed an interest in these, leading me to believe that maybe my drawing was better than I thought. They nurtured my confidence.

So when did I lose my confidence in my ability to draw? For surely I did. It has only been in the last couple of years that I started sketching again to work out some quilt design ideas, all the while telling myself I can't draw so these are only rough sketches. That mentality has kept me locked into other people's patterns when it comes to realistic work. Yet when I push aside the grown-up voice saying, "Who do you think you are?" the child is there reminding me that once I thought I was great. and I was unafraid to try. These stitched leaves are from my own hand. I am nurturing my confidence.

There is a rather dreadful and embarrassing recording of me singing "The Yellow Rose of Texas." I was probably 4, and I thought I was hot stuff. My older brothers were laughing hysterically, but I couldn't understand why. I'd done a fabulous job. Years later when I listened to that record, I was astounded to hear that the only words to the song I knew were "The yellow rose of Texas is the only rose for me!" The rest was just la, la, la and off-key at that...not at all what I remembered. At what point in my development did the laughter sink in and I stopped taking risks to avoid the chance of it? I need to get that little girl back, because I am beginning to realize that creative talent is nothing without the confidence to act on it. We must learn to nurture that.

Tuesday, November 22, 2005

The Idaho Beauty Begins


I have been toying with the idea of starting a blog in the hopes that it will help me focus, stay on track, pinpoint what works and what doesn't work as I explore how to better get these ideas in my head interpreted in my preferred medium of textiles, quilts in particular. I know that journaling has helped me in the past; sticking with it (and my art) without accountability to someone else is what I find difficult. Since I have no partner in crime at the moment, perhaps commitment to a blog and its readers will provide the incentive that I need.

On the other hand, blogging may be just another form of procrastination, of getting out of "doing the work" as Michael James so pointedly puts it. Well, if I have nothing but words to show for my efforts, this experiment will have failed. But if it actually shames me into playing with ideas and finding answers to keep me moving forward, then it will be well worth my time, and maybe even yours.

My goal is to post at least once a week, preferably with pictures of my progress, to chronicle my creative journey. Hopefully I will be inspired to post more often. In the meantime, let me explain the "Idaho Beauty" moniker. I'm a traditionalist at heart, and when I moved from my native Idaho to the Midwest, I searched for a quilt block that might refer to my home state. There it was, "Idaho Beauty" and I've been using it ever since.