Thursday, May 30, 2013

Slow Going...But Going

After quilting in some easy lines in the background and much contemplation, I've started quilting the mountains in my sunset piece, beginning with the smaller blue ones. These are no higher than 2 inches, and the first try was a bust. I thought a dark thread would tone them down a bit but it only drew more attention to them, and in a bad way. The line of stitching around the outside of the shape didn't work either. So I defaulted to an Oliver Twist hand-dyed thread that I initially thought not dark enough. What I've determined is that mostly it is ok, and when it variegates too light, I can apply a little ink to even things out.


But because I wanted that clean even look, and some of the lines are very short, I decided I didn't want to do the starting and ending the line of stitching with very close stitching. No, I'm pulling thread tails to the back and burying them. Very time consuming but the only way to get the look I will be happy with. The last time I did this was on my Palouse pieces. At least it's a process that doesn't require any decision making!


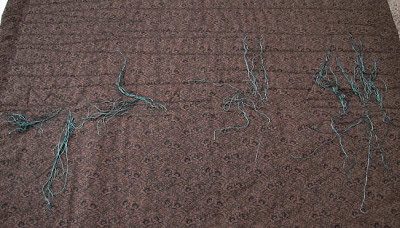
I've made the same trial and error now that I'm quilting the orange mountains, and again, it was thinking I needed a darker thread than necessary. It worked on the triangles of print fabric but not on the main ones. I think I'm on the right track now, more tails to bury and more lines of stitching to put in. Why horizontal lines? Well, from the beginning, images from my trip through the Badlands of South Dakota popped into my head when the triangle offcuts lined up on my work table. I didn't need to go back to my reference pictures to check; throughout this design process, it was enough to call on memory. Everywhere I looked, I saw the exposed layers of sediment, unbroken lines.

And also everywhere, triangular shapes, scattered over otherwise flat plains.


Or grouped together.

The stitching itself, while not difficult and mostly along penciled-in lines, is taking longer than expected...all that starting and stopping. But once done, the rest of the background quilting should go quickly. I'm using Hobbs 80/20 black batting which is more like Warm & Natural cotton batting than Hobbs regular 80/20. The queen size batt I'm cutting from has major distortions and wrinkles which normally I would try to tame by spritzing with water and steaming with an iron held just above but not touching the surface. But neither trick was helping much. Then I remembered skimming an article where the instructions suggested ironing the batting first. Mmmm, could it be I needed to get that iron right on the batt? I covered it with a pressing cloth so the iron would glide over it and ramped up the steam. Wow - distortions and wrinkles pretty much gone and it has given me a very stable sandwich to work with.

Saturday, May 25, 2013

Ready to Quilt

My internet service was down most of Thursday, at which point I realized just how addicted I've become to the always-on, quick loading portal to the world. Almost twitchy, I was, as I worked on the final arrangement of triangles on this piece. Made me realize a bad habit I've gotten into - that of bolting from the studio when the decision-making gets tough or murky to either elicit opinions on the blog or facebook, or check mail, or browse aimlessly. All avoidance behavior, all to avoid making those what seem like make or break choices that can't be undone, all to avoid moving to the next make or break moment.

So every time I felt unsure, I instinctively thought to get on the computer for a bit, only to remember it wasn't available. Forced me to stay put and get on with it! By the end of the day, not only were the triangles arranged and fused down (for better or for worse) but there was time to find backing and batting, layer with spray baste and thread baste around the edges. The thread auditioning has begun as well as the second guessing about just how to quilt it. Always whispering in the back of my head is the admonition: now don't ruin it with the quilting! I think my internet needs to go down again...

Wednesday, May 22, 2013

Back To My Comfort Zone

First, thanks to all of you that weighed in on my design dilemmas regarding the current bubble prayers piece. It really helped and as Wil suggested, I decided a blue would probably be best for the hands, cut from the sketched hand pattern. My art group agreed I was on the right track and offered additional insights. However, I've set it aside for the moment, both to let all this info simmer and also to await a care package with some additional options for the bubbles. Instead, I am forging ahead with my Sunset piece.


I decided that perhaps the fabric I'd auditioned for the background was not too dark after all if I just found a different spot in the yardage. This is actually two sections that I've overlapped and fused together where sky and land meet. The sky and ground have lighter areas plus it is a much bigger background to work with. That other piece was cramping my idea. And I love it when the fabric does so much of the work for me - instant landscape!


I also decided that the triangle cut-offs needed fusible on the back. Normally I would consider Steam-a-Seam Lite, but I am hoarding what I have for the bubble quilt and another idea using circles. There seems to be a shortage of it at the moment and I didn't want to get caught without on those pieces where I really needed it. Instead, I decided to use up some Misty Fuse, which frankly I don't care for very much. I only bought it based on the extreme raving over it when it hit the market, but have only struggled with it myself.  For this I laid the Misty Fuse on a sheet of parchment, arranged my triangles on it, topped it with more parchment paper and hit it with an iron.


I just like my Steam-a-Seam much better - easier to work with plus it has that tackiness that lets you move pieces around on the design wall without using pins. To make the Misty Fuse work the same, I sprayed a little 505 basting spray on the back after fusing, then separated the pieces and trimmed the tiniest sliver off of each triangle edge.


And then the arranging began. Those orange triangles really aren't that bright but you get the idea. This is not the final arrangement but getting close. Need to remove some of those print triangles I think. This project is much more in my comfort zone, a good break from the more challenging bubble design.

Saturday, May 18, 2013

Oh, yeah...


Just looking at this told me using the sketched hand was going to work better
.

Even without lines or shading, these hands look much more like they are part of the release of bubbles, more like my vision. And they are slightly smaller than my other hand patterns - wondering if they could even be a bit smaller...

But you still haven't helped me with color! Over on Facebook I've gotten a suggestion of dark turquoise. It's so difficult looking at the white paper patterns and not be influenced by them. I don't think skin-tone is right and wondered if a more or less monochromatic palette might be the way to go. I've been seeing them as fairly light all along but perhaps they DO need to be a darker value. Argh still - need to take another look at the stash.

It's the hands...

Argh...I'm feeling stuck and don't quite know how to get unstuck so am asking for fresh eyes. I'm struggling with these hands, photocopies of my own, have cut out three different versions and nothing, no orientation looks quite right to me. Not to mention I have to figure out what fabric to render them in. 

So this is what you are looking at: 1) the random placement of bubbles which is not complete yet, but I needed to get some up there to get the hands right. These are not fused so will fade a bit in intensity once that is done. 2) The paper pattern of the hands (I'll explain the double set later) which are smaller than life-size, copied at 80%. I'm wondering if part of the problem is that they are still too big, but I also don't sense they give the feel of palms-up hands. 3) Along the bottom and right edge are fabrics I'm considering for the hands. Some, you can see, let the dark of the background shadow through and thus alter their color. The lavender at the bottom feels the most right but obviously I am not 100% sold. It would be easier to tell I suppose if I cut hands out of each to audition but I'm trying to avoid "wasting" fabric. 4) At the top I am playing with the idea of borders to be on three sides only, gradating to a light value I guess I thought would help balance out the hands at the bottom. I have no idea how wide they should be. That light blue did not feel at all right for the hands but I may be wrong about that.

So bothered by those hands, I ended up sketching my own this morning - yes, I was avoiding that because I thought it would be more time consuming than just copying but I really didn't get this angle on the machine. A lot of what gives this cupped appearance is the detail lines, have yet to cut out the silhouette and see what that looks like. Maybe my paper hands would look better to me if I added those lines, which of course would be quilting lines.

So now it's your turn. What do you think? What would you suggest?

Wednesday, May 15, 2013

"Next" Next Up

Had a thought. Not quite the right background, though, for those triangle cutoffs I think. (Digital camera is showing them brighter than they are showing up in real life - have tried to tone them down to more what I am seeing.) But it shows that while ironing away these last few days, the brain still searches for solutions to things I'm not even working on, although this is one idea lined up in the relatively immediate queue. And that there's always more than one thing up on that design wall.

Ideas have suddenly started flowing these last few weeks, not for new quilts but solutions to make existing ideas move forward, connections to make a vision work, triggers to clear the fog of what to do with a certain fabric. It's difficult not to flit from one to another and another, but I think I would lose myself if I let that happen. Am tucking away a few of them for later - they can wait - and letting a few up on the design wall for subconscious ponderings while focusing my main energies, i.e. actually doing the work, on the next one up. Time to go work on those hands.  

Monday, May 13, 2013

Next Up

I've been photocopying my hands, faster than trying to sketch them. The results are striking me as kind of creepy.


A pair will go on this fat quarter of hand-dyed fabric, soon I hope. I've been busying myself with the post-African quilt straightening of the studio, plus sorting and washing of the fabric left over from it. I endured the possible cat dander in order to meet the deadline, but now I want it pristine before incorporating it into my stash.

Sunday, May 12, 2013

Oh, it's Mother's Day

As I've noted before, Mother's Day is not one I have reason to celebrate, my own mother being gone many years now and me not having any kids of my own. Yet in this last week the surprise emergence of blooms at my new abode of little more than 6 months has brought thoughts of my mother to the forefront. She loved flowers, especially wildflowers, and knew most of their names. She seemed eager each year to get out for the Sunday drives in the countryside or off on weekend camping trips to see the blooms emerge. She especially delighted in her children bringing her offerings of flowers found on their explorations of the woods surrounding our home. So when I discovered wild syringa blooming all up and down the wooded area that abuts the backyards of the townhouses where I live, I immediately thought of how pleased my mother would be, all smiles.


Syringa is the Idaho state flower, as my mother would be quick to tell you, sometimes known as mock orange, and emitting a lovely scent. It doesn't bloom for long, but when it does, it fills the woods with these bright white blooms.


Mom often shared memories of her own childhood in South Dakota and her talk of gathering chokecherries for jams always stuck in my head. Chokecherries don't sound like the sort of thing you'd want to be eating but she assured me they made wonderful jam. This week the little tree in front of my townhouse also burst into bloom and I have discovered that it is a Canadian Red Chokecherry tree. Well, hello mom again!


All was not sunshine and lollipops with my mom, not with the strain of raising 4 rambunctious boys and a little girl who couldn't understand why she didn't always get her way, but I have to admit that when I think of her, she is almost always smiling. This is a picture taken in one of those photo booths, and I actually remember this: first dressing up, then going to the hotel where the booth was and especially how, even sitting on mom's lap, I had to strain to get into view. Can you see the love in my mother's expression? On the back of the photo she's written "Daddy's girls."


Mom and I developed our own special rituals over the years, one of which was enjoying tea served in bone china teacups from her collection. I especially remember doing this on Easter morning, but we'd find other special occasions too. Once I left home for college and then to start my own home, just my visiting on a weekend was special occasion enough to get out the china tea cups. Not the best picture of mom but the only one I have of us and our little ritual, one we would be partaking in today were she still with us. Love you mom, and I'm still finding special occasions to use our teacups.

Saturday, May 11, 2013

Goodbye to a Friend

Today is my friend's birthday, alas, a birthday she did not live to celebrate. Instead, last weekend family and friends gathered at the art gallery that displayed her work to celebrate her life, although there was much more grieving than actual celebrating. Stunned silence would well describe our reaction upon seeing her textile art displayed in the foyer. Since I visited so seldom, mostly saw her work in pictures, I always forget just how striking and intricate her more recent work is; seeing it en masse stopped me in my tracks. Above is just a few of them - click on picture for larger view.


The formal service was held in the small auditorium and included a slideshow of her earliest years right up to the most recent. I've known her for about 17 years and had never seen pictures of her so young, almost unrecognizable. The potluck following was held in a sideroom used for classes and her larger quilts were hung there. Yes, I got enlisted to help along with a couple of mutual friends. This star quilt has an amazing intricate border that doesn't show in this picture, and was made for her mother. I knew I had a lone star quilt in me and wondered why she'd gotten no farther than the center star before tossing it aside for other things. I really did goad her to get back to it, laid on the guilt the best I could while dragging my feet on my own lone star. That was the nature of our friendship, always pushing each other.


Finally the top was done, ready for quilting. A lot was done by machine but she wanted to add interlocking Celtic designs as well. Judi was not a hand quilter at heart like me, but knew it was the only way. Stab stitching with crochet thread, she persevered until it was done. And of course, beat me by a country mile.


Here Sherrie Spangler and I stand in front of another of Judi's early bed quilts of original design - that girl did love her star blocks. When I started paying attention to the art quilt movement, I knew of Sherrie, but it was Judi that brought us together. To her delight, we have become good friends and gave each other more than a little mutual support during this difficult weekend. She's actually responsible for most of the pictures in this post and did her share of standing on a chair and stretching to hang these big quilts.


Then it was time to hang the African quilt. No way really to hang the 4 parts together as they will appear in final form so instead, each was showcased on these soundboards on two sides of the room.  Rhonda, who is doing the machine quilting on this, fearlessly mounted the stepladder while I stood on the counter handing her tape and pins.


Yes, it was a looonnnngggg stretch! Rhonda was happy for Judi's sister-in-law Rae's stabilizing of the ladder.


This gathering did give me the chance to connect again with some important people in Judi's life. This is her mother-in-law Joyce who did her own longer than anticipated stint as caregiver, flying out from her home in Wisconsin to help in Hood River when Judi took a turn for the worst. Joyce was there when I last visited Judi in Hood River, and that is when I got to know her a bit. We found we had a lot in common, and not just related to the caregiving.


So jolly jolly we all look for the camera, but don't let that fool you. Plenty of tears were shed that day. But what can you do but make the best of it? This is Judi's husband Curt, who I have always liked and respected. I so wanted to be sure I got a picture with him, dragging him over in front of yet another of Judi's quilts made from our hand-dyes as a sample for our booth when vending. Come on Curt, pretend that we like each other. Yes, that got a laugh.

Enjoy a few more examples of Judi Kane's Textile Art.


Thursday, May 02, 2013

A Collaborative Effort

I finished the last quarter of my friend Judi's African quilt last night as I'd hoped I could. To review, Judi was able to design and piece the top half of the quilt before becoming too ill to do more. Her friend Rhonda who lives in the same town agreed to machine quilt the quarters and has done so to that top half. The lower right quarter was partially designed with a few blocks completed when I took over the piecing. Judi had completed a few blocks for the last quarter but had not started working out the design. I've tried to stay true to her vision for this quilt as well as her aesthetic. At times that got in my way of moving forward with fabric and placement decisions, especially with this last part for which she gave me no guidance. It was usually when I said, "the heck with it, my gut says do this" that I'd get past the constant dithering. And I'd remember that even as Judi was designing it, nothing was set in stone. It would evolve as she worked. Why should it be any different for me?


Even before Rhonda and I got involved in helping Judi finish this quilt, it was a collaborative affair. She'd consulted with me when she'd gotten it out several years ago, and I'm sure she did the same with other quilter friends. Beyond that, she'd gratefully accepted help from her husband, who worked out in the CAD program he's proficient in some of the African symbols from sketches, and printed them to size. But collaboration or not, the final decisions were always hers until recently. And so I've been working very hard to keep my voice out of it, not wanting the finished product to obviously look the work of two, for anything I might add to stick out.


So I got stuck. Moving blocks around created a hole too big for just fabric, not sized to easily fill by duplicating an applique block from another section. That large block with the appliqued giraffes wasn't helping any, being so different from everything else in the quilt (it was the first block she worked on and her method changed later). I tried so many different fabrics above it with nothing working. I shared my frustration of not knowing what to put there with a non-quilting friend who suggested I put a bit of myself in it. No no no - that's exactly what I've been working so hard to avoid. Not my quilt, not my design. But he pointed out that Judi had entrusted it to me and so it was partly mine - a work we both contributed to and she would not mind me slipping something in that might be like a signature. I couldn't imagine what that would be but I promised to think on it. I only stared at the design wall a few minutes when I suddenly saw a sunburst over that panel with so much sky. When Judi had included big sheets of graph paper with everything else I'd need, I'd asked why. "You may need it," was her only reply. Yeah, how had I missed that bit of permission to design in her absence? Thanks to that friend, another collaborative voice, who nudged me toward the answer to my last problematic area.


Before I got so involved in art quilting, I was known for Mariner Compass blocks. I'd taken a three-day workshop with Judy Mathieson to learn how to make them, and ended up teaching classes in her method at quilt shops and guilds. You could say it became my signature and Judi watched as I mastered it. This new idea for her quilt required some digging in boxes out in the garage for my Mariner Compass materials and I even found a block that was a class sample that was tempting to include just as it was. But it wasn't quite right and no time to actually piece one. After playing with black paper rays to be sure this would look right, I chose a simple sunburst that could be fused In keeping with other blocks in the quilt. I'd originally thought to use a more subdued background but again, it suddenly popped into my mind's eye to repeat the background of the other two dramatic symbols. How had I not seen that before? I really don't understand how one minute I can see nothing and the next, it's right there.


I'm still too close to this to be sure it isn't just a hot mess, that what I've added has worked cohesively with the rest of the quilt. But I have to trust that I've done ok. And I hope to goodness my measurements are correct. Because now it goes back to Rhonda for the rest of the quilting, and those four quadrants must fit perfectly - no wiggle room.

Time to go pack - I leave tomorrow for Judi's Celebration of Life service on Saturday. I'm so thankful that her final masterpiece will also be in attendance.