Today was my chance to head off to the big city and see the art book exhibit featuring Timothy Ely's work that I talked about in this post. I was thrilled when one of my blog readers who actually lives in said big city showed an interest in viewing the exhibit too. I love getting the chance to meet and spend time with people I've only known through the magic of the internet, and although I would have made the trek alone, it's so much better to share an experience like this.

Here's my latest internet and now real-time artist friend Susan at the exhibit. When asked exactly what I'd be doing with this picture I'd snapped, I replied, "Well, I document everything and put it on the blog, of course! Fair warning." This area had a book by the artist that you could actually touch and page through, one of his sketchbooks on view to see how he takes notes and draws out ideas, and a video where he talks a bit about the history of bookbinding and demonstrates some of his techniques.

This display case held some of the examples or sample books Ely described in the video, plus many of the tools and materials he uses in his process. One that caught my attention was a double-typed pen that he said was designed to draw railroad tracks on maps - two parallel lines in one stroke.. Much of Ely's work is related to cartography.

In this case, Ely shares the sorts of things he's collected over the years that in one way or another work their inspiration into his art. I've left many of these photos quite large so that if you click, you can see the details. Yes, look closely and you'll see a transformer toy in there. An adjacent case displayed old books and comics that he read as a child, gave up, and then later in life tracked down again once he realized how much they had influenced the artistic path he would take.

One of the challenge of mounting this kind of exhibit is how to display insides and outsides. The bookbindings are exquisite and complex, and in many cases you could circle around to see front and back as well as a page inside.

Ely's work such as Redshift above, in detailed, measured and concise - instant appeal to me. But it is mystical, puzzling and expansive as well. What exactly is going on in this guy's head? Well, for one thing, this:
"As a young man, Ely pored over the maps in the Suzzallo Library at the University of Washington. It was there...that he had an epiphany...'Until that day, my view of the universe was that it was fixed and stable. I was looking at this old map when suddenly I realized everything is in constant change. The immutability of the map was an illusion, each one was simply a projection of what had been.' With that, Ely's work changed. Instead of trying to create microcosms of the external world, he began to view maps as means for diagramming the potential of what could be." (from exhibit flyer Chasing Shadows/Becoming Atlas by Ian Boyden)

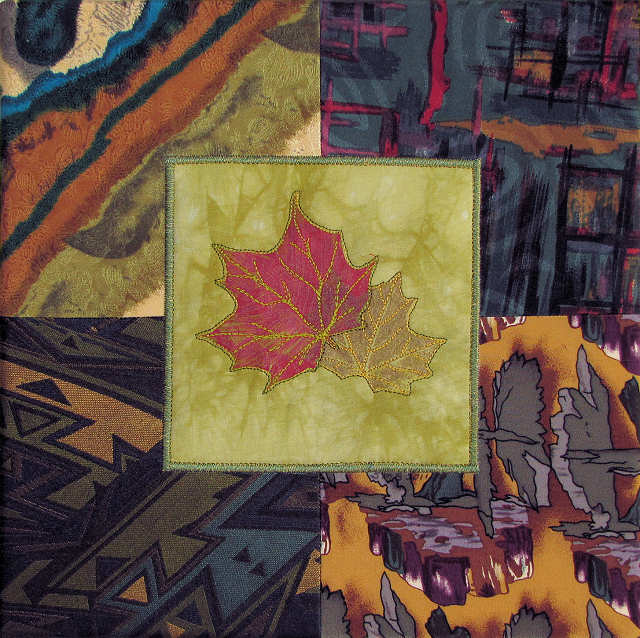
This was one of my favorites - big surprise. I naturally gravitate towards this color palette and geometric forms.

This was perhaps the most interesting book in the exhibit, by virtue of the fact that the edges of the pages do not align, but form interesting angles. And there are cut-outs in the pages, windows to things deeper in the book.
One of the reasons I wanted to see this exhibit was the hope that I would gain an understanding of this art form so foreign to me. As I stared at some large watercolors of Ely's traditionally framed and hung on the wall, I suddenly made the connection that the book form was just another way of showcasing the artwork, but in a compact and accessible form. All the related individual works bound together in one place, protected by the covers as carefully and beautifully designed as the work within, ready to rest on a bookshelf or coffee table until time to be viewed. A properly bound book, Ely stated, could survive a thousand years. As I struggle with my own issues of finishing, presentation and storage of my textile art, I could not help but envy Ely's exquisite solution.

I've spent the last 6 days entertaining 3 best friends from my Wisconsin days. While I've had opportunities to visit them since moving back to Idaho, this is their first time to see in person where I work, play, and garner my inspiration for my art. This is Judi who now lives in Oregon, arriving last Saturday - what's wrong with this picture(besides the fact that she seems a bit chummy with that good-looking stranger)? Amtrak arrives and departs from Sandpoint in the middle of the night and obviously it is not the middle of the night. All my raving about the wonders of train travel, and she is plagued by delays adding nearly 6 hours to the 8 hour trip.

And then after we'd settled in at home with our coffee and breakfast, it started snowing. "I left the sunshine and warmth and spring blooms of Hood River for this?" Judi inquired. "No, to see me," I replied. Not much accumulated, it quickly melted off and we saw no more for the duration of her stay.

Judi brought a little show and tell, which I failed to get pictures of, and this lovely gift by an artist in her area - I believe it's Kathryn Watne - my signature birches done in enamel on copper (3 x 5).

That night we were treated to this view of the Supermoon, taken from my yard looking towards the lake. Click on the picture for a larger view. The water reflecting the moon is NOT the lake, but standing water in the field from the recent rain and snowmelt.

The Wisconsin contingent was due to arrive a little before midnight, also by train and also late, but only a few hours. They came bearing food and wine...lots of food and wine. This represents a couple of Wisconsin wines, an Oregon favorite that I could readily get in WI but have trouble finding in Idaho, a bottle of Washington wine that they won on the train during a trivia game at a wine and cheese tasting, plus the bottle of Washington wine that Judi brought.

This is just some of the Wisconsin cheese they brought along - cheese curds (Judi snatched these up!), white cheddar with blueberries, regular cheddar...

...and boxes of crackers, Eau Claire's own Silver Springs Wasabi and Mustard (they not only make the best horseradish sauces, but also grow the horseradish on site) and jam by a local Amish family. I've missed that jam - there's nothing like it here unless I make my own. Oh, and don't forget the smoked almonds, Dove chocolate & Reese's peanut butter cups. So I guess you know how we spent a lot of our time.

Of course, I had to give them the quick tour of the sites before Judi had to head home Sunday night. They were thoroughly impressed by my local yarn shop, and fairly impressed with the scenery too. Yes, that's a lot of snow still on the mountains and we are fairly bundled up. Judi, Cindy and LeAnn with Lake Pend Oreille in the background.

All three had come prepared to fill idle moments on the train and here. While all are avid quilters, like me they also dabble in other needlecraft. LeAnn is taking a class on rug hooking and brought her "homework" along since she'd be missing one class.

Although I didn't catch her in the act, Cindy rotated between two different embroidery projects and knitting (you can just see her knitting project on the table in the bottom left). With 3 kids and a part-time job, chances to relax with a book are few and far between so when she tired of working with her hands, she escaped into a novel. Judi also brought knitting and a book. You'd think that perhaps I'd have joined in since I have no lack of handwork ready to pick up and stitch, but I'd done major spring cleaning in prep for their arrival, so I simply enjoyed relaxing in their company. Although I must admit, their industriousness was making me feel a teeny bit guilty.

The weather wasn't all that nice, but we did get a chance to walk the bike trail and there was plenty to do inside. Cindy and LeAnn participated in my Monday afternoon yoga class, followed by dinner out at Eickhart's Pub. For my friend BC: the Saranac black Irish Stout is worth tracking down and giving a try. These pics are from Cindy's phone which definitely had its limits.

We managed a table right in front of the small stage where Truck Mills led Eickhart's Monday night jam with an interesting mix of "world music blended with blues and Americana." Truck (left) started with just the guy on drums (Chris Ervin), but one by one, additional musicians showed up until we had this mix of guitars plus a guy out of the picture frame playing harmonica. At one point, a blues singer down from the Yukon Territories asked if she could join them on a couple of songs too, and she was very good. What fun!

Wednesday was their last day and it turned sunny and quite nice, perfect for our planned tour of the downtown area. They got to see the student art show at the Power House as well as the exhibit I'm in over at Panhandle State Bank.

Here's Cindy studying one of the quilts in that show.

And then it was on to the variety of shops - you can see LeAnn did her part to boost the local economy.
Alas, all good things must come to an end...but not as soon as we thought. Cindy and LeAnn were scheduled to board the train at 2:35 Thursday morning, but a check of its status before midnight showed it was already 3 hours behind schedule. The girls got some sleep and eventually the eta settled in at 6:53. The silver lining here is that we witnessed a beautiful sunrise on the way to the station and they would be traveling through the Rockies in daylight which is a rarity. However, 6:53 came and went, and eventually we contacted an agent who now informed us the train would arrive between 9 and 9:30. Well, it was a good excuse to go out to breakfast and that much more time to visit (because you know women never run out of things to talk about). The train finally arrived at 9:45 and they were very glad to board and settle in for the long trip home. I checked not long ago and it looked like their train had lost even more time, adding 10 hours onto a trip that's already over 24 hours long. Not exactly the best introductory experience to Amtrak but in spite of the delays, they seemed to enjoy traveling by train.
I know I sure enjoyed seeing these friends, showing them my work and getting their opinions on work-in-progress - there's just so much you can do over the internet. They have definitely acted like a tonic. I'm ready to get back in the studio, get out my knitting needles, get going in general again. Now if winter would just let go its icy grip...

I am pooped! I helped hang the new art quilt exhibit at Sandpoint's Panhandle State Bank today. We have the gallery space on the third floor, and I ended up racing up and down three flights of stairs more than once. Here is my section - a mix of new and older work. You might recognize a couple from previous exhibits- they needed to get out again. Detect a theme? Totally unintentional, but as I looked through what I thought would look good in this exhibit, I had an abundance of fall-themed work to choose from.

We had help from Gary who works for the bank and does such a great job getting the art to hang properly from the special system the bank has invested in.

Ok, here's a close-up of the quilt in the previous picture. I'm sure some of you needed a better look. Click on any of the pictures for a larger view.

I think we had about five POAC volunteers helping, plus a few of the art quilters dropping off their work who lingered and thought it was fun to help. Many hands make for quicker hanging for sure. Even so, it took us the better part of 4 hours to get everything up. Could it partly be because as the quilts were unfolded to oohs and aahs we forgot the task at hand and acted like quilters during a guild meeting show and tell? Each artist also has one piece that will be hung on the main floor in the community meeting room.

There were a few really big quilts, so we utilized the railing. This actually is really good as the art is difficult to see from the ground floor, but the quilts hanging over the railings attract the eye, alerting those entering the common area that something is going on up there. The second floor art is unrelated to our exhibit.
There's a lot of variety in this show. I took a tour before leaving, snapping some quick pics of most of the quilts. As I've gone through these, I realize I didn't get a good look at most of them, let alone note who had made what. I will have ample time to rectify that as this exhibit remains up through June 15th.


I wrap up this preview with my trio of maple leaf quilts below- they DO look quite nice together, although with that lighting fixture it was hard to get a good picture. If you find yourself in the area, I hope you'll stop by and enjoy!
********
Idaho Quilters: featuring Sheila Mahanke Barnes, Hermie Cline, Karla Harris, Terrie Kralik, Michele Keck, Terri Palmer, and Lynn Walters. March 18 - June 15, Panhandle State Bank, Sandpoint, ID


Satisfied with the results of my test (see last post here), I've now finished up the other two leaf stamp pieces by mounting them over stretched canvas. You may recall that I had constructed large 4-patches from tie silk as the background for the stitched leaf stamp charms. Since the silk was stabilized with fusible interfacing before cutting and I knew this would be mounted around stretched canvas, I didn't feel it necessary to back it further with Decor Bond as I did with the Strawberry Moon variations. However, I did plan to satin stitch the charm's raw edge and attach it to the background in one step. To prevent draw-up and distortion, I used Sulky's Totally Stable - a tearaway stabilizer that has a freezer paper-like coating that allows you to iron it to your fabric rather than having to pin or use basting spray to keep it in place. Worked like a charm.

And here are the finished pieces: Idaho Maple Leaves I & II, stretched over 10" x 10" canvases. They would look great, I realize, in floater frames. In fact, because of the silk, it would probably be a good idea to do that. I've already noted that one of the silks is prone to snagging, so preventing actual handling of the silk would be a good thing. But for now, they will go into the exhibit like this, hopefully one on either side of the bigger Idaho Maple. I think they make a nice pair - perhaps someone else will think so too and just have to take them home...


While I was preparing these images for the blog (still struggling to get accurate colors throughout each piece), I was distracted by a moose looking in at me. You can see more pictures of my neighborhood moose here.


I'm ready to wrap my leaf prints-on-silk-backgrounds around stretched canvas, but I want to try a method by Catharina Breedyk Law as described in the March 2008 issue of American Quilter. Because it requires some cutting, I didn't want my first time to do it to be on something that could not be salvaged should it not work as advertised. I should not have worried. This test run on one of my Strawberry Moon pieces worked like a charm, and was much quicker and easier than anticipated. I am sold on this method. You start by centering the canvas to mark the corners with dots. Catharina does this from the front with pins, then flips the piece over to place dots where the pins enter. I'm not sure why working from the front first is necessary - it appeared you could just as easily do this from the back. At any rate, once those guide dots are marked, you draw lines through them, then stitch along the corner lines only with a small stitch for reinforcement. Trim away the corners leaving a 1/4 inch seam allowance.

Mark the depth of your frame. In my case, that was 3/4" - you can see the pencil mark just above the pin. Match the dots (bring the quilt right sides together) with the end being exactly where the stay stitching reinforcement turns the corner. Stitch just to the left of the stay stitching, down to your mark and back and down again. I used a 1.5 stitch length.

When all four corners are sewn, turn right side out, poking out the corners. Slide in your frame - it should be a snug fit and the corner stitching should stop right at the back of the frame; otherwise, folding back those corners in the next step will be problematic. I have to tell you, this was one of those "little bit of magic" moments for me when the frame fit in there perfectly.

Now you can start stapling the excess to the back of the frame. Staple centers first and work your way to the corners (where her only instruction is to "fold the corners neatly and staple." You'll have to experiment to discover what constitutes a neatly folded corner). Remember to pull tightly as you go for a snug fit.

With the background print, it's a little hard to see, but here is Strawberry Moon 3, neatly wrapped around the stretched canvas with corners to die for (compared to the way I've done them in the past).

So this is how I am going to finish my two leaf prints on silk. But I'm not through with Strawberry Moon yet - I have another thing to try out.

A couple of years ago, I noticed many oil paintings being displayed in a frame I'd not seen before, but thought would showcase my textile art well as they allowed the canvas to "float" inside the frame, leaving the sides in view. I later found out that these are called "Illusions Frames" and even with careful reading of descriptions, I couldn't quite figure out how they worked. Being a bit pricier than the metal and gallery frames I've used, I was hesitant to buy sight unseen. But ASW was having a big sale in January, so I decided to order some up, crossing my fingers that my 3 most recent Strawberry Moons would look good in them. To my delight, they are easy to mount artwork in and make these textile pieces look great as you can see.

This is how the frame works: The canvas is inserted from the front, and rests on the innermost "ledge." The next little ledge keeps it in place, giving it the look of floating on the background. The next ledge is the outside of the frame which is essentially flush with the top of the canvas.

I had visions of having to drill through the canvas frame into Illusion frame, struggling to have everything centered properly. Instead, 6 little brackets on the back hold all in place, and only 1 screw through each into the canvas frame is all you use.

So simple, so effective. I'm in love...
If you are an AQS member, you can download the article with directions in pdf form here.