Showing posts with label Embellishing. Show all posts

Monday, February 27, 2023

A Hodge Podge Week

There was focus. There were diversions. But things got done. I made my final choice of border quilting design for Naomi's quilt. Was intending to do the one on the left but it ended up not being wide enough, so I opted for the more elaborate one on the right which is the perfect width . . . and has hearts! I cut strips of the quilting paper, folded it into fourths accordion style and taped one end over the design. As I finished tracing that section, I folded down the next quarter and continued tracing, repeating until the entire strip had the design transferred to it. This length is for the side borders.

Then I unfolded it and taped it to this cutting mat, laid a blank strip over it, taped it in place and traced the design onto it. (And discovered a glitch in my method of transferring from the book which resulted in several of the heart loops being stretched - but I like it.) Repeated one more time for a top border which was longer to include the corners. And that is where I got stuck. No matter how many times I tried, how many breaks I took, how much mulling when not in the studio I did, I couldn't figure out how to turn the corner of this border design. Yes, I could just continue the design straight across the corner but you know me. I wasn't about to be defeated, and finally last night I came upon a solution that I think will work. Need to transfer it to the other corner, then trace the complete design onto the last paper strip. Quilting should resume this week.

In the midst of this preparation for border quilting, I switched gears to work through a video class offered by my Handmade Book Club. The video was going to disappear at the end of the month so I had a deadline pushing me along. Here's my setup for working on botanical drawing with India Ink.

The first part of the class was devoted to making a small Japanese stab binding book. Luckily, I had one on hand that I'd made back in 2020 when this binding was an offering of the month. I made three different ones, with this one having signatures of rice paper so that I could experiment with gelli prints in it. Hmmm, never got around to trying that so was happy to use it for this class.

Before drawing in our books, it was advised to make some marks on a scrap piece of paper to get used to the way the brush and the India Ink played on the paper, and seeing the difference between full-strength India Ink and some that had been diluted.

Then it was on to painting/drawing in our books, following what the instructor, Amy Maricle of Mindful Art Studio was doing in making leaf shapes and stems. I'm using a pretty hefty rock to hold down the cover and pages as I go. I also inserted parchment paper between the page I was working on and the next page. Even though I doubled over each page before inserting into the binding, sometimes the ink bled through.

I couldn't seem to get my brush to do the thin-really thick-back to thin strokes that she was getting. After a few more pages of copying her designs, I did as she suggested and struck out on my own. I quite by accident found myself making these "broken" leaves that I really liked. If you look to the left, you can see how the dark ink shows through the two layers of rice paper. I rather like that as well. Interesting to see the faint image of the following page showing underneath the current one. I'm thinking of ways I can capitalize on this as I add work to this book.

This is perhaps my favorite page, simple and minimalist.

Finally, a really big diversion: the start of motorcycle racing season this weekend. I watch most of the races on my computer, and there is always content before and after the race that doesn't require me keeping my eyes glued to the screen. Since this computer is part of my office setup, sometimes I can work on bills and paperwork, sometimes I can do something creative, and this time I picked up my stitch camp piece and added a few more stitches as I listened. I really haven't done much with it, but it does sit on my printer so I see it everyday, pondering what to do next. This time it was to add running stitch spirals in more of the dark blue circles, and some whipped running stitches, a stitch that is new to me. I use a single strand of embroidery floss to make the running stitch, then "whip" this shiny 3-ply thread under the running stitches. It's a little like couching. I honestly can't remember where that thread came from and I'm only guessing that it must be rayon, but it is certainly my favorite teal blue. I still have no sense of where I'm going with this, just trying to read the marks and envisioning what stitches might enhance them. I've always thought there was a sense of water flowing through the center so hope my stitches bring that out.

Monday, January 23, 2023

Just Take Me Out & Shoot Me . . .


I must be feeling better. I let myself get enticed into signing up for TextileArtist.org's 5 day "stitch camp" - free of course so what is there to lose but some time? I rationalized it many ways: 1) I really do love hand stitching and haven't done any for quite some time; 2) it was billed as doable because of the way the project was divided into small segments over the 5 days; 3) I might see something new or a new way of doing something I'd already tried - you know, transferring parts to something I already do; 4) I could always just watch the videos and if nothing appealed, I wouldn't have to actually do the project; 5) did I mention it was free? Yeah, a lot of rationalization. And even though "mark making" was part of day one, something I've never liked doing in any medium, I was intrigued by the idea of "seeing things in the marks" to drive how you would add embroidery. That's pretty much in my wheelhouse, "Masks" being one of my best examples of seeing images to be picked out in stitch.

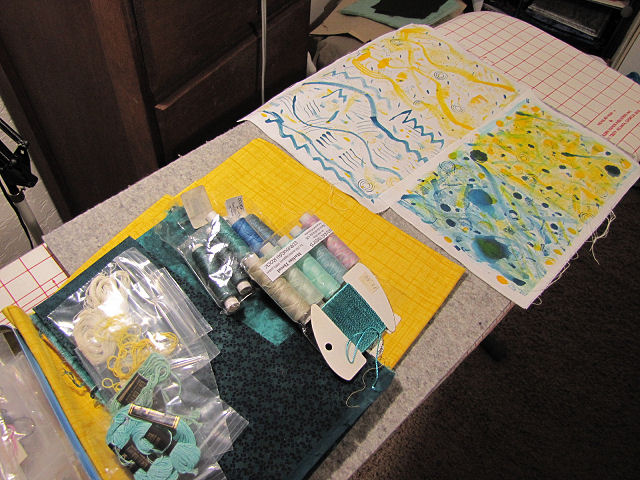
So I grit my teeth and did day one's assignment of mark making. One good lesson was the suggestion to pick just two colors (one medium, one dark) plus a light neutral. That really does simplify things. I chose teal and yellow and searched my stash for fabrics of that color as well as threads and floss for embroidery and paint for making those marks on the "winter white" kona fabric. The resulting painted fabric was of two kinds, one with dense marks and little white showing, the other with the marks farther apart with more white area. Accents of the opposite color on each area helps with a bit of cohesion. I did the dense marks first and really didn't like what I did, partly because I was learning how the paint was working with the various "tools" I tried. Before I did the less dense marks, I'd scrolled through the dedicated Facebook page to see what others were doing and spotted some really cool marks made with fork tines - I'd totally forgotten about that, so I got marks I liked better on that piece. (You can see the results and my pile of threads and other fabric in the photo above.)

But no matter, this painted fabric wasn't supposed to be a lovely composition because it would be cut into 2-1/2 x 3 inch pieces (don't ask - the teacher gave no explanation for that dimension and also said we could cut them any size we wanted). Pick and choose what to pair, looking for connections from one square to another, then overlap slightly and tack with small running stitches. Yes, no seaming here as the simple embroidery stitches suggested are meant to "blur" the joins. She was putting together up to 4 squares into a strip, but I could see others in the group were breaking from this idea of making a long strip to use more squares in rows, which is what I wanted to do. As you can imagine, after I pulled those 3 dark teal squares together as something embroidery could help make the marks flow one to another, I spent quite a bit of time arranging the other squares around them. At one point I actually had a second piece going, but dang, I couldn't help myself. I managed to use every single square in this one piece. No leftovers for this gal!

Favorite marks are the thin parallel lines made with a fork and the concentric circles from a spool end

Unfortunately (or possibly fortunately depending on your viewpoint), those of us with larger pieces immediately realized we would be adding embroidery stitches on them long past the day specified for the embroidery. But we don't really care. I enjoyed tacking the squares together, that rhythmic running stitch, and am equally enjoying pondering what to stitch where. Day 4, if one was done with embroidery, was to be time to assess the piece to see what bits of applique might be added to additionally blur joins and make the piece more cohesive. The last day talked about how to finish the piece, and I particularly liked an example where a piece like mine could be laid on a piece of fabric extending beyond like a border and where embroidery stitches could extend into it. I could see this sort of piece being framed.

This exercise of blending marks from one area to another reminded me of a quilt I made prior to 2006 I believe. A friend had challenged me to do something with a small piece of 60's polyester fabric with a bold print. I had some bias tubes left over from a Celtic applique project and they became the connectors between rectangles of that fabric, over the solid hand-dye. I'm getting a bit of the same vibe off my stitch camp piece.

Well, with watching the daily short videos and doing something each day on the piece, that took me through Friday, and knowing I could set the stitch camp piece aside, I spent some time Saturday and Sunday working on the baby quilt. Extra incentive, I was having lunch with a quilting friend today, and I'd told her the last time we'd gotten together about my plans so I really wanted to have something to show her. I completed the 4 light blocks and 8 split blocks with dark centers, plus one from the split block with the light center. Here are the rest of those blocks with their squares all arranged and ready for  joining, so half plus one done. I must admit that I feel Judi over my shoulder, telling me to quit so deliberately putting the different patches in place, to loosen up like she did once when we were on retreat and I was working on a mystery scrappy quilt. She "caught" me matching up fabrics, which I denied. She wanted me to just pull pieces out of a bag. a way of working that I do find very hard to do. So while I arranged these squares, I just told her to shush, important not to have two of the same fabric side by side! I got the impression she wasn't convinced. ;-)

Wednesday, July 11, 2018

"Adrift" Less Adrift

When I was cutting out leaves from a batik fabric to add to "Float", I was reminded that one of the reasons I abandoned work on "Adrift" was not just the unproductive dithering I'd been doing on leaf and grass placements, but also the realization that I would need to fuse more batiks together and cut out more leaves from them. That may sound like a silly little reason, but the fussy cutting already had taken its toll and I found I couldn't face fusing and cutting out more. But the leaf cutting for "Float" was going so well, so easily, the placement of leaves also, that it gave me renewed energy and confidence for completing "Adrift" at last. In the time since I'd last had it out (over 2 years ago), I'd also been keeping an eye out for branch placement in other artwork and photos, setting aside both photos on-line and in my own reference files as well as ones in magazines and books on hand. By the time I opened it out to work on it last week, I had a better idea in my head of how the branches formed from leaves should be placed and angled. Lots of rearranging and additional leaves cut and added got me to a point where I could say, "good enough; it doesn't have to be 100% accurate." I'd also been mulling forever how those leaves would be attached and couldn't come up with a workable way to stitch them down. In another rare for me "I don't care" moment, I simply glued them in place with Fabri-Tac, an adhesive I've used often and which has never failed me. The leaves were always meant to have the edges free so just a dab of glue in the center and along stems was all that was needed. The old me would be appalled at this, I admitted to myself; the older, tireder, and less rigid me was glad for the quick and easy application.


Once that was done, it was easier to see how the various yarns for the grasses needed to be laid out, how far up on the right and how much of a slant as they progress across the bottom. I'd spent a fair amount of time trying to figure out how best to attach them too when it dawned on me I could hand couch them. It gives me the control I need and the option of how much if any of the couched thread I wish to leave exposed, and I can quickly change from one color to the next as I work my way across. When I took this photo, the yarns were just clinging to the top naturally, but I could see that wouldn't do for long. Back to gluing, this time with Roxanne's Glue baste in a few spots along each strand, enough to hold everything in place until I can couch it down. All these processes are slow ones, but I don't mind. As long as I keep working steadily, I will make the exhibit deadline a short week away.

Sunday, June 03, 2018

And Now I'm Not...

...Not struggling that is. I wish I knew what flips that switch to change me from the bumbling awkward novice feeling to the confident competent no more second guessing almost on autopilot feeling. Maybe it's the realization that I'm running out of time for dithering. Maybe it's taking on a more I don't care attitude. Or just going into nose to the grindstone just get on with it mode. I wish I had more control over it because it is a wonderful feeling to be back in the driver's seat and making decisions with a minimum of fuss. A few more moves of leaves and said to myself, "Good enough." And as I was stitching them on down the middle (with invisible thread and leaving a bit of each end loose), my mind wandered. I'd considered adding piping in the binding but the batik I thought might work was just too much. But now, with nose so close to the quilting threads, it occurred to me that I could run a line of the lime green Oliver Twist thread next to the binding for a similar but more subtle affect. I laid a length of the thread along the binding and not allowing myself to ask too many questions, decided it would give the finishing touch and be a good tie-in to that same thread in the quilting. Again, I noticed myself thinking, "Good enough," almost as a wall against any inner critique wondering if I could have come up with a better solution. Nope. This looks really good. And those leaves look more like they belong, blending  better now that they are properly attached. I quickly cut and sewed a sleeve and hand-stitched it in place with little ado yesterday, so this one is done and I can start on one more piece for my ArtWalk display.

Tuesday, June 06, 2017

Deadline Met!

Leaf Cluster variations in the order I hope they get hung
I just finished transferring my several pots of flowering plants into their planters on the deck because . . . drum roll please . . . I delivered my four pieces of art to my ArtWalk venue for hanging yesterday and am free to putter without guilt. Based on info on the application form, I was thinking I'd have Monday to fiddle with pictures and paperwork and anything little thing that might still need doing, but midweek I got the e-mail from my "handler" that it would be Monday, not Tuesday, that work must be dropped off. I know, just one day's difference, but I'd already proven that at each step of the way, each week I'd left my intended work to the last minute. Ok, time to move the game plan up a day and indeed, it was late Sunday before I could put my feet up because all was ready to go.


Here's how I got there. When last I wrote I was all excited about adding beads to the last quilt, but a little concerned about the extra time it would take. And it did take longer than I'd hoped, even though it looks like so little. But I found myself truly enjoying the process, scattering the red beads this way and that in a manner I realized was a lot like the chicken scratch quilting stitch that has become so popular. I have to give a shout-out to my teacher and now friend, Mary Stori, who taught me everything I know about adding beads to quilts and who I think is still the best source of information on that subject. Any of you who have tried taking photos of shiny things will understand how hard it is to get the camera to focus and to catch those glints of sparkle, but I hope you get the idea and trust me that in person it glints nicely. Couple that with the camera getting confused about the true color of the fabric (it says blue, the fabric says greenish blue) and the red that sits on it (either too dull and dark or too bright) and well, this is as close as I could get.


Once the beads were on, it was time to measure, mark, cut and sew up the corners on the last 3 quilts so that they could fit over the stretched canvas with the excess pulled around to the back and stapled into place. (See this post for a bit of a tutorial of the method.) I'd already done that with Leaf Cluster II quite awhile ago so once I treated them with a UV protectant spray, all four pieces were ready to mount in the floater frames and hanging wires attached. Just that part took over 2 hours and I couldn't help thinking it was taking longer to get some of these pieces framed up than it took to make them! But when I flip them over and see the results, it is totally worth it. I ink label info on the back of the quilts before putting them over the canvas, then ink it again on the back of the canvas. A business card also gets taped to the back of each, meeting the exhibit requirements for labeling.

Now to take pictures and yes, the fight with the camera, lighting, accurate colors continued. The quality of the pics didn't have to be perfect for the paperwork (just an insurance requirement), but these are going to be gone til September (maybe one or two forever if they sell) so I tried to get some fairly decent shots before they were gone. Most have been tweaked to get the colors closer to right, but seriously, I can't figure out why each of these presented problems. Anyway, pictures taken, I printed out the contract and inventory sheet and a group photo, filled everything out and was done. I feel a bit like I have my life back!

Leaf Cluster II ©2017 Sheila Mahanke Barnes

Leaf Cluster II detail

This is the one I finished to submit with my application, cropping and adding a frame in Paintshop Pro. Does Leaf Cluster II not look like you remember? Could be that while I was working on the others, and its now wrapped onto canvas self leaned against the wall where I could see it, I kept turning it this way and that, wondering if a different orientation would look better. When I studied all four versions together to decide how to orient the last two, I decided this one needed flipping. Any of these, I think, would work in any orientation which is only slightly weird.

Leaf Cluster III ©2017 Sheila Mahanke Barnes

Leaf Cluster III detail

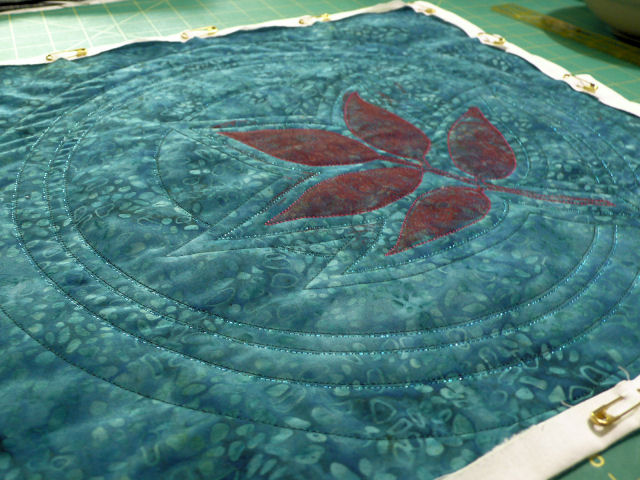
My not lazy art by virtue of that pebble quilting. I wanted Leaf Cluster III to look like a leaf resting on the ground, perhaps on a gravel trail or a cement sidewalk.

Leaf Cluster IV ©2017 Sheila Mahanke Barnes

Leaf Cluster IV detail

Still finding Leaf Cluster IV a disappointment. The quilting hardly shows, not even a shadow of it, and belatedly I'm remembering a different way I'd thought I might quilt it. I really want to redo it in a slightly darker thread and a different style because I do like how the leaves printed and how they are arranged. Ask me again after seeing it on display for 3 months; I may have a totally different take on it by the time it returns and decide it is just fine. By then I may have used that quilting idea on another variation. Lord knows, I still have unquilted squares and even unprinted squares to work on.

Leaf Cluster V ©2017 Sheila Mahanke Barnes

Leaf Cluster V detail

Alas, next to the others, even the addition of bright beads failed to lighten Leaf Cluster V as much as I would like. It's very much a night scene, really is still quite dark even in person. Think leaf floating on water in the moonlight. Again, I am anxious to see how it looks in the gallery. It may be just fine out of my studio. If nothing else, the beads and the sliver thread really do catch the light.

As always, you may click on any photo for a larger version if you would like to inspect details. Opening receptions are not until a week from Friday (June 16th). More on that as the date nears. 

Sunday, May 28, 2017

Lazy Art

This is NOT lazy quilting
As I quilted Leaf Cluster II, following the lines in the batik as I had in the first version, the thought came to me that I was making lazy art. Is that a thing or did I just coin a phrase? It's not the first time I've worried that I was not being inventive enough or complicated enough when designing and then quilting an art quilt. I love the texture that builds when a lot of stitch is used but I also worry that on some pieces, too much stitch will take over and overwhelm the main design element. Strike that happy medium, I tell myself, plus feel confident enough about one's stitching skills to execute a more demanding laying in of thread in the background. When in doubt, when feeling timid, the amount of quilting often diminishes, and even when minimal amounts following texture or line in the fabric is called for, I wonder if I am just being lazy. When I launched into the next one, quilting circle after circle in a small pebble stitch (see above photo), I felt excited and sure. Nothing lazy about THIS quilting, was my thought.


But now I was faced with additional squares to quilt, and the timidity and doubt returned. After shuffling the squares (I'll do this one next, no this one...) I chose the dark blue one. I knew I wanted to give the feel of water so hoped some ever widening echoing around the cluster would imply ripples that form when something hits the water. But was I remembering that right? Apparently not, once I looked at some photos on-line. There they were, leaves floating on water, and not a single ripple next to them, but larger circles starting quite far from them. Ok, I can do that, but I think I need to put a couple of echo rounds around the leaf anyway. That red looks so dull (don't believe the photo). And while I think of those circles in the water as being white and shiny, in the pictures they were dark and not shiny. So I opted for a dark green and black Ultra Twist rayon thread and stitched away. I thought the sheen of the thread would catch the light but it didn't. I stitched next to it with a blue YLI Sliver thread and instead of being too overbearing as I feared, it sparkled just right.


So I had done what I so often do, adhere to reality instead of going with my imagination. And sparkly thread or not, I was still underwhelmed by the results - it simply needed more, and I wasn't sure quite what that more was. Perhaps a few sparkly beads in the wide space between the cluster and the first circle. Yup, that definitely helps. And then as I rifled through my bead box, I came across the brilliant red seed beads and laid the strands over the leaves. Ohhhh, that got my heart racing! I won't be beading them on that solidly, but doing more of a scattering of them across each leaf, the paint from the stamped image peaking through. When finished, I will not be thinking that this one is lazy art.


Before adding those beads though, I decided to quilt up what would be the 4th square for my ArtWalk submission, thinking I'd be less stressed about the extra time needed for the beading knowing three were definitely done. I did a bit of back and forth again about what kind of quilting to do - am I still thinking floating on water or just getting some texture in there? An article in a quilting magazine reminded of a bubble pattern I used on this quilt, and as I dug out my reference material, I also unearthing an interesting grid pattern I've meant to try that may be the answer for how to quilt another of the leaf cluster squares. Kicked myself a bit for not having paged through my many resources first  but instead only looking through the dark and cobwebby recesses of my mind. I'm not a hundred percent on board with how it turned out, especially that the thread may as well have been invisible thread for all it shows. But the "bubbles" do show up when the light hits it just so and the leaves pop enough that they can stand on their own pretty well. Not quite lazy art - I DID put some effort into it. :-)

Bubble quilting from the back

While all this was going on, all this mulling and uncertainty about the series and how to keep myself as well as my audience engaged in it, this Painter's Keys showed up in my mailbox under the unlikely heading of "Artistic License" since this is what it started with: 

“If you want to be an artist — try being artistic.” This deceptively minor slip of info was given to me by a fellow painter, Maurice Golleau, somewhere in Provence many years ago. I’ve come to realize that it’s the life breath of our business. In other words, don’t just paint the boat, paint the most expressive boaty-boat you can drag out of your reference or your imagination.

It goes on to list some ideas of how to do that, a list that perhaps all of us should post in our studios. Pattern integrity, or composition, is one of them and that is the main thing I have been playing with. But I could consider more on that list . . . (In a similar vein, this Painter's Keys arrived a few weeks later, sharing the author's checklist of things one needs to do and think about as one creates and concluding "This stuff is all about a personal search for truth within one’s own vision. Getting there is half the fun. If it were a recipe, everyone’s truth might be the same. Only you can make your checklist and join the search for your own truth. Start your checklist now.) 

The stumbling onto the idea of adding beading felt like a breakthrough in the midst of concerns that in spite of my minor variations, my efforts were a bit repetitive and verging on lazy. (If I were hand appliqueing those clusters, would I feel less lazy about the end result? I hate to admit that I would.) As the opening to the letter says, I need to not just reproduce this leaf cluster over and over, but I need to make the most expressive, artistic versions I can drag out of my own references or imagination. "Unless things modify or become other things, or in some way interact through colour, shape or line, they’re merely the straight goods, which tend to be boring to both artist and observer. Don’t be boring." See? That's exactly what I've worried, that I could easily get boring with this series. The beaded version feels a definite step in the right direction, not the straight goods, not lazy art, and not boring. Now to keep that up. 

Friday, December 09, 2016

A Small Bowl & A Not So Small Revelation


I finished up this small bowl yesterday, same basic design and fabrics as the previous Sea And Sand bowl, except this time I wanted to make a shorter version with just two fabrics. When all the rounds were sewn, I meant to finish in the simplest way, grading the end of the closeline before the final rapping with fabric strips so it would blend into the beginning of the round and not leave a noticeable raise or bump along the rim. This is a little tricky and I did not do the best job of it on the other basket, hiding the imperfection with that handle.


I actually left the bowl in the machine overnight while I thought about this, mostly because as I studied the basket, I wasn't sure that where I had planned to end would make a smooth transition. But I think it was more than that. I think it was a bit of boredom. I just wanted to do something different from a plain finish. And so I played with continuing to wrap and stitch the clothesline but not to the basket, then looping and spiraling that length of line into something decorative. It required hand-stitching, which I've been avoiding but no other way to do this, and it was as tedious and awkward as I'd anticipated. I like the results though, and was pleased to find a bead to attach at the center of the spiral.

Approximately 6-1/2" across & 2" high. Still love the look hand-dyed fabric gives.

I think a lot of what I've been doing in the last year or so can be traced back to boredom. I've always thought of my impulses to try new things as more curiosity, but lately these urges to do something different have not always risen out of that excitement of "oh - what would it be like to try this idea" - that "what if" part of creativity. Instead, the feeling is more one of truly not interested in doing the same thing over and over or working with the same medium over and over. I think this is the first time I've been aware that my restlessness may indeed have roots in boredom. And boredom may be a good thing if it pushes me along in my explorations. 

I'm delighted with the way this bowl turned out. I enjoyed the process, finding it relaxing and meditative as I always do. I'm sure I would have been a little disappointed had I not put in that effort to create a more interesting finish. But I do wonder a bit why boredom has been stalking me. And I can hear my English & Latin teacher mother now, as she stood in front of her class responding to students complaining they were bored. "Bored? I'm not here to entertain you - you're here to learn!" 

Right mom. And learning I am . . .

Saturday, January 16, 2016

I Like What I See...

Hanging on the design wall since November, waiting for me to decide if it needed anything else, Masks has never looked finished to me. It is not anywhere near a standard size and looked squat. That dark edge on the right asked for something to help integrate it. The dangling bead idea never left my mind. Today, I started working with the wooden beads and leftover trade beads still on the work table.


Yes - exactly what it needs. I like the way the different beads are working together, how the darkness of the wood ones echoes the dark color along that one side. The dangles continue the tribal feel of the piece, move the eye down and visually as well as actually elongates it, gives it a balance it didn't have without them. Masks wasn't done. But it will be soon.

Friday, November 13, 2015

Is It Done?

You wouldn't know it from the blog (and my lack of posts thereon) but I have been diligently working to finish up Masks. I finished stitching beads into the eyes of the antler buttons I'd glued in place, wondered if I should add more buttons, then decided I'd know better after I got rid of that excess batting and backing along the edge. I'd originally intended to apply a facing following the natural unevenness of the edge, but two things changed my mind as I proceeded with the beading. First of all, I became very fond of that soft raveled edged all round. It seemed to play up the tribal feeling of the masks. But more importantly, I realized that especially along the bottom, I had not left enough room past some of the beading for a seam allowance. Still, I needed to do something along that edge in place of the basting stitches that would be removed. I settled on an uneven cross-stitch similar to what I'd done around the eye squares. As I was trying to decide whether to use the blue or the reddish pink thread that had gone around the squares and knowing that neither was probably right, my eyes finally picked up on the fact that I'd purposely used a variegated brown thread to quilt areas near the edges. Ahh - perfect tie-in.


I'd run the quilting stitches all the way out to the edge thinking they'd be caught in a seam. Now I needed to trim away the batting so it wouldn't show but not inadvertently trim away any of the raveled threads, and I'd given myself very little wiggle room in which to do that. After trying different scissors, I settled on these duckbill applique ones. The batting is Hobbs Thermore which is a thin polyester, and it cut away quite easily if I held the excess taut and angled the scissors just so. I managed only one nick in the backing fabric and no loss of fringe - pretty good in my book.


But now what to do about the backing? I considered trimming it flush with the top and fringing it out too but I sensed the edges could use a little stabilizing. I decided to try trimming it so I could turn it twice to the back, leaving about a half inch "facing" that I stitched in place with a running stitch. I felt the running stitch would give a bit more stability than a slip stitch along the edge and now that it is done, I think I am right. And of course, it is totally reversible if I change my mind and want to go back to the idea of fringing it like the front.


Here's how it looks from the front - free fringe, no batting or backing showing, and somewhat primitive-looking cross-stitches. For all the well-meaning people who over the years have advised me to loosen up, told me I was too uptight and concerned about perfection, I say, HERE! I CAN do it...but I must feel it is appropriate to do so. This quilt told me it must be that way and it got no argument from me.


Now it went up on the design wall for a good look. I'd used the equivalent of Cocoa Chanel's admonition to "Before you leave the house, look in the mirror and remove one accessory" with my "face" buttons when auditioning them. I'd pretty much put everything I had somewhere on this quilt before admitting that they were taking over, not adding to the story. A lot of them got set aside, and later I could see why specific ones needed to be left off, even if the quilt called for more buttons. I still had one of three similar ones that I decided needed to be added back on to fill a space and perhaps help move the eye but it was an iffy call. I decided to plunge ahead and just add it. I really like those red beads in the eyes.

The final rendition of Masks? (26W x 29L)

So it is finished - well, except for sleeve and label - or so I thought. When it went back up on the design wall for this picture, I started having second thoughts. At one point I'd toyed with the idea of dangling some wooden beads along the bottom then dismissed needing them. They fit the theme and have dark markings that might balance out that dark right edge. I'd have to mix some other beads in but I think I have something that would work. I'm wondering if they would be the final touch to pull it all together. And I'm also wondering if I should add another round of beads in the hat of the right mask. I've used every single green bead but still have some of the red and white. Also wondering if I should bead some white lines in the upper portion of the left mask hat. Or am I fiddling too much? I just suddenly found my eye a bit confused at what it was seeing so of course thought adding more beads was the answer. What do you think?

Monday, November 02, 2015

More Leaves, More Surprising Colors

Part of the crew who wore me out - nephews left, brother/sister-in-law right
You'll have to bear with me - I've been good for very little since my visitors all left, save for the Zentangling and an eye that continues to pick out color palettes in the turning leaves. I have to admit, I've been much distracted by the views outside my living room and studio windows. There's a continued urge to match up what I'm seeing with fabrics in my stash, but I've done this before and know that I will go nowhere with it right now - too drained from company, still struggling with getting my syndrome under control, perhaps being affected by an additional medicine thrown into the mix. Everything takes awhile to kick in and for the body to adjust to it - I should see some improvement in another week or so. And I had one of those little revelations as I sat on the couch, studying the chocolate browns, peachy reds and mustard yellows just beyond the back yard, then shifting my eyes to "Rolling Along" which currently sits leaning up against my fireplace. Yes, all those colors I want to pull from my stash are actually right there in that piece.

Multi-colored maple leaf

I resist, too, picking up leaves to bring home and press since I have a vast collection already. But a few still manage to intrigue me in some way other than just that they are pretty leaves. Take this maple leaf, for instance. I'd gotten out of my car and looked down at the wet pavement strewn with maple leaves of various colors (one of those times when I wished my cell phone could take pictures). It was a lovely natural arrangement, some yellow, some red, turned this way and that. And then this one - multi-colored as if it couldn't make up its mind which color to turn. I feel I have seen more of this sort of two toned turning this year than usual. Memory, however, is a slippery thing. Perhaps muscle memory is over-riding the truth of autumn leaves. Perhaps as a child, I cut out so many leaves from construction paper that my brain came to believe a turning leaf is one solid color. It's a theory, and maybe if I bring enough of these real leaves of many hues home, I can retrain my brain.

Autumn Splendour by Sheryl Meech

I was quite amused, then, to run across this quilt, Autumn Splendor by Sheryl Meech in New Zealand Quilter magazine yesterday. Sheryl says this was conjured up from her memories of Central Otago holidays. Obviously, her memory is better than mine.

Quaking aspen leaf

This leaf, however, came home with me for a different reason. I walk by a stand of quaking aspen most days, their leaves some of the more brilliant yellow in the area. They too are beginning to fall to wet pavement, with nothing too special about them except perhaps their shape. No need to drag any home, until I noticed this one definitely NOT yellow. It's more of that peachy yellow orange, very much like a hand-dye in my collection. The back is quite a bright yellow so I really don't know why the front is so very different. It's also quite small, less than 2" across at its widest point. I generally get sucked in by the really big leaves.

Playing with antler button placement

I've rallied a bit the last few days and have been staring down my Masks quilt. You might recall that I had just a little more beading to do after getting final input from the art group, but that still requires a little bit of decision making, visualizing, pondering (Oh just get ON with!). I've been collecting antler buttons for awhile now with the intention of adding them to this quilt - each button I bought looked like a face to me and would augment the quilt's theme. Today I played with placement and took several shots including this one to remind me of my last arrangement before starting to sew some of them down. This is by no means the final one, but I did get a feel for which ones would definitely end up staying where they were.

Faces...I see faces. Do you?

And so I committed. I applied some Gem Tac to the back of the ones I was sure about and stuck them in place - they are there to stay. Then I started additionally securing them by stitching a bead in each hole. I feel better for having taken this small step. I can feel my indecision subsiding, a surety of direction replacing it.