Honestly, things would go faster if I quit thinking about ways to deviate from the suggested materials, not to mention, just work on the books in order. Once I started doing that, convincing myself I can try the many ideas floating through my head on additional books after I finish these first three, things moved right along. I already showed you a sneak preview of book two - the cover with its sewing holes punched and an edge turned back to reveal the lining. Above you can see the inside of the cover in the background as I hold the signatures that I've put decorative wrappers around. You may remember that I started saving security envelops for the interesting patterns and I had a few from some oversized envelops, big enough to match the size of my signatures. I've not done the signature wrap thing before, not really understanding the why of it, but tried it here as it was a suggestion to help bulk up the signatures.
The back of two of these wrapper had a bit of printing that needed covering. Just quickly cut strips from the leftovers that are held in place with Scor Tape.
It dawned on me that I'd made this book before and was unhappy with how the signatures didn't fill in the gaps between them and came up with a solution after much pondering. This time I chose to really load up each signatures with almost twice the recommended number of sheets. There - nice and fat. But I must admit, it was a bit hard to get the awl through all those layers when it was time to make the sewing holes.
The binding is called a Long Stitch with Packing and while not as difficult as it looks like it might be, it can be tricky to get those wraps from twisting and pulled up next to each other. In the book I made before, I used a hemp thread that I waxed myself. This time I used a heavily pre-waxed linen thread and oh my, what a difference! I was given a tip on how to move the wrap up which also made a difference, but without the wax from that heavily waxed thread grabbing on to the wrap above it and holding it in place, I still would have struggled. Yes, you can make do but sometimes having the right tools/supplies makes the job much easier. Using two different colors of thread as I'd done on the first book per suggestion from the examples was something that wouldn't have occurred to me to do, but is so much fun.
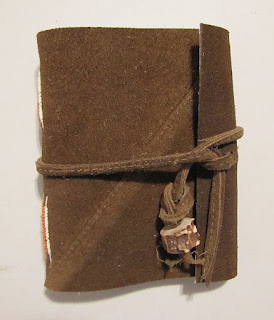
Here's the finished book complete with a leather strap closure. The strap was cut from a welted seam, threaded through two slits on the flap and finished off with an piece of elk horn with a large hole in the center.
I cut the cover across a seam so that it would angle across the front but not fall where I had to punch a hole in the spine for sewing.The two slits in the flap allowed the strap to create a place where a pen could be slipped.
I dithered over using these security envelop wraps for this book as I had originally thought I'd make the third book's cover out of black Kraftex where the grey would coordinate so well rather than stick with leather for all three books as in the examples. But this was one of those times when I realized I just had to get on with it and finish this one up for a friend who will need all those pages and the convenience of the pen holder which I don't believe I could have pulled off with my Kraftex idea. Using them here influenced my choice of lining a bit, going with the fabric that had some black in it. I think my friend will love it, probably more than my other idea, which of course I could also make for him at a later date. :-)
The last book is actually done except for the closure which I am still deciding on. I know what I want to use, just have to figure out how to attach it.


No comments:
Post a Comment