In my goals for the week, I stated that I only wanted to finish up Strawberry Moon and perhaps a second piece for submission to Small Works II. I knew the first could be done and here it is. It was that second piece that was questionable. Also, upon closer scrutiny of the directions, I needed to get the paperwork in the mail a few days earlier than my mind was telling me. In other words, both quilts finished and photocopied, and the paperwork filled out and mailed no later than Monday.
I guess I always need this panic push deadline business as motivation, as much as I hate to admit it. What I hate about working that way is that sometimes I don't leave myself enough time and short change the work. This time, it merely made me get moving.
Friday was a great day in the studio. I'd thought through how I wanted to do the second piece so when I entered my studio it was just a matter of doing it. No floundering, wondering, speculation, time-wasting. All the particulars had been worked out in my mind while doing other things, fabric picked, master pattern found the previous day. Everything went according to plan, I didn't feel rushed and the work was enjoyable. I love days like that. Although based on the same design as Strawberry Moon, this companion piece, Silver Birches, has a much different feel to it. A friend remarked it had a more "industrial" look with all the satin stitching than Strawberry Moon which is all hand stitching. (Click on either pictures for a larger view.) Now there's a comment you probably won't find on any judge's sheet! But I thought it was a good observation. I'd like to try this again with a different technique and softer look, something a bit more ethereal.

Saturday I got my photocopies made, entry form completed and all in the mail. Now if one or both pieces can make it past the jury into the exhibit, I will be even more insufferably pleased!
A few tech notes for those interested in process:
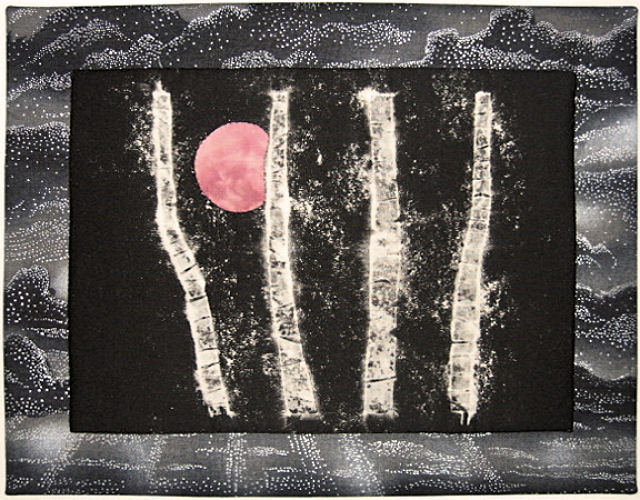
Strawberry Moon's tree trunks were discharged with bleach, using a freezer paper stencil to delineate the areas effected. The moon area had fusible web on the wrong side, then the area was cut away. A small piece of hand dyed cotton was placed underneath and fused in place - effectively, reverse applique. It was then layered with Thermore batting and hand quilted with black rayon thread along the tree trunks and with an Oliver Twist hand dyed cotton thread around the moon. The turning line was marked in chalk and I ran a line of hand basting over it through both layers, then centered it over a pre-made "mount." A few touches of fabric glue were applied to the batting to keep the center from sagging away from the mount. Then I turned under the edges (including the batting) along the basting line, pinned, and slip stitched it to the mount through all layers.
Silver Birches started with a piece of batik cut slightly larger than finished size. Using a light box, I traced the trunks from the master pattern onto the right side of the batik, then cut them out. I spray basted the back of this and then centered it over the silver fabric which became the tree trunks (essentially, reverse applique). I free cut bias "wisps" from a sheer for the fog and played with arrangement, marking with a white pencil the final positioning. These also got a little spray baste on the back so I could stick them in place and cut away sections that would be "behind" a trunk, allowing those raw edges to be caught when the trunks were appliqued. Next I spray basted one side of a piece of Thermore batting and centered the "top" over it. Then I trimmed this to the exact finished size, spray basted the back and centered it over a pre-made "mount." Using a walking foot and black rayon thread, I zigzagged around the outside raw edges first, then along the raw edges of the applique (trunks). Finally, I used a looser zigzag stitch and clear monofilament thread to secure the edges of the sheer "fog."
The "mounts" were made by bonding Decor-Bond cut to the exact finished dimension of the mount to the wrong side of the "top" fabric and fusing a 1-3/4 x 6 inch rectangle of WonderUnder to the wrong side of the "back" fabric. (These two fabrics were cut about 1/2 inch larger all way around than the finished size.) A slit was made through the WonderUnder to within 1/2 inch of either end for turning later. Then the front and back were pinned right sides together, running the pins parallel to the Decor-Bond. Then I stitched all the way around next to but not through the Decor-bond, trimmed the seam allowances to 1/4 inch and clipped the corners, and turned the piece inside out, poking out the corners until they were square. Pressing from the front, I gently rolled the back slightly under the edge so it wouldn't show from the front, creating a perfect knife-edge finish. Finally, I flipped the mount back side up so I could smooth the slit together and fuse it in place.
Finished size of both pieces is 14" x 11"
I guess I always need this panic push deadline business as motivation, as much as I hate to admit it. What I hate about working that way is that sometimes I don't leave myself enough time and short change the work. This time, it merely made me get moving.
Friday was a great day in the studio. I'd thought through how I wanted to do the second piece so when I entered my studio it was just a matter of doing it. No floundering, wondering, speculation, time-wasting. All the particulars had been worked out in my mind while doing other things, fabric picked, master pattern found the previous day. Everything went according to plan, I didn't feel rushed and the work was enjoyable. I love days like that. Although based on the same design as Strawberry Moon, this companion piece, Silver Birches, has a much different feel to it. A friend remarked it had a more "industrial" look with all the satin stitching than Strawberry Moon which is all hand stitching. (Click on either pictures for a larger view.) Now there's a comment you probably won't find on any judge's sheet! But I thought it was a good observation. I'd like to try this again with a different technique and softer look, something a bit more ethereal.

Saturday I got my photocopies made, entry form completed and all in the mail. Now if one or both pieces can make it past the jury into the exhibit, I will be even more insufferably pleased!
A few tech notes for those interested in process:
Strawberry Moon's tree trunks were discharged with bleach, using a freezer paper stencil to delineate the areas effected. The moon area had fusible web on the wrong side, then the area was cut away. A small piece of hand dyed cotton was placed underneath and fused in place - effectively, reverse applique. It was then layered with Thermore batting and hand quilted with black rayon thread along the tree trunks and with an Oliver Twist hand dyed cotton thread around the moon. The turning line was marked in chalk and I ran a line of hand basting over it through both layers, then centered it over a pre-made "mount." A few touches of fabric glue were applied to the batting to keep the center from sagging away from the mount. Then I turned under the edges (including the batting) along the basting line, pinned, and slip stitched it to the mount through all layers.
Silver Birches started with a piece of batik cut slightly larger than finished size. Using a light box, I traced the trunks from the master pattern onto the right side of the batik, then cut them out. I spray basted the back of this and then centered it over the silver fabric which became the tree trunks (essentially, reverse applique). I free cut bias "wisps" from a sheer for the fog and played with arrangement, marking with a white pencil the final positioning. These also got a little spray baste on the back so I could stick them in place and cut away sections that would be "behind" a trunk, allowing those raw edges to be caught when the trunks were appliqued. Next I spray basted one side of a piece of Thermore batting and centered the "top" over it. Then I trimmed this to the exact finished size, spray basted the back and centered it over a pre-made "mount." Using a walking foot and black rayon thread, I zigzagged around the outside raw edges first, then along the raw edges of the applique (trunks). Finally, I used a looser zigzag stitch and clear monofilament thread to secure the edges of the sheer "fog."
The "mounts" were made by bonding Decor-Bond cut to the exact finished dimension of the mount to the wrong side of the "top" fabric and fusing a 1-3/4 x 6 inch rectangle of WonderUnder to the wrong side of the "back" fabric. (These two fabrics were cut about 1/2 inch larger all way around than the finished size.) A slit was made through the WonderUnder to within 1/2 inch of either end for turning later. Then the front and back were pinned right sides together, running the pins parallel to the Decor-Bond. Then I stitched all the way around next to but not through the Decor-bond, trimmed the seam allowances to 1/4 inch and clipped the corners, and turned the piece inside out, poking out the corners until they were square. Pressing from the front, I gently rolled the back slightly under the edge so it wouldn't show from the front, creating a perfect knife-edge finish. Finally, I flipped the mount back side up so I could smooth the slit together and fuse it in place.
Finished size of both pieces is 14" x 11"
2 comments:
I wonder what would happen if you combined the discharge technique for the birches with the wisps of the sheer fabric?
Lovely work on these!
Thanks, Nikki. Yes, working with these was generating more ideas including more discharge and perhaps a different way to represent the fog. Want to do a "Night Birches" just as you suggest. And more subtle Silver Birches. I could definitely work with my birches for a long time.
Post a Comment