 |
| Master pattern for Silhouette Trees |
Remember the silhouette trees I was working on for a Christmas gift? Well, it didn't get done in time to be received by Christmas. Heck, it didn't get DONE by Christmas. In fact, I just barely got it to my friend before the year ended, the package arriving around 6 p.m. on New Year's Eve - that's cutting it close. But he loves it (and the candle) as I knew he would, and I am very pleased with how it turned out, very glad I opted for the photo view looking up through the branches at the sky. That's my master in the photo above, the areas of the photo to be used all blacked in with a Sharpie pen.
 |
| Traced Steam-a-Seam on fabric ready to cut out |
I also did some blackening on the reverse so I could see better to trace the shapes onto Steam-a-Seam, my fusible of choice for this sort of thing. It has a tackiness to it that holds applique pieces onto the background as you arrange them but not so much that you can't reposition pieces. It also does not require stitching along the edges once fused in place. I knew I would not be stitching on these pieces, many of which would be very small and narrow, so this was a must.
 |
| Karen Kay Buckley's "Perfect Scissors" |
I remembered how tedious and somewhat difficult cutting the zig zagging reflection pieces for my Sailing the Wine-Dark Sea quilts was and had taken someone's suggestion to try a pair of applique scissors with serrated edges. I tracked a pair down, Karen Kay Buckley's "Perfect Scissors", in a small applique size that also had Teflon coating, but I had not yet had the opportunity to try them. Oh, what a difference! I could definitely tell that the serrated edges were making the cuts with more ease and precision, and I found the large openings in the handles so much more comfortable - no rubbing after extended sessions of cutting.

Just goes to show that the right tool can make all the difference. I could easily get into all those tight spots and small curves. And these "Perfect Scissors" were not very expensive as good quality scissors go.

My master pattern slipped under the piece of hand-dye for the background, and I could just make out the shapes to help guide me with placement of the applique pieces. Did not have to be exact but boy, did that help move things along.

When I'd traced the very small openings in the parts of the trees that would be in opposite corners, I wasn't sure I'd be able to get in there and cut them out, and I was willing to live with that if that was the case. But the very sharp points and thin blades of these scissors allowed me to get in there and remove even the tiniest of them, even through the fusible and its paper backing. Very different from the Teflon Fiskars applique scissors I've been using.

Once all pieces were in place and permanently fused, I penciled in the rest of the branches that were too small for applique and would be stitched. I used basting spray to hold it to the felt taking the place of batting, and the stitching began. I stitched alongside but not through each branch and out onto the background to make the spindly branches. This quilting of the little branches reminded me of a journal quilt I made many years ago, an abstraction of sorts of a winter scene looking into a thick wooded area that was all bare branches. I found it very enjoyable stitching.

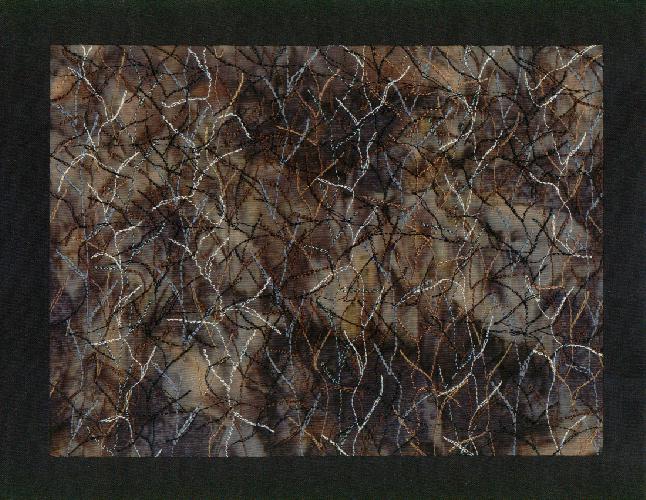
Here it is all done and from the back so you can see just how much stitching I put in it. The color of the felt, by the way, ended up to be important as the hand-dye was transparent enough to be altered by what color was underneath it. I tried several and like this brown the best.

Now for the mount and attaching the quilted section to it. After all those batiks I had strewn about the table as possibilities, I soon realized I just needed to go with black, either the same hand-dyed black of the trees or... I looked through my commercial black stash and found this wood grain print which read just the slightest bit lighter than the tree black. No need for fussing with the thread either. I used the same Aurofil 40 wt cotton thread as in the quilting to satin stitch the edges before centering on the mount and attaching it with a straight stitch right next to the edge of satin stitching.

Here's another view of some of the stitching. While I was working away, wouldn't you know I kept running across other people's photos of bare trees in silhouette against sunset skies - on blogs, on Facebook, in books. In fact, if you are a tree nut like me, you might like to track down my latest find at the library, taunting me from the "new books" display: Ancient Skies, Ancient Trees by Beth Moon.
 |
| "Silhouette Trees" by Sheila Mahanke Barnes ©2016 |
Once mounted the quilt measured 13-1/2 x 15-1/2 inches, and in my mind is the perfect compliment to the candle, just as I had envisioned. Whether or not they will be displayed near each other is in question, but I'm so happy that candle inspired me to work up this design, and that I chose a photo that did not duplicate the candle itself. (Click on photo for a larger view.)
I ended up not working with the second piece of hand-dye concurrently as I thought I might so can make another of these right away if I choose. But I'm thinking I won't want to make an exact copy after all, but choose another photo and view to work from. I'm quite pulled to a photo with a vertical orientation but also like one of the landscape oriented ones too. We'll have to see what strikes my fancy when I get organized and back to serious studio work.
7 comments:
This is stunning Sheila! And those scissors sound like a real find. Xx
A beautifully dramatic capture of a winter sunset - a wondrous gift.
Really amazing work! Happy New Year to you. Hope it's a good one!
Looks great. It goes really well with the candle. And I told you how great her scissors were! So I take credit for you getting a pair and for your tree....I am a big tree fan as well. I will have to check out the book.
PERFECTION! Every step obviously was well thought out and executed.
All of Karen’s products are excellent, glad her appliqué scissors were such a help.
Wow! I'm sure they were happy to have your quiltie as a compliment to the candle. I did something similar a few years ago with a photograph and a quilted postcard. Thank goodness for steam-a-seam, and that it's back in business!
And that Beth Moon -- I think my friend, Janna who lives in Idaho as a pilot, told me about her incredible work. I'll have to see if my own public library has anything by her.
Thanks, Michele! I thought about doing a fabric postcard but then decided my friend deserved something a little bigger to go with the candle which didn't seem like enough. You are so right about Steam-a-Seam. Many nervous moments and hoarding of product while we waited to here if and when it would be back in production. I did try an alternate brand's product which was supposed to be just like Steam-a-Seam but it was very frustrating to work with and very gummy adhesive. I can't understand how that product sells. Hope you can get your hands on some of Beth Moon's work.
Post a Comment