
The on-line Handmade Book Club that I subscribe to offers a 5-Day Challenge twice a year to the public for a small fee. You've seen books I've made through past challenges; it's a great way to dip your toe into bookmaking or increase your technical knowledge while adding new bindings to your repertoire. For awhile now, the club has been tapping members to be a part of what they call The Design Team for each challenge. Those who accept receive advance access to videos and instructions so that they can make additional inspiration books for the website in advance of opening up the challenge, incorporating their own style and twist on the challenge book. Guess who got the call a few weeks ago and suddenly panicked at the thought - yes me! Panic, because I know how long I often take to actually get around to finishing these challenges, and here I have a hard deadline of two weeks. Panic because I don't think of myself as a seasoned bookmaker (although I am), let alone a creative one who breaks from following directions to a "T" (although I often do these days). And I don't particularly like being put in the spotlight (although I do post my books here as well as in the Club's Facebook page) and part of what they hope I'll agree to is being interviewed in one of the daily Zoom meetings for participants during the challenge week. Eek eek eek! Yeah, you can see how insecure I am about this when I wouldn't for a second be insecure if it was about quilting. I eventually reasoned, "Why NOT accept?" and said yes to the offer. After cutting and folding a piece of watercolor paper for the cover, I decided to ease into things by stenciling the insides of it. I'd bought some new stencils in January that I was eager to try, and the willow one was a perfect size. I got out my Shiva oil sticks that have been gathering dust and chose a green that I hoped would mirror a green I planned to use on the outside cover.
 |
| Security envelopes, fabric strips, lace and tissue paper, just some of the things I gathered. |
As for the outside of the cover, this is where I thought, "What have I gotten myself into?" as I read instructions for adding collage to it. Not that I don't have plenty of collage supplies, I definitely do as evidenced by the more than enough piles of paper and fabric in the photo above that I pulled from bins and baskets, but I don't feel comfortable with collage, haven't done a lot of it and am often not happy with the attempts I've made. Well, consider this a push to get some practical experience, and that is exactly what it was.

The teacher suggested starting with torn pieces of text and other black and white ephemera. I worked with my many designs of security envelopes. Towards the end of working on this layer, I could feel myself loosening up as I added torn bits of orange from a magazine page, but also not exactly happy that my hard work here would soon be partially covered up. That is the one thing about collage that I have a hard time reconciling. But I forged ahead to layer two's suggestion of adding some transparent tissue paper. You can see it on the left of the photo of collage elements. I was so happy to have a place to use this, and it had the two colors I was working with, orange and teal. But again, there was one more layer to add that if I was not careful, might totally obliterate those lightening bolts. Took a deep breath and soldiered on, adding strips of batik and torn silk. Having a hard time feeling it. Having a hard time adding over some of that patterning of the security envelopes not to mention the lightening bolts. Trying to achieve visual and value balance. Not particularly happy. Let it sit for a day. Stewed over it in my head til the morrow.

I'd wanted to add some lace but failed to find what I was looking for first time around. Now I looked a bit deeper and found a tatted-like off-white strip of lace and then a much wider similar piece. The narrow piece didn't do much for me and not enough really to use on both sides. But the wide one - there was enough to run the length of the cover on both front and back. Maybe along the fore edge would look good. Nope. Right down the center struck me as perfect. But there still seemed to be something lacking. One more day to sit, consider, stew over what additions might make it better.

I'd actually gone ahead and punched sewing holes in the spine and signatures, but still kept analyzing the collage. When pulling fabric strips from a basket, there was also some lengths of yarn that might be the right color. As I wondered what I might use this book for, it dawned on me that it might be the perfect vehicle for organizing my yarn stash by inventorying it here, along with noting the pattern I might use for specific yarns and even keeping track of what I'd made from specific yarns and keeping their label and washing instructions there. Once determining that, it only made sense to add some yarn to my covers, and they turned out to be the bit that brought cohesiveness and balance to the collage.


There I stood, in some kind of triumph, and realized I'd not taken progress photos of the different layers. So above are some close-ups so you can peer through to spot various bits that make up the whole.

For me, that was the hard part. Sewing in the signatures was pretty straightforward, although a binding different from any I've done so far. The zig zag requires working with two signatures at once rather than one at a time. But to get the hang of the sewing, it was highly suggested that we practice on a scrap of file folder or such. I really have never been fond of practicing anything before diving in, but when cutting the cover, I ended up with a strip of watercolor paper the perfect size for this practice run that could easily become a bookmark, so I used it along with embroidery floss to get the muscle memory hang of backstitching the zigzags. It also helped me see if I liked the colors and order of the threads I planned to use to stitch the book together.

Here's my finished book for the Scrappy Journal Challenge. I love that zigzag binding and the collage is growing on me. It measures 4" x 9".
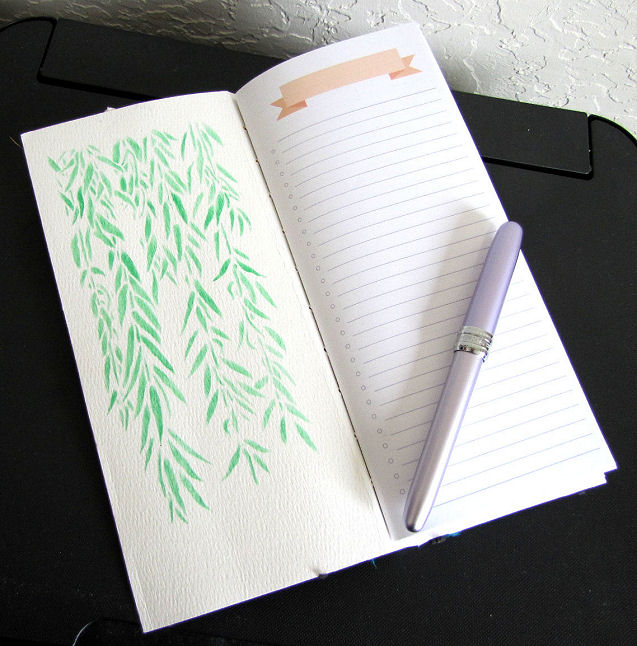
And here's a look at the inside. One of the perks of being on the Design Team was free access to custom designed pdf "Printables" so we could print lines, dots, dashed lines, and/or banner checklist pages for our signatures. I chose a mix of the banner checklist, lines, and dots. We'll see how well I like the way I distributed them when I start using this.
 |
| Teacher Ali's Version of Scrappy Journal |
Our teacher is all about using up what you have this year rather than keep buying new things. This challenge is a perfect example of that, with her giving lots of options for the supplies needed. If you think you might be interested in participating in the challenge which will run the second week in March, everything you need to know about the challenge is on the site here, along with link to sign up and a special earlybird price if you sign up before February 26th. Come join the fun!
2 comments:
First, congratulations on being invited to join the group's Design Team! Your talent has been recognized for the creativity that you bring to the table. The willow stencil's green caught my attention immediately! It's gorgeous! The wider lace invites the viewer to peek at the layers below which is what a collage should do, in my opinion. Good for you taking advantage of the opportunity when it came knocking! Jan in WY
Thanks Jan! I like your take on why the lace panel works on this. Looking forward to trying more collage and getting over my aversion to "covering things up", then transfiguring what I'm learning to fabric collage. Don't know why I always think I my first tries at something should come out really good when in fact, practice is what trains the eye and leads to aha moments.
Post a Comment