Saturday, January 26, 2019

It's Done

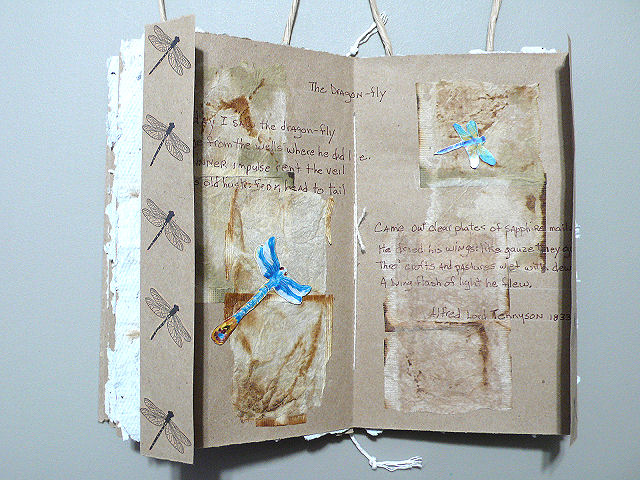
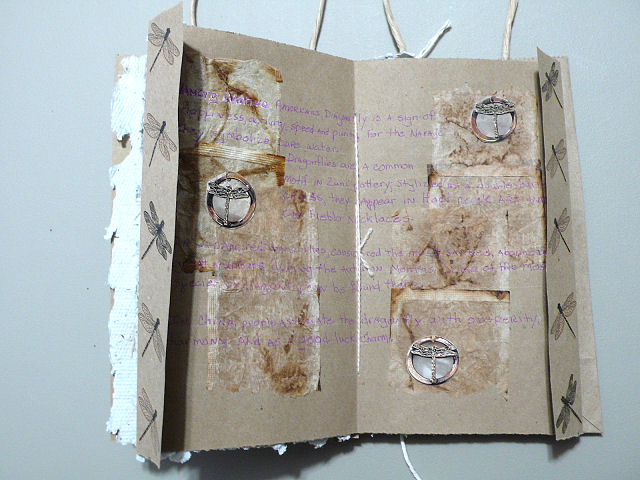
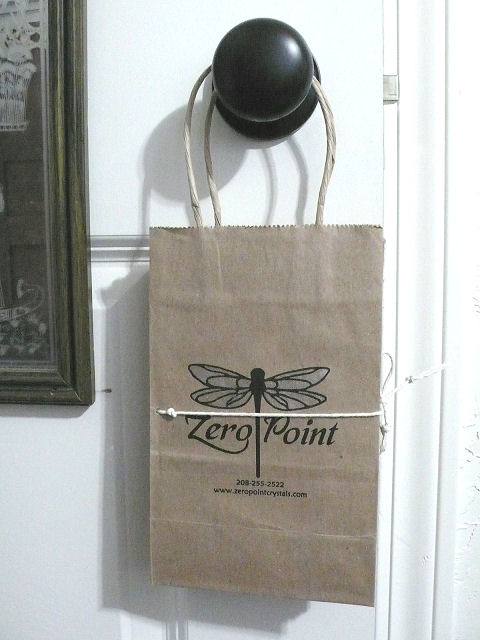
I've put the finishing touches on my recycle bookbinding challenge at long last. Frankly, my interest was waning and I am SO tired of dragonflies that I don't want to see another one for a long time! Talk about a learning experience though. So many things I should have thought through before forging ahead with parts of it. Things I discovered about pens and adhesives through trial and error. Overall, it did not turn out too badly. But I really didn't think I'd be fiddling with it for so many months. This first post about it from last May sets the scene: Evolution of a "Simple" Project. And the rest of this post is photos of each page in all their recycled/upcycled glory - packing paper, paper made from junk mail, used teabags, images from catalogs, magazines, tissue and wrapping paper, and fabric, security envelop patterns, salvaged cording and crewel yarn, and of course, the cover which was the start of it all, made from a shopping bag. Click on any photo for a larger view. Apologies for the few that are out of focus.


If you have questions about process, see these additional posts:

Monday, January 21, 2019

Curious

Imagined tree at sunset
I get curious about things but it's often a long time before I actually follow up on my curiosity. I decided that with my new Wing It resolution, I should devote at least some of January to satisfying my curiosity about some of these things I've wondered about for awhile now. First up, is the ink in my black Pitt brush pen opaque enough that the red ink laid down first won't show through? Yes it is. That was easy.

Pressing a piece of muslin on a wool pressing mat

The next thing would take more time, more gathering of supplies, including fabric suitable for printing on. One piece in particular needed some creases pressed out which gave me the perfect opportunity to try out this wool pressing mat. I've been using a similarly sized June Tailor Cut and Press on my ironing board for years, probably decades by now, because I like its firm surface for pressing seams when piecing. I guessed that these wool mats, now being seen everywhere in videos and TV shows, would be a similar firm surface, and being wool, perhaps work even better. I'd read that someone liked their Cut and Press for a stamping surface, and since mine is stained and pulling away from the cutting side, I thought I might retire it as a pressing surface and relegate it to a stamping surface. Those wool mats are pricey though, and I waited until I had some money from an art sale and a birthday to treat myself to one. I didn't actually pick it up until November and haven't had a reason to get it out of the wrapper until now. I need to put it through more paces before I decide what I think, but at a minimum, it worked pretty well as a pressing surface. Very grippy so you have to be careful to smooth the fabric over it well before starting and directions say not to move the iron back and forth as much as up and down.


Now on to this curiosity about what is essentially a monoprinting process. I'd seen it on Mary Stori's blog, this post reporting in on one of her sessions with her Fiber Junkies meetings. The technique involved essentially squishing paint between 2 panes of glass to create a texture that could be transferred to either paper or fabric (scroll down towards end of her post to see the process). I loved what I saw and knew I had everything I needed: two pieces of glass not used with their frames, Dynaflow paint, and fabric. Now a few months later, I didn't even bother to look up the post (Wing It!) because I remembered it as so simple. I used an eyedropper to drop 3 colors of paint onto one piece of glass. Is that too much? Not enough? Too close or too far apart? We'll find out.


I carefully place the second piece of glass on top. Looks promising.


I was totally unprepared for how difficult it would be to pull the two panes of glass apart - really a lot of suction! And while I was trying to figure out how to break that suction, the paint kept moving. When I finally split them apart, the ink ran together into a huge blob, most patterning lost. Dynafow is simply too thin to work, I decided. 


Still, I lifted the paint off the plates by laying fabric over them and pressing, which pushed the paint together even more. Trial one a fail (in terms of what I was going for) but this could be overprinted. I cleaned the plates and got out a thicker paint.


Versatex is a favorite paint because of its creaminess. It's just the right thickness in my book for use in stamping, no need to thin. It does have a bit of metallic sheen to it though, which has limited my use of it. I'm guessing it will work great here, but how to lay it down as it is too thick to drip? I used a small stick to dip it out of the jar and tap it onto the glass - 3 colors again. And again, too much, not enough, not close enough together? Let's see.


Glass on top and I could see I could have spaced the drops much closer. The glass shifted slightly and I could see this could add interest.


Again, mega suction making it really hard to pull the panes apart. But when they did, there it was, that interesting pattern.


I printed both plates and was delighted, even though there was a lot of open spaces. 


Sea coral, right?


I tried taking a ghost print but the paint dries pretty fast and not much came up. 


As I was rinsing off one plate, ruing all that paint going down the drain, I suddenly realized I could probably mist the plate with water to reconstitute the paint and allow more to be taken up in multiple ghost prints. And yes, that really does work as seen on my first failed piece, now overprinted.


Down to my last piece of fabric, a green hand-dye (I know, it doesn't look green here, funky lighting), I chose my favorite color, teal, and since there was quite a bit on the underside of the lid, I thought I'd try picking it up with a piece of sponge and dabbing it onto the plate. Fingers crossed, was not too sure about the coverage here. 


I added some copper in the first method of spooning it up on a stick, and laid a plate over it. And then I couldn't help myself. I give the top piece a spin. What do I have to lose?


And when I finally pried the two pieces of glass apart and gently laid and pressed the fabric over each pain, I was stunned at the results.


It is amazing to me that the details are so sharp.


I kept misting the plates and ghost printing on my white piece of muslin and a bit on that first pull. This one is nothing much to look at, but can be a base for more printing.

There was one other thing I meant to try, but was so caught up in the success of that last print and pulling up the last of the paint off the plates that I totally forgot. I just wondered what would happen if I dropped one color of paint on one pane and a different color on the other pane before smooshing them together? And I totally forgot about the Maribu Textile Paints I got on sale in November, which are supposed to have more "open" time for use in this kind of printing. Guess there will be one more trial before my curiosity is totally sated on this one. 
Tuesday, January 01, 2019

And the Resolution Word of the Year Is . . .

. . . two words! Or perhaps we can call it a phrase. It's been something that kept flitting through my brain all of December once I realized it was getting that time of year and that, as has been the case most years, I struggled to remember what my current resolution word was. Oh yeah - "refresh" - which stayed in my mind about half the year I suppose. And actually, I did continue to look at things with a fresh eye during the months of limited use of my right arm and shoulder, unfamiliar pain and physical therapy. I had to come up with "fresh" ways of moving, sitting, accomplishing all sorts of everyday and mundane tasks, and my physical therapist prodded me to think about my body and pain in fresh ways. It may not have been in the forefront of my mind, but perhaps that notion of "refresh" was planted and operating in my subconscious all along.

But that was 2018. My imposed limitations ended up having a freeing effect on me overall, as I didn't have the energy or ability often to maintain my usual somewhat rigid and researched approach to life. I realized I was becoming more comfortable with just winging it to get through things. Once that thought came forward, I was uninterested in searching out any other word for the new year. Everything on my mind for the upcoming months feel like the sort of things best done by winging it. And so, my resolution word/phrase for 2019 is:  

WING IT!

I know. Shocking to those of you who have followed this blog for any length of time or know me personally. I am seldom a "wing it" person. I prep. I research. I consider all alternatives. I plan. I mull. But I must move along, feel a strong urge to get with it and not worry so much about consequences. Will I still find myself doing due diligence? Oh yes, I'm sure. But for the less important things, the fun things, the let's see what happens things, I'm going to try to set aside all that stuff I generally do (which is often just generated by fear and procrastination) and try to wing it a bit more. I'm hoping it results in a lot of things tried and accomplished and a big smile.

Sketchbook by Geninnne's Art
Two Christmas gifts I received have the potential to get me back in the studio more and sketching more. The first is a boxed set of cds, hours of a favorite author, philosopher and mystic of mine talking about his books and beliefs. I only listen to this sort of thing while working in my studio so there's a double pull I'm hoping will work towards re-establishing a regular studio practice. Fingers crossed. The second is this lovely leather sketchbook cover with moleskine insert. A cousin, who is quite artistic in her own right, bought one for each of us to use for sketching. We live too far apart to see each other much, but stay in touch the modern way, through the internet with the occasional old school letter through the postal service. We have gotten so close over the years, and I love this new connection we have with the twin sketchbooks. How can I not get busy and sketch when I know she is sketching away in hers as she takes her next trip? Throw aside every misgiving I feel when I think about picking up one of my many sketchbooks. We'll just wing it in this one as I've done with its very first page today.

Wishing you a marvelous start to the new year and everything you need to weather the rest of 2019. Let's make it a great year!

And if you are interested in reading about my previous resolution words, go to last year's post where there are links at the end to those older words.  

Monday, December 31, 2018

Wrapping up the Year

I've hardly posted this month, busy with holiday things, slowed down by a cold that sapped my energy as it went through its stages over two weeks, not spending the sort of time in the studio I thought I might. I'd mentioned that I was saving the reporting of progress on the recycle bookbinding challenge project until it was done, but it now looks like done isn't going to happen very soon. So I may as well show you how things went with my tissue paper dragonflies applied along the flaps with matte medium. It went great!


I adhered those two larger dragonflies onto the spread almost like a test run. The matte medium didn't always get to the edge, hard to see how well it is covering, so there was some going back in to make sure all edges were held down. The trimming around each dragonfly went fairly fast, then it was only a matter of deciding placement. I'm pleased with this arrangement of them all angling the same direction toward the center.


I'd been considering doing something different on each spread's flaps but now I want to add these dragonflies like this to each one, or at least as far as my supply will allow. Perhaps the dragonfly gift wrap my friend passed along will get me there.


I've decided on the sequence of the spreads with their accompanying handmade paper, and I am to the point where I want to fully complete a set and stitch it to its pleat in the binding before doing anymore work on the next. I still have a few dragonflies to add to the front/back of the handmade paper along with some fussycut fabric (which will be fused) but because the back of one is facing the front of the next and so create a sort of spread of their own, it will be easier to keep all straight and cohesive if I approach these finishing steps in the order the signatures will be sewn in place. Not sure if that makes sense. But anyway, the first spread is now done and I've been looking through my threads and yarns for something to bind with. I've settled on this leftover wool yarn from an embroidery kit of long ago because it seems to blend the best overall, being off-white like the teabags. Honestly, here was another thing I did not think ahead about, that whatever I used to sew the signatures to the binding would be so visible along that center fold. It may cover some of my text.

So as the year winds down, I find myself with many partially finished projects to carry forward into the new year, and I am not stressed or concerned about that. I've had a most pleasant month actually, a peaceful holiday week, a few special gifts that awed me for their thoughtfulness and appropriateness, and the trickle of Christmas cards with warm greetings and year-end reviews I so enjoy reading. For all its ups and downs, triumphs and challenges, this year has ended on a mellow and uplifted note. I couldn't ask for better, except perhaps to wish that your year, dear reader, has ended equally well for you in spite of what may have come before or perhaps because of it. Pause to reflect . . . then onward!

Tuesday, December 25, 2018

It's Christmas


I confess; I so envied the outdoor decorations my neighbor of the other half of the townhouse put up last year (you can see them here) that I did a little sweet talking as they were putting up this year's, noting that I wouldn't mind at all if they continued the lights across over my garage doors. Just in case they had wanted to but didn't want to assume I'd be ok with that. You know, in case they have time on their hands. For the sake of symmetry, if nothing else. They just laughed and got right to it. I'm so lucky to have them for neighbors. These are the ones that keep my driveway clear of snow too.


The snow in that first picture had pretty much melted away thanks to warm and rainy weather last week. But Sunday morning I was greeted with a wintry scene of fresh snow which made it instantly feel like Christmas. Click on the photo for a larger view and to see what is hanging out on the tree branch.


I couldn't resist taking some shots of the way the snow piled up on the leafless branches of a bridal wreath bush outside my window.


When I think of Christmases when I was I kid, I usually think of the ones after dad finished out part of the walk-out basement into a kind of family room. In my recent scanning of old slides, I found a few pictures taken down there. During the holidays, it was the only room in the house we decorated. The walls were knotty pine and brick, and we hung an old wool blanket behind the heavily tinseled tree to pin Christmas cards we'd received onto.


There was an exposed beam running the length of the room, and dad attached cedar boughs and Christmas lights to it and also ran cedar boughs near the ceiling along the knotty pine walls. Vying with the tree for attention was the fireplace he built, fueled by Prestologs and providing a place to hang our stockings. The mantel was where we placed candles amongst angel hair. Now that I describe it, it was probably a terrible fire trap, but it was a beautiful and fragrant place to spend evenings together.


There were two hide-a-bed sofas and an easy chair, a stereo to play Christmas music, and I have fond memories of sitting quietly with my parents, watching the fire and knitting by the soft light of the fireplace, candles and Christmas lights.

I did a lot of knitting back in those days and I'm getting the itch to pick up my needles again while sitting by my fake fireplace fueled by electricity and a light show of flickering flames (I really miss the crackling) and listening to Christmas cds. it's nostalgia kicking in, and maybe I'll play along. May you find a bit of peaceful reflection and good memories of Christmas past today. Merry Christmas - Happy Holidays! 

Friday, December 07, 2018

The Latest Get Together

My art group got together this week, one last sharing between holidays and before the end of the year. I didn't have a great deal to share, just the Inktober Zentangles finished since the last meeting and this article from Smithsonian Magazine about a fascinating portrait technique by artist Kyle Meyer. If you can't read the text when clicking on the photo for a larger view, this link will take you to the article on the magazine's website. It is not only an interesting story of how he came to do these portraits, but what making them involves, a melding of photography and basket weaving. I think how he does it may surprise you.


You've already seen all my Inktober Zentangles but here are some that Terrie worked up. She was so intrigued by what I showed at the last meeting and that I learned from books I got at our library, that she went straight from meeting to library to check them out. It was fun for me to see how she interpreted the same lessons I had worked through and how she is trying out working some of the tangles into her quilting designs. Above are just a few of the pages she's filled in her sketchbook with this play.

Terrie's original design includes her hand-painted and hand-dyed fabric

Terrie also shared a 24" x 30" "fabric design", quilted and stretched over canvas, that she is submitting to a call for artwork to be displayed on an old carousel purchased by a local couple and now under restoration. Read more about the Carousel project at https://thecarouselofsmiles.org/ This link will explain the Art Panel Project that Terrie is submitting to: https://thecarouselofsmiles.org/artist-participation/

1 yard sample printing of Meg's original designs

Watercolor sketches used to develop designs

Meg was anxious to show us the results of her efforts to develop a fabric line. She's been working up her own designs and motifs with sketching and watercolor before bringing them into a program that lets her combine individual motifs, work out repeats and play with different colorways. Learning a lot, she says, but it's a beginning what she has put up on Spoonflower.com. She's had them printed out twice on a sort of swatch layout at full size to see how they read in real life. The first printing was on an inexpensive cloth much like muslin, and the second on a better quality Kona cotton which produced a sharper, more colorful image. This experience makes her think this is really what she wants to do, design fabric. You can take a look at her shop at:

Anne's resin pours

Our newest member, Anne, brought examples of some trials she is running on resin pours, something the rest of us had not heard of. It started with a project her husband is working on that he wants protected with the resin. She couldn't resist trying out mixing it with paints and inks to see what would happen.


She also brought along another eco printed scarf (she'd brought a dozen or more to the first meeting she attended) as well as some pieces of regular cottons that had been eco printed with rusted objects for the mordant. And because we all love hand-dyes, she also brought a sample of some of hers. We just want to steal all her stuff when she's not looking! No need to steal though. She's opened an Etsy shop featuring her beautiful scarves, EmdaArt.

Meg's testing of Craft-Tex

Finally, Meg proudly showed me the results of her putting the samples of Craft-Tex I'd given out at the last meeting to the test. First up, a square that she'd applied paint to, fused fabric to and stitched through. The second square is one she applied oil stick paint to, washed, crumpled, dried and ironed. At some point she handed it to her daughter who promptly put a big tear in it. Well, so much for the manufacturer's claims that it does not rip! However, the paint did not scrub off in the wash, but the wrinkles did not iron out (although it would flatten out - the piece here we all had balled up to feel how it changes the hand). She liked it enough though that she has ordered some for her own purposes, which made me very pleased I'd shared this, thinking she might be interested.


I'm still working off and on on my dragonfly-themed bookbinding project and to spur me on, Meg handed me this heavy wrapping paper with dragonflies printed on it! Yes, I was unduly excited and thankful, and now pretty much have no excuse for not finishing my book. 

Monday, December 03, 2018

What Other Artists Do And Say

Designer Alexander Girard's textile organization system
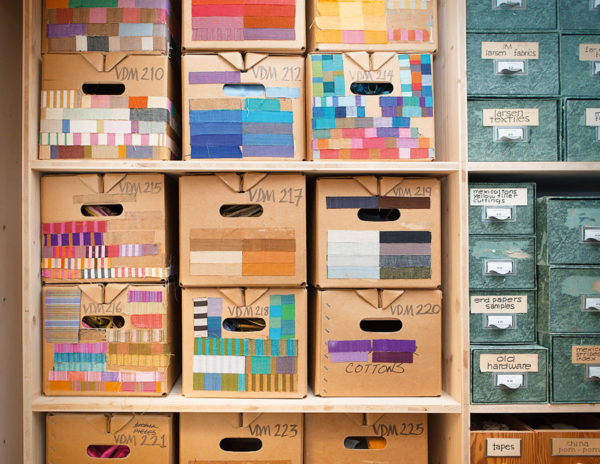
Here are some things I've been saving to share with you. Grab a cup of tea or coffee, settle in and get ready to follow some links. Let's begin with this fabric storage method used by designer Alexander Girard. I have to admit that putting swatches on the front of a storage bin so you know exactly what's in it is better than my longstanding method of trusting my memory to steer me to the right bin, box, cabinet or drawer. But even for an organizer and neat freak like me, this struck me as obsessive. No, probably just smart for his purposes. If you follow this link to Austin Kleon's blog post where I found this, there will be more links about Girard to follow.

Next up, one of my favorite artists who is not only a master bookbinder, but creates intriguing multi-media pieces with found objects and is a poet as well. Kaija at Paperiaarre recently recounted some unexpected successes and recognition she'd received, and how in the doing, she had struggled a bit with direction. In the end, she decided to trust herself and feels that was the key to success. The very last line of that post, Lost & Found & Forgotten & Found, really struck a familiar chord with me:

I’m glad I dare to do me in all I do.

Upon reading this, I realized how many years I did not dare to do me in my artwork, at least not with any real confidence, but that these days I have found myself proceeding more with ears and eyes shut against a world that would tell me I'm going about it all wrong or that my vision doesn't fit the current trends. I find it a comfortable place and hope that I remain here, just doing me in all I do. I hope you will read the entire post or at the least the final paragraph, beautifully written, with pictures of her work and one of Kaija herself. You can also see her work for sale in her Etsy shop.

I subscribe to The Painter's Keys which offers good overall advice to would-be artists on a variety of subjects that more than just painters can benefit from. Here are two I felt worthy of sharing. The first, The Five Minute Rule, deals with the bane of us all, procrastination. You've perhaps heard of this trick, to tell yourself you are going to do something for just 5 minutes (some have you set a timer for 15), which almost always turns into staying at whatever task for longer than that initial short period of time; things in motion stay in motion according to Isaac Newton and it tends to be true. But here's something else to remember too:

Now that you’re on the dance floor, understand that the path to proficiency is long — it rambles over dunes of ugliness, stumbles among boulder-sized re-dos, and falls into perfectionist back-eddies. The pain of doing it poorly is part of the activity of learning. The elation of doing it well is the hard-won result of beginning this activity in the first place. Begin now. “If you wait,” said Mario Andretti, “all that happens is that you get older.”

Now that you've got your procrastination issues solved, move on to the second Painter's Keys I found of interest, Golden Day. The idea here is to take a full day to just work on your art, morning to night undistracted.

You set aside a clear and uncluttered day to work and love your craft. Start early; end late. You put your head down and push yourself from one thing to another. It’s a day where everything comes out of the end of the brush (or pen, or chisel), a luxury day where all that counts is the universe of your creation. After, on your weary way to bed, you can give yourself a badge.

I think most of us would agree this sounds like a wonderful luxury. If you've ever been on a quilt or artist retreat, you have a sense of what this would be like and what you could accomplish. It's certainly worth considering if one could manage a full day without turning on the computer or tv or answering the phone, telling any spouses or children to pretend you are not home. Among other things, the writer says, "Before long you’re pushing into bonus territory and you may startle yourself." I miss being startled by what I find myself doing, achieving. Haven't had that feeling for awhile and no doubt because I haven't been spending the sort of time in the studio I once did. It's a thought.

And now because you've been so patient with me and my words without pictures, here's a little slideshow of some interesting art quilts by Judith Beaver.