
Looking back at my blog posts, I see that I did indeed do a session of snowdyeing last year, and somewhat similar to what I ended up doing on Monday - a bit of overdyeing of previous snowdyes that could be improved and a bit of folding and manipulating of undyed pfd fabric. You've already seen my snow-stacked and dye sprinkled setup in the previous post. Here it is 24 hours later, still with snow left to melt. But I can see around the edges that things looks promising. I always fear I'll get nothing but ugly results as I look at how the dye powder appears dissolving into the snow. But this time I used only two dye colors - the bright green which was so fabulous on the parfait piece, and the ultraviolet for contrast. I think I also sprinkled a little blue around the edges to use it up, or maybe some lavender. Not sure - I was winging it. It was so warm in the afternoon that I left the garage door open when I got home from my afternoon yoga class in the hopes that the sun and air would heat things up and get that snow melted!

I always have fabric in the bottom of the tub to use up perfectly good dye in the melted snow water. This time, inspired by Wisconsin friend Michele's experiments with dyeing wool yarn, I also tossed in some cotton yarn down there. You can just spy it through the plastic grating.

Finally, the snow all melted away and I was able to start rinsing and unfolding this batch and boy, did some of them surprise me! There was only one that I feel iffy about and even it has potential. (I have to warn you that my camera struggles with some colors so I've had to tweak these photos, sometimes with better results than at other times.) I'll show before and after photos together starting with some I rolled and scrunched. That method has you roll fabric around a cord of some kind and then push the fabric along the cord in a gathering motion before tying the cord to hold it in place. I remembered that I'd purchased some reusable zip ties from Dharma and decided this might be a good time to test them out.
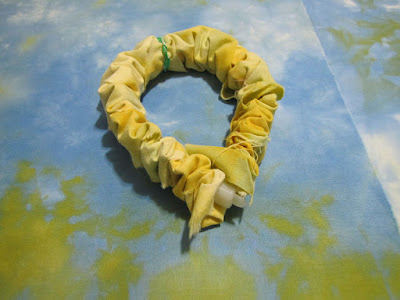
First I tried them with the yellow fat quarter from the parfait dyeing session (seen under the zip tie package). This one I rolled on the diagonal and the zip tie was a little short to reach all the way across but I made it work and managed to just get the end of the zip tie in place. I used an ordinary twist tie from the grocery store to hold the point of fabric in place there at the middle.


And this is the result. While the yellow fabric was not a fail, I think this a grand improvement.

This photo shows the manipulations on two more from the parfait snowdyeing plus some undyed fabric. In the upper left is another roll and scrunch, this time done end to end instead of on the diagonal with the mostly blue fat eighth. It was so handy to be able to cinch it tight with that zip tie.

And I am SO pleased with this result. I see water here. ;-)


In the upper right, I tried something I hadn't before, a way of twisting the fabric until it twists back on itself, using the mostly blue with ugly yellow/green from the parfaits (seen under the yellow scrunched in a previous photo). It didn't seem to pick up much new dye but it is altered just enough to make me like it better.

In the lower left you see a wide accordion fold which was then accordion-folded to create rectangles and then clamped to hold in place. I did NOT see this coming, although I did expect it to give me something of a windowpane effect Wowsa!

Nor did I expect THIS wowsa! Its folded before is shown in the lower right, starting with an actual square of fabric with a diagonal fold and then adding folds in the hopes of getting some kind of kaleidoscope pattern. Somewhere in my mess is instructions I'd found on how to properly fold for a kaleidoscope but I could not find it. So this is what happens when you wing it! Not sure what happened there in the middle, perhaps a fluke of the folding or how the random dye powder worked its way down, but it is challenging me to make it work anyway.

There were so many surprises in this piece, including the way there is an absolute glow of green around those outer motifs - only there in this piece.

Here's the last folded piece and the cotton yarn. I should note that I took the advice of another prolific kaleidoscope maker to do all the folding with a good press before soaking in soda ash solution. I've always done the folding when the fabric was wet and so always got less precise results. On this last piece of undyed fabric, I wanted to see if I could get lines going off in all different directions so folded randomly. The yarn (Lily Sugar & Cream cotton yarn) spools from the center so I carefully removed bunches starting from the outside and used twist ties to keep it all from ending up a tangled mess.

The yarn turned out wonderful. After rinsing, I put it in a net for the final wash in the machine. I had to replace my 18 year old washer a few months ago and this was my first chance to try it out with dye processing. I knew that if I didn't corral that yarn in some kind of bag I'd be very sorry. But even this bag was no match for the super duper spin cycle of the new machine. I had to laugh at the way multiple loops of yarn worked their way through the holes in the net. I pulled it all back in before tossing in the dryer, where it all stayed within the net.

And here it is before removing the twist ties and rolling into a ball. I love this combination of colors.
As for that randomly folded piece, it was the only one that I felt iffy about. It did not do what I thought it would at all. But it still may be usable - parts of it are interesting.
Oh, there is one last folded piece, the one that was in the bottom of the bin. I didn't get a before pic of it but I just made random wide accordion folds both directions until it fit flat in the bottom. It soaked up all the dyes and amazingly, has specific areas of green as well as the ultraviolet and some colors in between. It's moody and reminds me of water too. And as I looked through this batch, I see the advantage of this kind of dyeing of multiple pieces with the same dye combination. I have pieces that I can use together rather than a bunch of interesting but unrelated ones. I've already got an idea peculating for two of them . . .

Finally, the snow all melted away and I was able to start rinsing and unfolding this batch and boy, did some of them surprise me! There was only one that I feel iffy about and even it has potential. (I have to warn you that my camera struggles with some colors so I've had to tweak these photos, sometimes with better results than at other times.) I'll show before and after photos together starting with some I rolled and scrunched. That method has you roll fabric around a cord of some kind and then push the fabric along the cord in a gathering motion before tying the cord to hold it in place. I remembered that I'd purchased some reusable zip ties from Dharma and decided this might be a good time to test them out.

First I tried them with the yellow fat quarter from the parfait dyeing session (seen under the zip tie package). This one I rolled on the diagonal and the zip tie was a little short to reach all the way across but I made it work and managed to just get the end of the zip tie in place. I used an ordinary twist tie from the grocery store to hold the point of fabric in place there at the middle.


And this is the result. While the yellow fabric was not a fail, I think this a grand improvement.

This photo shows the manipulations on two more from the parfait snowdyeing plus some undyed fabric. In the upper left is another roll and scrunch, this time done end to end instead of on the diagonal with the mostly blue fat eighth. It was so handy to be able to cinch it tight with that zip tie.

And I am SO pleased with this result. I see water here. ;-)


In the upper right, I tried something I hadn't before, a way of twisting the fabric until it twists back on itself, using the mostly blue with ugly yellow/green from the parfaits (seen under the yellow scrunched in a previous photo). It didn't seem to pick up much new dye but it is altered just enough to make me like it better.

In the lower left you see a wide accordion fold which was then accordion-folded to create rectangles and then clamped to hold in place. I did NOT see this coming, although I did expect it to give me something of a windowpane effect Wowsa!

Nor did I expect THIS wowsa! Its folded before is shown in the lower right, starting with an actual square of fabric with a diagonal fold and then adding folds in the hopes of getting some kind of kaleidoscope pattern. Somewhere in my mess is instructions I'd found on how to properly fold for a kaleidoscope but I could not find it. So this is what happens when you wing it! Not sure what happened there in the middle, perhaps a fluke of the folding or how the random dye powder worked its way down, but it is challenging me to make it work anyway.

There were so many surprises in this piece, including the way there is an absolute glow of green around those outer motifs - only there in this piece.

Here's the last folded piece and the cotton yarn. I should note that I took the advice of another prolific kaleidoscope maker to do all the folding with a good press before soaking in soda ash solution. I've always done the folding when the fabric was wet and so always got less precise results. On this last piece of undyed fabric, I wanted to see if I could get lines going off in all different directions so folded randomly. The yarn (Lily Sugar & Cream cotton yarn) spools from the center so I carefully removed bunches starting from the outside and used twist ties to keep it all from ending up a tangled mess.

The yarn turned out wonderful. After rinsing, I put it in a net for the final wash in the machine. I had to replace my 18 year old washer a few months ago and this was my first chance to try it out with dye processing. I knew that if I didn't corral that yarn in some kind of bag I'd be very sorry. But even this bag was no match for the super duper spin cycle of the new machine. I had to laugh at the way multiple loops of yarn worked their way through the holes in the net. I pulled it all back in before tossing in the dryer, where it all stayed within the net.

And here it is before removing the twist ties and rolling into a ball. I love this combination of colors.
 |
| You're going to say butterfly or dragonfly, aren't you? |
As for that randomly folded piece, it was the only one that I felt iffy about. It did not do what I thought it would at all. But it still may be usable - parts of it are interesting.
 |
| The ultraviolet reads more red here than in real life |
Oh, there is one last folded piece, the one that was in the bottom of the bin. I didn't get a before pic of it but I just made random wide accordion folds both directions until it fit flat in the bottom. It soaked up all the dyes and amazingly, has specific areas of green as well as the ultraviolet and some colors in between. It's moody and reminds me of water too. And as I looked through this batch, I see the advantage of this kind of dyeing of multiple pieces with the same dye combination. I have pieces that I can use together rather than a bunch of interesting but unrelated ones. I've already got an idea peculating for two of them . . .
4 comments:
You DID IT!! What fabulous results…you must be thrilled and itching to create with these beauties!
Indeed I AM, Mary! It's nice to have the brain cogitating constructively on designs again. I hate those droughty periods when I simply draw a blank.
I love the diagonal yellow! They're all beautiful, but that's my favorite! We had a really fun retreat weekend in Cody & did some fun projects I imagine you're going to be seeing! Jan in WY
Thanks, Jan! I was really pleased with that yellow one. I so love the effect that rolling and scrunching makes - I've used it before with regular dyeing and it's always wonderful.
Post a Comment