Thursday, March 07, 2024

Mistakes Were Made . . .

As I sat down on Tuesday to write this blog post, my internet went down and stayed down until this morning. Thus the lateness of this post; always amazes me how it throws me off whenever I can't keep to my normal internet routine. I did find ways to fill the time, of course, including more tidying of the studio and some housework I've been avoiding. You'd think I might have spent some time knitting on my sock but I was giving it a rest after working last week getting the heel turned on sock two. I'd struggled on sock one with the method used in my pattern directions and struggled again even though I had a better understanding of what I was doing. Mistakes were made that left a couple of holes in the knitting, but rather than unraveling what I'd done to the bad spot, I just fixed it with a bit of "darning" from the inside. After all, these socks are not gifts so I can live with the imperfections and my fixes. But onward to finishing up the Celtic Weave journal, where I discovered another mistake made. I didn't notice it until I'd sewn almost half the signatures together with the outside link stitches. Look closely at the above photo (or click for a larger view) and you will see in the center 3 sets of holes in the middle of each signature. There should only be two. I know not how I managed to mark my template with the two holes for the weaving offset from center by so much. I simply could not live with it so I added a hole that made the weaving space longer but at least centered. Yes, you CAN punch additional holes in a signature after it is sewn into the spine.

I was hoping that the threads crossing over would hide the extra holes but they did not. My signatures are a bit thicker I think than the ones on the first journal so the weaving isn't as compressed. I like that it shows up better even if it doesn't cover the extra holes. And I'm not unhappy with the extra width; I think the stitching looks very balanced. I worked a bit at encouraging the holes to close with some success, but like the socks, I'm glad this is not a gift; I can live with this imperfection, as well as the fact that the lines printed on the pages do not line up along the spine. I seldom remember to think about how the signatures will look on these open spine bindings. In this case, I really struggled with trimming the pages to size, my paper cutter forcing me to reduce the number of pages cut at a time (which accounts for lines not lining up) and still not giving me clean cuts many times. I trimmed the fore edges with a rotary cutter and struggled with that too, the pages within the folded signatures shifting inside leaving me with uneven cuts. Seriously, the signatures turned out a mess which I could mostly but not entirely clean up. Sigh. I blame it all on the paper, although I've used it before and don't remember having these issues.

But it is done, or almost, a chunky 5 x 6-3/4 book for quotations. I did fold the covers to leave a rather large flap on front and back which I will glue at top and bottom so it functions like a pocket.
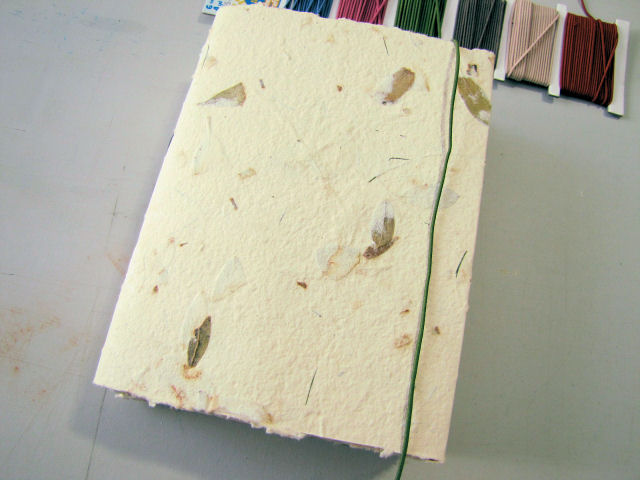
But before doing that, I'm considering adding an elastic closure like what is on my current quotation book, running vertically along the fore edge rather than horizontally around the middle (and in doing so, covering up the weaving stitch). The chunkiness of the signatures coupled with the soft cover seem to demand that and the flap can hide where it comes through the back cover. But what should I use? I could use this bright green narrow elastic.

Or I could use this wider decorative flat elastic which has a bit of glitz to it but goes well with the handmade paper of the cover. What do you think?

Wednesday, February 28, 2024

Another Book and a Solution

When I cut the covers for this Celtic Weave Journal, I had an approximately 7 inch wide strip of the handmade paper left, enough I hoped that I could make a smaller Celtic Weave Journal for myself. That was near the end of August last year, and yes, I'd left it out on the worktable along with instructions, signature paper, needles and linen thread thinking I would get to it long before now. It is the last thing I need to work on to clear enough space to get started on the overdue baby quilt. The strip is actually not long enough to make front and back covers in the same manner as in the original book, but over the months I had an epiphany; I could make the covers like in the Butterfly Binding where the folded in side that will be between signatures is narrow instead of having to be as wide as the front of the cover. Now to decide just how that will work, what the width of the folds and ultimate size of signatures would be. Here I am experimenting with that by folding a piece of copy paper in various ways.

The paper I wanted to use is a 24 lb Ivory "Granite" Specialty paper by Southworth (bought on extreme markdown at Staples). The size paper I need to turn into my signatures is approximately 10 x 7 inches, preferably short grain since it will be folded in half to make 5 x 7 signatures. But normal 8-1/2 x 11 paper is long grain, meaning it folds with ease along its length, not so much crosswise. But 24 lb paper is relatively thin and I've folded similar against the grain to make signatures without much problem. I'd also been toying with the idea of printing lines on the pages, starting to think of how I could create a line document to print within the size of the pages once trimmed. I don't always know how I will use the books I make, but when I do have a particular use in mind, it motivates me even more. So as I mused, I realized this would make a great replacement book for one nearly full that I use for recording poems and quotations. Starting to get excited! More musings as I walk (where I do some of my best problem solving) about how to get lines printed since that use for the book really does require them, when I remembered a line pdf supplied by the book club. I checked and, since I have to trim down these pages anyway, I can make it work. There's my stack of printed pages ready to trim and fold into my signatures.

Frankly, there was a lot of puttering going on last week before I got busy on the book. I've been reticent to tackle the stack of fabrics on the ironing board but really they must go if I'm to work on a quilt, As I peeled them back to reveal so many beautiful fat quarters I've dyed, I knew why they had ended up on the floor. I didn't want to fold any of them up (I've had issues in the past getting creases out of fabric that has been folded and stored one on top of the other) and even if I did, I didn't really know how to "file" them. Then another epiphany: they could easily be clipped to hangers and remain flat. I've done it before and can't imagine why that hadn't occurred to me earlier.

There were also big yardage of Stonehenge fabrics I'd bought for a particular project, again, wanting to leave them as flat as possible because I was using such large pieces in work, and might well use them in other art quilts as they are the kind of thing that worked well with my nature pieces. But that project is long done, and I can't imagine any project that will call for them soon so I did do a fold in half so they would fit in the wire cubes where my batiks and hand-dyes reside. Next layer had some really small pieces (on the left of the ironing board) that I think came from friend Judi's stash - again I probably didn't want to fold them up and hide them away and didn't really know how to logically file them in the space I had anyway. Still have to figure that out, but with just a few more fat quarters to hang, I'm well on my way to having a functional ironing board again and a little more organizing complete.

Tuesday, February 20, 2024

More Collage

I had started a spread in my big art journal before I was tapped to make the Scrappy Journal, which ironically would also include collaging. Although I was eager to work on my journal page, I thought of it as good practice, a trial run before I got to that part in my art journal. The theme for the page is my resolution word: organize. Laly Mille who I'd taken a class from, was art journaling her resolution word, and in running across a picture of a clock, I thought of my wish to organize my time and was inspired to do the same. Art journaling has two worthwhile components in my book. The page can be a place to experiment with new media, tools and techniques, and in the process of composing the collage it can unlock feelings, emotions and more, just like writing in a journal can, only here you are exploring visually. Laly often does written journaling on the page in pencil before anything else which I find helpful in focusing my mind on what it is I want to accomplish with this page or maybe just what I'm feeling at the moment. With that done, time to start covering the page. I started with laying down some watercolor paint with nothing particular in mind.

I started with watercolor because I wanted to conduct an experiment. I knew what happens when you scatter salt over fabric or paper that is wet with dye or paint. The salt sucks the color to it and you can get some interesting patterning. I'd read that you could do the same with what's in those packets that come in some many things to keep things dry. One of my medications comes with a rather large packet so I have quite a few saved waiting for the experiment. I was surprised to find that they are actually filled with tiny balls. Look closely at the above photo and you should be able to spot some that haven't drawn up any color. The "dots" are ones that definitely have.

And when brushed off, they do leave a bit of patterning on the paper, not as much as I'd hoped but there just the same. Now I know.

With the Scrappy Journal done, I could pull out this spread again, along with the things I'd set aside to collage on it. I'm finally dipping more into my stash of security envelops and chose blue ones as I want to keep this spread light and positive. Was so excited when I ran across large text reading "Getting Organized" which I amended to "Get Organized". "New Year" and the colorful strips of balls and stars are from a New Year's card I received after Christmas (some people just admit they will not get their greetings out before Christmas!). The lined memo paper needs me to add those things I want to get organized but other than not, not sure what the next step should be. I'm pretty happy with it right now, but just like in quilting when I hesitate to add the final step of quilting for fear of ruining what I've already done, I'm hesitant to try blending with paint or other things even though I know it needs something to make it even better and bring the whole thing together. It can sit while I ponder and do some more straightening and organizing in the studio.

Speaking of which, my goddaughter asked the other day how the organizing was going and I have to admit it's going slowly, still dragging my feet about where things should go if not on the floor. Bits and pieces are finding either a new home and where they should have gone in the first place. I'm trying to be more disciplined about putting things away as soon as I am done with them rather than my usual habit of leaving them on the worktable pushed aside for "later". It really is a helpful habit to get into. But I am making some disturbing finds, like the silk tie fabric from one floor stack that I really can't remember why I wanted to leave it out. Or more disturbing, while rearranging the small stacking bins I keep under the worktable and looking through the quilting magazines on one, I uncovered two books I don't remember buying, and neither have anything to do with quilting, so why are they there? What other mysteries will I uncover?

Worse still perhaps is that I know I have to clear off the ironing board, those stacks still a bit mysterious, because I am about ready to embark on the baby quilt for my goddaughter's latest baby. Not willing to attend to that as my excitement in finding a pattern and material for the quilt is driving me to get started, I began searching through my stash for the pinks I think I want to use. Well, you have to audition those pinks against what you just bought and with nowhere else to do it, I started working on top of the pile on the ironing board. Mired, I am absolutely mired in a mess and confused as to what direction to go with these fabrics. So I'm thinking today the ironing board must be liberated, the fabric auditioning set aside until I have space on the worktable again. I want to start cutting!!!! That should be incentive enough, wouldn't you think?

Wednesday, February 14, 2024

Design Team Invite

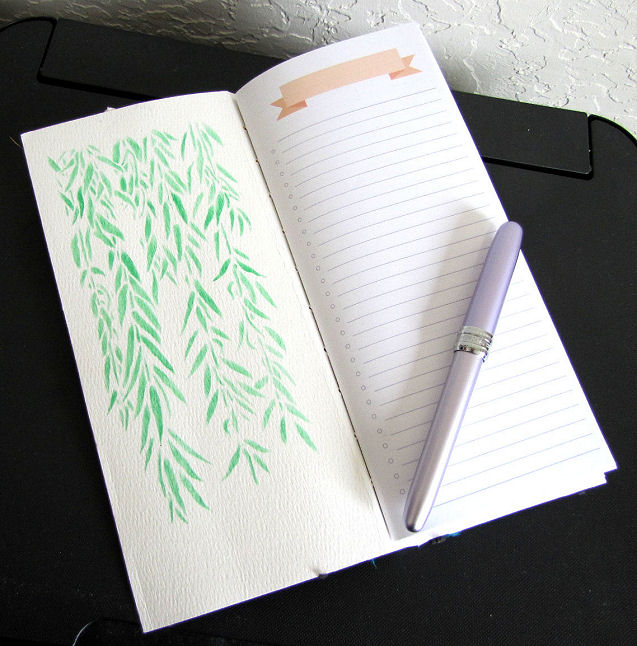
The on-line Handmade Book Club that I subscribe to offers a 5-Day Challenge twice a year to the public for a small fee. You've seen books I've made through past challenges; it's a great way to dip your toe into bookmaking or increase your technical knowledge while adding new bindings to your repertoire. For awhile now, the club has been tapping members to be a part of what they call The Design Team for each challenge. Those who accept receive advance access to videos and instructions so that they can make additional inspiration books for the website in advance of opening up the challenge, incorporating their own style and twist on the challenge book. Guess who got the call a few weeks ago and suddenly panicked at the thought - yes me! Panic, because I know how long I often take to actually get around to finishing these challenges, and here I have a hard deadline of two weeks. Panic because I don't think of myself as a seasoned bookmaker (although I am), let alone a creative one who breaks from following directions to a "T" (although I often do these days). And I don't particularly like being put in the spotlight (although I do post my books here as well as in the Club's Facebook page) and part of what they hope I'll agree to is being interviewed in one of the daily Zoom meetings for participants during the challenge week. Eek eek eek! Yeah, you can see how insecure I am about this when I wouldn't for a second be insecure if it was about quilting. I eventually reasoned, "Why NOT accept?" and said yes to the offer. After cutting and folding a piece of watercolor paper for the cover, I decided to ease into things by stenciling the insides of it. I'd bought some new stencils in January that I was eager to try, and the willow one was a perfect size. I got out my Shiva oil sticks that have been gathering dust and chose a green that I hoped would mirror a green I planned to use on the outside cover.

Security envelopes, fabric strips, lace and tissue paper, just some of the things I gathered.

As for the outside of the cover, this is where I thought, "What have I gotten myself into?" as I read instructions for adding collage to it. Not that I don't have plenty of collage supplies, I definitely do as evidenced by the more than enough piles of paper and fabric in the photo above that I pulled from bins and baskets, but I don't feel comfortable with collage, haven't done a lot of it and am often not happy with the attempts I've made. Well, consider this a push to get some practical experience, and that is exactly what it was.

The teacher suggested starting with torn pieces of text and other black and white ephemera. I worked with my many designs of security envelopes. Towards the end of working on this layer, I could feel myself loosening up as I added torn bits of orange from a magazine page, but also not exactly happy that my hard work here would soon be partially covered up. That is the one thing about collage that I have a hard time reconciling. But I forged ahead to layer two's suggestion of adding some transparent tissue paper. You can see it on the left of the photo of collage elements. I was so happy to have a place to use this, and it had the two colors I was working with, orange and teal. But again, there was one more layer to add that if I was not careful, might totally obliterate those lightening bolts. Took a deep breath and soldiered on, adding strips of batik and torn silk. Having a hard time feeling it. Having a hard time adding over some of that patterning of the security envelopes not to mention the lightening bolts. Trying to achieve visual and value balance. Not particularly happy. Let it sit for a day. Stewed over it in my head til the morrow.

I'd wanted to add some lace but failed to find what I was looking for first time around. Now I looked a bit deeper and found a tatted-like off-white strip of lace and then a much wider similar piece. The narrow piece didn't do much for me and not enough really to use on both sides. But the wide one - there was enough to run the length of the cover on both front and back. Maybe along the fore edge would look good. Nope. Right down the center struck me as perfect. But there still seemed to be something lacking. One more day to sit, consider, stew over what additions might make it better.

I'd actually gone ahead and punched sewing holes in the spine and signatures, but still kept analyzing the collage. When pulling fabric strips from a basket, there was also some lengths of yarn that might be the right color. As I wondered what I might use this book for, it dawned on me that it might be the perfect vehicle for organizing my yarn stash by inventorying it here, along with noting the pattern I might use for specific yarns and even keeping track of what I'd made from specific yarns and keeping their label and washing instructions there. Once determining that, it only made sense to add some yarn to my covers, and they turned out to be the bit that brought cohesiveness and balance to the collage.


There I stood, in some kind of triumph, and realized I'd not taken progress photos of the different layers. So above are some close-ups so you can peer through to spot various bits that make up the whole.


For me, that was the hard part. Sewing in the signatures was pretty straightforward, although a binding different from any I've done so far. The zig zag requires working with two signatures at once rather than one at a time. But to get the hang of the sewing, it was highly suggested that we practice on a scrap of file folder or such. I really have never been fond of practicing anything before diving in, but when cutting the cover, I ended up with a strip of watercolor paper the perfect size for this practice run that could easily become a bookmark, so I used it along with embroidery floss to get the muscle memory hang of backstitching the zigzags. It also helped me see if I liked the colors and order of the threads I planned to use to stitch the book together.


Here's my finished book for the Scrappy Journal Challenge. I love that zigzag binding and the collage is growing on me. It measures 4" x 9".

And here's a look at the inside. One of the perks of being on the Design Team was free access to custom designed pdf "Printables" so we could print lines, dots, dashed lines, and/or banner checklist pages for our signatures. I chose a mix of the banner checklist, lines, and dots. We'll see how well I like the way I distributed them when I start using this.

Teacher Ali's Version of Scrappy Journal

Our teacher is all about using up what you have this year rather than keep buying new things. This challenge is a perfect example of that, with her giving lots of options for the supplies needed. If you think you might be interested in participating in the challenge which will run the second week in March, everything you need to know about the challenge is on the site here, along with link to sign up and a special earlybird price if you sign up before February 26th. Come join the fun!


Tuesday, February 06, 2024

Unbelievable!

I don't know about you, but I find myself filling out surveys and questionnaires and leaving my e-mail here and there in the hopes that I will win whatever free offer I decide I wouldn't mind having. I remain optimistic that surely one day I will win something, but I never do, or so rarely I can't remember the last time that spending time doing this rewarded me with a prize. I've slowed down considerably lately - all these clicks and comments eat up time I should be spending elsewhere, and I very nearly jettisoned a recent survey from the Stella Lighting Company which makes lamps somewhat like the Ott lights I've used for years. For the record, I have a small portable task lamp, a floor lamp, two architect lamps with Ott daylight bulbs and I've also replaced the bulbs in my studio overhead fixture with Ott daylight bulbs.  I'd decided that while I didn't need another task lamp with daylight bulb in my life, I'd keep on Stella's e-mail list just in case. So hovering over the delete button, I paused and decided, oh let's just do it. Five minutes of my life in exchange for the chance of being one of three randomly chosen people to receive one of their lamps. Imagine my surprise when the email came announcing I'd won a lamp, a Stella Two, what color would you like? So suspicious was I that this was some scam that I spent some time over on their website to confirm that this e-mail was real and wasn't asking for any info other than where to send the lamp. It arrived last week and it is a wonder, doing much more than my Ott task light does and worth over $200. Go check it out here for all its features as well as other styles available. I'm thinking it might replace the architect lamp over my ironing board - places where it bends to adjust height and angle no longer tighten for a firm hold.

On the organizing side, I've made little progress in the studio, so hard to face those piles and decide what to do with them. However, I spotted this little basket out in my garage and realized I could use it to corral some of my tools specific to bookbinding rather than having to hunt for them on the work table or in the bin where I have a lot of bookbinding supplies. I already use a tall cup for shears and glue brushes and other taller items. Needles are another thing that I'm always searching for in that bin - besides the straight bookbinding ones, I have some curved ones used on specific bindings. But it's always an irritating sorting through other things to get to them. A long time ago a made some small zippered pouches in several sizes, all given away except the one you see in the photo. I checked to see if the needles would fit and they do. The pouch will go in the bin but at least all the needles will be in one place inside it.
 
Such a small step but it made me feel so good! What small thing have you accomplished lately that felt big once done?

Monday, January 29, 2024

Another Gratitude Journal

I put the finishing touches on this gratitude journal and got it into the hands of a friend last week so now I can share it with you. I'd shown you here how I backed the gift wrap for the pockets and covers by using Cling Wrap between the gift wrap and rice paper backing and a hot iron. The Cling Wrap melts a bit to stick the two layers together, but when I trimmed up a smaller piece where cling wrap and rice paper extended past the gift wrap, I discovered that the Cling wrap peels right off the paper. Sooo, not a permanent solution at all, but I think it will hold well enough in this application. If I back gift wrap again, I'll do so with something more permanent like fusible web, provided it doesn't cause any wrinkling.

I'd pulled this beautiful gift wrap from National Wildlife Federation along with the William Morris gift wrap, not sure which I would use on the first gratitude journal. William Morris won out and I couldn't part with the finished book. That's ok because I felt this NWF paper more suited to my friend. When looking for ribbon for the closure of my book, I found this yellow ribbon as well, which I decided was perfect for this second book. But my choice of waxed linen thread on hand was pretty dull next to this paper so I found this yellow orange online. It could have been a brighter yellow but I didn't see anything better anywhere I looked.

I made this reading through directions I'd printed out, only referencing the videos a few times. Got a little cocky when I sewed the back cover on when, in my haste, I kept reading "link stitch" as "kettle stitch" for some reason, probably because the kettle stitch was the stitch before. So I'm short a "chain" on that last row of stitches but otherwise, the cover is attached well.

Didn't really have gift paper for the end papers (didn't want to use more of the cover paper) and in scrounging around my small stash of papers, I came across this paste paper I received from Sylvia Weir after I'd commented on her blog post showing her experiments with making it. It sort of looks like wavy water which I decided fit with the pocket gift wrap.

I chose some scenes from old calendars for the signature wraps. Not intended but I realized they could be seen representing the 4 seasons so I arranged the signatures in order of spring to winter. This one would be summer. An inspirational quote printed on presentation paper is slipped into the pocket.

I glued this message on the title page so she would have no doubt what this book was for.

I painted borders on some of the pages like I did in my own journal. It's such a nice touch, especially when coordinated with a magazine page inserted between signature pages.

I also used washi tape again to create borders. The tape is so old it doesn't want to peel off the roll without tearing. But I remembered a trick to help remove masking tape without affecting the surface it is being pulled away from: warm it with a heat tool or hair dryer. It did the trick.

Some of the things I tried attaching didn't stick particularly well around the edges so I bordered them with washi tape to hold them in place.

I was doing my best to cover the back side of those calendar pictures - more washi tape holding a card in place and some stickers.

One last washi tape-bordered card. The book was very well received which I was sure it would be. But you never know, so I was more than pleased at my friend's response. She said what I included in the book was indeed inspirational and she was immediately planning what would go inside. So while she starts on her gratitude journal, I continue to add things to my own. So much to be grateful for, so many little things worth preserving in it.

Tuesday, January 23, 2024

Studio Organizing Kick Start

I did get the latest gratitude journal sewn together last week but got delayed in adding finishing touches because I had this coupon from my landlord for a free rug cleaning and it was due to expire by the end of the month. I'd opted not to use it in December (who wants the uproar of a rug cleaning during the holidays, except I understand many companies are swamped with requests as people ready for company and parties - not me), then our weather took that deep dive temperature wise this month, and I knew the cleaners would have to leave the front door partially open while they worked. So last week we finally started rising above zero and I figured I'd better call and get my rug cleaning scheduled. Honestly, I thought they might not have an opening before my coupon expired. Instead, they could come the next day (NO!) or the following day (Okay!) and the rush was on to get things up off the floor and a few pieces of furniture moved throughout the house. Finishing the gratitude journal would have to wait.

I nearly opted for them not to clean in my studio; it doesn't get the same amount of foot traffic as the rest of the house and as I've mentioned before, so many things end up piled on the floor for various reasons. My worktable was already covered, so where was I going to put all those things that needed picking up? I started by clearing things from the door back to where I have small tables for printer and laptop. Here's how it looked after removing bags and boxes from either side of this space.

Thank goodness this room has the adjoining bathroom where these things could be moved to, along with chairs and the laptop table.

Then there was the small stack of fat quarter handdyes and Stonehedge fabric I didn't want to fold so laid on the floor between worktable and storage cabinets along the outer wall. Also another stack of projects I'd laid out in the space behind where I sit at my main sewing machine with the idea that they would be handy to work on - I remember my logic in a past organizing scheme, but they just sat and started getting covered up by things from my bookmaking projects and other small bins I'd worked from and not returned to their place in the closet. Honestly, as I started picking through them, some seemed like ancient history and maybe not applicable anymore, plus I also found more hand-dyed fat quarters with no idea why they had ended up on the bottom of this stack. Where to quickly put all this to clear that space seen above for cleaning?

Here's where - on my ironing board. It already had things on it and I had no intention of folding it down. I decided they could work around it.

Well, kinda work around it. The cleaner immediately recognized that this room was a studio (his girlfriend makes upcycled art for sale) and said he'd be very careful going around all that was still under the worktable as well as this pile in front of the closet doors. I have two long skinny baskets of fat quarters that always sit there and I just piled the other bags and stacks on top of them. Turns out he decided to move the ironing board but did so without a thing out of place.

I have to say, all that lifting, pulling, shoving and bending over picking up things left me with sore arm muscles, stiff back of legs and a general achyness all over which took several days to recover from but to my surprise, absolutely no back pain! I guess I've arrived at a new level of post surgery healing and it is great to know. The rest of the house is put back in order, a few organizing things attended to along the way, but I'm not looking forward to figuring out how to organize the mess of my studio, although a few things have been sorted. After all, it got in this state due to my inability to make decisions and procrastination about putting things back where they belong. But I will have to if I plan on getting any work done in there. I did finish up the gratitude journal yesterday, but my next project may be a baby quilt, and you can see I can't work on that or "create any other pretty things" until real progress is made on this unexpected kick start to getting things organized. 

Monday, January 15, 2024

Busy & Cold!

Hope the above does not offend anyone, but when I came across Dorothy Parker's short poem, I had to laugh. Oh yes, exactly how I feel as I find myself in denial, listening to talk of MLK day coming up and thinking, surely that isn't THIS Monday. But it is and we are at the mid-point of January already, leaving me wondering how did that happen. Well, keep on making organizational and project progress!

And I have, though I have no photos yet to prove it. I'm continuing work on another gratitude journal, this a belated Christmas present, and just like the one I made for myself, I am having great fun with it. And as I work and also move around my house, I am remembering a couple of key things about organizing. Most importantly, you don't have to do it all at once. Even dealing with a single item out of place RIGHT NOW rather than throwing it back on a pile for later is progress making me feel better. More and more is slowly being put right. And as I looked for magazine pages to use in the signatures, I got through two past issues of quilting magazines that I'd set on the end of the worktable until I felt I had time to go through them and pull any articles or pictures worth saving. Now there are two off my table and ready to go to the library where they have a magazine exchange section.

I'm still feeling pretty invigorated and diving into my studio with more energy and direction than I've felt for quite awhile. Could it be the ultra cold weather we've been experiencing? Like much of the country, we have been affected by that Arctic Blast. Thursday I hustled between snow squalls to pick up meds, groceries and a battery for the garage door opener and do a quick shovel of my short sidewalk to the front steps as that very day the temps were predicted to drop from high 20's towards single digits. And indeed, by Friday we were in the negatives, windchills leaving no doubt that my daily walks would be on hold. For two days we did not get above zero with our lowest low being around -18, but yesterday and today our high has been 8 degrees and the lows have been edging closer to zero. The forecast shows a steady rise in temperature the rest of the week but also a storm coming in tomorrow night or Wednesday that may dump up to a foot of snow on us. Well, it IS winter in the Pacific Northwest, and I have to admit, the super cold but sunny days have brought me a bit alive! And more snow? Just gives me more excuse to stay inside to work in the studio and knit in the evening.

How's the weather in your neck of the woods?

Tuesday, January 09, 2024

One and (Not) Done

I started last week with unusual vigor, and when I sat down to do my usual checks on the internet, I instead found myself pulling things out of the center cubby of my roll top desk. There are smaller cubbies on either side that are fine in terms of being organized, but this larger one is where I tend to toss papers I think I will want to reference soon or just don't know what to do with yet. It always gets totally out of hand and gets searched through throughout the year without ever really doing anything about the pile. Not this day. Out came everything, including 2 years' worth of Christmas cards (I always hold some back thinking I will answer them before the next Christmas rolls around but rarely do), a paper clipped group of recipes from magazines (I have no idea why I put them there), and various papers that could either be filed or tossed. In the process, the fountain pen I'd been looking for I think 2 years emerged; I must have tossed it up there with something too and it had rolled to the back and down near the bottom of the stack. I know I looked for it several times in that cubby, lifting up papers from the front but probably just burying it further. Anyway, excited to have it back. Then I attacked the corner of the writing area where I had let those insurance "explanation of benefits", prescription labels and paid medical statements pile up, waiting for me to match them up and file them. Well look at that - a clean desk and my first organizing of the year done.

Also one and (not) done, the first sock of the pair from the grey wool. I actually knitted into the wee hours of New Year's Day to finish them, only to find the instructions for binding off merely saying to do it with a sewn bind off. A sewn bind off? What is that? While these directions did include illustrations of how to cast on and decrease/increase, it assumed I'd know how to do a sewn bind off. Luckily, when I first got interested in knitting socks, I invested in a book that absolutely has everything you need to know about knitting socks, all the different methods and stitches, and then patterns to try them out. I did a quick check and yes, it had instructions for a sewn bind off, but it was way to late for me to absorb the method. Another day, a study of the method, and I quickly finished off this first sock. It really is an easy and nifty bind off for the top of a ribbed sock. Speaking of ribs, I realize that the sock looks a little weird, but that's the 2 x 2 ribbing which stretches out when on the foot, keeping them snug all the way up past the ankle without being too tight. That bodes well for the knee high version which I just may try. It's a good fit though maybe a tad long heel to toe, but I think blocking will made it all better. I've started on sock two, having the same struggle with that different cast-on and the first few inches of increases. I may have done a better job than on the first sock which has a curious lump of knitting under the middle toes and a few holes I need to sew up. Anxious to get past the increases and on to the ribbing pattern.

Do you remember the Celtic Weave handmade book from August? I intended to add a few things to the pages before gifting it to my niece who has been researching her Irish heritage and making a few sojourns to Ireland. Plenty of time, I told myself as I set it aside to work on other things. And then not plenty of time as I realized it would be a Christmas gift and Christmas was almost here. So that week before Christmas, I got busy, cutting out the stained glass images of a Celtic design that repeatedly showed up in catalogs. I'd been tossing them in the bin of ephemera for art journaling/mixed media and now they had a home. The signature papers are off-white while the Celtic design had a white background, so I used an X-acto knife to cut away the white within the design. I've been wanting to try the Artist-tac adhesive that is especially made for open designs like lace or doilies; instead of a solid sheet of adhesive, it has dots of adhesive. Here's the video where I found out about this product and shows it in action as well as Art Graf's Double tack which I used to adhere a large print out instead of glue so there'd be no wrinkling. Both product worked great.

The book has 8 inner signatures and I had just enough of these Celtic designs to place one on the first page of each of those signatures.

I also wanted to add a couple of Irish Blessings and decided to invest in a wood stencil designed for drawing evenly spaced lines on a page. Oh, where have you been all my life? I found this one on Etsy and decided that even though a little more expensive than some of the plastic ones for sale, it would be worth it and I think I was right. Here I've drawn the lines in pencil and they were erased after I finished writing. The finished book is now in the hands of my niece and she is delighted with it. Call that a finish for 2023. On to 2024 projects whatever they may be!

Monday, January 01, 2024

Into A New Year

Time once again to reveal my resolution word for the new year. I often have ideas pop into my head in advance of the end of one year and beginning of the next, but this year I was drawing a blank, no inspiration hitting me. But at last I had a thought, and the thought became something I warmed to. And I decided, this is it: my resolution word for 2024 will be "ORGANIZE". I'm generally quite the organizer but I've fallen off the wagon for too long. One look in my studio will tell you how badly I need to get that space organized again, but it is not the only space in my house needing attention. Also, my computer, full of photos that need sorting and/or deleting, saves to read later, things to print out. I need to get back to making lists too, short term and long term things and projects to complete, and I know that will help me stay more organized. I think I have a big job ahead of me but I am very ready to have a less clutter space everywhere, with organizing keeping me on track. Because you know, I still have so much to finish and no end to new things I want to try.

Speaking of new things, I have a confession to make. I've definitely been bitten by the knitting bug again, and have been spending a lot of time poring over patterns I have and downloading new free patterns to print out. I'd gotten out my stash of yarns, thinking to match what I had to patterns at hand, so that once that pair of socks is done, I can dive into the next project and start using up yarn. As I went through the bags, I was reminded of the mill end wool yarns I used to get at a yarn shop in town and wondering if they still carried them now that the shop had changed hands. The owner must have ESP because shortly after that, she posted that they had just gotten in a new shipment and showed a picture of them hanging on the wall. It was too much for me to resist, although I kept telling myself I did NOT need more yarn. But yarn is like quilting fabric, and one buys it even if one doesn't need it, because it is beautiful, and in this case quite a deal - just $4.50 per 190 yd skein. Be still my heart, as I focused on a lavender one. Against my better judgement, I stopped by, and not only bought all of the lavender yarn, but also the beautiful blue yarn right next to it. So there is my big bag of yarn, with enough there for a couple of sweaters. I already have it paired with patterns and am way too excited about getting started on them.

So that's how I'm starting off 2024 - with high hopes to get organized and way too much yarn for evening knitting! How about you? Have you done any reflecting on how 2023 went for you? Any plans or resolutions for the new year? Calm has a Facebook page where they post meditative and well, calming things, and I thought this offering might be good to work through; maybe you will too. Let's have a great New Year!


*********************************************************

For previous year's resolution words, see these posts:

2008 - Freedom
2009 - Calm
2010 - Focus
2011 - Refocus
2013 - Perseverance
2014 - Explore
2015 - Fearless
2016 - Light
2017 - Endure 
2018 - Refresh
2019 - Wing It!  
2020 - Go! 
2021 - Finish 
2022 - More 
2023 - Continue