One of the things I wanted to incorporate into my Changing Perspective piece was leaves produced from scans of oak and maple leaves I've collected over the years. Ok, so it would have been much easier to cut shapes from hand-dyed or batik fabrics, or even fussy-cut leaves from commercial fabrics, but my stubborn streak insisted I try to use real leaves. My other goal was to figure out a way to float the leaves off the surface of the quilt, requiring them to have a certain stiffness. If I printed my images directly onto fabric, I figured fusing them to another fabric would do the trick and eliminate the need to finish the edges. But as I've mentioned, I've not had good luck printing on fabric, so my mind was considering other options. I discovered I had two different types of photo transfer paper, the iron on types that normally leave the fabric in an undesirable state - stiff and hard to sew through. Well, in this case, I would not be needing to sew through my piece AND stiffness was what I was looking for. Plus, I knew these sheets would run through my printer without incident and would give me better detail than I could probably get on fabric anyway. It was a place to start and as it turned out, where I ended my experiment as well.
 I got exactly the results I expected using the ink jet printer iron-on transfers by Hammermill Papers. My scans were not terribly bright since the leaves had been dry for so long, but by upping the saturation in my printer settings, the printed colors became a bit richer. Not easy to see from these pictures. There was a real difference, though, between ironing them to a white fabric and a colored fabric. I thought to eliminate the need of fusing to a second fabric by ironing the transfer to a batik that would mimic the underside of the leaf. As you can see, the transfer is much darker and the detail does not show up as well. I can also see some shadowing through of the pattern in the batik.
 Here are more leaves printed on white fabric. I added the colored background to the oak leaf scan thinking it would help when I cut out the individual leaves, but I'm not sure it made any difference. I did note however, that the color changed once it was transferred on. I used more of a peach on another leaf and it became quite a bit darker and peachier whereas this tan turned a yellowish green. Yet the leaf colors seemed not to change at all. No clue there.
The other transfer paper I had on hand was Quiltmakers Photo Transfer Paper for color copiers. I've had this a really long time so I don't even know if it is made anymore. And based on the length of time I've had it, I decided it was reasonable to assume my chances of actually preparing photos and taking them to a color copy shop for them to print on this paper was probably pretty slim, so I may as well experiment with it here at home. Yes, I know that color copier and ink jet printer technologies are different but I was curious to see what would happen and figured there was nothing that could happen to hurt my printer. The results were pretty interesting. The ink merely puddled on the surface of the paper. Detail was lost, but texture was created. Here is a picture comparing how the two transfer papers looked after printing (and before transferring to fabric); the oak leaf on the bottom is the one on the color copier transfer paper:

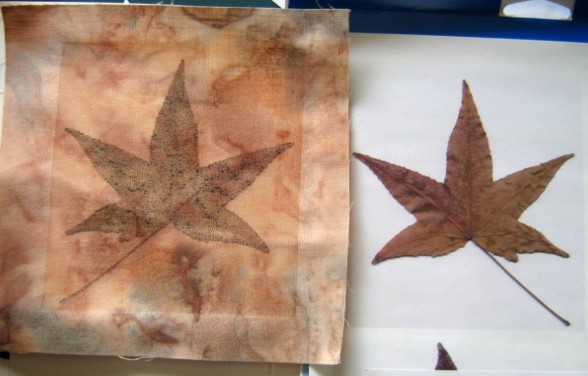
After a week, the ink still had not dried completely so any touching smudged the image. That made the transfer tricky, but I liked the end results. The other major difference in the two transfer mediums is the color copier one is not as heavy and stiff and the surface is smoother as well. I haven't tried sewing through it yet, but I imagine it would be less of a problem than with traditional iron-on transfers. I'm guessing details would also be much sharper, so if I seriously wanted to transfer a photo to fabric for use in a quilt, I think I would make the effort to get myself to that color copy shop. Here is the transferred leaf on the left with comparison to the inkjet transfer on the right:

One other technical note: Thank goodness I was thinking straight when I went to fuse the transferred leaf to a second backing fabric. I placed it face down on a teflon sheet, then added Steam-a-Seam 2 lite and the backing fabric. Using a medium setting on the iron was enough to complete the fusing, but had I not protected the ironing surface with the teflon sheet, I think I would have re-transferred my leaf to another surface. As it was, the transfer peeled right off without damage. I trimmed away the background from around the leaf and ended up with sealed edges and a leaf ready to mount on my quilt.
The other transfer paper I had on hand was Quiltmakers Photo Transfer Paper for color copiers. I've had this a really long time so I don't even know if it is made anymore. And based on the length of time I've had it, I decided it was reasonable to assume my chances of actually preparing photos and taking them to a color copy shop for them to print on this paper was probably pretty slim, so I may as well experiment with it here at home. Yes, I know that color copier and ink jet printer technologies are different but I was curious to see what would happen and figured there was nothing that could happen to hurt my printer. The results were pretty interesting. The ink merely puddled on the surface of the paper. Detail was lost, but texture was created. Here is a picture comparing how the two transfer papers looked after printing (and before transferring to fabric); the oak leaf on the bottom is the one on the color copier transfer paper:
After a week, the ink still had not dried completely so any touching smudged the image. That made the transfer tricky, but I liked the end results. The other major difference in the two transfer mediums is the color copier one is not as heavy and stiff and the surface is smoother as well. I haven't tried sewing through it yet, but I imagine it would be less of a problem than with traditional iron-on transfers. I'm guessing details would also be much sharper, so if I seriously wanted to transfer a photo to fabric for use in a quilt, I think I would make the effort to get myself to that color copy shop. Here is the transferred leaf on the left with comparison to the inkjet transfer on the right:
One other technical note: Thank goodness I was thinking straight when I went to fuse the transferred leaf to a second backing fabric. I placed it face down on a teflon sheet, then added Steam-a-Seam 2 lite and the backing fabric. Using a medium setting on the iron was enough to complete the fusing, but had I not protected the ironing surface with the teflon sheet, I think I would have re-transferred my leaf to another surface. As it was, the transfer peeled right off without damage. I trimmed away the background from around the leaf and ended up with sealed edges and a leaf ready to mount on my quilt.
No comments:
Post a Comment