Saturday, May 28, 2022

My Gardening Efforts

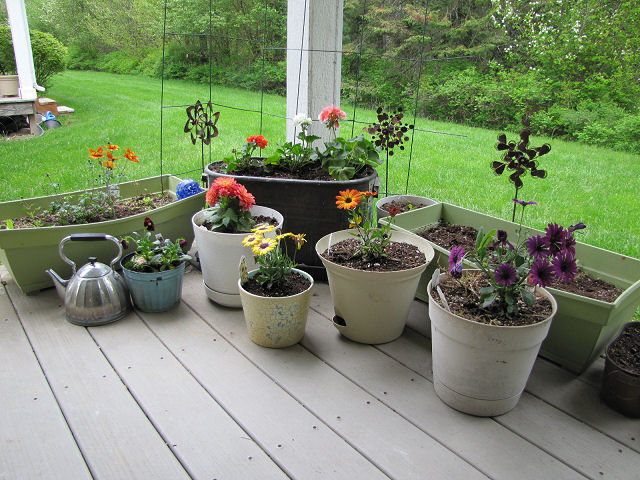
I promised to show you how I potted and arranged those plants that were huddling in the corner of my deck. It will look better once things fill out, the plants that wintered over have revived and started blooming and perhaps the few seeds I planted germinate as well. Let me tell you, it is a much better "after" view than the "before" view of dead plants and empty pots! If you look closely in the upper right hand corner, you will see that the syringa are doing their part too, having recently started to bloom all along the greenbelt behind our street of duplexes.

I was really drawn to yellow and orange blooms this year for some reason, but was sure to add this purple colorway to the orange one I picked out. I realized I was picking flowers like I used to pick fabric - if I couldn't decide which colorway I liked best, I'd buy some of each.

Here's the orange colorway along with this pretty yellow flower tinged with pink. Almost out of view in the upper left is a dahlia. I've never had dahlias before but know they come in so many varieties and colors. I hope this one does well in its pot. Could have bought different colorways of this one too but I only have so many pots on my deck! In the upper right is the pot holding a purple perennial whose name eludes me at the moment which is slowly re-emerging. Out of view on the left is a robust pansy which I hope does better than pansies I've had in the past. They seemed to be prone to mildew and bugs but this one looks much hardier. I have to try because pansies are a special  link to my mother and her mother who, I was told, always said pansies looked like little faces smiling up at you.

This is perhaps my favorite pick of the lot. It was a last minute grab after I thought I had the requisite number of new plants for my pots. It's called funny honey for some reason and because it seemed to have a spreading nature, it has gone in one of my long pots where I'm having a bit of trouble establishing anything perennial. I almost put it back, realizing how heavy on the orange/yellow I'd gone, but just couldn't resist.

I also have a big pot by my front steps that I've never been able to get to look like other people's large front step pots along my street which overflow with greenery and blooms. I just end up with a few blooms barely peaking over the edge. I truly am not much of a gardener, pretty much failing at every residence I've lived at to groom lush gardens. I love roses and tried them at several places only to have them go nowhere and be aphid gatherers. I've planted hundreds of bulbs over the years, never seeing more than widely spaced results in spring. Never could get foundation plantings to shield foundations with greenery and blooms. When we moved to Wisconsin, I swore off gardening, save to continue planting geraniums each year in that big copper tub - the one thing I have success with. So what to try this year? To my surprise, I brought home some double pentunias, a surprise because I have never cared for petunias, mainly because of the sticky secretions coming off them. But this pink double caught my eye and I thought maybe, maybe it could give me a better result.

I went back and got two more so the pot would be fuller with them. I'm hoping they will literally rise to the occasion.

And because they are giving me as much joy as the newly potted blooms on the deck, I share with you some closer shots of those wild syringas.


Tuesday, May 24, 2022

A Challenge Story

Here's a story for you - my quilts all seem to have stories behind them. This is a picture of the couch I said the mystery quilt I just mended goes with. Not a very good photo of the upholstery which really does have more green in it but it's the pattern that's important here. It was the inspiration for a quilt I made for a local quilt show challenge when I was living in Brodhead, WI. The theme of the challenge was Seminole, and I'd pondered ever since we'd gotten this couch about replicating that pattern in a quilt. But how to piece something so intricate? I hadn't been seriously quilting all that long, hadn't built up a large arsenal of techniques, and sat at the kitchen table with paper and pencil trying to work it out, about to give up.

And then my husband walked by, paused to observe, then said as he continued on by, "Naw, you'll never be able to work it out." Well, that was the goading I needed (as he well knew as well as he knew that I COULD figure it out) - challenge on! I used the challenge fabric in that center motif, a packet of gradated green Cherrywood Handdyes, and a few other fabrics from my stash. Not quite sure how I managed the math working out the strips that I did piece using Seminole piecing but I obviously did. It's not an exact replica but captures most of the upholstery design.

Look at those tiny pieces!

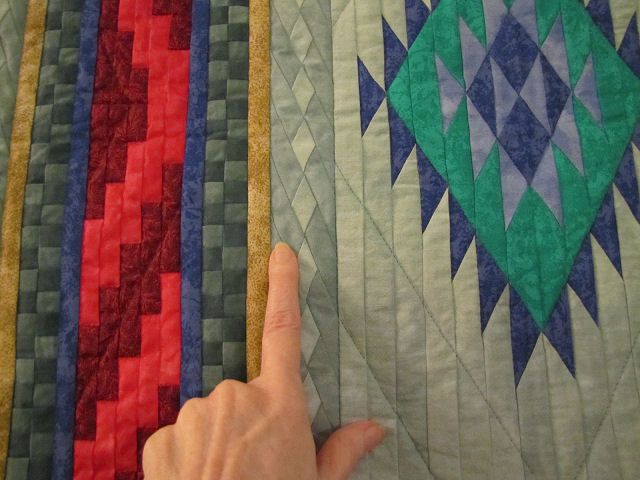
But that center motif - I just could see how it could be pieced using a Seminole piecing method. Instead, I used a modified version of Cynthia England's freezer paper template piecing method. There's even one template I missed removing - you can hear it crinkle when you press your finger on that place. I haven't had this quilt hanging in the livingroom for years though I've thought of it often, wanting it sharing space with the couch. I've finally dug it out to hang in the spot where I rotate quilts in and out. So wonderful to still love a piece this old (1996) and marvel at how I did it. I'm losing my patience for such fiddly work!

Sunday, May 22, 2022

The In Between Time

This week found me not quite knowing what to do with myself. I'd recently seen something about this phenomenon fairly common among artists. You make the big push to finish a project, setting all else aside, and then once done, you sigh with satisfaction but realize you hadn't thought about what the next project would be. You wander about, trying to remember what else you had in mind, whether it be a new piece of art or a bit of neglected housework. The driving goal that had kept you moving is gone and you've yet to decide on the next one, leaving you a bit uneasy in this in between time. Doesn't matter if your to do list is long or short, it can take a few days to find your bearings and get back to work. That's where I found myself and this is how I got myself going again, getting these plants that had been huddling in the corner of the covered deck until our nights quit dipping below freezing into their planters. Pictures of the final arrangement to come.

Then it was a ponder as to what my next "finish more" project would be. That set me on spin cycle so I decided to finish filling out the documentation sheet for the fat quarter quilt. That led to getting out those pieced sections that I figured were my step by step samples for making the blocks when I taught the class. Sure enough, when I laid them out, they will make a complete block when sewn together. And then what will I do with it? At least it will be out of the book.

"Pennsylvania Eye Popper"

I sensed what I needed to do next before diving into another quilt project was something I'd been putting off: mending the quilting on a quilt I use all the time while I am sitting or napping on my couch. I completed this mystery quilt in 2000 and when I showed it to the group of ladies I sewed with at the time, they oohed and aahed and said "You're NOT going to USE it, ARE you?"Well, yes, actually. The colors matched my couch, it didn't have expensive fabric in it, and I really liked the pattern that unfolded as I worked through the mystery quilt directions.

Look closely to spot the line of loose invisible thread in the center of the picture

So 22 years and several washes later after nearly daily use, it's not surprising that the quilt is showing some wear. I'd noticed lately that when I slid my had down to grab a piece of it to pull up over my lap or shoulders, a finger or two would slide right under a loop of stitching that had come loose. As time went on, I realized this wasn't just one bit of stitching, but quite a few places that had come loose. I'd used invisible thread on the top and cotton thread in the bobbin and I suppose that invisible thread was the culprit, wearing through the cotton thread. 

A strand of broken cotton thread on the back. I bought 2 colorways of that fabric!

I realized the sleeve on the back was coming loose as well, to the point that I finally took all the stitching out, never planning to hang it for display again. (Can you believe this got an Honorable Mention at the Ashville Quilt Competition?) Oh, I was NOT looking forward to fixing this, having worked on a different quilt whose stitches had broken for entirely different reasons. But time to bite the bullet while I still had the ironing board next to the sewing machine to rest it on as I sewed.

One of the longer failed stretches between the arrows. You can just make out the invisible thread looped over my finger.

I thought I'd found all the loops of invisible thread where I needed to sew new stitches and was a bit surprised to find that all of the stitches that had failed were the stitch in the ditch ones. All of the free motion stitching seems fine. Back over my legs that night, I purposely ran my hand over the entire quilt and found many more places needing mending. I tied yarn around the loops so I could easily find them when this went back under the needle. The failed stitching could be as short as an inch or as long as four. But I think I finally found them all and snipped off those loops on top. As always, click on any photo for a larger view.

I kept thinking, this is really something. I can't think of another quilt I own and have used that I've had to repair because of wear. Granted, this is some of the first cotton fabric I purchased for quilting before quilt shops with quality fabric became a thing and picked for this project because of that, in case I ended up not liking the pattern when the mystery was revealed. I even found one spot where there's almost a hole worn through one spot. I still have pieces of all of these fabrics so I could even patch it if it came to that. And I can't imagine replacing it with something new. This is my ultimate comfort quilt that I don't have to worry about being careful with. 

Also really something, my studio appears to have swallowed another tool. The curve-tipped scissors I keep by my machine for snipping threads close to the fabric were nowhere to be found when I sat down to repair this. Again, I've tried to retrace my steps, pretty sure the last time I used them was when I was burying those last thread tails on the fat quarter quilt, and have looked in all logical and illogical places to no avail. Again, I worry they fell into the wastebasket and went out with the trash. But if I stop looking, I suppose they will magically appear, just like that favorite screwdriver.

Saturday, May 14, 2022

A Name and More Shrinkage

Forgive the uneven lighting

Here it is on my bed - my fabulous fat quarter quilt nearly 20 years in the making! Yes, not much of an overhang but that's not an issue for me. I was just pleased that it dropped over the edges of the bed at the border.

It took an overnight soak in 20 Mule Team Borax and two washes with hour-long rinse cycle soaks with vinegar added to finally get all the cigarette smoke odor out. But I think I did. Didn't put it in the dryer though as one internet suggestion warned against it. Instead, I spread it out in the livingroom to airdry with a fan moving air over it. Here's the back showing the two reproduction fabrics on either side of the Dutch reproduction border fabric - I love it as much as the front!

I'd forgotten that when quilting the main part of the top, I'd left a lot of tails in the back to bury. I found most of them before the wash but found several more afterward. It's like this quilt refuses to be fully finished.

After I'd done this overall paisley quilting as an experiment, I was disappointed in it and wished I'd just quilted like I normally do - lots of stitching in the ditch and straight lines. And it bothers me a bit that changing bobbin thread to match the backing as I moved over the dark strips at the sides was not a practical option.

However, when I got it out again to quilt the border, I was surprised to now kind of like it. I was reminded of what Angela Walters always says about not worrying if you make mistakes or your stitches aren't even because when done, all you'll see is the beautiful texture. She's turning me into a believer. And goodness, can you actually see that tiny sliver of piping in the binding? Not sure what I was thinking to make it so narrow (maybe the widest I could do with the fabric left?). It's almost a conversation piece and I'm playing in my head what my descendants will make of it - lol. Certainly not necessary but all the same, a nice little accent.

All that was left now was to ink in a little information on the back. (Boy am I glad I don't have to sew a sleeve on!) I've been calling this my fat quarter quilt because its true name picked so many years ago is so very long. The original pattern was called "Hot Apple Cider" no doubt because of it cider-colored palette. But my palette reminded me of something else so I decided to call it "Blueberry Jam and Toast . . . With Eggs Over Easy!" I always use a Pigma Micron Pen when writing on fabric which is not always easy, the felt nibs catching in the weave. I've been seeing a lot about Pigma's newish PN pens - same permanent archival ink but with a plastic nib (thus the PN designation), so picked one up on a recent trip to Michael's. Oh My Goodness! It glides right over the fabric and leaves a beautiful line of ink.

Wool batting sample hand quilted on left, machine quilted on right

I'd measured this quilt before binding in order to estimate the amount of binding I would need and it measured 87" x 69" which was a little bit of a surprise. Before quilting it had measured 89-1/2" x 71, and while I am used to a quilt shrinking up a bit from quilting, this was more than usual, no doubt because of the density of the quilting. But since it has been so long since I've finished a piece that would be washed, I totally forgot about the additional shrinkage from the batting, and I lost a lot. Now my quilt measured 83 x 67-1/2. At one point in my traditional quilting journey, I got into making batting samples per Harriet Hargrave, the ultimate source for all things technical and otherwise having to do with batting. Few surprises, she offered, if you've taken the time to do a batting sample which among other things, will tell you how much shrinkage to expect when washed. I divided my samples in half, machine stitching on one side and hand stitching on the other (because it makes a difference sometimes in how much is drawn in). Out of curiosity, I dug out the one I did for the Hobbs Wool Batting I used in this quilt (above).

Total shrinkage of this sample: 6.5 - 7%

On the back side you record all the pertinent information: type of batting, type of fabric, if anything has been prewashed, starting size, size after quilting and size after washing. And there it is, a really high percentage of shrinkage with this wool batting (most cotton battings run around 3%). On a smaller piece it might not matter, but if you are planning a quilt for a bed that drops a certain amount over the sides, you'd do well to know how much shrinkage to expect and figure dimensions accordingly. You can lose 3 to 7 inches before you know it.

Over the years, I've settled into using pretty much the same few battings that give the different looks I want and that I am so familiar with how they behave so I haven't made a batting sample in a long time. I still have my stack of samples from when I was trying almost everything that was out there, and every now and then, pull them out for reference if I need a reminder of how a particular batting looks and drapes when quilted. Would I spend the time to make up a sample if I find a new batting to try? I should but I'd probably just sandwich up that quilt and hope for the best!

Sunday, May 08, 2022

A Little Spring, A Little Binding

Spring is finally ramping up although the temps are still cool and overnight it is still in the 30's. Still, that hasn't stopped the birches behind my place from doing their spring thing (above), neighborhood trees from blossoming and daffodils and hyacinths from bursting forth around the building where I went to early vote. It is all very uplifting.

Also uplifting is getting that binding on my fat quarter quilt. Here's a trick I picked up a long time ago, don't remember where, but I find it an excellent way to keep those long lengths of binding from getting tangled as you add them if, like me, you don't pin the binding on before starting to sew. You just fold the binding accordion style and thread the folds onto a large safety pin. This sits in your lap as you apply the binding, and as you need more, you just remove one fold from the safety pin.

As I turned the sewn-on binding to the back and pinned, I could view how evenly that bit of piping/flange showed. Not perfect, a few places where it is narrower than in others, but overall I am quite pleased, thinking "close enough for jazz." And I am also pleased with those corners where I lapped the piping rather than included them on the binding for a miter. If you click on the picture for a larger view, you can just make out the stitching along the binding seam which I did in a gold thread that matches the gold fabric well.

Doing the second thought thing, I wondered if I really should have done the piping between the border and the quilt top rather than in the binding. Nevertheless, it does give the edge a nice pop of color. Now for a good soak in vinegar and a wash. 

And since it's Mother's Day, and I've been back to scanning old slides, here's one from 1955 of little me being held by my mom, and her mother, my grandmother standing on the other side. My grandparents died when I was about 5 so I don't have many memories of them or photos either so this one feels very special.

Sunday, May 01, 2022

Piping or Flange?

I'd stopped by my local quilt shop to pick up some needles and got to chatting with the owner about this quilt and my tentativeness about adding the piping. She was quick to suggest that I merely needed to sew the piping to the binding so that the two could be applied to the quilt in one step. She took me over to a wall quilt on display to show me the flange that had been added in the binding. Yes, flange. She kept saying flange; I kept saying piping. Granted my piping which will show just 1/8th of an inch has no filling so may not technically be a piping, but the flange on this shop sample was very wide (more than a 1/4 inch less than a half?) so I could see why she kept referring to it as a flange. Couldn't resist a google and it appears that size may indeed be the difference between piping and flange, piping being narrow, flange being wide.

Be that as it may, I just couldn't bring myself to sew the piping to the binding first, mostly because of the bulk it might create at the mitered corners. I plan to machine sew the binding from the front after it has been turned to the back, and getting into those corners at the miters is tricky enough. But also because I don't trust myself to keep all layers even since so little of the piping will be showing. I guess it's another case of control for me. The piping is now machine basted in place and we'll see how evenly I can get that binding sewn over it.

Monday, April 25, 2022

A Little Embarrassing

A few weeks ago I got the word from the management company I rent from that there's a city ordinance requiring the flappers in toilets in rental properties to be replaced after a certain amount of time and our buildings had reached that magic number. So I was required to set up a time for the maintenance man to come by and do it to my three toilets, a quick repair, but one that made me realize I had some extra cleaning and picking up to do before he arrived. If you live alone, you understand how easy it is to let some housework slide and boy had I let it slide lately, what with the issues with my back. Plus two of the bathrooms are on the second floor with the stairs and landing having served as a dumping ground for things that needed to go upstairs or into the studio but not right away. Yeah, I even procrastinate on that and now I needed to make that stuff disappear to where it was intended. What's more, one of the upstairs bathrooms I don't really use as a bathroom since it is off the master bedroom which I use as a studio. I've delegated it for my paints and stamping supplies and boy, did I have stuff stacked all over the floor and on the toilet seat and tank where he needed to get in to work. While I've had years to hone my storage system for my quilting things, I've failed to get a handle on organizing these newer mixed media supplies. Thus, picking up and putting things out of sight in there was not unlike the archeological digs I encounter whenever I clear my work table. Oh...THAT'S where that went to. Hmm - forgot I saved those things. Oh yeah, here's something I set aside to be stenciled. And when I opened the cupboard under the sink to put away the organizer that holds among other things my paint brushes, I was dumbfounded to see a very large bottle of matte medium! I have no recollection of buying it, obviously, since I recently related to you how I gave in and bought some to try with my collage since everyone raves about it. Yeah, a little embarrassing!

Also a little embarrassing is the way I continue to drag my feet over finishing the fat quarter quilt. To be honest, I'm letting that piping intimidate me unnecessarily - not like the first time I've ever done it. But at least like the binding, it is pieced and pressed in half, ready to go. But the real foot dragging has been because of the terrible cigarette smoke smell that arose from the quilt after I dampened it in preparation for trimming. It had to go out into the garage to air for quite a bit before I could bring it back in and square it up. I'm still a little stumped about the smell, although I know it was picked up in that quilt shop where I taught the class so many years ago. The shop was next door to a bar, and even though the owner had air filters going, anything that stayed in that shop long soon picked up the smell. I know I washed all the fabrics before construction and no doubt used a little steam from the iron now and then when pressing that should have alerted me to any lingering smell. All I can figure is that it must have absorbed some of the odor while hanging in the shop, but not such that one would smell it until dampened. What a shock. Once I get the binding on, you can bet I'll be doing a deep soaking with vinegar and thorough washing before this goes on my bed.

Saturday, April 16, 2022

Easter Greetings

To those of you who celebrate, a blessed Easter. I also understand it's Ramadan and Passover, three major religions celebrating their individual major events at the same time (it doesn't happen that often). To everyone else, happy spring! Still doesn't look like spring in my neck of the woods (just south of us about an hour away they got up to a foot of snow the other day, and even more as you continue further south down the Idaho panhandle). But the arrival of these tulips from my niece, Vanessa, brought instant brightness to my days.

She sent chocolate too - how cute are these handcrafted hand-painted "eggs"? Worthy of the calories!

The tulips arrived just as this spring bouquet from my cousin Laura was starting to fade. I've been enjoying them for several weeks and they were the perfect tonic to my not quite winter not quite spring blues.

Wishing you beauty and brightness and the promise of hope and new life wherever you may be.

Saturday, April 09, 2022

An Unusual Approach

Monstera Delisioso by Heidi Jung - sumi ink & charcoal on Mylar on Panel

Don't have anything to show for the week save getting my taxes finalized and making my way through a few more of a backlog of magazines. A January/February 1921 issue of Artists Magazine introduced me to Heidi Jung, and I doubt I have to tell you why I am drawn to her work.

"When we meet a work of art, there’s something about that encounter that isn’t fixed in time, but rather, it unfixes time: the shaft opens. The past and present exist in the same moment, and we know, as beings, that we are connected. All the people who lived before us, all who will come after us, are connected in this moment." Ali Smith

I guess that is a little what happened to me as I paged through her work featured in the article "Giving Nature Her Due", unfortunately not available on line. And her interpretation of different plants, often without color, took my breath away. Doesn't happen all that often. But then I needed to know how she did it and found she is using sumi ink and charcoal on Mylar in a process that hearkens back to her earlier work developing film in a darkroom. If you check out her website, I suggest you look at "installations" under the Portfolio menu where you can see her art hanging in situ as well as in exhibitions. Then take a look at Gallery 1 for more of these sumi ink on Mylar works. She also does acrylic on panel which can be seen in the other Galleries - all ethereal and beautiful to my eyes.

Saturday, April 02, 2022

Exceptionalism Art Journal Spread

 
I think I'm done fiddling with this art journal spread. Here it is with the two things I used to help "blend" the collage elements and text: Inktense colored pencils and water soluble graphite pencil, two things I don't play with often enough. I'd been thinking a lot lately about the idea of "exceptionalism", and that while most would envy someone thought to be exceptional in some way, the person who is seen as exceptional often experiences an isolation not to be envied and difficult to break out of. Speaking from experience here although what I've noted people have thought exceptional about me is really not that exceptional.

And then I ran across an article in Smithsonian Magazine about Brunhilde of Wagner's Valkyrie fame and her sister-in-law Fredegund who were not just Norse legend but actual queens ("The Medieval Queens Whose Daring, Murderous Reigns Were Quickly Forgotten" January 2022 issue). As I read through their history and drank in that fabulous opening illustration, I had my beginnings of a spread on exceptionalism using two very strong women as examples. "A queen had to dodge assassins, and employ some of her own, while combating the open misogyny of her advisers and nobles—the early medieval equivalent of doing it all backwards and in heels." And ruling through a male relative. The yellow you see around Brunhild is Inktense pencil.

With Randy Newman's "It's Lonely At The Top" lyrics playing in my head, I built upon this idea of the exceptional being placed on a pedestal, either being adored or hated. Fredegund was in such a precarious position at the top; her predecessor was strangled after catching Fredegund,a slave girl, in bed with the King and going off in a huff. Ahh, palace life. By now strains of another song about popularity were coming to mind. These I inked in various open places on the spread.

I added these disapproving and one approving heads and used the water soluble graphite to outline them and then a damp paint brush to spread the graphite into a dark background cloud. "Some of them want to use you. Some of them want to be used by you."

A final touch - adding some small characters along the paths - the "little people" who take little notice of those above as they simply try to eke out an existence and hope the rulers don't do anything rash to upset it.

Either way, always a separation that is difficult to close. As for our queens after they died, "With their accomplishments cut from official histories, the queens took root in legends and myths," a different kind of exceptionalism but no less lonely I suspect. Do read the article; it is full of interesting twists and turns. 

.

Saturday, March 26, 2022

A Challenging Week

I had hoped to get farther along in the studio this week, but I have some ongoing health issues that make some days more challenging than others and some weeks just disappear altogether. I used to try to fight through these difficult days, refusing to succumb to them, but keep on working on my projects, but over time I've learned this is not always the best tact for either my body or my studio work. For example, I kept looking at those fabric strips meant for piping and didn't think I had it in me to deal with them. Each day I'd peek in at the fabric needing cutting into binding, think about the process of adding piping and said no, no, no, I don't have the energy to fuss with it. Turning those strips into fabric coiled baskets sounded more appealing. Then Friday I suddenly had a good day and the piping no longer looked so daunting as I lay it at the edge of the quilt and covered all but that 1/8th inch that would show next to the binding. I didn't get much at all done this week, but I did get my binding strips cut and found my resolve to add the piping. We'll see if that holds!

And then there are things that I simply get tired of looking at that are waiting for me to take the next step. Not to mention I'd like to clear these things off the table so I can square up my big quilt for binding. I'd been auditioning placement of some pieces on this art journal spread as well as looking for some additional things to add. It was time to trim everything and stick them down. As I used the X-acto knife to cut interior sections and small outer curves too difficult for scissors to do well, I mused about the first time I'd been introduced to this type of cutting. It was in the 6th grade and our teacher gave each of us a single edge razor blade with lots of threats about using it carefully as to NOT cut ourselves with it. I remember this so well; we were to cut out from black construction paper an old-fashioned train engine pulling cars which meant there were many windows to cut out as well as the spaces between spokes. I really took to the challenge and loved all that careful cutting. And I still do.

I also wanted to try using matte medium as the adhesive to stick down my pieces cut from magazines. Honestly, I've gotten a little tired of the ubiquitous suggestion of using matte medium as the cure-all for all your mixed media needs. So many actual glues on the market, many developed for specific uses, that it's almost irritating that few people mention them. Need to glue down a piece of paper? Do it with matte medium. Need to protect your collage or other piece of art? Slather matte medium over it. Need to adhere a button or piece of metal to a flat surface like a book cover? Use matte medium. I have tried it to adhere things like tissue but let's just say it has never been my go-to answer for everything like it seems to be for so many. But I decided maybe I should give it another go, bought the recommended Liquitex brand and used a paint brush to add it to the backs of these pieces now added to the spread. I have to admit it worked pretty well, not wrinkling up the paper as some glues will, and was even forgiving enough to allow me to reposition pieces if I moved quickly enough. I didn't add any over the top of the pieces as I see most artists do but maybe I'll get to that too eventually. In the meantime, a day later I am still peeling off medium that got on my fingers. I haven't had that problem with acrylic paint. It reminds me of that liquid bandaid stuff.

Now I think it's ready for some text. I've jotted down a few things I'd like to find room for that will help explain where I'm going with this. I started with a concept that was really bugging me that I wanted to rant about, and where better than on an art journal page? To my surprise, even before I get to the ranting in words, I am feeling better about what was driving my emotions. That's kind of the point of any kind of journaling. Art journaling is not making mixed media art, although mixed media plays a part, any more than written journaling is creating a novel or essay, although relating stories may be a part. Art journaling might lead to a finished piece of art just like journaling might lead to writing a short story. At least that's my take on it. With this in mind, I really appreciated Laly Mille's blog post where she shares step by step how her art journal spreads evolve. You might find it interesting. She titles it "All I Have To Bring."

If you take a look at that post, you will see the final steps I'll be taking on my own spread, the "tricks" that help bring it visually together. We'll see how well I can do that.

Saturday, March 19, 2022

Just What Was I Thinking

"The great thing, if one can, is to stop regarding all the unpleasant things as interruptions of one’s ‘own’ or ‘real’ life. The truth is of course that what one calls the interruptions are precisely one’s real life—the life God is sending one day by day: what one calls one’s ‘real life’ is a phantom of one’s own imagination."  C.S. Lewis

This quotation was on my mind as I prepared myself for a possible week of jury duty. I overheard someone in the jury pool lament during a lengthy pause in procedure that all she could think of was all the things she could be doing at home. I, on the other hand, had cleared the decks in anticipation of not having much time for anything else and could focus on this new experience. As it turned out, the trial I was chosen for went more quickly than anticipated and we, the jury, were a bit surprised at how in agreement we were about the verdict when it was time to deliberate. Very little to discuss and we felt good about our collective decision. A few days later I came across this fact I'd never heard before, regarding a 17th century trial with similarities to ours where the female witness "testified as cords were tightened around her fingers; the theory was that torture would insure the veracity of a witness's account." Hmmm - no torturing of witnesses in our trial; I think having to testify at all was torture enough.

So settled back into my normal routine and catching up a bit on things, time to take the final steps on the fat quarter quilt, especially since today is National Quilting Day and in fact, it is also International Quilting Weekend. I pulled from the closet a bundle that I was sure had the leftovers of this project waiting for these final steps. That's not all that was in the bundle (some machine quilting samples and the leftovers from another quilt top needing quilting and binding), but in the above picture, this is what presented itself to me: 3 fairly large pieces of fabric from the quilt top, a few strips left from cutting the fat quarters, the book containing the quilt pattern and a documentation sheet where I'd pasted in fabric swatches on the back. On the front I'd filled in the name I planned to give this but to my chagrin, no start date.

Here's the book which has a copyright date of 2002, and I'm pretty sure I bought it soon after it came out. So I think I probably made this for the class sample around 2003 or 04 - I can go back through old engagement calendars and track down the date if I really want to. I remember really liking this method of using fat quarters (and I have a ton of them from when I belonged to a Reproduction Fabric Collection of the month club), and there are two patterns in it that I still like enough to think about making, including the quilt on the cover.

This is what was squirreled away inside the book - more scraps of fabric and some pieced odds and ends, possibly demo pieces for the class. Also, three copies of the photo I took while the finished top was up on my design wall. I'm pretty sure these weren't taken with a digital camera, not sure exactly when I got my first one. Lots of notes in pencil all over the pages of directions which pertained to teaching the class as I wanted to do this alternate on-point arrangement.

So nearly 20 years on, just what was I thinking about finishing this up? I don't think there was very much if any of that dark blue fabric pieced into the backing left, and if so, I don't know where I would have put it if not with this bundle. I measured the quilt as it lay on the floor drying from some pre-squaring up spritzing so I could figure how many binding strips to cut and how much fabric that would take and decided that I must have meant for the border fabric to also be used for the binding - there's plenty. But all those narrow strips cut from the gold fabrics, what were they for? certainly not binding since they are only 3/4 of an inch wide. A real puzzle.

Out of curiosity, I studied the penciled notes around the page with the top diagram and noted two things. First, I'd measured the top and noted its dimensions, and with all that dense quilting I did, my new measurements show I lost 3 inches in both directions. Second, I found a note about piping - how many inches needed of 3/4 inch wide strips for 1/8" piping. Truly a detail I not only forgot but am having a hard time remembering at all. After some thought, I must have thought of inserting it in the binding, but for some reason my memory was thinking I was going to use leftover strips from all the different fabrics in the binding itself. Well, it's actually a relief to figure all this out, know the multi-fabric binding was never an option and that the border fabric was always meant to be the binding fabric as well.

And to think there was a time when I remember all details of everything I worked on or had set aside to work on later. So not the case anymore, so best to get with it and finish things in a more timely fashion for sure. At least I kept everything together!


Saturday, March 12, 2022

Not Error Free

The slow and steady tortoise finished the last bit of quilting on the final border of the fat quarter quilt today - hooray! I set a goal of one border a week (bearing in mind I wouldn't be able to quilt every day and when I did, limiting my time to 40 minutes to an hour), and I am so pleased I was able to keep to that. I tossed it on the bed to take a few pics for you - not the best lighting but hopefully you can see why I like this quilt so much.

Now to dig out the leftover fabric from the piecing to piece together a colorful binding once this is squared up. click on any photo for a larger view of the quilting.

Although I have to say, looking at that dark blue turned from the back to the front, I'm wondering if I wouldn't like a single fabric blue border instead.

Here's a pretty good shot of the "row by row" paisley quilting I did over the inside of the quilt.

As for the "not error free", on the last border, I was so into following the designs in the fabric, having memorized the best path around them, that I didn't notice I was coming close to a safety pin as I sewed backward. I don't know how I managed not to hit the pin with the needle but suddenly, there it was under my presser foot with a single stitch holding it in place! Took some maneuvering get it off the foot and to open it to pull it free without having to break a thread. So now you would think I would quilt more aware, removing pins in plenty of time but no, I did it twice more! The third time I actually did strike the pin with the needle and had to replace it.

Not to mention that I also managed to quilt a bit of the excess turned over the batting to the back of the quilt. The whole reason for leaving as much extra backing and batting as I do at the edge of the quilt is so I can neatly fold the backing over the quilt so this sort of thing doesn't happen and I have plenty to grip as I move the quilt around. I definitely was not paying attention and making sure the edge was smoothed out, not folded under. It only caught in two short places and I was determined not to take out stitches and re-quilt those short runs. So I cut very closely to the stitching on either side to release the part that got caught up in the quilting and then teased out the threads of the bits of fabric left under the stitching on the back of the quilt. The arrows point to the cutaway part on the edge of the turnover.

So glad I got this finished today as I don't know how much time jury duty might take up next week. I've been lucky so far with the trials of the first two weeks of the month being canceled, but now they are requiring us to sign in early on Monday for a trial. The last time I got called in for jury duty, they filled all the spots long before I got a chance to be questioned. Maybe I'll be that lucky again, although I actually think it would be interesting to go through a trial.