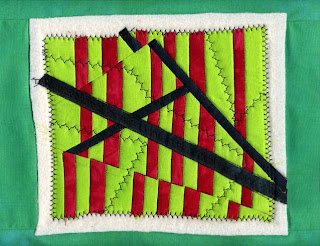
I fixed myself a cup of Creativi-tea and headed to the studio to finish up my April Take It Further Challenge. Thanks, West Country Mother for your comment. I was seriously considering not proceeding with it, but knowing it was getting across my feelings about change really spurred me on. Tuesday it felt like I was exorcising those negative feelings about change. Today it felt like I was moving on to the "something good about change" you pleaded for! I've added a more soothing green as a reminder that after change, things do calm down again. Indeed, I DO know there's something good about change - Change is what got me moved back to my beautiful Idaho! In spite of my initial negativeness about change, once I can't avoid it, I start looking for the silver linings which are usually lurking just under the surface.
Because this is so small, I layered it with muslin and a scrap of Quilters Dream cotton batting held together by straight pins. I put on a walking foot and began by stitching in the ditch along the black strips with black thread. Before I knew it, I was stitching in the ditch along all the seam lines with black. I hadn't intended to do that; I can only think that it was partly because my traditional background included lots of that kind of quilting, and partly because I've been reading Suzanne Marshall's latest book, Adventure & Applique. I've studied with her and had the pleasure of studying her quilts up close. Most of the applique had this fine black line along the edge. It looked inked to me, but no, she actually embroiders those lines. Here is an example from her quilt "What's For Dinner?" (click on pic to see the detail in a larger view.)

Someone else who does this kind of thing, but by layering her applique shapes on a slightly larger piece of black fabric is Pam Rupert. At any rate, I really liked the way it made the red stripes stand out and accentuated the jaggedness of the offsets.
I'd used a bridging stitch to apply that loose strip of black and tried lengthening it to add additional quilting lines. Yes, this worked well, I think. Finally, I went back to the default length and ran it around the edge, letting the stitches swinging to the right fall off the edge on to the batting.
I originally intended to trim the batting back to the stitches, but I liked the way the black strips were hanging off. Since I think I will frame this is some way, I decided I could attach "border" strips to the muslin backing, and the extra batting would cover the join.

Here it is from the back - looks cool from this direction too.

Since visualization is one of my weak points, I played with Corel Paint Shop Pro X to see what color mat and frame might look best. The picture at the top is actually a scan, and I allowed for the outer green to be a bit wider on the top and bottom than the scan allowed. Still, this really helped me get an idea of which direction I want to go. Do you have a favorite? I sized this to fit a standard pre-cut mat and intend to tape it to the back side of the same. No more batting, no more quilting, no edge to finish.


You may notice that I changed the orientation since the last post. It was another case of it getting tossed "upside down" on the ironing board and thinking I liked it better that direction. I'm toying with the idea of stamping "change" in black letters up one side of the border, but that may be too much of a good thing.
1 comment:
I love this! It really does evoke the whole idea of how difficult change is. I'm facing change in a BIG way as we will soon be moving to South America, leaving our adult kids behind. I can't even think about it without getting emotional. It's not that I'm not excited about the move, I AM! - but at the same time I know it's going to be TOUGH.
I love the way the all black mat and frame makes it pop!
Post a Comment