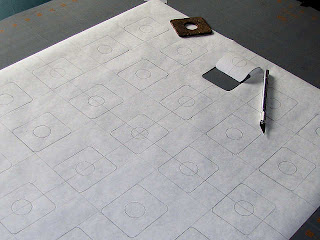
I never got back in the studio last week after sketching out some options for a new piece based on a metal plate found along the side of the road. Today I tried to make up for that by taking the next step - translating one of the sketches into a full-size working drawing. In this case, it is drawn directly onto freezer paper which I then cut to make a stencil. You can see the guidelines for positioning the plate which I then drew around in pencil. It doesn't have the same compact feel as the sketch, but I felt I needed the extra room if I am to have a cutout in the middle. I can try a closer orientation later.
I don't know why I like meticulous work so much but I do. Once I had the design drawn, I pulled out an x-acto knife and cut out all 25 rectangles, then cut the circles out of each rectangle. This type of slow precise work puts me in the zone, becomes almost meditative. I first discovered how much I love this kind of activity back in the 6th grade. Our teacher decided to brave an art project that required each student to wield a single edge razor blade. With that blade we were to cut out the silhouette of a train from black construction paper. I still remember how I enjoyed cutting the tiny windows and the spaces between spokes away. Now I've graduated from razor blades to x-acto knives.
As so often happens, once I had this 5 x 5 layout drawn, I wondered if 3 x 3 would have been better. So I overlaid the stencil over a smaller piece of freezer paper, traced nine of the cutouts, and created a second stencil. And by virtue of misaligning the plate at one point, I then wondered about staggering every other row. I want to create a stencil with that idea too. Then it will be on to the next step of ironing the stencils to fabric and discharging the exposed areas. Oh, and don't forget - I have the shapes that were cut out of the stencils to use to create a negative discharge image. This truly is one thing leads to another.
No comments:
Post a Comment