
I finally made good on my offer to lead a dye session with my Third Mondays art group, tapping into the dyeing supplies my friend Judi bequeathed me. After staying away from dyeing for probably 15 years, it was good to refresh my memory and share our method with my current friends. I quickly found myself going into teacher mode and dispensed with the idea of getting pictures for the blog - just a little distracted anyway and hoping I wouldn't skip any important steps! So all you get to see is my results after I got home.

I decided to include basic gradations, color families and random play in our session, all done in freezer bags per Adriene Buffington's book, Hand-dyed Fabric Made Easy. Judi and I had adapted the original 7 step gradation recipe to 4 steps which is what we used this day. I dyed up a purple using fuchsia and indigo dye powders mixed together, but in my distracted state, mis-measured so these are a little more red plum than the purple plum I was going for. Still a pretty color that is missing from my stash.

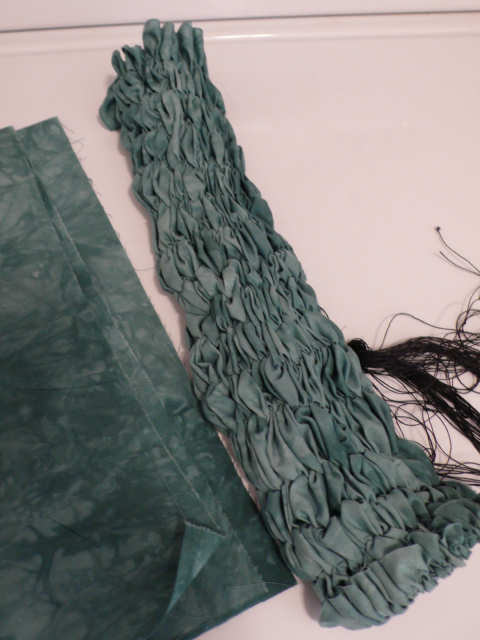
I would have preferred them to have less texture, but boy, is this wonderful or what?

Next we used two dye stocks to create a color family, but again, I made a mistake as I kept one eye on the others and lost track of the order of distribution of my two dyes. There should be some fuchsias in there. To my amusement, half of these trend toward a lavender gradation and the other half towards a periwinkle gradation, two recipes I'd pulled out to dye up after our session. Now I may not need to.

This is the flip side of the fabrics shown in the previous picture. Again, way too much texture with nearly every section of each fabric crossing all values of the run. To get a more solid fabric and even color, I should have massaged the bags several times once the fabric was added. Judi and I had a huge blow-up over this once. She just didn't want to take the time to keep agitating the dye runs and insisted most people buy hand-dyes for those textures. But I had just spent an afternoon folding and re-folding gradation packs to find areas that when viewed from the package's end would show the 4 value steps. When the textures are this all over the place, it's hard to convince the customer they are really buying a gradation. She finally saw my point and saved those wonderful textures for the one-of-a-kind specialty pieces. With my mis-measurements and my wild texturizing during this session, I felt Judi was getting back at me!
Now that "my girls" had learned the basics, it was time to play - experiment with manipulating the fabric and tossing whatever leftover dyes were around into the dye bath, no measuring. This really is a favorite part for me and I took the opportunity to try overdyeing some fabric. One fat quarter would be folded, the other I shiboried with a whip stitch over folded edges.

They both went in with the fuchsia/indigo dyestock left over from my purple gradation. There wasn't much left of the original green showing through when it was done.

My instructions for the shibori were vague so I didn't know how long or deep to whip stitch or how far between the rows. It was a whole lot of stitching for minimal results - it was supposed to produce curling leaves.

You can sort of see how that would happen had my stitches been longer and deeper. I may try this again and not use such a dark dye to over dye.

Now for the stars of my dye session. I just love the drama of this fat quarter that was loosely rolled and coiled in the bag. I started with the leftover fuschia from my color family, borrowed a yellow from one of the girls, put in the fabric and poured the rest of the indigo dye stock over it. I only "mooshed" the bag a little - I didn't want lose all of the lighter dye with too much mixing.

This is from the same bag, the fat quarter being accordion folded, twisted, and then coiled into the bag. Fabulous.

And on closer inspection, I found what I so often find in dyed fabric that has been folded in some way - faces. This looks like Pharaoh to me.

This one looks more native mask guy.

And along the bottom, owl and a friend - can't quite decide what that is. Any suggestions?
So lots of more or less happy accidents for me which means, I get to redo my color family if nothing else. And Pandora's Box has been opened...I've got plans for other dye runs before the week is over and my group wants to make this an annual or semi-annual event.
8 comments:
Wow, Sheila, these are really wonderful. Makes me want to dye again!
Great fabrics. Love the one with the faces. I painted a fabric once that when it dried looked like it had an eye on it.
I also love the purples.
You didn't make mistakes, you made beautiful colors! I love the texture, but I can see how it would be a problem selling gradations. Wish I lived closer and could dye with you. Those faces are little treasures.
Pretty results! You know that dyeing can become addictive :-))
Hi Sheila!
How good seeing you taking these stuff shared with Judi and sharing these with your friends of your art group.
For my own experience with marbling paper, I guess that the learning and sharing process is so important as the result.
I think it could be an owl! I nlove owls!!
A great day!!
Lucia
Fabulous results....you are a doll to share your knowledge with your friends!
You got some beautiful results, Sheila. The ones at the top may look like too much texture, but that's just the way I like it! That one looks like a spider web. Makes me want to whip up some Shibori and dye this weekend! Thanks for the inspiration!
You guys are too kind! Michele, I just ran across an e-mail from you that I'd saved giving me more information on a dye session you'd shared on your blog. I'm seeing the information with fresh eyes, it answering a question raised as I perused my various books: what's the difference between fabric in dye-stock, then add soda ash, and dye stock in soda ash, then add fabric? I need to try the first, I see, if I want more evenness and less texture. At least, that's what I glean from your pictures.
Post a Comment