 |
| Master stapled over blanks |
Things are going slowly with the Sea and Sand quilting but they are going. I mentioned that I'd be drawing out my design on Golden Threads Quilting Paper, cutting pieces to size for the different sections. Most of the blue areas are about 6 inches wide but vary in length. My original trial sketch is smaller than that so I start with it kind of centered under the tracing paper and fill in as needed around it. I'm finding I can use the same configuration for 4 to 6 areas before having to cut and trace a different size so to save time, I thought to stack the papers and needlepunch the design through all instead of individually tracing each paper.

The areas to be quilted are small enough that I can simply pin the pattern on rather than use any kind of temporary spray baste. I've tried that and found removing the papers afterward a nightmare, the tiny bits refusing to release, so I do not recommend it. The long flowerhead pins worked particularly well. The paper tears away quite cleanly along the stitching lines, like tearing a page out of a notebook. Slipping a seam ripper under the paper and along the stitching helps in the tight area as do tweezers to remove any small bits trapped under threads.
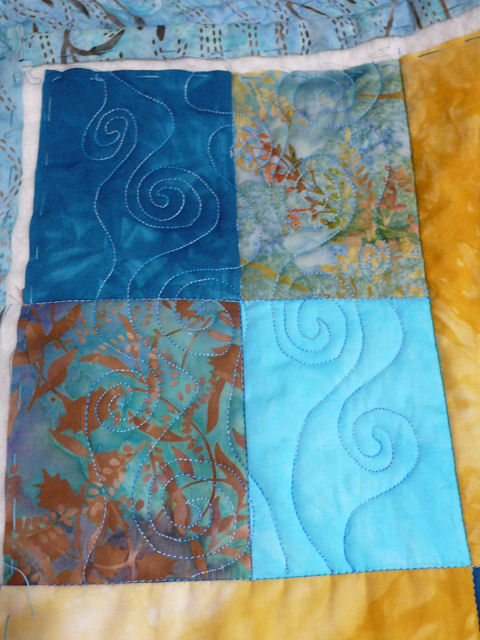 |
| Trouble following lines but better |
But I am easily confused these days and I found the perforated lines were not guide enough for seeing where to go around those swirls. I needed a solid line to follow so ended up running pencil along the hard to decipher perforations before stitching away. And to say I am a bit rusty in my machine quilting is an understatement! However, I have a system now that is speeding things up, even as I take time to trace the design on each paper rather than needlepunch and spend extra time removing said papers afterward. These extra steps are worth it to me when I see the results, and each tracing solidifies the memory of how the swirls swirl. With about half of the areas quilted, I am getting in the groove with a steadier more relaxed movement. I'm thinking I may even be able to do the last few smaller areas on my own, no guide on paper needed. Maybe.
4 comments:
I watched a video where Hilary Beattie was quilting over tissue paper onto which she had transferred her design. I'm in the planning stages of two largish paper quilts based on old maps. I wonder about the same approach but it's removing the paper that puts me off.
Anyway, yours looks lovely.
Hilary X
Hey….this is really, really nice…….
Hilary, I wouldn't use just any paper to do this. The Golden Needles Quilting paper is translucent and a bit like the paper dress patterns are printed on, but I think a bit crisper than tissue paper or even tracing paper. I think it must have very short fibers in its make-up and that crispness that makes the tearing away easy and mostly clean yet it has enough stability to not rip through prematurely. If your stitches are short like mine are, it perforates closely making the paper come off even easier. It does take extra time to remove it but it's the sort of thing you could do while watching tv or sitting outside enjoying the nice weather. (Do you have nice weather right now?)
This quilting paper comes on a roll, either 12 or 18 inches wide. Of course, I have both widths. You can roll your quilt with it pinned on (to get it into the machine for stitching) and it resists tearing but I think there is a limit to how big of a piece you could work with under the machine without running into trouble. I guess my best advice would be to try out this method on something small and not too complicated so you can see how the paper works and whether the removal process is too fussy for you.
Why thanks Mary! I'm very pleased with it. And you know how persnickety I am about how my machine quilting turns out. :-)
Post a Comment