Monday, December 31, 2018

Wrapping up the Year

I've hardly posted this month, busy with holiday things, slowed down by a cold that sapped my energy as it went through its stages over two weeks, not spending the sort of time in the studio I thought I might. I'd mentioned that I was saving the reporting of progress on the recycle bookbinding challenge project until it was done, but it now looks like done isn't going to happen very soon. So I may as well show you how things went with my tissue paper dragonflies applied along the flaps with matte medium. It went great!


I adhered those two larger dragonflies onto the spread almost like a test run. The matte medium didn't always get to the edge, hard to see how well it is covering, so there was some going back in to make sure all edges were held down. The trimming around each dragonfly went fairly fast, then it was only a matter of deciding placement. I'm pleased with this arrangement of them all angling the same direction toward the center.


I'd been considering doing something different on each spread's flaps but now I want to add these dragonflies like this to each one, or at least as far as my supply will allow. Perhaps the dragonfly gift wrap my friend passed along will get me there.


I've decided on the sequence of the spreads with their accompanying handmade paper, and I am to the point where I want to fully complete a set and stitch it to its pleat in the binding before doing anymore work on the next. I still have a few dragonflies to add to the front/back of the handmade paper along with some fussycut fabric (which will be fused) but because the back of one is facing the front of the next and so create a sort of spread of their own, it will be easier to keep all straight and cohesive if I approach these finishing steps in the order the signatures will be sewn in place. Not sure if that makes sense. But anyway, the first spread is now done and I've been looking through my threads and yarns for something to bind with. I've settled on this leftover wool yarn from an embroidery kit of long ago because it seems to blend the best overall, being off-white like the teabags. Honestly, here was another thing I did not think ahead about, that whatever I used to sew the signatures to the binding would be so visible along that center fold. It may cover some of my text.

So as the year winds down, I find myself with many partially finished projects to carry forward into the new year, and I am not stressed or concerned about that. I've had a most pleasant month actually, a peaceful holiday week, a few special gifts that awed me for their thoughtfulness and appropriateness, and the trickle of Christmas cards with warm greetings and year-end reviews I so enjoy reading. For all its ups and downs, triumphs and challenges, this year has ended on a mellow and uplifted note. I couldn't ask for better, except perhaps to wish that your year, dear reader, has ended equally well for you in spite of what may have come before or perhaps because of it. Pause to reflect . . . then onward!

Tuesday, December 25, 2018

It's Christmas


I confess; I so envied the outdoor decorations my neighbor of the other half of the townhouse put up last year (you can see them here) that I did a little sweet talking as they were putting up this year's, noting that I wouldn't mind at all if they continued the lights across over my garage doors. Just in case they had wanted to but didn't want to assume I'd be ok with that. You know, in case they have time on their hands. For the sake of symmetry, if nothing else. They just laughed and got right to it. I'm so lucky to have them for neighbors. These are the ones that keep my driveway clear of snow too.


The snow in that first picture had pretty much melted away thanks to warm and rainy weather last week. But Sunday morning I was greeted with a wintry scene of fresh snow which made it instantly feel like Christmas. Click on the photo for a larger view and to see what is hanging out on the tree branch.


I couldn't resist taking some shots of the way the snow piled up on the leafless branches of a bridal wreath bush outside my window.


When I think of Christmases when I was I kid, I usually think of the ones after dad finished out part of the walk-out basement into a kind of family room. In my recent scanning of old slides, I found a few pictures taken down there. During the holidays, it was the only room in the house we decorated. The walls were knotty pine and brick, and we hung an old wool blanket behind the heavily tinseled tree to pin Christmas cards we'd received onto.


There was an exposed beam running the length of the room, and dad attached cedar boughs and Christmas lights to it and also ran cedar boughs near the ceiling along the knotty pine walls. Vying with the tree for attention was the fireplace he built, fueled by Prestologs and providing a place to hang our stockings. The mantel was where we placed candles amongst angel hair. Now that I describe it, it was probably a terrible fire trap, but it was a beautiful and fragrant place to spend evenings together.


There were two hide-a-bed sofas and an easy chair, a stereo to play Christmas music, and I have fond memories of sitting quietly with my parents, watching the fire and knitting by the soft light of the fireplace, candles and Christmas lights.

I did a lot of knitting back in those days and I'm getting the itch to pick up my needles again while sitting by my fake fireplace fueled by electricity and a light show of flickering flames (I really miss the crackling) and listening to Christmas cds. it's nostalgia kicking in, and maybe I'll play along. May you find a bit of peaceful reflection and good memories of Christmas past today. Merry Christmas - Happy Holidays! 

Friday, December 07, 2018

The Latest Get Together

My art group got together this week, one last sharing between holidays and before the end of the year. I didn't have a great deal to share, just the Inktober Zentangles finished since the last meeting and this article from Smithsonian Magazine about a fascinating portrait technique by artist Kyle Meyer. If you can't read the text when clicking on the photo for a larger view, this link will take you to the article on the magazine's website. It is not only an interesting story of how he came to do these portraits, but what making them involves, a melding of photography and basket weaving. I think how he does it may surprise you.


You've already seen all my Inktober Zentangles but here are some that Terrie worked up. She was so intrigued by what I showed at the last meeting and that I learned from books I got at our library, that she went straight from meeting to library to check them out. It was fun for me to see how she interpreted the same lessons I had worked through and how she is trying out working some of the tangles into her quilting designs. Above are just a few of the pages she's filled in her sketchbook with this play.

Terrie's original design includes her hand-painted and hand-dyed fabric

Terrie also shared a 24" x 30" "fabric design", quilted and stretched over canvas, that she is submitting to a call for artwork to be displayed on an old carousel purchased by a local couple and now under restoration. Read more about the Carousel project at https://thecarouselofsmiles.org/ This link will explain the Art Panel Project that Terrie is submitting to: https://thecarouselofsmiles.org/artist-participation/

1 yard sample printing of Meg's original designs

Watercolor sketches used to develop designs

Meg was anxious to show us the results of her efforts to develop a fabric line. She's been working up her own designs and motifs with sketching and watercolor before bringing them into a program that lets her combine individual motifs, work out repeats and play with different colorways. Learning a lot, she says, but it's a beginning what she has put up on Spoonflower.com. She's had them printed out twice on a sort of swatch layout at full size to see how they read in real life. The first printing was on an inexpensive cloth much like muslin, and the second on a better quality Kona cotton which produced a sharper, more colorful image. This experience makes her think this is really what she wants to do, design fabric. You can take a look at her shop at:

Anne's resin pours

Our newest member, Anne, brought examples of some trials she is running on resin pours, something the rest of us had not heard of. It started with a project her husband is working on that he wants protected with the resin. She couldn't resist trying out mixing it with paints and inks to see what would happen.


She also brought along another eco printed scarf (she'd brought a dozen or more to the first meeting she attended) as well as some pieces of regular cottons that had been eco printed with rusted objects for the mordant. And because we all love hand-dyes, she also brought a sample of some of hers. We just want to steal all her stuff when she's not looking! No need to steal though. She's opened an Etsy shop featuring her beautiful scarves, EmdaArt.

Meg's testing of Craft-Tex

Finally, Meg proudly showed me the results of her putting the samples of Craft-Tex I'd given out at the last meeting to the test. First up, a square that she'd applied paint to, fused fabric to and stitched through. The second square is one she applied oil stick paint to, washed, crumpled, dried and ironed. At some point she handed it to her daughter who promptly put a big tear in it. Well, so much for the manufacturer's claims that it does not rip! However, the paint did not scrub off in the wash, but the wrinkles did not iron out (although it would flatten out - the piece here we all had balled up to feel how it changes the hand). She liked it enough though that she has ordered some for her own purposes, which made me very pleased I'd shared this, thinking she might be interested.


I'm still working off and on on my dragonfly-themed bookbinding project and to spur me on, Meg handed me this heavy wrapping paper with dragonflies printed on it! Yes, I was unduly excited and thankful, and now pretty much have no excuse for not finishing my book. 

Monday, December 03, 2018

What Other Artists Do And Say

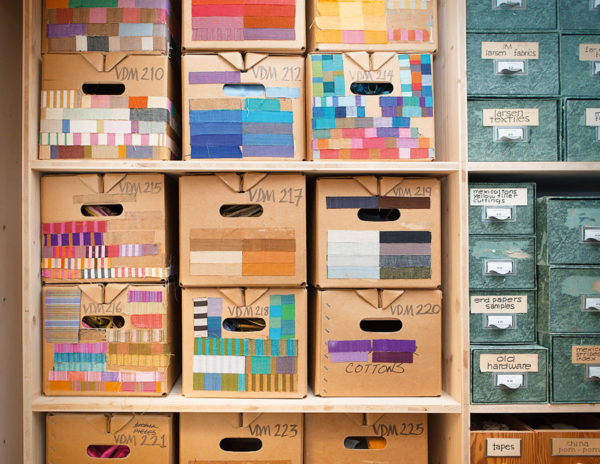
Designer Alexander Girard's textile organization system
Here are some things I've been saving to share with you. Grab a cup of tea or coffee, settle in and get ready to follow some links. Let's begin with this fabric storage method used by designer Alexander Girard. I have to admit that putting swatches on the front of a storage bin so you know exactly what's in it is better than my longstanding method of trusting my memory to steer me to the right bin, box, cabinet or drawer. But even for an organizer and neat freak like me, this struck me as obsessive. No, probably just smart for his purposes. If you follow this link to Austin Kleon's blog post where I found this, there will be more links about Girard to follow.

Next up, one of my favorite artists who is not only a master bookbinder, but creates intriguing multi-media pieces with found objects and is a poet as well. Kaija at Paperiaarre recently recounted some unexpected successes and recognition she'd received, and how in the doing, she had struggled a bit with direction. In the end, she decided to trust herself and feels that was the key to success. The very last line of that post, Lost & Found & Forgotten & Found, really struck a familiar chord with me:

I’m glad I dare to do me in all I do.

Upon reading this, I realized how many years I did not dare to do me in my artwork, at least not with any real confidence, but that these days I have found myself proceeding more with ears and eyes shut against a world that would tell me I'm going about it all wrong or that my vision doesn't fit the current trends. I find it a comfortable place and hope that I remain here, just doing me in all I do. I hope you will read the entire post or at the least the final paragraph, beautifully written, with pictures of her work and one of Kaija herself. You can also see her work for sale in her Etsy shop.

I subscribe to The Painter's Keys which offers good overall advice to would-be artists on a variety of subjects that more than just painters can benefit from. Here are two I felt worthy of sharing. The first, The Five Minute Rule, deals with the bane of us all, procrastination. You've perhaps heard of this trick, to tell yourself you are going to do something for just 5 minutes (some have you set a timer for 15), which almost always turns into staying at whatever task for longer than that initial short period of time; things in motion stay in motion according to Isaac Newton and it tends to be true. But here's something else to remember too:

Now that you’re on the dance floor, understand that the path to proficiency is long — it rambles over dunes of ugliness, stumbles among boulder-sized re-dos, and falls into perfectionist back-eddies. The pain of doing it poorly is part of the activity of learning. The elation of doing it well is the hard-won result of beginning this activity in the first place. Begin now. “If you wait,” said Mario Andretti, “all that happens is that you get older.”

Now that you've got your procrastination issues solved, move on to the second Painter's Keys I found of interest, Golden Day. The idea here is to take a full day to just work on your art, morning to night undistracted.

You set aside a clear and uncluttered day to work and love your craft. Start early; end late. You put your head down and push yourself from one thing to another. It’s a day where everything comes out of the end of the brush (or pen, or chisel), a luxury day where all that counts is the universe of your creation. After, on your weary way to bed, you can give yourself a badge.

I think most of us would agree this sounds like a wonderful luxury. If you've ever been on a quilt or artist retreat, you have a sense of what this would be like and what you could accomplish. It's certainly worth considering if one could manage a full day without turning on the computer or tv or answering the phone, telling any spouses or children to pretend you are not home. Among other things, the writer says, "Before long you’re pushing into bonus territory and you may startle yourself." I miss being startled by what I find myself doing, achieving. Haven't had that feeling for awhile and no doubt because I haven't been spending the sort of time in the studio I once did. It's a thought.

And now because you've been so patient with me and my words without pictures, here's a little slideshow of some interesting art quilts by Judith Beaver.


Monday, November 26, 2018

Test Test Test

While I'm still babying my shoulder and thus unwilling to give any actual sewing a try, I did test out something multimedia-ish that I've been meaning to try for awhile. I watch a lot of videos on Joggles.com that, granted, are tutorials featuring products she sells but which really give a lot of good general information about how to do a lot of multimedia techniques. And while the majority of the ideas are geared towards use on paper, a lot of them involve paint and could easily adapt to use on cloth. That's my justification for watching them. One thing she showed was how to remove design elements printed on tissue paper without using scissors. I recently realized that I had some tissue paper printed with dragonflies and maybe I could use it in my recycle bookbinding project. Step one is to take a wet paint brush to "draw" around the image, making a damp line - you should be able to see a bit of reflection around the lower dragonfly.


Now the tissue paper has been weakened and you can gently apply pressure to cause the damp line to tear. Ok, so far so good. I'm guessing that soft uneven edge is part of the reason that, when adhered to your project, the unprinted part of the tissue paper "melts into the background and virtually disappears." Yes, that is what it appears to do in the video, but that tissue paper is white. Mine is this tan, but since I'd be adhering it to my brown paper pages, I assumed the disappearing act would still take place.


But I have learned over time that many techniques that work so beautifully in videos and other instructions, don't always work the same when I attempt them. So time to test on a scrap of paper, along with trying out adhering with matte gel medium. Everyone uses this almost interchangeably with regular glues and pastes, and I could see that my preferred adhesives would be a pain if not downright impossible to use on tissue paper. So out came the medium and the brush and I tried both putting it just on the underside and as well as underneath and over the top. I didn't know what kind of visual change the medium might make on top but it literally looked and felt no different from the one just underneath, and the brushing on top helps to smooth out any wrinkles and give a nice even stick. However, as you can see in the picture, the unprinted portion of the tissue paper did not "virtually disappear."


So I will be going back to scissors and cutting these various sized dragonflies out leaving just a small margin of tissue paper. Here you can see an example of how they might fill some space on some of the pages - these are not adhered to the page yet.

Speaking of Joggles, look what came last week - a box full of goodies to play with. Joggles was having a closeout on Marabu paint products and I decided to get some more of their opaque textile paint. And try the textile paint in a spray. And while so much on their site was marked down, I checked my wish list and added a few more things like another stencil. And then because I had the paint and stencil coming and I'd watched so many videos using these on a gel plate, I added one of those to my shopping cart too. I bought enough to get half off shipping and two free Marabu crayons. Yeah, I have a bit of new supplies to play with.

Saturday, November 24, 2018

A Little Gift

Lately I've been thinking that if my readers are waiting for me to do something exciting and share it, they may have a long wait. It's not the only thing diverting me, but the ongoing family history project is sucking up time and is no doubt more exciting to me than my readers. As several of you noted in my last post, just the slide scanning is a bit daunting, but just like working on a large quilt, I've figured out a way to approach it in sections that counters the overwhelming feelings when viewed as a whole. But it still takes a lot of time.


However, I had lunch last week with someone who IS doing something exciting, or at least interesting. Sue, fellow POAC fiber artist, has been playing with these handy gadget holders. A quilting  friend of hers had given her one along with instructions, and for mine, she incorporated hand-dyed fabric because she knows how I love hand-dyed fabric. But while this is meant for things like rotary cutters, scissors, rulers and other small quilting tools, my first thought was how handy this would be for all these sketching pens I've been collecting.


So the fabric part slips over one of those acrylic stands and there are lots of pockets front and back. I'm still playing with what to put in it and where but boy, this is really going to come in handy!

Sunday, November 11, 2018

Veterans Day

A fifteen-year span between me on the left and my oldest brother on the right. What's with those see-through shirts in the middle?
Forgive me for sharing this 1956 or '57 era photo of my brothers and me, a stair-step arrangement that made me laugh. I'm supposed to be putting the finishing touches on my recycle bookbinding challenge project but I suddenly got a wild hair to do some slide scanning instead. Since getting the older carousels of slides from a brother in California, I've been doing a bit of picking and choosing trying to find specific ones to go with the next post on my family blog, sadly put on hold for far too long. This was getting me nowhere and I'd decided to put aside my tunnel vision and just scan the whole carousel. I soon found that while mom had written lots of information on some of them, most were blank, not even a date imprint from the processor. The above photograph is a prime example. Well, that shouldn't pose a big problem if these are placed in the carousel in order, as I was sure they were. Lots could be guessed by surrounding pictures with dates.

A snapshot of me decked out in part of my brother's uniform on the occasion of my third birthday.

As I switched from scanning mode to info adding mode, I discovered to my chagrin that the slides were not in order. My penchant for neat and tidy and sequential soon distracted me from the task at hand and I spent much time yesterday merely trying to sort the slides into chronological order. I can see that much detective work is left to figure out what and when a lot of these were taken by crosschecking albums of snapshots, letters, and a brother's keen memory. I'm on a mission to sort through all I have and make sense of it, adding a narrative for all who might be interested in our family history.

Waine Mahanke at Parks AFB

It has been nice to run across those pictures of my oldest brother in uniform, back in the late 1950's, now that it is the time when we remember the end to the first world war and especially honor all who have served in our military, men and women alike. One such veteran recently suggested that perhaps a better greeting to veterans than the currently popular "thank you for your service" would be "never forget". I liked that idea.

Two other brothers also served, plus one of their sons. You can read more about them in this post. Never forget.

Tuesday, November 06, 2018

A Million Things to Consider

I exaggerate. As I return to that recycle bookbinding project, I continue to be amazed at how many things there are to consider, how many little details to add. Not a million, but there have been dozens. As I've eased back into it, trying to continue to set aside a bit of time each day, no longer for drawing but just for any kind of creativity, I'm less uptight about these considerations that keep popping up, except perhaps to be convinced my textile projects aren't this complicated. I exaggerate here as well. This, I've realized is much like one's first sampler quilt, full of different things to learn while striving to keep a common theme to hold the different parts together. One thing that occurred to me lately was that one way to assure some cohesion was to add more security envelop patterns throughout the pages. I liked the look of this image that didn't fit elsewhere added on top of this envelop. And I also realized that rather than glue the security envelop rectangle to the page, I could maybe just use this scrapbooking double stick tape and get it used up.


So my first task as I returned to this project was to dig out more security envelops and trim them to size. I'd transferred all my dragonfly poems and quotations and information to the brown paper pages except for a more general quotation that, while not referencing dragonflies directly, definitely encompassed the feel of all within. Rather than find a place to hand write it onto, I played with it in Corel Paint Shop Pro so that it would print out at the same size as the image at the top of the page. I added a blurred photo of birch trees behind the text and printed it out, then attached it to the security envelop rectangle that would go on the opening page.


I found security patterns to match the one used on the insides of the cover, and several more for variety, attaching them to the front and back of each signature with the double stick tape. I originally had fought the idea of covering so much of that handmade paper, but I got over it as I remembered I hadn't considered that paper much of a success.


I'd found more dragonfly images and pasted them to the brown paper for added stability. Those now got cut out and added to the inside spreads that needed more filling spaces around quotations.There still may be more added, especially on the flaps.


What was left is finding homes over the security envelop rectangles. And I'm finally bringing in some fabric too, this example using a scrap of Art Nouveau fabric fused down with Steam a Seam II. I'm getting pretty close to the end of this project and sewing those signatures into place. It's been quite the learning experience.

Wednesday, October 31, 2018

Wrapping up #Inktober 2018

I always find it interesting the trajectory any finite project takes, whether it be an idea for a design or a challenge of a specific length. There's always excitement at first, lots of energy and enthusiasm. Midway there is often a slump, a stagnation of ideas, a wondering if this will ever wrap up. Then there's the race down the home stretch, ideas percolating again, maybe more than can be squeezed in, and a gratification of having completed the challenge when all is done. So it has been with my month of daily drawings.

Here are the Zentangle drawings from the 29th, 30th and 31st. I like what I did on the first one, although it is pretty busy, nowhere really for the eye to rest. I had Halloween on the brain as I sketched in some cobwebs. I also tried a new variation on a familiar tangle, that one in the lower right. I think I'd like to play with that some more. 

The second I consider another one that got away from me and got a bit messy. The center tangle is one based on a grid, and depending on how you spiral the lines in the triangular spaces, you can get different effects. But it is easy to get confused, and that is what happened in the larger squares. The Zentangle people encourage you to use mistakes as an opportunity to add something different to "fix" them, which is what's going on in the bottom square, but it makes no sense to what else is going on around it. I wanted to use that over and under woven pattern before the challenge ended so I put it on this one and really should have put it in all 4 corners. Oh well, they all can't be successful.

The last shows more slowing down and thoughtful approach, a nice way to end. I've been saving that feather, a similar technique to the pine bough, only using pointed ends instead of squared off ends and adding the feathery barbs at the base. I was noticing the other night that one of the fabrics in the quilt on my bed has a similar pattern to the tangle I used as background. I'd like to try a variation based on it. But for now, it's back to what's lingering in  my studio. I've been doing a bit here, a bit there on that bookbinding challenge, and it's time to give it some undivided attention.

Sunday, October 28, 2018

#Inktober Adaptations to Tangles

Once you've learned the basics of Zentangling and mastered some of the "official" tangles (here's one source for reference), the Zentangle people encourage you to look for patterns as you go about your daily life that might be adapted into a tangle. Last week while paging through a magazine, I ran across a photo of crystals that reminded me so much of the tangle "reef" (used in the middle Zentangle here), the difference being that the crystals have pointed tops and more than one side showing while reef's tops are flat and the sides one-dimensional. I pasted the photo into my sketchbook and played around a bit with this idea for my October 25th drawing.

Continuing with this theme of adaptation, on the 26th I turned to my little notebook of tangles and the pages showing a pattern I'd clipped from a catalogue that I thought could be used as an alternate to the basket weave pattern on the facing page. Rather than use it as a fill across a wide space, I decided to try it in a border with great results. I added different variations of the tangle "rain" (honestly, the name makes no sense to me) in the center, without much thought to design aesthetics. I was a bit tired and uninspired that day once I tried out my border idea.

In for a penny, in for a pound as they say, I decided the next two squares would also be adaption tryouts. In 2013, Wisconsin friend Michele, who is into photography as much as she is fiber, sent me a photo of shadows cast by a lacy curtain, thinking it could inspire a Zentangle. I agreed and printed it out to file away in the cigar box where I keep my Zentangle supplies and printouts of step-outs. Well, this hasn't taken me long to get over its intimidation, has it? On the 27th, I broke down the elements, recognized tangle-like areas and started drawing swooping lines. I think I've stumbled upon a possible machine quilting design in there.

Finally, on the 28th I thought I'd see if I could adapt a snowflake image, found at the same time as the crystals. This was not very successful, partly because of the wonkiness of the center hexigon and partly because I tried to copy too closely the lines in the design. This needs work and simplification.


Here's what I was working from to try out these adaptions. Click on the photo for a larger view.


Speaking of Michele, she commented on a previous post, one where I'd taken a disappointing Zentangle and rotated it for a better result, that I might put four of them together kaleidoscope-style for an interesting design. As long as I had my photo software program open, I decided to see how that would work. What do you think?


And of course, I had to tray the opposite configuration. It's more of a fan design, and if I could scrunch each one up to meet along the vertical and horizontal center lines, I might have something.  


Thursday, October 25, 2018

More #Inktober Zentangle Borders

You know it when you've found that thing that makes you smile, makes you eager to dive in. That is what has happened with these Zentangles where I've started with a border or frame. While the swoopy, less regimented, almost free form Zentangles do appeal on a certain level, my comfort zone and aesthetic is so obviously tied to a more contained and symmetrical style. I've been encouraged throughout my creative journey to loosen up, throw out the rules, etc etc, and I give that a go from time to time. But it's an uncomfortable experience usually that does not produce results I am thoroughly happy with. Usually but not always. It doesn't hurt to get outside your comfort zone now and then!

But for these three from the 22nd, 23rd and 24th, I could hardly wait for the time slot I've set aside to work on my daily drawing, could hardly wait to try the next border and find something to put within it. I suppose this is the way it goes if you truly have a daily practice of anything. There will be days when you'd rather skip it, feel uninspired, even feel that you are only repeating yourself, and then days when your ideas and enthusiasm are overflowing.

And in these three you also see the way I gravitate toward adding circles, given half a chance. Is it any wonder I often gravitate to adding them in my machine quilting backgrounds as well?

Sunday, October 21, 2018

#Inktober Zentangle Borders

There are tangles that lend themselves to making frames or borders around what else is going on in a Zentangle. For these three from the 19th, 20th and 21st, I wanted to try this idea out. 

These frames appeal to my neat and contained aesthetic while allowing for some looseness in conforming them to a square border. 

It then encourages me to use tangles within to form a vignette that may be recognizable as a landscape or a formal grouping. Or, if in a hurry as I was today, merely to help showcase a single tangle almost like a still life.

By the way, this group started just past the midpoint of this month-long challenge. That is the point where the novelty and charm of a daily challenge usually starts wearing off for me, starts feeling more like drudgery, and my "fun" ideas for what to draw start to wane. Sometimes just adding color to my pen and ink drawings is enough to spark my enthusiasm again, but I'm trying to keep at this without resorting to that. Focusing on frames/borders is doing the trick!

Thursday, October 18, 2018

#Inktober Zentangle Trial and Error

Click on the photo to see details in a larger version
Turning the page again, it was time to try out and practice some new tangles. I have to confess, I was feeling no love while I worked on those on the 16th and 17th. This process, both Inktober and Zentangles, is supposed to be meditative and affirming, but I only felt frustration and defeat. Could not get a nice symetrical shape on the first one, could not follow the step-out of the second one which is just starting with 3 rice shapes placed in a triangle and continuing to add rice shapes to form an overall flower design.

So today I pulled out one I was sure I could do because it starts with a grid of dots like a peg board. Shoulders relaxed as I added the curves dot to dot to form the rice shapes. Joy returned adding the diagonal rice shapes overlapping each other. There was too much error in my trials.

The more I worked, the more ideas came to mind for variations which I eagerly tried. Some are looking very quilty. I think I could do something with these besides include them in a zentangle.

Monday, October 15, 2018

#Inktober Zentangles With Grids

Quite a few of the "official" tangles are based on grids. You can work with something with straight lines like a tic tack toe grid or you can curve the lines to produce either a pincushion or barrel distortion. Filling these distorted squares can lead to some interesting effects. You can also make the lines in the grid curve off at odd angles or keep them nice and symmetrical.

On the 13th I wanted to use a tangle that in the past has worked well in these odd shaped grids. Ack! I did not look closely enough at my step-out and filled in the triangles formed by the extra lines (called a star grid) wrong. I left too much space between the grid line and my fill shape plus did not round it off at the point. I went over it several times to try to rectify this but it just didn't look good to me. What's in the lower right corner is very pleasing to my eye, nice and neat and organized.

On the 14th, I gave that problem tangle another try, using a slightly different curve to the line defining the edge of the grid. Ahh, much better. This is what it's supposed to look like.

On the 15th, I wanted to cover the tile area with a single grid with the center lines straight and the lines on either side curving outward, then find different tangles that would fit in the grid working from the center out. Except for how I finished the last row of grid top and bottom, I'm rather pleased with this one. I'm wishing now I'd filled those leftover squares top and bottom with leaves or circles.