Friday, March 14, 2014

March on the Lake

Considering that a few weeks ago we got 9 inches of snow, our current warm-up to 50 degrees is quite the contrast. After a weekend of rain rain and more rain, two days of this warmer weather coupled with SUN! sent me off to City Beach for my walk. This is my favorite place to sit, the impact that the view has on me lost in the photo. Can't really explain why this particular view feels so special, but it has healing powers for me. I often come here if I am troubled, sad, or in need of working something out. It's also a great place to just be when there's not a thing wrong, and when things are in fact great for a special reason. However, with the breeze off the icy lake, it's still a bit too chilly for me to want to sit and linger.


I wasn't the only one enjoying the park, of course. There were the usual hunters with their metal detectors taking advantage of the low level of the water, people walking with dogs (which raises the question, "What part of 'NO DOGS IN PARK' don't you understand?"), parents with young kids, and people like me just out to enjoy the sun and the view. Frankly, I did not expect to find ice along the shoreline and no one was concerned about "No LIfeguard On Duty". I've seen people wading in the water when the rest of us were still bundled up but not this day.


People had been playing with rocks along the beach. Soon these will be underwater.


Actually, I'd not taken my camera the first day, thinking there'd be nothing to shoot. Luckily, the good weather continued the next so I could get these shots. But even in 24 hours, the ice had started to recede, or maybe the water level rise. I didn't remember this stack of rocks being in the water like this.


But this is the real reason I came back with my camera. This is on the north side of a jetty. I was fascinated by the patterns created, I'm assuming by the wind and the gentle movement of the open water. Maybe by the thawing and refreezing as well.


Looking the other direction out into the lake. Lovely curving scalloping line. Not sure how well you can see it (click on pic for a larger version) but the lake had three distinct bands of color, ending in the dark blue on the opposite shore.


The edge of the ice was a bit broken but hanging together as the water rocked it up and down. 


The next section was quite smooth ice, but with some longer cracks. And finally near the shore, the rounded undulating forms.


They've been replacing the wooden benches with these metal ones, which I noted had some great design motifs and beautiful lines. In fact, I couldn't help but think, now there's a classy elegant bench! I bet if it could talk, it would be with a French accent. "Oh, mon ami, come seet wiz me..."  Oh, did I just butcher that terribly??? 

Monday, March 10, 2014

Time to Over-dye

I've had Ann Johnston's fabric dyeing book, Color by Accident, for years. Even though I'd been dyeing for a few years, part of that time as a business, I was still curious about how others went about it, always wondering if there was a better way. I had quite a bit of dye concentrate left over from my snow dyeing experiment and had been thinking about how to use it up before it lost its oomph out in my cold cold garage. I pulled several other books on dyeing as well, but settled on Ann's because my concentrate was mixed pretty much per her instructions and her method includes applying the dye before adding soda ash. The way I've always done it is by adding dye concentrate to the soda ash solution, then quickly adding fabric. I'd seen side by side examples of both methods and there definitely was a difference. Ann's method looked simple enough, plus it is the one used by one of the members of my art group. I decided to use it to experiment with over-dyeing these two half-yards from my dye session last August. I'd been unhappy with the uneveness of the dye saturation, so they were prefect candidates.


The set-up is simple enough: wet your fabric in a little water and then arrange it in the bottom of a bin or other container. I just "scrumbled" each piece in its own bin plus added a third half-yard of white fabric to a jar to act as my control factor. Next pour the dye concentrate which has been slightly diluted over your fabric. I had golden yellow and basic red which I squirted over the fabric in pretty much equal amounts. I combined what was left in a single bottle and poured it over the fabric in the jar.  You can press on the fabric as much as you want to help distribute the dye or just leave it alone. I really wanted to leave it alone, but was worried about air pockets and the like so tried to hit a happy medium between nothing and too much. Really wanted to see a variety of colors in the end.

After the fabric has soaked in the dye for about 15 minutes (note I bought a new timer just for this!) it's time to add the soda ash. This is extremely low water immersion dyeing and I admit to being skeptical about the half cup of soda ash solution being enough (my freezer bag method require 2 cups per bag). I'd brought my liquids in from the garage the day before to get them up to room temperature, but as I mentioned before, I barely keep my house at that minimum temp so also invested in a thermometer to check my water temps. I warmed the solution in the microwave a bit before pouring it over the fabric. Again, I felt  compelled to press down on the fabric to make sure the soda ash got distributed, even though I really wanted to leave it all alone. That's it - now the fabric sits for 1 to 4 hours before processing. I waited the full 4 hours.


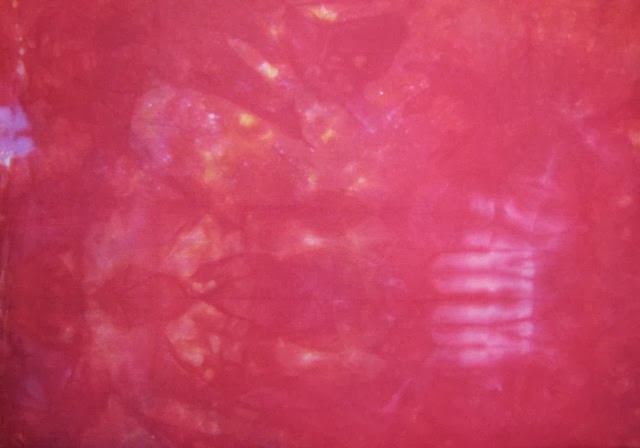
I have to say I'm really happy with the results! The one on the left started out blue and had the most variation in colors and the one on the right started out lavender, bits of which showed through here and there. So much interesting texture going on, showing through from the first dyeing.


I didn't have a sense that I was doing more manipulating of the lavender piece but it came out the most solid. I believe I pretty much covered it with the golden yellow before adding the basic red.


The over-dyed blue is by far the most interesting of the two. Seen as a whole it is not a particularly pretty sight, but it has some great areas and so much underlying texture.


I was counting on the golden yellow turning some of the blue to green, and you can see that happened in a few places. I sometimes say I can't bear to cut into some of the specialty hand-dyes, but I will have no trouble cutting into these.


As for my control piece, the one that was to show me what the dyes would look like without the modifying of the underlying color? Well, I wasn't sure where that piece of fabric came from, either inherited from my friend's or from my mother-in-law's stash, but I was certain it was cotton. Apparently it is a cotton blend as it came out a lovely sherbert chambray. I burned a few threads to confirm and yes, part burned to ash while the rest clumped into a hard ball. You can pick out the threads in the weave that picked up more dye than the rest in the closeup above. I really quite like it.


I had loosely pleated it, then twisted and coiled it before stuffing it into the jar, but there was practically no resist pattern as a result. This was about the only spot that showed any texture. I'm not sure why that was.

You may note that this method does not call for salt, something I have always used. When I was doing my snow-dyeing research, I noticed on the Pro Chem site mention of the fact that salt was not necessary. That reminded me of an internet friend who had run an experiment to see if there was any difference between using salt and not using salt, and she could not see any. Now here was Ann not only omitting salt but explaining that it can actually keep dye from getting into the fibers when using so little water to dye. Apparently the use of salt IS necessary if you are using the old methods requiring lots of water, lots of dye and lots of stirring, the salt helping to pull the dye in. But remove all that water and the chemistry changes. I can't say I'm sorry to no longer have to add salt to my dye bath. 

Sunday, March 09, 2014

Art Journaling What You Want

This week's art journaling exercise uses something I've tried before - drawing wavy lines in which to write your text - see this post. The spread is simply painted, the lines and text applied with the blue pen from my new gel pen set. It was suggested to practice on a piece of scrap paper to get the spacing down right, and I was glad that I did.


So the journaling prompt was to think about something that you really want and why you want it. I really want to visit New Zealand someday - it's been on my list for years. I've blurred my reason - you don't mind that I keep it private, do you? On the opposite side of the spread we were to add a picture or collage a group of pictures cut from magazines or even use a personal photograph on hand. Would you believe I could not find a single image of New Zealand in my stack of magazines, not even in New Zealand Quilter? I guess the dream is all in my head at this point. So I searched the internet for images to download. What a beautiful country! I printed them from Corel Paint Shop Pro where I sized and collaged them on the print layout screen. After pasting the cutout onto the page, there were some blank spots which I decided to fill with spirals reminiscent of some Maori designs. I went over the letters a second time to darken them, and because of that lime green in the map and the lime green in my pen set, I went over the lines, around the pictures and filled in the spirals with green. And now we have told the universe what we want so we can let it go and let the universe bring it to us. Do you believe in that?

I also did some dyeing today - it's in the wash right now, so pictures soon.

Thursday, March 06, 2014

Pairings

When there's been a lapse of creativity in the studio, regardless of the reason, sometimes you just need to get in there and do something...anything...and you can get going again. I'm ready to move on my next art quilt, already in progress, but it's a bit of a mess in there. As I looked around the room, I could see a little straightening up was in order, to free up the work table, design wall, even the ironing board. Time to take down the dyeing results from August and clear the table of the the snow dyeing of last week. But look what happened instead. The design wall is now totally covered with new pairings, new ideas.


I hate it when this happens! I'm trying to stay focused on a couple of specific design ideas, but my brain won't stop seeing new possibilities. When I first put these purple beauties up, wondering what I would do with them, I remembered an African batik that might work with them. There was a collection of them that I'd wrapped around one of those cardboard things that fabric comes on - if you catch a fabric store on a good day, they often have some ready for the garbage and they are more than willing to let you take them off their hands. They are great for longer lengths of fabric or anything you'd like to store without creasing. After washing and ironing these fat quarters, I didn't want to fold them up, so stacked and wrapped them onto the cardboard holder. (What are they called????) When I pulled them out to see if the purple really did work with my new fabric, I just leaned it against the wall, didn't actually peel the fabric off and put it up. Now I know I'm not going to do anything with this for awhile, so I was going to put it back in the closet. Well, maybe I shouldn't put it out of mind like that, so I unwrapped the neat little package with the intention of leaving that top batik and the purple fabric on the design wall for now. It was like opening Pandora's box.


I definitely have so much wonderful fabric collected over the years, and often I've forgotten some of them. I'd definitely forgotten the majority of these. Why were they suddenly the possible answer to what to do with these newly created hand dyes of mine? Remember the stitched shibori overdye experiment that disappointed, so little of the original green showing and now reading a different color? Hard to see in this photo, but now that bit of green showing through is the same as what I'm seeing in the batiks.


And then there was the pole wrapped overdyed shibori from the follow-up dye session that came out so well, a part of one of them peaking out on the right in the picture above. It looks like golden water to me and I intend to quilt it that way. I suppose that might be enough but I've been hoping to come up with something to make it more interesting or help finish it off. Another set of these African batiks have all the right colors and differing values, offering glimpses of a more exciting piece if I can figure out how to incorporate one or more of them.


The other pole wrapped piece was oriented the other way and it too will be quilted along the shibori lines as if they were ripples in a lake. Again, I've been thinking it would need more, and had run across some sheer willow leaves I'd made and had not yet found a home for. I think they'd be perfect scatter across this piece, but again, I felt just a knife-edge finish and nothing more might be a cop out, that I could find a way to add to its basic beauty. This African batik has just a bit of the golden yellow along one edge and then gradates a beautiful deep blue/purple. As I was holding up that yellow edge to my shibori piece, the light reflected off the surface revealing these leaves. All these batiks have been done over jacquards of various patterns, some more obvious than others. This one would echo my idea of adding the three-dimensional leaves.


Also a puzzle what to do with is this piece from the same dye session, created in a tall narrow jar. I often can't bear the thought of cutting these specialty pieces up. I've auditioned different things against it, tried to think of something interesting to applique on it, have come up empty. I never would have thought to try something so dull next to it, but I think this may be what will make an interesting combination. Exactly how I don't know, but I like the possibility. It glows anyway, but something about that dull dark orange and red batik sets it off even more.


Finally, here is one of the snow dyed pieces I was lukewarm about, partly because I was expecting something else and partly because I thought it was too much like ones I already had. I guess I'm tiring of the ubiquitous fuchsia/blue combination. What a surprise to find this batik in the group, so very different from the others, and my snow-dye a perfect complement. What I would make from these two fat quarters, I have no idea, but I love that they want to do a dance together.


Well, that was an interesting and fun exercise, although having nothing to do with March's line-up. I'm sure it did me more good, though, than had I dived right into what I was trying to clear space to work on. And although the design wall remained totally covered in non-related ideas, I did spend a little time with my next project, Upward Tick. I'm going to work on two versions simultaneously as I can't decide between two different border mounts (photos printed on fabric), and whether to use regular cotton or sheers for the circles I'll be adding. The background fabric had already been cut, has been waiting for me to cut the thin black line and fuse it on. One piece got a blue/black batik line which looked much harsher than anticipated. So the second got a dark grey one. Next comes quilting, at least on one of them, before any circles are added. But I couldn't help pulling some sheers and playing with some fabric scraps to get my mind moving.

Wednesday, March 05, 2014

Some Thoughts and Favorite Artists

Bluebird Sketchbook Page by Mattias Adolfsson - Mattias Inks
I follow some artists who are not art quilters, always with an eye to what I can learn from them that would be useful in my own endeavors, and also just because I love what they are doing. With my own activities at a low ebb, this seems a good time to share some recent work that caught my eye. Above is a sketchbook page by Mattias Adolfsson of Mattias Inks, a freelance illustrator living in Sweden. He has a quirky sense of humor that I find appealing, populating his worlds with the most amazing creatures in such incredible detail. But I share "Bluebird" with you because when it popped up on the screen, my first thought was to wonder what he was doing showing us a quilt. Ah, no. It's one of his illustrations, finely wrought with stitch-like detail. Yes, it gives me ideas.

Richard Saja collaboration with Mother of Pearl

Richard Saja detail
Richard Saja of the blog Historically Inaccurate, is a textile artist I've shared before (see this post). He works mainly with toiles that he meticulously adds hand-embroidery to. He too has a bit of a quirky sense to his interpretations. He recently collaborated with the British fashion house Mother of Pearl, and you must see the results here. What caught my eye with this group is how effective adding color to just a portion of the textile can be, as in the example above. I guess I think all or nothing, but here, the unembroidered portions act as a frame to showcase his work as well as flatter the wearer.

Medallion I by Daniel Sroka

I have also been drawn in by the work of photographer Daniel Sroka, whose only quirk is that he produces extreme close-ups. He works with dried leaves or twigs or other things he picks up on his walks, studying them to reveal each's unique personality, a tiny bit caught in focus while the rest stays a blurred backdrop. Like me, he often sees images in ordinary objects: a seashell that suddenly looks like a slipper, a curled leaf becoming a chalice. Like other parts of the country, we got quite a bit of snow yesterday, which I only shoveled, not photographed. But Daniel was out on his deck capturing the most beautiful images of the snow and ice as they melted and sharing them here at Daniel Sroka Open Studio. See the entire set here. 

Are you inspired yet?

Finally, I want to share with you a quotation I ran across a few days ago. There's so much discussion about what is art and what is an artist and what should or shouldn't an artist be doing with his/her work. I liked what Dr. Daniel Siedell of King's College had to say in "5 Things Art Is Not", especially this:

"An artist does not paint a picture to express what she already knows or believes. She paints to learn something about herself and the world—something she doesn’t already know. Oscar Wilde wrote that the work of art "has an independent life of its own, and may deliver a message far other than what which was put into its lips to say." A work of art does not point back to its maker, but looks out to you the viewer. It’s not concerned with beliefs or thoughts of its maker. It’s addressing you and your heart." 

Tuesday, March 04, 2014

February Wrap

This won't take long. February is a short month to begin with, but my quilting really took it on the nose since so much of the month was devoted to all things sinus related. When I made out my list of things I might work on, I transferred the few things I didn't get to from the January list and added quite a bit more - very optimist. As I look at the list now, I see I only managed to cross off one thing, finishing the quilting and binding on the half-square triangle quilt. All else remained thoughts and dreams in my head - not totally bad. The art journaling is not part of the list since it is a weekly routine, & I did managed to stay faithful to it. I also don't note sketching activities like the Zentangles, although maybe I should. They were a good substitute in those weeks after the surgery when working in the studio simply was not an option. The snow-dyeing was an impulsive spur of the moment thing - I allow for that, and I must say it felt very good to be doing something - anything - with fabric again.

I want March to be different, of course. I'm planning on applying for ArtWalk again, so need to finish a piece or two for the application form due mid-April. Those pieces were on February's list, so they will top March's list. I have the makings of another padfolio ready to go (and a taker for it), so it too is on the list. In fact, I can pretty much scratch out "February" and write in "March" and be ready to go. Now, if the body will just match the willingness of the spirit!

Sunday, March 02, 2014

Art Journaling with Bubble Wrap

It's Sunday already and time for another spread in the Positively Creative Art Journal. I'm guessing there's hardly a reader of my blog that hasn't heard about stamping with bubble wrap, and probably many of you have actually tried it. It's been on my radar for years, and yes indeed, when I rummaged through my stamping/painting supplies, I found some small pieces of bubble wrapped tucked away. These are very small bubbles, and probably because of their age, a bit deflated. Still, they worked just fine. First step, stamp a few times across the unpainted page with one of the colors.


Second step, paint over the page with another color. Remember the nice swirls I said I got on a previous page but lost because I added more paint to more thoroughly block out the text on the paper? I used that same brush and color of paint here, and since the bubbles were not to be totally obliterated, I didn't have to worry about full coverage. The directions did say to wipe some of the paint off, but that wasn't necessary. The yellow did knock back the green a bit more than this picture would lead you to believe.


Third step, stamp with the bubble wrap again with a third color. I'd rinsed the first color out of the foam brush and thought I'd squeezed all the water out, but there was enough in there to leave the violet paint a little thin. A different effect that I did not dislike.

While the page dried, I reviewed the journaling prompt. I'd read through the lesson after finishing up last week's spread and had been thinking about Dale Ann's challenge to avoid using "don't", "no" and "not". Catch yourself phrasing something in the negative using one of those words, try rephrasing it in the positive. I know what she's getting at here, but I truly found it difficult to catch myself saying or thinking things that needed to be rephrased. Instead, I started thinking about how it feels when someone says, "Don't" or "No", and what might be a good response. I think that thought comes from my iRest Yoga Nidra practice of the last few months as well as my resolution word focus of "explore". How can you explore if you put up barriers of don't do that and this is not working? I roughed out a possible design so I wouldn't forget. 


As I prepared to add text to the page, I was happy that cut and paste was optional - not really in the mood to page through magazines for letters and words today. But I haven't been terribly happy with my printing on previous spreads. Wait! I have an alphabet stamp set! Time to get it out and use it.


I've really liked using the Gelly Roll pen but I only have it in white. My other pens have not always worked well on the acrylic paint and I've been frustrated by the limited number of colors on hand. So when I went to Staples to take advantage of their 20% off everything in your bag sale, I was hoping that they would have some gel pens in stock. I took a chance on this set by Sarasa, partly because of price and partly because of the variety of colors. They flow quite nicely and the retractable feature is quite convenient. The .07 point gives a thinner line than I'd hoped but so far that is the only drawback. According to the label, they are archival and acid-free, and I found they flowed across the painted surface without a glitch.


So I used a couple of different colors to help isolate the negative stamped words from the challenge response to them, and added some additional text borne of my yoga studies. The wavy lines filled in with cross-hatching didn't work quite as well as I thought they would, but I'm reminding myself that this is part of why I'm doing these exercises - to try things and see what works and what doesn't. Why not?!?


Oh, and one last thing. I decided to use a babywipe to clean off my stamps, and it was quite messy. Oh, let's stamp the excess ink off first onto this scrap piece of paper that has been saved to use in a future lesson. Ooh, I like that! And then I stamped on the babywipe and saw a good image come off. I swore I would not save these babywipes to incorporate into my art as some do, but here I am, my waste-not-want-not mantra leading me astray... 

Saturday, March 01, 2014

Snow Dyeing


Proof of how easily dye powder migrates
Snow dyeing has never appealed to me; it struck me as one of those jump on the band wagon fads which was enough to make me disinterested. Still, I've read the articles, studied pictures of results, tried to figure out its appeal, came to the same conclusion every time: puzzlement at its appeal and no interest in trying it myself. Really. I'm not interested. So many other things I'm more interested in trying. Perfectly happy with how I normally dye although there are some variations I'm curious to try. But not snow dyeing.

So why did I find myself last week with this sudden itch to give it a go? Well, there was the Quilting Arts Episode 1303 that I watched which demonstrated faux snow dyeing. Something about actually watching someone do it... Then I saw some fabulous results by a couple of bloggers I follow. I was beginning to see how their results differed from other ways of dyeing. And of course, there was the snow outside my door and an abundance of dye powders gifted to me over the past year. What did I have to lose?

Even with printed instructions from the Quilting Arts website in hand, I did a little research to see how others were going about this. Frankly, I questioned those first directions, knowing what I know about dyeing. Anyway, I discovered there are two ways people are approaching this. There are those who soak their fabric in soda ash and mix their dye powder with water and process their dyed fabrics pretty much as soon as the snow has melted. Then there's the other school that soak their fabric in soda ash and mix their dye powder with a water/urea mixture and batch the dyed fabric for up to 24 hours after the snow melts. I found instructions for the latter method on Pro Chemical & Dyes website. Now there's a trusted name. And I have a ridiculous amount of urea on hand. So I used these instructions as my guide.


Now I've seen some pretty ugly (in my eyes) snow dyes and some very beautiful ones as well. The ones striking me as not so great often seem to be the result of throwing too many colors together, or perhaps just not thinking through what the colors might look like together. I decided to consult my dye records to help me choose a direction. I just love the orangey rusts of the run on the right and could use some of it in my stash. That recipe called for strongest red, golden yellow and a bit of chino. I didn't have strongest red on hand so substituted basic red. The dye recipe on the left includes fuschia, bright blue and black, all on hand. No matter how these turn out, I should at least like the color combinations.

There are other variables to snow-dyeing. Pro Chem covers two of them. You can mix your dye stock into snow before covering your fabric with it, or you can squirt or pour the dye stock directly onto the snow after it has been mounded over the fabric. I was not in the mood to be mixing dye stock into snow in a big bowl or bucket, so I just squirted it on. Another method is to sprinkle dye powder onto the mounded snow. I wanted to try that method too. I decided not to make a big production out of this, but just do a few fat quarters to test things out. Always bothered by waste, I was happy to find in my research that many lay a piece of fabric in the bottom of the catch basin to soak up the dripping dye.
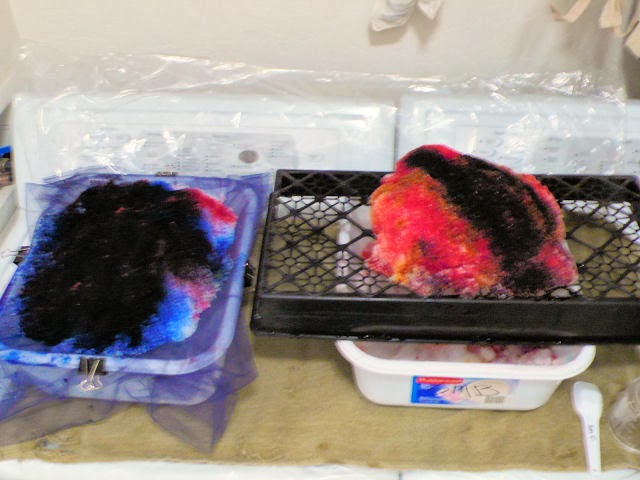
Tulle support on left, garden store tray support on right
Once my fabric was soaked, I moved the whole operation outside, and I am so glad I did. Even if I had not been sprinkling dye powder over the snow-mounded fabric (you can see in the top photo how that went), I still would have made a mess as the snow shifted and dribble past the edge of my tubs. Should have used larger receptacles. I must note that I really like the way the tulle (held on with binder clips) supported the fabric/snow. And for the first time, I used squirt bottles to mix the dye solutions, discovering as I vigorously shook the red that the top was leaking. Oops - can't believe I didn't get any on me but the snow looked like a crime scene with drops of blood. What must the neighbors think? I found it hard to know how much of the dye solution and powders to use but I eventually got everything squirted and sprinkled and wiped up enough around the edges to move inside for the slow melting process.


Before going to bed, enough snow had melted to cover all with plastic to keep the fabric from drying out while batching. All directions I read said this batching needed to be done at a minimum of 70 degrees. I barely keep my house at 70 degrees during the day, let alone at night. The one room that is warmer and has a floor vent is upstairs. No way I'm hauling this potential accident waiting to happen through the house and up there. I'll just have to trust that time and the barely bare minimum will be sufficient.


Ok, these look promising. Note the fabric lurking in the run-off in the bottom of the bins. Time to rinse, rinse, wash with Synthropal, set with Retayne and iron. And I was equal parts disappointed and happy.


This is the red and golden yellow dye solution result (I also sprinkled a little chino powder over the top). Pale, not very interesting textures, not unlike I could have gotten some other way, I'm thinking, and very pink. Some of the tanness I think can be attributed to the unbleached muslin that I used. They do warn that the dyes get quite diluted with the snow, but I did mix them about double strength. Perhaps I just didn't put enough solution on. Or perhaps it's that the dye powders are quite old.


Or not. Look at this great piece, the white cotton that was in the bottom of the bin. I just love this one.


On to the sprinkle technique, again done on unbleached muslin. If I remember correctly, I sprinkled the fuschia on first, then the bright blue over it, and topped it off with a little black. Again, pretty pale, pretty uninteresting to my eye (especially if you'd seen the successful snow dyes I'd seen on line).


There were only a few spots that remotely exhibited the texture I'd seen covering whole yards of snow dyes. There are so many variables with this process, including the water content of the snow you use, that I can't begin to analyze any of this in the hopes of better results should I try this again.


But oh my - look at what came out of the bottom of this second bin. I am in LOVE! And I have no idea why those places in the fabric that were not totally submerged came out pure blue. I would have thought some of the fuchsia would have wicked up into them.


This was the white cotton again. I might have gotten better results on the pieces directly under the snow had I stuck with white fabric, but that was one of the things I wanted to explore - how using an off-white instead of pure white base fabric will effect how the dye color reads. I'm most puzzled though, that none of these came out very close to the colors I was going for. I think that first piece is headed for an over-dye.

Will I do more snow dyeing? I'm thinking not. I really don't enjoy messy processes, let alone ones where I feel I have no control, and this snow dyeing was both. On the other hand, I have quite a bit of dye stock left, I'm catching my subconscious working out what ifs in terms of adding other colors, and it IS snowing outside...