And Happy New Year!
Exploring the creative journey...MY creative journey...as expressed through textiles. What nurtures it, what blocks it? Inspirations, frustrations and "doing the work." Oh yes - and the occasional rant.
Monday, December 31, 2007
It's New Year's Eve...
And Happy New Year!
December Journal Quilt
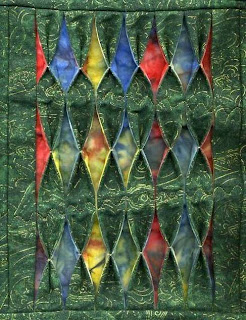 Here is the final journal quilt of the year, the last of the series based on themes and quotations from a 2004 calendar entitled "Simplicity: Inspirations for a Simpler Life." December's theme is "Insight" and the quotation from Aldous Huxley: "The smallest fact is a window through which the infinite may be seen." I didn't have to think twice about what I would use to interpret this. I'd saved an article from the September 2007 issue of Quilters Newsletter by Margit Morawietz about "Folds, Pleats, and Tucks" which showed how to manipulate pleats to reveal diamonds of fabric - a little like Cathedral Windows blocks. I didn't expect to see "the infinite" through my "windows" but at least I might gain some insight into a new dimensional technique.

These strips were alternated and sewn together into what looks like a stripset. I figured accurate straight seams were important, so used my trick of pressing a small PostIt note pad next to the presser foot as a guide.

Next, seams are pressed open. I used another trick of mine - draping the piece over a tailor's seam or sleeve roll. This effectively keeps the seams on either side of the one I was working on out of the way of the iron.

Here's the pressed strip set ready for the next step - folding and pleating.

It's difficult to get a picture of this first fold, but if you look at the top, what I've done is folded back the green strip right along the seam line. Each seam line gets the same treatment.

Now for the pleating. Margit likens this to box pleats you find in skirts (maybe you have to be of a certain age to remember those?). I finger-pressed a short fold on either end of the batik strip to mark the center of it. Then the fold along the seam is brought over to that line and the pleat it forms pressed into place. This was a tedious and time-consuming task, I discovered.

To hold the pleats in place for the next steps, it was necessary to pin, then sew lines of basting across them.

Here is where the process started breaking down for me. Normally, this pleated section would be inserted into a larger quilt top design. In this journal quilt, it WAS the whole design. Before doing the tucking part, I was supposed to "complete" the quilt, i.e., layer it, quilt it and bind it. The pleated section was to have no quilting on it. Well, that wouldn't do, so I set my machine to an undulating decorative stitch, put in some gold metallic thread and stitched two horizontal quilting lines that divided the top into 3 more or less equal sections. I sewed on binding to hold the edges in place, but didn't totally complete it because of the way I print a label and fuse it on as backing once I've completed all the sewing on my journal quilts. I still had technique to work through, so was lacking all the information I would want to put on the label. I also wasn't sure if I'd be doing more stitching all the way through the layers. If so, I wouldn't want that happening over the label and obscuring the information there. I'd just have to hope I could continue on.
Up to this point, the directions had been very detailed, but now that I needed specific information, the directions went general: "Using a thread color of your choice, tack the edges together with a few stitches..." I could see from the photos what I was to do, but there was no suggestion of how to secure those tacking stitches. I tried several things, and eventually realized I could leave the knot on the front because it would be hidden once the tuck was taken and stitched. A backstitch along the side of the tuck followed by pulling the thread through the loop to knot it didn't show much, and I could pull the thread end into the fold. Nowhere could I see that you were to run any stitches all the way through - the entire pleated and tucked section just sits on top of the batting and backing unsecured. I am really uncomfortable with that.
But what bothered me even more was the way the whole piece buckled as soon as I tacked a tuck. My three sections, as you can see below, undulate like swells on an ocean. The thimble placed in one of the "windows" gives you an idea of how deep they are. I don't think this will flatten out with ironing - if it does, I think it will change the look of the tucks to something undesirable.

Bottom line: This is far more dimension than I am comfortable with. It uses a lot of fabric and takes a lot of time to sew and press. And unless I missed something, I can't imagine how you could ever have a nice flat and well-hanging quilt inserting this kind of dimensional accent. I doubt that this is something I will ever use. As always, clicking on any picture will pull up a larger view.
Sunday, December 30, 2007
Redwork Cross
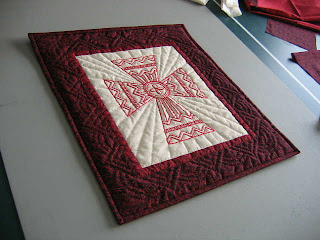 When last I reported on this project, I was scrambling to finish it by Christmas, along with the normal holiday preparations. I indeed completed it to present to its new owners on Christmas Day. See these posts here and here, for info regarding adding the borders and the quilting process.


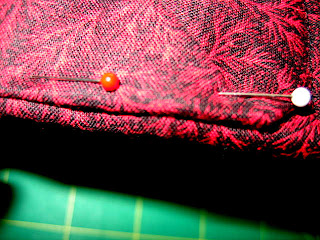
And here you can see how much of a sleeve it makes and how nicely it lies without pulling on the quilt at all.


Saturday, December 29, 2007
Merry Christmas To Me
 This arrived before Christmas, a little gift to myself. I was ordering some notecards on the Metropolitan Museum of Art website, and popped into the sale page out of curiosity. It is divided up into departments: jewelry, shawls, art books... I certainly don't need more books, but I thought I'd look anyway - they often have exceptional discounts on coffee table books. Once you click on books, you get another page of subdivisions, and there, advertising one of them was this book. I couldn't believe it. I first became acquainted with Signac through an article in the Smithsonian Magazine. This is the painting that captured my imagination and wouldn't let go.
 As you no doubt have guessed, it was that background, so reminiscent of fabric, that intrigued me as well as the curving lines. I took it as a personal challenge to test my technical prowess: could I draft and piece a similar background to make a small wall quilt. I used the Hoffman Challenge fabric for that year and submitted it for consideration - but it wasn't chosen. Ah, well, I was happy I made it anyway.
 I was in one of my stubborn moods when I made it. Every curve you see, with the exception of the circles, are pieced, not appliqued. One section in particular was nearly impossible to do that way, and to the casual observer, it actually looks to be appliqued. I learned a lesson there about how far to take curved piecing.
I quilted the heck out of it, trying different designs I'd seen used elsewhere, then added lots of beads. The hand didn't get added until after the piece was rejected by the Hoffman Challenge jury. A friend kept insisting I must put that hand in there. Having no faith in my abilities to draw it freehand, I scanned my own arm and hand, then traced the outline from that. At one point I'd considered dangling some of the challenge fabric from that hand, but in the course of making this, it started reminding me of planets swirling in space. I named it "Night & Noon on the Planet Hoffman" and thought of the hand as a great creator bringing a special universe into being. So sprays of beads rising up out of the hand seemed more appropriate.

The book is beautiful, I love the rest of his work as much as what I had already seen, and the book also includes works of his contemporaries like Monet and Seurat. I feel like I hit the jackpot!
As always, click on any picture for a larger view.
Friday, December 28, 2007
More Christmas Bounty

Thursday, December 27, 2007
A Bountiful Christmas
 I thought I would share some of the quilt-related gifts I received this year. This gift bag isn't exactly that, but it sure is cute. I'm wondering if my mother-in-law made it - she was toying with a Christmas stocking for an addition to the family, so maybe she got ambitious. She'll probably laugh when I ask, followed by a long, 'Nooooooo!" She used to do a lot of sewing and needlework, but not so much anymore.


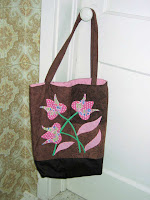 This particular friend wasn't done with me yet. The books were tucked inside this tote bag, which is a bit of a private joke between us. I'd started the block in a workshop with the "Piece o' Cake" ladies who were touting their new line of fabric. We were given kits for the block, and while I loved the brown background squares, I just about couldn't stand the bright striped and dotted fabric mixed with that electric green. I forced myself to finish the block, telling myself it was good practice for learning their unique method of applique (which I really liked), but I really hated everything about it. The pattern style and the fabric just weren't me.
Wednesday, December 26, 2007
My Condolences...
 I have fond memories of "Christmas Vacation" both when I was in school and later when I worked in the public school system. That lovely week between holidays, before the beginning of the New Year, before having to get back to seriousness and commitments, was always full of sleeping in, reading, knitting in front of the fireplace, listening to holiday music. Mom was a teacher so had that vacation too, but Dad only had Christmas Day and New Year's Day off. He worked underground in a silver mine, a physically punishing and dangerous job. That's him on the right, filling in for a shift boss and giving a tour at the 3000 foot level to one of the mine directors (spring 1958). Paid holidays were few, paid sick leave nonexistent. It's no wonder he slept so much on those few extra days off. There were times I could sense the resentment when he had to head back to work the day after Christmas while the rest of us goofed off.
 He was lucky to spend so many years underground with only a few minor injuries. He did have a few close brushes with death, and his survival wasn't all luck. I found this 1961 photo with a typewritten note from "Larry" saying, "I appreciate your efforts in keeping your work place with good floors and the necessary safeguards." That's dad on the right.

The mine is still in operation today, men still taking extraordinary risks to support their families. Here's what it looks like on top, no hint as to the dark and dank recesses the miners decend to.

I'd like to think that things got easier for dad as he got older, and we five kids also got older and responsible for ourselves. My brothers are all quite a bit older than me, so I remember many years of feeling like an only child, spending lots of one-on-one time with dad in his off hours. Here we are on vacation in 1968. I think he's trying to suppress a laugh there.
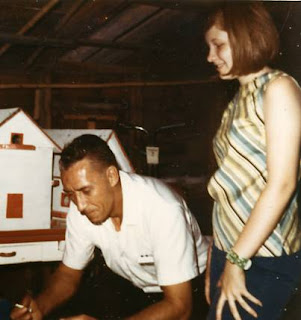
I'd also like to think that he never forgot the good times interspersed with the harsher ones. This is one of my favorite pictures of mom and dad when they were courting in 1937. He was in the Civilian Conservation Corps at Pactola (South Dakota) and she came out to the camp with her church group which put on dances for the boys.

Thanks for indulging me as I drifted off into a family memory. I meant to tell you how I dreamed of spending this week catching up on my reading. like in the days of my youth. But since that isn't going to happen, this little sidetrack was a very pleasant substitute.
Monday, December 24, 2007
Merry Christmas

My sister-in-law, Jackie, picked up this card for me at an arts and crafts fair in Southern California. The artist is Yvonne Rice of "One Winged Angel Company" in Redondo Beach, CA (y.rice@verizon.net).
May many angels watch over you as you travel and spend time with friends and family this holiday season.
Saturday, December 22, 2007
The Other Side of Winter


Thursday, December 20, 2007
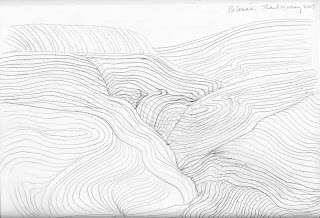
Zentangle
Tuesday, December 18, 2007
Holiday Break

Friday, December 14, 2007
Quilting Coming Along

I spent some lovely time hand quilting this afternoon. As near as I can tell, the 505 Spray Baste used to hold the layers together is doing just that and is not causing any drag on the needle. The untested batting is behaving as well. I may need to buy some of this and make up a real sample, one I can test both hand and machine quilting on, then wash to see how it reacts. It appears to have good stability while maintaining a lightness and needles easily.
The book showed two ideas for quilting: crosshatching (hand quilted) and meandering (machine quilted). One of the reasons I chose handquilting was because of the difficulty of manuevering around the embroidery by machine. I wanted to outline various parts of the cross with stitching comparable to stitching in the ditch - something I felt much easier to do by hand as in the picture above
My first stitches, however, were taken in the ditch between the panel and first border. Everything I read when I first started quilting recommended quilting from the middle and working to the edges. I started to question the necessity of this once I purchased a full-size quilting frame. It was made by Grace and rolled the quilt from one end to the other. I just knew my quilt would be skewed in some way because I wasn't quilting from the middle out, but it was not. I questioned more when I read of women like Suzanne Marshall quilting full size quilts without benefit of any hoop or frame. I had to agree with the logic that, if I quilt were properly and thoroughly basted, shifting or bunching would not be a problem so it shouldn't matter where you started quilting. This theory was reinforced once I got into machine quilting. I was taught by Harriet Hargrave and Diane Gaudynski that my first machine stitches should be ones to stabilize the main vertical and horizontal seams of the quilt. Once done, then I could start quilting any section in any order.
And so you see, with a bit of confidence, I stitched around the border seam first, then stitched around the ouside of the cross, then went back to complete the border. It has the most "fragile" marking, and I wanted to get those areas quilted before any of the markings rubbed off - easy to do when rolling and turning the piece to get to the middle section. Having the border quilted first will also help me know how much quilting to put into the body of the cross. I could stitch along each embroidered line but I don't think that will be necessary or even desirable.
As far as what I quilt with, I am using Coats & Clark 100% cotton hand quilting thread with a Roxanne #11 between needle (very short and fairly thin). I also use a Roxanne Thimble. I'd tried several different thimbles and brands of needles, but after watching Roxanne's daughter demonstrate the thimble and her method of hand quilting, then trying the thimble myself, I was sold on the advantages. My stitch length immediately shortened and the strain on my hands and fingers nearly disappeared. Yes, I'm a convert, but unless you do a lot of hand quilting, you may not want to make the investment as those thimbles do not come cheap. And as long as I was sold on the thimble and her basting glue as well, I decided to give the needles a try. Here is the website where you can see all the products and learn more about "that perfect stitch."
Thursday, December 13, 2007
Moving On
 I've been collecting quilting patterns and ideas for quilting for nearly 15 years, dutifully filed away in this folder. There's no way I will ever use all the patterns in there (let's not talk about all the books I own with quilting patterns in them), yet I rarely cull the collection. That's the thing about quilting - you just never know what idea will suddenly be just the thing for your current project. I was actually looking for a Greek Key design for the border, but instead, I found the border idea cut from a Piecemakers calendar a long time ago, and this is the first time I've had an opportunity to use it. It perfectly picks up the design elements in the cross itself. (Click on the picture for a larger view - it is the strip to the left of the panel.)
  It took a little figuring and fudging to come up with a dimension for the triangle that would fit evenly in both the top and side borders - cutting a strip of paper the two lengths and playing with folding them yielded the dimension that would work. I used this Omnigrid triangle ruler as my template, placing a piece of painter's tape on the back side where I needed to line the ruler up to the border seamline. Spacing of the inner lines were a guess - what looked right. The semi-circles were drawn with a compass. Simple simple simple. No templates to make, no stencils to cut. I've used my absolute favorite white marking pencil (that is, when I need more permanence than soapstone or chalk can give me). It is a Nonce pencil, inexpensive, easy to sharpen, but soft enough to mark easily. Most important of all, I've never had any trouble removing it when the quilting's done. It can be rubbed off or washed out either one. I've had the same good luck with the Berol pencil.
Wednesday, December 12, 2007
The Pink Quilt
 Here it is, done at last and now on its way to my grandniece. It is about 43 x 54 inches. This method produces a two-sided quilt, with this view being the "front" or the side I concentrated my design efforts on. My camera had a hard time capturing the different pinks accurately, but I think I tweaked it fairly close.
 And this is the "back" or the side I paid no attention to as per pattern instructions. In many ways I like this side better. In truth, I really struggled getting a decent balance. Part of that was the method itself, part of it the limitations of the fabrics I had on hand.


