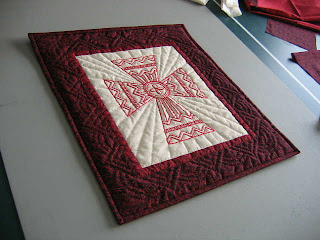
 When last I reported on this project, I was scrambling to finish it by Christmas, along with the normal holiday preparations. I indeed completed it to present to its new owners on Christmas Day. See these posts here and here, for info regarding adding the borders and the quilting process.
I tried a different way of applying binding that incorporates the pocket as part of the binding. It was devised by Gretchen Hudock and detailed in the September 2001 issue of Quilters Newsletter Magazine. Gads, I didn't think it'd been THAT long since I saved it to try. Maybe I put it aside because most of the quilts I made up until a few years ago were going into shows requiring a 4 inch hanging sleeve. This method produces a narrower sleeve well suited to smaller wall quilts that may be bypassing the traditional exhibit route. The instructions are still available in pdf format on QMN's website here.
Basically, this is a french fold or double fold binding that is cut twice as wide as normal. The extra that ends up on the back doubles as a sleeve, top and bottom. Some quilts benefit from the weight of a rod along the bottom.
The direction said to cut the binding strips 5 inches wide. I would normally cut mine 2 inches although I know many people who use 2-1/2 inch strips. I decided to go with her directions on this trial piece, but I think a 4 inch strip would have been wide enough for me. Press in half and sew on with a 1/4 inch seam allowance as you normally would. Here's a picture of the back before turning the binding over it. It will cover up much of that border quilting.

When the binding is turned to the back, the sides are turned and pinned first, then the top and bottom. This is different than the normal way which folds to reduce bulk at the miters. It is what allows a rod to be run under the binding. The binding is then held in place by stitching in the ditch from the front. This also catches the ends of the binding where they were folded under - see picture below.

The picture also shows the loose flap that results. The directions didn't say to stitch this closed, but I knew from experience this would forever be catching the rod. Since the extension of binding had to be hand stitched in place anyway, I continued all the way up and caught the fold on the underside as well - see below.

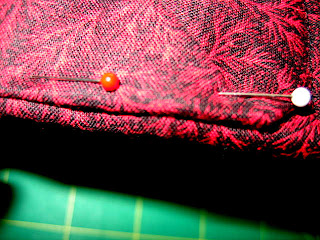
It was at this point that I remembered that I like my sleeves to have a little ease in them, not lie flat against the quilt top. Otherwise, the rod can cause a visible lump across the top of the quilt. I decided there was no reason why I couldn't create a little fold by pulling up the binding a little before stitching it in place. Here I have the fold pinned about 1/4" below the edge of the binding. You can make out the top stitching on the right side.

Here's a closer view of the pinned fold.

And here you can see how much of a sleeve it makes and how nicely it lies without pulling on the quilt at all.

I decided not to make the fold on the bottom sleeve. Here you can see how much wider that makes the sleeve.

I generally use 1/4 to 3/8 inch wooden dowels to hang my smaller pieces. Here you can see how nicely this sleeve-in-a-binding works. The angle of the miter leaves plenty of dowel exposed to rest on push pins or nails to hang.

As with most methods, there are pros and cons. You could not easily use this method on a quilt unless there was one side at least 16 inches long. When you join the "tails" of the binding on an angle, that 5 inch width suddenly stretches, and you need a good 10 inches between where you started and stopped stitching to maneuver in. Also, this methods provides no extra protective layer of fabric between the rod and the quilt back. There's always a chance that a wooden dowel will emit acids that will stain the quilt, which is why I usually use a tube-style sleeve. This problem is easily solved though. Gretchen uses fiberglass rods used for electric fence posts which have the additional benefit of not warping.
As for pluses, I felt this did take less time to do than sewing on a separate sleeve and I liked the fact that I wasn't stitching extra layers of fabric into the binding area as some sleeve methods have you do. I encourage you to give this one a try.
1 comment:
This piece turned out really nice. I'm sure the owners will love it.
Thanks for the link to that pdf. I have all of my old QN's but don't remember that article. I think I will try it on something small.
Post a Comment