Thursday, January 31, 2008

And more...

Reaching critical mass here. I'm beginning to feel like the people who live in the Tahoe area who have trap doors in their roofs so they can escape when the snow piles over doors and windows. Where the snow slides off the roof, it is stacked above the window sills (this is my studio window), and my satellite dish is in danger of being swallowed up. After more slid off in back, I noticed the pile is only a few feet from the eaves. I'm thinking a lot about my grandparents who homesteaded on the Dakota prairies. I grew up on stories of 10 foot drifts and getting out the horse and sleigh to get into town or to the next farm.


I got my mail yesterday, but today they didn't deliver. Another 5 inches of snow fell overnight, and it has warmed up above freezing - a mixed blessing. The accumulation on the shoulder next to the mailboxes is part from the sky and part from the snowplows. What they spray from the highway has de-icer in it and so the shoulder is a slushy sloppy mess.

I spent about 3-1/2 hours yesterday removing the berm next to the car and shoveling all around it and at least a car's length behind and in front of it so I could get out today. Oh, yes, and I also used the shovel to remove the over 20 inches of snow stacked on it. I normally use a broom to do this, but the bottom 6 inches had a crust over it, followed by the next two snowstorms worth of snow. I could move the snow under the crust, but the crust just sat there. So shovel the car off I did. The warmer temps today made the new 5 inches easier to remove, and the ice on the windshield had melted away.


Yes, the mixed blessings of the warmer weather. The snow slides off the roof and hangs maybe a foot beyond the edge before it finally breaks loose. Here it is encroaching on the porch itself...


And filling the opening off the front of the porch.

And yes, more is expected tonight.

And you have more questions. Annabelle commented that the UK where she lives would grind to a halt if it were hit by this kind of snow. Ah, but this is Northern Idaho, where we are supposed to expect this sort of thing. There are a ton of Subaru Outbacks like mine - all-wheel drive - and 4-wheel drive trucks and SUV's. We are prepared as long as the plows push most of it to one side. Still, we are on the verge of breaking a record here. We have gotten over 80 inches of snow already this winter, which is well over the average. In anticipation of the additional snow scheduled to dump on us in the next week, the county has declared itself a disaster area. See these two local articles for more details: here and here. So while we have not ground to a standstill, we are finding it challenging to negotiate all this. I was just a little irritated at the weatherman who seemed to think the warmer weather was a good thing because it would melt some of this (can you say sloppy mess with standing water to hydroplane through?), and flippantly noted that in a few weeks all the snow would be gone and we'd be left with our stories of the winter of 2007-2008. Gone in a few weeks? I rather doubt it. I'm sure my piles of snow will still be lingering come April.

Annabelle wanted to know what my dog thinks of it. Well, she's a dog - she loves it! She refuses to wait until I've shoveled a path; she dives right in and plows through it, bad shoulder and all. She loves to stick her head in it and woofle around. She's been pretty patient about hanging around while I shovel, but it tires both of us (even though she's doing NO work!) Her limp is worse and she sighs and moans a lot, but then, so do I.

It was pretty interesting to get out today and see what the rest of the area looks like. I'd heard that people were complaining about how rough the roads were. Well, duh - we've had a lot of snow and you can't always plow right down to the pavement. Warmer weather, and yes, that layer of snow pack is going to break up. Semi's have been told to chain up period in Northern Idaho so that chews up the roads too. Sidestreets are slushy. Standing water in the roadway abounds where drains are clogged. I was pretty impressed with Wal-mart's parking lot, though - they'd done a fine job of plowing.

So I've had my day out, ran the errands, and am ready to hunker down for the next two or three storms coming through. I am getting nothing done in the studio - all my time and energy seem to be consumed by keeping up with the snow - common lament in these parts. I am becoming one with my shovel...

Tuesday, January 29, 2008

January Snowdrop


It's going to be a long time until the first blooms of spring emerge. When I saw this glob of snow hanging from the branch, I decided it was winter's answer to the snowdrops of spring. I don't think I've ever seen anything quite like this before. I have no idea what the snow would be clinging to in order to build up like this. I'm sure there's nothing on the end of that branch, except perhaps a small leaf. It is quite large - maybe 6 to 8 inches long.

Dread & Uncertainty

Several people have asked me about being snowed in. Can I get out? Well, you can see from the picture above and below that no, I cannot. What about food? I had the foresight to stock up before the storm hit so I am fine for quite a while. It's more the lack of mail that bothers me. Below you can see just how close to the main highway I am, a highway that is plowed and passable. The truck passing by is right where my driveway comes out. There's a fence that runs on either side, obscured by the snow banks, and on the other side of that a rather wide shoulder where the mail and paper boxes are. The paper delivery person just tosses my paper onto the snowbank on his/her way by if he/she can't manage the shoulder. The post person, on the other hand, just drives on by. No mail in, no mail out. Disconcerting. Have I lost power? Thankfully, no, although many have. The snow of the weekend was very heavy. The 7-1/2 inches that fell today was very light. If I did lose power, I think my gas earth stove would still work and keep me warm. I've not had to test that.


Does being snowed in make me uncomfortable? Not really, since I'm not one who goes out every day anyway. But then I got to thinking about what if there was a fire? Or I got ill and needed to be transported to the hospital? Emergency equipment would have a time getting in. Then I got uncomfortable.

But all is well now, at least for the moment. My landlord's groundskeeper made it out today and got the majority of the snow shoved off to the side. I even think the post person will consider delivering my mail tomorrow and taking away my bills. Here she is doing her thing. And while I appreciate the driveway being passable, I was not thrilled with the 2 ft high, foot wide berm she left piled up next to the car. I had enough to move without her adding to my pile. Oh, well, be thankful that she was here at all today.


All this wild weather has helped me identify something about my character and habits that I've been struggling with. I suppose this is pretty obvious, but it dawned on me that much of my procrastination behavior is fueled by dread or uncertainty. One feeds off the other. Both drain me of energy, incentive, motivation, will.

A single bad experience can stay with me forever, causing me to dread having to face the same situation again, even if I've had positive experiences with it. This was what slowed me down last week with both projects. I kept avoiding the printing trials because I dreaded the possibility of fighting with the process as I have before. I also tried to avoid making the mount for Grid 4 because it involved using a large piece of Decor Bond. I had great success with Decor Bond up until the last 3 or 4 times when suddenly I was getting bubbling and distorting. It wasn't reacting as it always had; I couldn't think what I might be doing differently. I mourned the loss of my favorite stabilizer. I dreaded using it again because I'd lost faith I could apply it successfully.

In both cases, the answer was to take a deep breath and go slowly and meticulously through the process. In both cases, I had excellent results and got control of my demons.

Of course, there are all kinds of things in the rest of my life I dread too. Anything that might result in a confrontation. Anything that might catch me off guard and looking stupid. Anything I think is more than I can handle. When I dread facing something, I find lots of ways to procrastinate including doing nothing at all, not even something I would enjoy doing. I hate that about me - it is so counter productive and illogical. But the reality is, dread over one thing drains me of my will to do anything. I've dreaded many mornings lately, knowing the chore ahead of me with the shovel, unsure if I have the physical strength and stamina to keep up with this snow. But once I get out there and get going, I seem to manage ok, and I can get on with my day. If only I'd convince myself to get out there earlier.

As for uncertainty, it also leads to procrastination at times, but for a different reason. Uncertainty breeds worry, and worry, even more so than dread, absolutely saps my energy, my enthusiasm, my motivation. In my present situation, I never know exactly when rental maintenance will get taken care of. It could be a few days, a few weeks, a few months. I can't get the powers that be to commit, and I am very low on the priority list. So a lot of the uncomfortableness and unease I felt the last two weekends was tied to the uncertainty of if and when someone would come to plow. When the plow showed up, there was such an immense change in demeanor that it surprised me. I hadn't realized how much I was letting the uncertainty of when I'd be able to get out sap my ability to function and encourage me to procrastinate about studio work.

It got me thinking about the fear that sometimes seizes and freezes me as I approach my work. Things I have mastered, have no uncertainty about I can dive right into, thoroughly enjoy, feel good about the results. Those that are new to me, or that I have little experience with, or worse, have had a bad experience with, well, those are the ones full of uncertainty that make me want to hold back, leave me tired and lethargic and sure I cannot face them on this day. Again, the solution is to forge ahead, take that first step. But it is oh, so hard to convince myself of at times.

Now that I've identified this, I need to pinpoint strategies for controlling this fuel for procrastination. Any ideas?

Sunday, January 27, 2008

Here We Go Again

Wanda asked if any of the snow I've gotten this winter had melted. No, not very much, meaning that the 6 inches of snow the high winds blew around last weekend filled in all the spaces between the snowbanks still three to four feet high. I wasn't snowed in, I was drifted in. Today, on the other hand, I am snowed in. It started at noon yesterday and is still coming down 28 hrs later. The weatherman was loath to break the news that there's no end in sight. The 12 inches that fell in the first 12 to 15 hours will continue to stack up: another 4 by tonight, 2 more tomorrow, 2 more the day after, 2 to 4 the next...there isn't a day this coming week that doesn't have snow in the forecast. I like winter and snow a lot, but this is getting ridiculous!

The picture above may look familiar. This is the view of the back deck where I let the dog out at night. I've been keeping a narrow path shoveled for her, letting the excess pile up. With this last go, the pile is as tall as I am and I'm having trouble tossing the snow over it. Of course, some of that snow has slid off the roof.

Here's what it looks like out front:


And here are more views out the back. Note the snow on roof - that's all new.


Saturday, January 26, 2008

Been there, Done that...

"At the beginning stages of playing with an idea, it's better to move a bit more slowly than to sit in a glum heap of regret for blindly acting on an impulse."

Jeanne of Exploring the Surface

This is one of the blogs I follow, and this line from Monday's post here made me nod my head in total agreement. The fear of ending up in regret is partly responsible for my plodding work style.

Ink Jet Printing on Fabric Trials

Thanks for the comments on my last post regarding more stitching on "Off the Grid." I'm still mulling it over, and have started making the mount while I decide. In the meantime, I proceeded with a printing test for my Take It Further Challenge piece.

I wanted to try printing on fabric that had been treated with fabric softener. I've not been totally happy with my results using Bubble Jet Set, and being able to use a simple household product appealed. I first ran across this idea in New Zealand Quilter magazine, then found more detailed instructions online, although I apologize to the writer - I did not notate her name. I only know that she is an Aussie and got the instructions from someone in her quilt group.
I cut a strip of muslin and soaked it in fabric softener, squeezed out the excess and hung it to dry as instructed. It's not supposed to make any difference what brand you use so I used the Downy I had on hand. The scent was so strong in this concentrated form that it was almost more than I could handle throughout the whole process.

The next day, I ironed it, having to mist slightly as was suggested to get the wrinkles under control. Then I cut a piece to size and ironed it to a piece of Jenkins Freezer paper. This stuff is great - so much heavier than the Reynolds freezer paper on the roll. I think fabric sticks to it better too. I had no problem feeding this through my Epson Stylus Photo RX500 printer. I was extremely impressed with the sharpness of the prints and the true and saturated nature of the color. As a control, I also printed on a piece of pima cotton that had been treated with Bubble Jet set back in 2004 and stored in a sealed freezer bag. I know; I was asking to skew the results. I've read that even old Bubble Jet Set that has been stored in its original bottle loses potency over time. But you know me: waste not, want not.


The Bubble Jet Set fabric is on the left. You can see how different the colors are - a more faded look, which has been my experience with printing on an ink jet printer.

Whereas the Bubble Jet Set treatment can be rinsed out in as little as 30 minutes, the fabric softener treatment needed to sit for 24 hours. Then it can be ironed and left to set for another 24 hours. My instructions didn't say how long to iron or which side of the fabric to iron on, so I opted to be safe and iron from the back (freezer paper still adhered). I placed it face down on a dishtowel and pressed with a hot iron for a minute or more. When I turned it over, I could see that some of the ink had transferred to the towel, which I did not think was a good sign. Brown spots like scorching also appeared and worried me. (It turned out that the fabric was not scorched, just the softener that had turned.)


Yesterday, the second 24 hours was up and it was time to rinse both samples. Both treatments recommend a rinse in cool water and mild detergent, so I used my Orvus Paste. The Bubble Jet Set sample showed little if any ink in the water and no color loss or running on the fabric. Wow, this had not been my experience in the past with this, so I was thrilled. I was not as thrilled with what happened with the fabric softener sample. I'd cut it in two sections, and the first ran and ran. Ok, maybe my detergent is reacting badly, so I took the second section and just rinsed it in cool water, with the exact same results. What a huge disappointment.

I laid all my rinsed samples face down on the dishtowel again, and pressed them dry. I find this insures that all the wrinkles disappear and the photo stays square. When I turned them over, there was even more ink transfer to the towel from the fabric softener treated fabric, but no transfer from the Bubble Jet Set one. Here they are along side their unwashed twins.


So I guess you Aussies will have to tell me what I did wrong. Did I not let the fabric softener soak in enough? Did a leave too much on the surface of the fabric so that the ink didn't have a chance to penetrate the threads? Is your fabric softener of a different chemical composition than that sold in the United States? Is the ink for my particular model of printer the culprit?

Although I'm unhappy that the fabric softener experiment was such a huge failure, I'm very happy to have had success with the Bubble Jet Set, and found a way to feed my fabric through the printer without major jamming.

Tuesday, January 22, 2008

Saturday, January 19, 2008

Taking the Challenge

I was intrigued by the Take It Forward challenge put forth by Sharon B of In a Minute Ago. And although I did not officially sign up for the challenge, I will be playing with it on my own. Each month Sharon will present a key concept or a color palette to work with, the idea being, if the concept doesn't interest, then work with the colors instead.

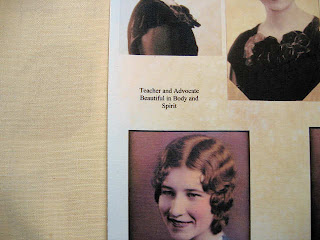
For January, the key concept is the feeling of admiration for another. Go here to read more and to see the optional color scheme. My mind went immediately to my mother. I have many reasons to admire her. If nothing else, she was such a beauty, as the portraits in the above picture show. She had great inner beauty and strength as well. And later, I remembered that she was born in January. No wonder I was thinking of her.

As for the color scheme, well, I rather like it. When digging around for something else, I ran across this pansy print fabric. Ah, not only does it contain all the colors for January, it also represents a link between my mother and me. She had a thing for pansies, passed on to her from her own mother who likened them to "little faces smiling up at us." I remember Mom planting pansies when I was young, and I've often incorporated pansies into my various gardens. We wrote to each other on stationary decorated with pansies. I embroidered a small crewel picture of pansies and thought of mom whenever I gazed upon it.

So my thought is a simple one. I've scanned the portraits and will print one of them, probably the one in the center, on to fabric, and surround it with the bouquets of pansies from the fabric. I need an excuse to work with printing on fabric - my past experiences being less successful than I'd hoped. Ditto for the quilting of such a piece. Maybe I can work some of those kinks out on this.

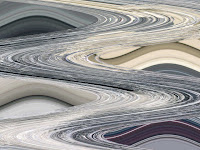
I may then "take it further" by doing some photo manipulation to make a second quilt less simple and obvious. I've already played with trying to "ripple" the image as if looking at a reflection in a pond where a pebble has been tossed. Couldn't get the effect I wanted quite yet. Then I randomly tried out some of the other effects. I got stuck on the pixalation one the way I got stuck on the wave one with the icicles. Below is one of several vertical orientation that hinted at landscapes.

Thursday, January 17, 2008

Change of Plans


This cloth is like a chameleon. Every time I move it, the "pink" in it changes quality. I did my minimal quilting today and put it up on the design board, "border" fabric behind it. I wasn't sure how closely I wanted to space the undulating lines, so kept them wide to begin. Quilted along paint lines to delineate a few squares/rectangles. The curvy lines are not enough, the blocked areas too plain. That "pink" driving me nuts.

This often happens to me: I get attached to what's going on in the top and fear that too much quilting will obscure it. Not to worry, I decided. This NEEDED more going on. So back under the needle it went. I briefly considered some hand stitching with a heavier thread in the squares, then thought about how much I liked the close parallel stitching in September's Journal quilt here. Another deep breath and away I went, using the purple variegated thread. It shades those areas just a bit, and I was intrigued by how much of the subtle paint design I could still see through it. It reminds me of looking through a screen.

Once this was done and I studied it some more, I felt fairly certain I needed to add more undulating lines. How closely I will space them is yet to be seen. What do you think?

Oh, and the flap itself answered the question about whether to apply interfacing to its back. Once I stitched along the fold line, it refused to flop down. Now I think I will tack the corner, maybe even add a bead. The process is fluid, that's for sure.

I've also started hand quilting on my nephew's quilt again. I've done so little on it since moving. It's one of the first things I blogged about way back here and here. At the risk of jinxing myself, I've made finishing it this year one of my few resolutions.

Wednesday, January 16, 2008

Baby Steps


There are times when I wish I could work faster, but experience has taught me there's no point in trying to rush some parts of the process. As long as I move along a little at a time, the proper answers will present themselves, and I will save myself a lot of grief.

Such seems to be the case with Off the Grid. While a simple piece, it has not been a straight forward one, full of decisions less about design than about approach, which is dictating the sequence of events. I had my little triumph yesterday, after pulling half a dozen possibilities for a border to confirm a thread color. Questions remained to be answered before I could proceed with the quilting.

The slave driver in me kept insisting that today I needed to at least layer this, if not actually start the quilting. The rebellious teenager in me kept whining, Nooo, I'm not ready. So I cleaned the bottoms of my irons, traced the next redwork cross pattern on the pre-cut panel, and turned to face Off the Grid. Well, at least I could make the final decision on the border, I decided.

With different lighting than when I pulled the possible candidates, there was no question as to which one was the perfect foil. And now, everything else is falling into place. Along the bottom you can see the commercial yarn I will twist with my painted one to couch along the edge. The two spools of thread will be my quilting colors. I'll trim away the center of that border fabric before fusing it to Decor Bond. I'll layer and quilt my painted fabric, make my pillow turn "mount," center my "quilt" on it over the exposed Decor Bond and fuse the two together. The final step will be to couch my twisted yarns along the unfinished edge of the quilted portion, effectively stitching all layers together.

Now I have a plan, the details pinned down, the sequence figured out. Now I can proceed, no more whining!

Tuesday, January 15, 2008

Taking a Deep Breath...


I tried everything to keep from taking this next step on "Off the Grid" but I finally had to take a deep breath and just do it. Here you see my sample testing different couching stitches, and then the real thing done on the flap. The Sulky tearaway stabilizer is still attached to the flap.

Why was I hesitant to do this? I have just one piece of this fabric. If I botch that corner, the whole thing goes in the dumpster. I don't like not having safety nets. I don't like having to decide on stitches. I'd rather the yarn magically adhered itself to the edge of the fabric!


Here's a close up. I tried a three-step zig zag, regular zig zag and a several decorative stitches before I settled on this blanket stitch: two stitches forward, one back and forth to the side. The stitch is not the thing, in this case, but has no choice but to be visible. These straight up and down stitches are a good match for the grid in the fabric. The edge of the fabric was Fray Checked in advance so the couching stitch wouldn't have to double as a way to keep the edge from fraying.

This went off without a hitch, lightening my mood exponentially. But I almost immediately began second guessing myself. I want that flap to hang loose, drape on its own. I'm hoping the slight addition of weight from the yarn will help that. The second guessing is wondering if I should have bonded some interfacing to the underside anyway. I can see where this could be a problem if I end up shipping it somewhere for display. Well, I guess any addition of a stiffener can happen almost any time.

Monday, January 14, 2008

Paint Play Results


The painting of the cotton yarn from my paint play session on Friday did not work quite as I had anticipated. As you can see from the picture, the color is right for use on "Off the Grid" but the paint did not travel as much throughout the ball as I thought it would. I wanted longer lengths of really dark sections, and only bits of the very light. Perhaps the yarn wasn't wet enough before I applied the paint, or perhaps I should have spritzed it several times after applying the paint. I thought about re-wetting it and applying more, or perhaps trying another color on it, but the parts that are dark at this point are a little stiff - all the pigment settled in a concentrated area. I don't need to add to that. I planned to twist several strands together or twist it with another yarn anyway, so I think I'll just go with it the way it is.

The tints from the waste water, on the other hand, turned out quite well. When I dipped the first one, I forgot about pigment settling to the bottom of the cup, so I used the wadded up fabric to "stir" and it picked up a lot of pigment in a few areas. I was afraid I wouldn't like this, but it actually worked well on these two. The larger piece in a lovely orchid while the smaller piece runs more to lavender. Not sure how well that comes through on the computer screen, and not sure why the two would be markedly different having been dipped in the same solution. There are fine veins of darker color running throughout, and then a few intense areas - a true marble effect. I may use these as the base for my next experiment: rubbings.

Friday, January 11, 2008

Paint Play

It's Friday and I thought it high time to get the paints out. I do my painting and stamping on a table in the kitchen, which has played the role of catch-all for months. Earlier this week, I cleared it of mail, old ads, all kinds of things I forgot was lurking there. My goal for the day was to add paint to the texturized piece that was my New Year's Challenge piece and to try coloring some cotton yarn. If all goes well, the yarn may end up getting couched to "Off the Grid."

I started with the yarn. This is a cotton yarn that I bought tons of many years ago. It was for matching sweaters for me and my husband. I'd never worked with cotton before, and of course, it was not the type of yarn the directions were written for. Thus, I totally overestimated what I'd need. Recently I used up more of it knitting a prayer shawl, but still had lots left. I've read how to wind yarn on special apparatus to dye it, but I wanted to leave this end of the ball intact to see how the paint might migrate and change.

I did soak it in water and squeeze it mostly dry before applying Dye-Na-Flow paint. I was considering what brush to use when I remembered the eye droppers I'd bought (again, years ago). These are perfect for dribbling paint and poking between the strands in a fairly controlled manner. I considered dribbling a second color, but decided not to push my luck this first time out.

Now on to the texturized piece. Let me say upfront that its color is the dickens to get accurate on a computer screen. The shots taken with the camera are the closest. The individual scans of the quadrants are less so, even after manipulating them in Corel Paint Shop Pro. The muted nature of the added paints is lost. That being said, the color itself is pretty awful, thus my need to cover it up with more paint! Here's the end result.


I started in the upper left corner. The original paint on the cloth is Dye-Na-Flow, so I added more in Midnight Blue. I left the fabric dry and simply loaded a flat brush sparingly with the paint, lightly brushing across the section. The raised puckered portions picked up the paint and accentuated the texturizing nicely.


Next I moved across to the upper right corner. Here the stitching is running horizontally and I thought "landscape." I wanted to see how well stamping would work over the texture so picked a commercial leaf stamp and a simple willow leaf stamp I made from a Styrofoam meat tray. I switched to Versatex paints because they are thicker out of the jar and can easily be applied to the stamp with a brush.


The Bronze and Orchid showed up well, the Copper was too close to the background color and the gold barely showed up. These colors weren't doing anything to improve the base color; what I needed, I decided was a green, and the only green I had in this line of paints was definitely not right. I searched my other offerings and stumbled upon some Lumiere paints. The olive looked to be close enough, and I like what it added. This arrangement of leaves reminds me a bit of Wisteria and how it hangs.


What to do with the last two quadrants? I started with the lower left, dipping the pen in the first picture into the Midnight Blue Dye-na-flow and drawing a curving line down the wider of the columns formed by the stitching. Although the pen worked well to draw this kind of detailed line, the line itself didn't add much to the overall design. So I decided to wet the fabric in that section and apply more Dye-Na-Flow, this time in Periwinkle. I wanted to see if the color would migrate and pool, altering the base color, but it pretty much just stayed where I put it.

While I waited for something to happen in that quadrant, I moved to the last one in the lower right. This configuration of stitching was perhaps the most successful in creating the type of texture I anticipated, and the open areas between the stitching begged for something dramatic. I turned to my set of Celtic inspired stamps, and a Versacraft fabric ink pad. I loved the clear crisp images, even with the uneven surface. I tried to stop myself before I stamped too many images - I have a bad habit of not knowing when enough is enough.

I was disappointed that next door, that extra paint on the wet fabric just wasn't doing anything. I was so excited about my Celtic stamps that I wondered if I could use them over the paint while still wet. I have several very small stamps in that set, just the right size for those columns. I eyeballed the spacing and alternated between two designs. The triangular one's details printed very sharply, in spite of the scan not picking that up. This worked well for me, I decided, because of the space being divided up by the stitching. If I were just stamping on a plain piece of fabric, I don't think this kind of arrangement would occur to me. I'd end up doing something more like I did with the other Celtic stamps or the leaves. I'll have to remember that. This sections was still a bit blah though, so I lightly brushed a little gold Versatex paint over it with a flat brush, just to add a few sparkly highlights. If you look closely, you can just make out those original curving lines made with the pen. The actual blue color is not nearly this bright.

Looking back at the other Celtic stamping, the black ink looked odd, so I considered how I could tone and blend it in a bit. I went back to the midnight blue Dye-na-flow and experimented with applying it with a fan brush. One has to be very careful about overloading the brush, as you can see in the upper right portion, and it takes a very light touch.


I liked the speckling effect and the hints of arches. This, I felt was very successful, although this scan does not do it justice.


This has worked out to be an excellent sample piece. The leaf section calls out to be incorporated into a larger piece, but I may just leave this intact for future reference.

Before I quit for the day, I dipped a couple of small pieces of white muslin into the Dye-Na-Flow waste water to tint them. I didn't squeeze out a lot of the water, so they may take some time to dry.

Thursday, January 10, 2008

Just when I thought Christmas was over...


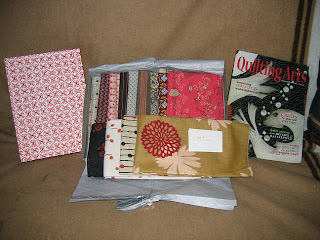
...packages arrived from my lovely niece in New York. She'd been a busy shopper, as you can see, picking up a Quilting Arts Magazine, lovely stationary by Brookfield (printed the old way), and fabric galore from a quilt shop in Soho - Purl Patchwork (they carry knitting supplies too - some gorgeous yarns there). Her wish was to inspire me, and I think she succeeded!


Oh, and she did not forget the dog. I think the gourmet dog cookies and the chew toy were meant to be diversions to keep Jesse busy while I go put some of that inspiration to good use.

Wednesday, January 09, 2008

New Work


I don't want you to think I'm not working on anything (other than shoveling snow...) just because I haven't posted. I declared the holidays over and told myself it was high time to get back to work. I recognized my reluctance to do so was partly due to the logjam in my studio. Since New Year's I've been sorting and tossing and organizing everywhere but in the studio. Yesterday was the studio's turn. I had some pictures to print and documentation to take care of from the last few projects. I had a lot of stuff taking up space on my table again, waiting for me to do a little prep on something I don't intend to work on for a few months, but needed doing before putting it away. Once I did that, a bin disappeared followed by a box of odd yarns, and suddenly, half of my table reappeared. It's amazing to me how the condition of my workspace can so effect how I feel when I'm in there. I didn't really need that table space to proceed with the next quilt, but darned if my mood didn't improve with the cleared space.

The picture above shows a piece of fabric I folded and applied paint to some time last year. I don't remember many of the details, but I do know I expected more of the paint to show in the folds to create more of a grid effect. I pondered what I might do with it for quite a while. I was particularly bothered by the two corners that picked up so much color, but on opposite sides of the fabric. I kept flipping down one corner to compare, and that's when I hit upon the idea of leaving that flap down and creating a piece call "Off the Grid." I finally solved the technical problem of that flap yesterday, having cut a triangle to fill the corner, its raw edge tucked under the fabric fold. I fused this to Decor Bond to keep it nice and straight when I quilt undulating lines across its diagonal as in some of the blocks in the pink quilt.

I'm not moving quickly on this because there are so many decisions. The yarn is there because I've decided to couch some kind of yarn around the outside and also along the flap edge. But I'm still wondering if I want to quilt those undulating lines or just stitch them before adding batting. There are a few spots where I intend to quilt along the straight lines. Maybe they should be the stitched ones, not quilted. I'm also considering that the couched yarn edge finish may not be enough and it may need to be "mounted" to a background that would act like a border or mat. There's a certain sequence depending on which way I decided to treat the various steps. Not a straightforward project for sure, but one I am pretty excited about, so I am willing to take my time working through these questions.

Tuesday, January 08, 2008

Colors

A Pottery Barn catalog came the other day, and the first page sucked me right in. Those are my colors alright.


I've never purchased anything from the Pottery Barn, but I sure do love looking through their catalogs. The gorgeous way they use color in the various rooms gives me lots of ideas - not for decorating, but for quilting. I particularly liked the reddish tone of the furniture here against that rich navy.


I sometimes stumble on ways of combining colors to jar me out of my usual rut. Here's more of the oranges, browns and greens in this tumble of pillows. See? I'd never think to throw in that blue with the green.


The catalog even had this nifty color wheel of sorts.


Unfortunately, they turned me off with their use of the term "Ecochic." Oh, puleeze! Besides, I hardly call adding a mere 5% organic cotton to their bedding qualifies as eco-anything. Nice try, though.

Sunday, January 06, 2008

Playing with Paint Shop Pro

Last week I was downloading some pictures I'd taken of icicles. My camera has an automatic rotating function, so I often go through the downloads right away and delete any duplicates that are not rotated properly. This one was headed for the trash bin until I spotted the angles behind the icicles. This got me thinking of creating a design of bold angles overlayed with sheer horizontal strips. So I saved this orientation and took it over to my Corel Paint Shop Pro X program to reduce it down to a line drawing. Instead, I got caught up in a bunch of special effects. So here's what happens when you take icicles and solarize them:


Now try glowing edges:


They can be rippled:


And twirled:


Here's a wave:


And another wave:


And yet another wave:


And a different wave:


And one more wave:


That last one reminds me of the Palouse area I wrote about here. I'm not even showing you all the wave patterns I came up with using the random button. I moved on to patterns. Can you believe this was generated from the original picture above?


Or this one?


And this one too?


I finally quit at this one:


Now, what to do with all these ideas?

Better yet, what would YOU do with any of these? Feel free to download any of them for play, and please share your results. Consider it my New Year's challenge to you.