...Pressing seams, which also seems to take forever. And so much for giving myself the day off yesterday. Oh, I did the extra cooking, watched some racing I'd recorded awhile ago, but I couldn't get my mind to quit thinking about my pinwheel project. I'm thinking that's a good sign. Well, let's not do any work, but maybe get the design wall flannel up. That would be a very good thing as I'll be needing to arrange these units on it pretty soon. But I couldn't stand it. Once the flannel was up, I started pressing, which took nearly as long as the sewing!
For you process-oriented readers out there, the picture shows the seams of these units pressed open. Most quilters learn early in their careers that seams are to be pressed to one side, preferably towards the dark to prevent shadowing. This may be a holdover from the days of hand piecing when seams were not as strong as when machine pieced. There are many times when pressing seams open is a good thing, reducing bulk, lumps and bumps. I felt that was the case here.
This seam is sewn on the bias of the fabric, which has more stretch than the straight of grain. So care needs to be taken not to stretch and distort the unit while pressing. I open up the seam with my fingers, then lightly run the tip of the iron down the seam. This is easier when done on a firm, slightly rounded surface like a sleeve roll and it also helps control any distortion. Depending on the fabric, sometimes I flip the unit and press again from the right side.
 I don't plan to press all the seams of this block open, although I could. Here is the back side of my sample block which shows other seams pressed to one side which results in a nice spin of seams which reduces bulk where multiple seams meet in the center. It will also create opposing seams when the blocks are sewn to each other.
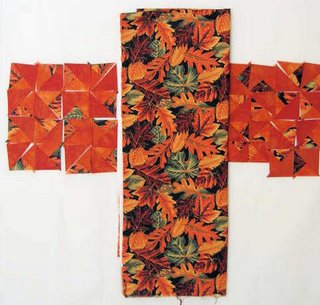
 And here is the first play with the units. I have a choice as to whether the dark fabric forms the inner pinwheel as in the sample or will form a pinwheel when the blocks are combined. I'm leaning towards the latter right now as it seems to provide a better bridge between the center panel fabric and the block border. This may all change though as I go along.
For you process-oriented readers out there, the picture shows the seams of these units pressed open. Most quilters learn early in their careers that seams are to be pressed to one side, preferably towards the dark to prevent shadowing. This may be a holdover from the days of hand piecing when seams were not as strong as when machine pieced. There are many times when pressing seams open is a good thing, reducing bulk, lumps and bumps. I felt that was the case here.
This seam is sewn on the bias of the fabric, which has more stretch than the straight of grain. So care needs to be taken not to stretch and distort the unit while pressing. I open up the seam with my fingers, then lightly run the tip of the iron down the seam. This is easier when done on a firm, slightly rounded surface like a sleeve roll and it also helps control any distortion. Depending on the fabric, sometimes I flip the unit and press again from the right side.
 I don't plan to press all the seams of this block open, although I could. Here is the back side of my sample block which shows other seams pressed to one side which results in a nice spin of seams which reduces bulk where multiple seams meet in the center. It will also create opposing seams when the blocks are sewn to each other.
 And here is the first play with the units. I have a choice as to whether the dark fabric forms the inner pinwheel as in the sample or will form a pinwheel when the blocks are combined. I'm leaning towards the latter right now as it seems to provide a better bridge between the center panel fabric and the block border. This may all change though as I go along.
No comments:
Post a Comment