Tuesday, September 23, 2008

Beading Has Commenced


I didn't have the patience for it yesterday, but I can't delay working on my TIFC quilt any longer. There's an exhibit coming up in October I'd love to have it ready for. I've been hesitating to take the next step for several reasons, mostly because I was unclear about the sequence of events and exactly how I will finish this out. One part of me said I should square it up before adding beads - rulers rock precariously over a beaded surface - maybe even finish the edges. Another part said I wouldn't know how the edges would be finished until I did the beading. Now it looks as if I won't be finishing the edges at all, but putting it into a frame. At any rate, it was time to get off the fence and do something.

This piece was one I took along to Hood River with me, looking for input from my art quilt friends. It was a rare treat to hear what Mary Stori, the embellishment queen, thought of my beading ideas. One she jettisoned (and I have to admit, I knew it probably wasn't right, but sometimes we just need to hear it from someone else), approved of another and suggested much the same you readers here did for the central area - beads or french knots but nothing too flashy. I decided there was too much fullness around the applique for beading or french knots alone to get under control and chose this darker variegated Oliver Twist to do a little quilting, mimicking the shapes in the applique and pulling some of that purple into another area. From a distance, it barely shows.


I'm still a little unclear of how the beading will go in that area, but I knew exactly what I wanted to do in the outer corners, so that's where I started. I was only a few beads into it when I realized I'd done it to myself again - chose a fussy time-consuming task to add to my quilt. But like so much in life, once I established a plan, I quickly slipped into a rhythm, and my lack of patience turned into the old, "Just one more bead...I'll stop after just one more bead, or the next one...definitely after one more..."
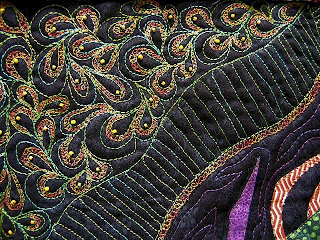

I'm actually using three slightly different yellow/orange beads here, reading not nearly as yellow as they are on my computer screen right now. (In fact, all these pics are reading a bit washed out to me now that they've been uploaded.) Beads are a lot like fabric in that you start collecting and before you know it, you're building a stash. Even so, you often find you don't have as many of one color and kind as you need to complete a project. So you find yourself substituting something similar and in the process create a much more interesting look. Such is the case here.

I nearly finished the sections using these beads today, so tomorrow I must decide what goes in the center.

Monday, September 22, 2008

Color Influence


Right on cue, our temps dropped a good 15 degrees and rains set in. The maple has started its slow turn and I find I'm not as drawn to work on my azalea mosaic piece as I was all summer. I'm ready to turn my attention to the more muted rusts and russets, golds and mustards that soon will take over outside.

I live where there are 4 distinct seasons, and this shifting of color palette with the changing seasons is something I've just recently realized I do. It's not 100%, but I do seem to want to work with the same colors I'm observing outside my doorstep. I have no desire to work with snowflakes and frost in the heat of summer, and likewise I don't care to warm myself up with tropical brights in the dead of winter.

What about you? Do your surroundings influence your color palette? If so, how?

Sunday, September 21, 2008

More Fun in Hood River


Saturday morning Judi, Sherrie and I headed down to this funky coffee shop on Stevenson's main street. Here's Sherrie and Judi discussing some weighty topic no doubt, like the nutritional value of an oatmeal peanut butter cookie for breakfast. I mostly took the picture to show the wall treatment. We quilters see fabric everywhere we look, and this streaky paint job was something we wanted to take home with us. There was artwork for sale, a wall covered with a giant crossword puzzle, the chandelier of balls you see hanging in the background and a unisex bathroom.

Why do I mention the bathroom? Because of the text painted inside and out. On the door was the admonition, "Boy or Girl, one at a time." and once inside there was the instruction over the doorknob to lock yourself in. Then there was this painted in the corner.


If you can't quite read it in the larger picture, it says, "There's more inside our imagination than we are comfortable letting on." True, oh true.

Duly fortified with caffeine and sweets, we headed back up the street to check out the tiny local quilt shop, Birdhouse Quilting, which has been in business less than a year. It may be small, but that didn't keep us from finding things to buy. Here are my purchases - a couple of batiks, and this book at 1/2 price. I've been interested in coil baskets for a long time, and I particularly like the shapes of the baskets and bags in this book. For $10 I couldn't pass it up. My friends joked that I must put it up on the blog and say I'd be trying this out to be sure the book didn't just go on the shelf to be forgotten. After all, that's one of the reasons I started the blog, so that I'd feel accountable to some outside audience, waiting waiting for me to make good on my promises to try this or finish that. So here it is, my announcement that in the dead of winter I'll be getting this book out and trying this technique!


Stevenson is right on the Columbia River, so we couldn't resist walking down to the waterfront, where we found it very windy and the wind & kite surfers taking advantage. I'd not seen the kite surfing before and almost thought I'd like to give it a try. Crazy, I know.

Sherrie needed to head back to Gig Harbor, so we bid farewell at this point, Judi & I returning to Hood River to spend a little time at Rhonda's house. I thought we'd be sewing so got out my azalea mosaic but Judi & Rhonda decided to look through quilt books instead and Rhonda shared her many quilts and quilt tops while we enjoyed typical quilter conversation and I appliqued away.

That evening, we went to the first annual Rising Moon Festival - a fundraiser to support the Columbia Gorge Master Gardeners. It was held outside, and lots of whoops went up when someone spotted the nearly full moon rising above the mountain. Besides wine and appetizers, there was great live music, including the Mamba Jamba marimba group. They were terrific with their Jamaican style renditions and soon had the crowd up and dancing.


The next day, Sunday, was fairly laid back, with a trip to the Columbia Art Gallery where Judi has her art quilts & jewelry displayed, coffee at one of her favorite coffee houses and snooping around several bead shops and interesting stores. By 6:30 I was back on the train headed for home, and it wasn't long until that full moon was up again, reflecting off the Columbia River and following me all the way home.


Saturday, September 20, 2008

Reunion...


Well, I just can't wait any longer for my friends to retrieve their trip pictures from their balky computers. Here is the reason we picked this weekend for a get-together in the Hood River, OR area - Mary Stori! Judi and I are old friends of Mary's from our Brodhead, WI days. Mary now lives near Ashville, NC and the only time we get to see her is if we happen to be at the same quilt show.

I'm not sure how many members the Columbia River Gorge Quilt Guild has, but they put on a nice little show with about 85 quilts and quite a few vendors. There were a variety of workshops, including Mary's beading ones, but we opted just to view the show and attend Mary's lecture later that evening. Joining us were Sherrie Spangler, formerly from Rockford, IL and now living in Gig Harbor WA (she and Judi were in an art quilt group together) and Rhonda Harris, a new quilting friend Judi has made in Hood River (and member of this guild). Mary had many of her quilts laid out on tables for viewing, and I really like the new turn her work has taken with beading & embellishing on felted wool. Need to try that. See Mary's blog entry here to see some of her students' work that weekend.

After the lecture, we followed her back to her lovely accommodations at Skamania Lodge, for a few hours of show & tell, girl-talk, chocolate and wine. At midnight, Mary stood up like Cinderella at the ball, announcing that since she had to teach the next day, she needed to go to bed. Oops! We were having such a great time and ourselves had no place in particular to be in the morning that we totally forgot Mary still had to work. So we bid her a fond farewell and sadly headed back to our own not nearly so nice Econolodge motel room...

And yes, the group picture of us is on someone else's camera. Will post it soon I hope.

Thursday, September 18, 2008

More Distractions and Pondering


Here's the other thing keeping me from my creative journey this week. When I got back from my weekend trip, the yellow plums were ripening and dropping as I had feared. I spend a little time each morning picking up and disposing of windfalls (the first day back, I picked up three bucket's full; today it was not even one). I pick what I can reach standing on the ground, just what releases without pulling. But I could see so many ripe ones far above my head, a few falling as I worked. So the last two days I've grabbed a limb and shook resulting in a heavy rain of fruit. Since I probably will can the majority of these, I'm not too concerned with bruising. I just don't have the time or desire to pick what must be hundreds of plums properly.

I was overcome by a sense of insecurity today. I think it's a combination of working on the Art Exhibit stuff and being out of the studio for so long. I've appliqued outside on my azalea mosaic for an hour the last two mornings, thinking that would restore some calm, but it hasn't been working. I'm just good and unsettled. I got a call that my machine was ready to pick up, and the insecurities just heightened. I wasn't expecting it back this soon. I wasn't expecting him to be able to fix it. I was expecting a call next week to say it was going back to the manufacturer. Would I arrive to pick it up only to hear him say once again he could find nothing wrong and couldn't make it do what it does incessantly for me? Would I find myself in an unwanted confrontation?

He had found something, a burr on the feed dog, but admitted that he still couldn't understand how the thread was whipping back there to catch on it. And again, it hadn't performed for him as it does for me. Well, sometimes it's the smallest things that create the biggest problems. I decided to set it right up, pretend it was trouble free again and do some stitching on my August TIFC.


Here you can see what I decided to do as a first step in resolving my quilting dilemma around the central motif. I didn't like the way the green frame seemed to disappear and got the bright idea to add the same sort of "frills" along the inner edge of it as I put on the inner curve of the feathers in the outer corners. I think I really like this. But I need to do more stitching and as you can see, I'm pondering threads to do it in. I've also set out some of the beads I think I'll be using. I may use some purple thread to outline the applique and fill in some of the space around it, or I may just use black thread. I'm about ready to go back in and work on it some more.

Oh, and as to whether the machine is behaving while doing my free-motion quilting? I thought it was, quilted nearly all along the green frame before it hung up on me. Sigh. Well, at least I got farther than I was getting before I took it in. I'll keep working with it over the weekend, then call the repairman on Monday to see what he wants to do next.

In spite of this snag, this little bit of sewing did more to lighten my mood than anything this week. And afterwards, I relaxed outside enjoying what may be the last beautiful warm day we'll see for awhile. A last gasp of summer perhaps, and I'll take it.

Diverted Again


There's not been much creative journeying going on this week, partly because I'm working on the publicity for this Art event at my church. Here's my flyer which took longer than it probably should have. I'm still fumbling my way around Corel Paint Shop Pro. I have an older publishing program that is easier to use but limited in what you can do. I wanted to float images of the maple leaves, but the old program wouldn't accept an image like that. It "saw" the transparent background too.

I'm always glad for any opportunity to learn the Corel program better, and I think I finally understand how to add and edit text now. And I had great fun with my maple leaf scattering.


This is the photo I used for the background, one taken of my maple tree the first year I was here. I blurred it over in the other program, but I could have blurred it here too.


And here is the scan of one of many maple leaves I've collected. I used the "magic wand" feature to select and copy just the leaf, then pasted it over on my background as a new selection. Multiple copies later, I could twist and turn and spread them around "artistically."

No one twisted my arm to put together this art exhibit. It was my idea because I wanted to have another open house exhibit without having it in my house. I also knew there were other artistic types among the membership at my church, and I knew I'd never have enough new work ready to fill the walls on my own. I've chaired small guild quilt shows in the past, so thought this would be no big deal. What was I thinking???

So many details, so many things to remember, so much information to relay to the other artists participating...at least I don't have to do anything with the Oktoberfest end of it. We're hoping the dual event will draw more people, enticing people who otherwise might not come out for an art show but would for bratwurst and beer, and vise versa. We'll see. If I can finish the publicity this week, I should be able to ignore it next week and get back to the studio. After all, I still have a few quilts to finish up for the show...

I'm waiting on pictures from the friends I met with down in Hood River to finish out the story of my weekend. Bear with me - there are some balky computers out there refusing to give up their jpgs.

Monday, September 15, 2008

Sightseeing


I thought I'd share a little of what I did on my trip in and around Hood River, Or. Here I am with journal quilt partner, former hand-dyed business partner, and still bestest friend Judi in front of Horsetail Falls. I'd requested a little sightseeing during my visit because I've never had the opportunity to do more than whiz by the beauty of the Columbia Gorge. Judi, who is originally from Wisconsin, has been visiting this area for years since her parents relocated here, and now lives here herself, so she was more than happy to show me around this area that she loves so much.

Next stop was Multnomah Falls, where we treated ourselves to a fabulous lunch at the lodge before checking out the falls. This is the classic shot of the two-section falls and Benson Bridge. Now THAT'S where I want to be, on that bridge, I told Judi, not realizing we were standing right where the trail up to it started. So up we went.


Here's another view of the bridge.


And here's the upper part of the falls. That large rock by the pool is extremely large and the reason the trail to that area is now closed to hikers. The story goes that it fell during a wedding ceremony being staged there and fortunately no one was hurt.


On the way up the switchbacking trail, I spotted these large trees covered with thick moss.


We'd dawdled quite a bit over lunch so the rest of the falls along this stretch of road would have to wait for my next visit. (To see some of the sites we missed along the scenic hwy, go here.) We needed to get to Stevenson across the river to meet up with other quilter friends at a local quilt show. More on that in the next post.

It's a classic...


...and it's mine!

I'm back from my trip, the dog's home from the kennel and I'm ignoring the next batch of ripening plums for now. The trip was a bit of a belated birthday treat to myself, and the quilt is a belated birthday present from the friend I visited in Hood River. Judi, who is also my journal partner when we journal quilt, knows I have a small collection of antique quilts, spotted this at a yard sale and figured I would like it. It's the double wedding ring pattern so popular during the 1930's & 40's, although this is is probably made later. It is hand pieced and hand quilted and appears to have polyester batting (thus the later date). It is in near mint condition and I love that it has a pink background rather than muslin or mint green as is often the case with this pattern. I haven't had time to cross-reference the fabric in the rings with my fabric dating books, but it is a wonderful variety of prints possibly spanning 30 years or more. Plus it fills a gap in my collection perfectly.


I'm sure I was the envy of all in my train coach accommodations on my return trip home. For some reason, Amtrak seems to think the cars should be refrigerated and I was uncomfortably cold on the way down. Not so coming back as I snuggled under my "new" quilt and nodded off.

Thursday, September 11, 2008

Almost Gone...

The dog's at the kennel, the marmalade's in jars, last minute e-mails are sent...time to pack and be off to Hood River, OR. See you on the other side of the weekend!

Wednesday, September 10, 2008

Plums


I'm going away for the weekend. I'm starting to stress about the things I need to do towards the art exhibit I'm organizing at my church in less than a month. My machine's in the shop again and I'm wondering how and when I'll get the little pieces I'd planned to make for this exhibit made up with only my less than perfect older machine to work with. Of all the things I thought I had to do this week, dealing with plums was not one of them.

But nature waits for no one. I have three red plum trees which decided yesterday that their fruit was ready to pick. There's a limit to how much fruit one person needs to put up, so I just picked what I could easily reach from my regular ladder and let the landlady and maintenance gal know the rest was up for grabs. Of what I gathered, part is going into marmalade. Well that's what my mother called it. It's simply plums chopped in a food processor with equal amount of sugar added. This sits overnight and I will cook it and seal it in jars in the morning. The rest has gone into jars with a light syrup and been processed in a hot water bath. Fingers crossed that all lids seal.

I remember eating my mother's canned plums when I'd come home for a visit. I'd been raised up on the store-bought ones and loved them. But mom's were not pitted in advance. I really hated working around those pits as I ate. After pitting the plums for the marmalade, now I know why mom didn't bother with the canned ones. And guess what? Neither did I. One note - if you're not going to pit them, then they need to be punctured with a needle (I used a nut pick) so they don't explode during processing. Kind of like baking potatoes.

I'm not done with plums though. I have another tree loaded with little yellow plums. The branches are so thick with them that they look like huge clusters of grapes. These are wonderful eating plums and will probably be ready to start picking as soon as I get back. I'll definitely need help getting rid of those. Any favorite plum recipes out there?

Monday, September 08, 2008

A slight diversion

My nephew's birthday is coming up soon and I thought I'd get the 12th installment in his freedom quilt out of the way while I continue to ponder the next step on the TIFC quilt for August. To learn more about this project and see another block made for it, go here. While looking for a suitable block to represent something in his life this year, I came across a block called Twister by Michael James (it can be found in his book, The Quiltmaker's Handbook, copyright 1978). This is a perfect combination. My nephew lives in the part of the country frequented by tornadoes, oftentimes referred to as twisters, and Michael James is one of my longtime quilt idols. Plus I thought my nephew might be a little more interested in my quilting if he knew GUYS do it too.


This is a fairly simple block based on a 5 division grid. Just rectangles, triangles and a single square. My BlockBase program prints out the block and rotary cutting directions. I made the 1/2 triangle units by starting with squares placed right sides together. One is larger than the other simply because I pulled from my box of pre-cut 3-1/2" squares for the dark, but cut the other to size (3-1/4") from yardage. I'm not one to buy every gadget to come on the market, but there are a few specialty tools I feel worth the price and Quick Quarter 2 is one of them. You line it up with the diagonal of the square and draw along both sides to mark your sewing line.

When I sew, I err a bit to the left (or towards the center of the square) of the line. I usually have to square these units up a bit and this will make sure that your unit does not end up a little too small. You can chain stitch multiples of these, running down one stitching line, then swinging the group around to sew down the other. Then cut through the middle to separate what are now two 1/2 square triangle units.


I pressed the seams toward the dark as this will make opposing seams where units meet up. And then I can do any trimming. This kind of unit is easy to square up with a square up ruler - just aline the diagonal on the ruler with the diagonal seam on the unit.


Using the printout diagram for reference, I arrange all the units in order and sew them together. The center is essentially a nine-patch, the outer round forming a sort of border. Viola! Twister! When set side by side in a quilt top. pinwheels form where the blocks meet.

I admit this isn't the most exciting block with these fabrics, but there's a reason I chose them. The background and center fabrics are some of his mother's scraps from dressmaking - another level of meaning I try to add to each block. It will also go well with the fabrics I've used in the previous 11 blocks.

Saturday, September 06, 2008

Back to Pondering


Now what???

As you can see, the quilting is done around the outside of my quilted "frame" and I am so in love with it. But as I stand back and look at the piece as a whole, that frame definitely needs some sort of defining on the inside. It almost seems to need a little bit of orange for balance, but as West Country Buddha noted in her comment here, I don't want to lose the contrast of the black around the applique.

Her thinking of how to quilt down that section, by the way, is so in line with what I'd been thinking to do that it's scary! I'm still considering a sprinkling of beads in there too, much on the same order as her french knots suggestion. I was considering purple beads for those spaces within the applique itself, but perhaps some orange echoing the line of the frame. What do you think? I'll be pondering this for a few days and hoping for a brilliant idea from one of you!

Thursday, September 04, 2008

Unconfused


More thought, more thread unearthed to test, and a chalk marker helped clear up my confusion about how to proceed on my TIFC for August. This motif is definitely "stolen" from Dijanne Cevaal's Seventy-Two Ways Not to Stipple or Meander but I believe I'm using it in a slightly different way than I've seen her use it. Actually, it reminds me of my birch trees and the way I sometimes applique down bias strips used to form them (see here). I "sketched" the main lines with the chalk, "erasing" and redrawing until I had them the way I liked, then free motion stitched this with an Oliver Twist hand-dyed thread. I really like the way it frames the center design and provides a visual separation between what I added in the outside corners.


I tried a few other ideas before returning to the one tested on the sampler in the previous post. I found a King Tut variegated thread that was more orange than the one on the sample and decided it was perfect. I stitched a few more variations and decided to do the main design in the green, and use the orange/yellow to make those little circles along the inner curves. It is time consuming since, as I noted before, I can't travel between areas - lots of starting and stopping with just a little quilting in between. But I do like it a lot. It's giving the balanced glow I was hoping for and does not overpower in proportion or value the central design. Click on the picture for a larger view that shows the colors better.

Not sure what I'm going to do in that space around the applique, but because of the heaviness of the rest of the quilting, I'll have to do something - it puffs up too much. Perhaps some beading?

Tuesday, September 02, 2008

Confused...as usual


Here's some of the threads and design ideas I played with today in preparation for quilting my August TIFC quilt. As usual, the picture in my head did not begin to match the reality, and I am at a loss as to how to proceed. I don't want the quilting to overpower the design, yet I want it to be interesting in its own right. The red/yellow variegated thread in the lower left looks too red to me now. I really like the green but is it interesting enough on its own? Does mixing the two add interest or distraction to this particular quilt? I even retrieved one thread I'd eliminated during the auditioning process - that's it in the upper left.


At least I got the quilting along the edges of the applique done, using the green rayon sulky twist thread resting near the top. I started playing with the background quilting idea by sketching as you can see to the right. I think I have Feather on a Wire to thank for my thinking to add the circles along the curve of those shapes. See this blog post where she is adding circles to her wonderful feather design. I like the idea but not sure if I should use it here. Using a different color for the circles seemed to make the other color sort of disappear. Then I thought to try adding them in the same color - the green sample near the top right. That could work well, and can be done as part of the continuous line quilting. When adding a second color, there's really no way to travel from one line to the next. (Click on either picture for a larger view.)

After folding the sample this way and that, and placing it on the quilt top here and there, I suddenly hit upon an idea, but the color of thread is still up in the air. At least I have a cool little sample...

Saturday, August 30, 2008

Open For Business

I've spent the better part of the last few days setting up and adding product to my cafepress shop, Idaho Beauty's Textile Arts at http://www.cafepress.com/IdahoBeauty. For years I've used the slogan: "Quilting...an alternative lifestyle" on my business cards and letterhead. I even transfer-printed it on a sweatshirt for myself. I always thought it would be cool to offer it to others in the form of magnets, mugs, sweatshirts etc., and with cafepress, I can.

I've also printed notecards and postcards at home for my own use for almost as long as I've had inkjet printers, using images of my quilts on the fronts. Some of my favorites are quilts I would never sell, even though people have inquired about purchasing them. Once again, cafepress to the rescue. I had one of those lightbulb moments that through cafepress, I could offer these quilts for sale, but in the form of notecards and even framed prints. I've heard good things about the quality of cafepress merchandise, so I'm hoping for good things here.

Right now I have notecards and greeting cards available with my "wisdom" journal quilt on them, and postcards with June! June! Strawberry Moon. You'll have to slog through the slogan merchandise to get to them (but then again, maybe you want a slogan t-shirt ;-}). Go take a look and see what you think. There's an option to sign up for a newsletter which I'll use to notify of new items in the store.

If you've had dealings with cafepress, either as a customer or shop owner, I'd love to hear about your experiences.

Friday, August 29, 2008

Time for a Test


Today was a putter day, catching up on paper work to help clear more off the work table. And also the day to set up my test on a product touted to provide UV protection for fabrics. Since Quilt Guard is no longer available, I've not heard any quilter suggest a replacement. So I did some research myself and stumbled upon 303 High Tech Fabric Guard. It's main use seems to be to protect auto upholstery and convertible tops, but can be used on a variety of items and types of fabric. I figured, who besides quilters, are more obsessive about protecting their babies than male car owners! Yes, I'm stereotyping here. It does sound like a bit of magic though, containing no silicone to draw dirt yet protecting from water and stains as well as the sun. I ordered some up.

I think what has been holding me back is that it only comes in a pump spray, not an aerosol spray. I don't feel I have the same control, worry about uneven coverage, getting the fabric too saturated. Actually, the spray bottle has several adjustments and I was able to get a relatively fine even spray after several tries. The directions say to totally saturate the material, which I'm not keen to do. I worry about bleeding and spotting. But the samples got a good soaking just because I wasn't sure what I was doing.

The group on the bottom is untreated. The masking tape should block light so that each swatch will have an unexposed strip for comparison. The top group is thoroughly saturated with 303. The two sheets are now taped to my south facing studio window where they will get both direct sun and strong light most of the day. I'll leave them up for a month and report the result.

Thursday, August 28, 2008

Slightly More Exciting


I finished quilting the tie quilt today, and I have to tell you, the conservative in me wasn't altogether sure about that thread choice. Here you should be able to see how it varies. (Click on any picture for a larger view.) When you're quilting through tightly woven hand-dyed fabric and silk, there's no taking out of stitches and doing over. It's next to impossible to get rid of the needle holes. So changing to something else wasn't an option, even if I had a better idea, which I didn't.


Let me also tell you, quilting nice perfect circles is not easy. I fear if Allen were still with us, he would be pointing out numerous places that should be redone. But he's not, and this isn't for competition, so the less than perfect quilting stays. On this full circle block, I decided to do a spiral in the center, starting in the upper left quadrant where it wouldn't show. I didn't want all those starts and stops and having to line them up. I think it worked rather well.


The color's not totally true on this since I took it without a flash, but I wanted to show the overall effect of the quilting, which I like. I think I'll make my peace with the thread color eventually - already it is not bothering me nearly as much as when I started. When I spread this out to take the picture, I suddenly thought how cool it would be to add lines of beads between the rays. That background area is wider than the rays and could stand some stitching. Beads really appeal as they would add additional interest and shine. Well, I hadn't planned on it, but I suspect now that I've thought of it, I won't be happy until I add them. And here I thought I would finish this this week...

Wednesday, August 27, 2008

Not too exciting


I started the quilting on my NY Beauty tie quilt today. Just stitching in the ditch along the arc and point seams. with the walking foot on. At least I didn't default to monofilament thread; on this part I'm using this darker Oliver Twist hand-dyed thread. I'll use a lighter one with more color variation on the open areas. That's for tomorrow.

The basting spray is holding just fine, to my relief. Everything seems to be lying flat and undistorted with no puckers. Let's hope that I don't run into problems when I add echo quilting following the curve of the arcs.

Thanks to everyone who expressed their druthers on binding color. It is unanimous for the orange! This makes me happy, because it is what I felt I should use, but the conservative side of me was afraid it might be too much. I often opt for a "safe" color choice in my quilts that I regret later. No regret this time hopefully.

Monday, August 25, 2008

August TIFC

Today's my birthday, and I didn't want it to be just another Monday doing ordinary Monday things. The plan was to pack my bathing suit, a novel & my sketchbook and head for the city park on the lake, stopping along the way to pick up a huckleberry milkshake. Even a few hours spread out on the sandy beach vegetating, interrupted by the occasional dip in the water sounded like a grand way to treat myself. However, 60 degrees and rain does not a fun day at the beach make. So I've done my best to shun the ordinary, and enjoy my day at home.

And that is how the piece above came about. I let myself get intimidated by the tie quilt Friday. I did get it layered for quilting, but then found myself panicking about how to quilt it. It was the old fear of ruining the piece, fear of picking the wrong thread that would either show up too much or not enough., quilted in the wrong design There was even fear that the basting spray would not hold everything in place (that slick tricot interfacing doesn't stick as firmly as cotton does). So instead I found myself playing with these "off-cuts" left over from the fun tropical project here. They were what was left after cutting a design element and had fusible webbing on them. Couldn't let THAT go to waste. I got as far as determining they really might make a decent design, and picked out the black fabric for the background.

Today it just felt right to finalize the positioning of them and get them fused down. This all plays into my current strategy for clearing my work table - whatever project is on top gets worked on. It was pretty close to next (I really didn't want to start that quilting although I'm not intimidated by it anymore) and in my mind is a good fit for the Take It Further Challenge concept for August: balance. (Read more about it here.)

Attaining balance is an ongoing theme in my life, and in my designing in particular. I often have a very difficult time achieving a good balance when positioning three similar shapes. I'm fairly pleased with how this worked out, even though there was a frustrating few moments when no matter what I did, it didn't looked right let alone balanced. Intertwining some of the elements, and the narrow stem-like strips helped create a flow for the eye to follow. Isn't that just like life? We'd like to keep everything separate, but it is always a balancing act with many facets working to keep it all together. Maybe it's all those Olympic gymnastics I just watched, but I found myself thinking of this piece as "Balance Check."

Once it was fused, I suddenly saw how well running beads along those negative spaces could work. It should be a nice link to the vivid quilting I plan to do in the background, something different, interesting ala Dijanne Cevaal, author of Seventy-Two Ways Not to Stipple or Meander. In fact, I realized that my shapes reminded me somewhat of her pomegranate series, a sample of which you can see here. I really admire her stitching and the way she can take a simple shape and keep it fresh and interesting with so many variations.

Will I finish this by the end of August? I doubt it, especially if I add the beads. But considering I haven't worked on May through July challenges, I'm just pleased it's on its way.

Thursday, August 21, 2008

Enough!

Thanks everyone for your positive response to my block arrangement in yesterday's post. Wanda (Exuberant Color) advised: "You finally just have to say "enough" and sew them together." So true and so hard to do, but I knew that was the plan for today. However, I wasn't comfortable with the lower right corner, so I took about 10 minutes this morning to turn a few blocks and am much happier now with the total balance. I didn't want too much symmetry, but I also didn't want any one section to stop the eye with a question of, is that off? I was avoiding making any full circles, I'm not sure why, but as you can see, I added one in that troublesome corner. I turned one other block too. Can you spot it?

Once I said, "Enough!" the blocks went together rather quickly. I decided to press the block join seams open even though some would have been less bulky if pressed to one side. Since there was no consistency in which way the seem might naturally fall, I knew it would only create more problems when I started sewing rows together. Not every seam needed pinning, just those where there were seams intersecting, which accounts for how fast I could sew this all together.

I cut apart one of my late husband's shirts to use as backing. He was quite tall so by sewing the fronts on either end of the back (after squaring things up), The one shirt was just enough. I'll layer it tomorrow, probably spray basting since safety pins will leave visible holes in both the silk and the hand-dyes. I'm thinking quite simple quilting, perhaps even with silk thread: some stitching in the ditch around those points, and widely spaced echo stitching in the frames and centers. No border necessary, and if you look closely at the picture above, you can see I'm already contemplating binding color. I'm very tempted to go with that orange on the left, although there's not enough left. I do have quite a bit of the slightly less intense orange that I can substitute. Or should I go with a dark navy like you see on the right side? Click on the picture for a larger view.

Wednesday, August 20, 2008

How many ways...


...can you rearrange New York Beauty blocks? A zillion, apparently. I did decide to add another row so pieced 4 more arcs on Saturday, then cut the rest of the frames and centers and got all the blocks sewn together by the end of yesterday. I really thought I'd get this sewn together today, but I couldn't settle on an arrangement. I started moving blocks around before getting dressed this morning, continued rearranging while chatting on the phone with a friend, picked it up again for about an hour between the vet appointment and lunch, then went back to it after lunch. I'm embarrassed to tell you how much time I spent doing that today and I'm still not sure this is my final arrangement. But it definitely is the best distribution in terms of spreading the different fabrics across the top and making sure I didn't end up with two blocks next to each other with the same fabric in them. These things are important to me, although maybe it's not as big a deal as I think right now.

Friday, August 15, 2008

Remembering to Enjoy

ARTiculations blog has a great post here about viewing Vincent an Gogh's The Starry Night and being reminded that we sometimes let the seriousness of making art overshadow the sensory pleasure that can be derived from it. A thought from the post:

"We never really talk or ask about the enjoyable side of it. Probably because it makes a serious work seem not-so-serious..."

I know that I often downgrade the value of things I've created if I felt it was more play than concentrated work. I hesitate to share that a piece has come together almost on its own. Hobbyists do things for fun. Artist work and suffer. Right?

What's your perception? How to you handle the fun side of making art?

Thursday, August 14, 2008

Coming together


The local radio station as background wasn't going to cut it today. Motivational music of the day? Weather Report, Traveling Wilburys, Stevie Winwood, McCartney. I'm nothing if not eclectic in my musical tastes.

All arcs for the tie quilt are pieced (provided I don't decide to make it bigger than 16 blocks) so today was playing some with pairings and starting to sew units into blocks. These 4 on the right are my very favorites so I started with them while I tweaked the others.
These of course will not show up in the quilt like this - they will be scatter among the less exciting ones. Conventional wisdom advises that not all blocks need by stars, and some of my combinations are definitely a little plain Jane. The orange hand-dye in these give wonderful spark to what would otherwise be a very dull quilt. That's one of the hazards of working with tie fabric - it often is on the dark side.


I may have shown you before how I sew curved seams, but I thought I'd give a brief explanation in case I haven't. First I needed to remove the freezer paper pattern from the back of the arc. Note that I ran a line of stitching along both curved seam lines.


For no particular reason, I pieced the shorter, tighter curve first. Some people can do this with a few or no pins but I'm not one of them. I use lots which improves my chances of coming out with a pucker-free unit with little distortion. I don't usually insert my pins from the outside in but for some reason it seems to work better on the curved seams. Normally I would sew from this side, but my seam line guide is on the other side, so I flipped it over and followed the stitching.


Voila! A pucker-free join!


Now to sew the "frame" to the arc. I used a freezer paper template to cut out the frame, marking the seam line with a pigma micron pen. I poke the pin through matching up my seam lines, starting in the center, then pinning the ends, and finally working my way along the seam. Again, I use lots of pins. The first one I pieced I skimped and ended up having to take out a 3 inch section to fix a pucker and misalignment. The tricot interfacing makes that particularly tedious.

Last step is to press the seams (they naturally press away from the arc) and square up the block to 6-1/2 inches. I completed 6 blocks today, plus cut the remaining frames. I'm pleased with the progress.

Monday, August 11, 2008

Working with Silk


Last week got crazy with a bit of a pet emergency. Things are back to what passes as normal in this household as of today - or at least I hope - but my studio time really suffered. To salvage some of it and distract me with something that wouldn't take much concentration, I went back to working on my tie project, fusing interfacing to the silk and cutting frames and centers. Today I finished fusing the last of the silk. I use a knit tricot fusible that gives stability and prevents fraying without changing the hand of the silk or adding too much weight or bulk. It makes the thin silk handle like the heavier silk and allows me to cut my units any direction, not having to adhere to grain lines. It's a challenge to cut the interfacing to size, having no pattern pieces as a guide. There's probably an easier way, but I just lay the interfacing over the silk (it's sheer enough to make out the edges of the silk) and rough cut the interfacing slightly smaller. I don't worry about the interfacing going all the way to the edge of the silk as I'll be trimming that part off anyway, and it eliminates any worry about fusing overhanging interfacing to my ironing board cover.


I cut more "chunks" for arc points to match up with the ones already cut for the arc background. I still need more parts cut to have everything I need for the remaining blocks, but I felt it was time to start sewing arcs again. It will help me decide what colors to add. So here are the two arcs I pieced today. It took about an hour, but maybe I'll get faster if I make some every day.

Thursday, August 07, 2008

Twitter

"Bluebird of Unhappiness"
June 2006 Journal Quilt
Sheila Mahanke Barnes

The previous post dealt with whether or not blogs should be used for sales. If you haven't already, be sure to read Lyn Mettler's clarification of her statement in the article referenced. The issue is not as black and white as that article suggested.

Lyn also maintains her New World PR blog here. I found lots of good information about Twitter on it. If you currently Twitter, or are on the fence about Twitter, she may have answers to some of your questions.

Do I Twitter? Only on a personal basis to keep up with a relative I'd otherwise correspond with or talk to much less frequently. Do I want to open my creative self up on Twitter for the hoards to devour? Well, I guess my tone here answers that question! I just can't be "on" 24/7. Somewhere must be a private life to escape to.

The journal quilt pictured above, by the way, was started in a class by Charlotte Warr Anderson. The name partly came from my own unhappiness with both her method and her design - birds like this are not my thing!

Tuesday, August 05, 2008

Selling through blogs


I spotted an article in Sunday's paper by Kelly K. Spors about using social media to bond with customers, read here:

This was geared toward small businesses in general, and covered the importance of internet phenomena like Twitter, Facebook and blogs to create a presence, interact with customers and the like.


The thing that struck me was, after mentioning the various networking options, it relayed advice from Lyn Mettler of Step Ahead Web Strategies: "...it's important that businesses don't use social media to directly try to sell their products." And then quotes her directly: "Clearly, these tools are about being authentic and not selling."

This advice came as a surprise since I am aware of artists who successfully sell art on their blogs and I was considering doing the same. It's not that they don't have separate websites for displaying art for sale - they do. It's not that they are hobbyist - they are fully engaged in trying to make at least part of their living from selling art.

So what do you think? Is it inappropriate or bad business sense to be selling art on a blog? Does it turn you off when a blogger you follow suddenly posts something for sale?

And yes, today's picture is totally unrelated to the topic. It's just that my geraniums are doing so well this year and I know you all like pictures with your posts.